Removing the brake drum - why master this operation?
As you know, this brake mechanism consists of a stationary part (pads or band) and a movable part (the drum itself), and the braking process occurs through mechanical friction of these parts, thus the speed of rotation of the wheels slows down until it comes to a complete stop. The drum brake has a number of advantages, including low pricing, simplicity and the effect of mechanical self-reinforcement. After all, the lower parts of the pads are rigidly connected to each other, and when friction occurs between the drum and the front pad, additional force is created, which also presses the rear pad against it, which greatly increases the braking effect.
Removing a brake drum is a fairly common procedure, because its condition does not have the most favorable effect on the quality of our road surface. Also, increased air humidity has a negative impact, which contributes to the occurrence of corrosion, an aggressive driving style and sharp braking leads to overheating, not to mention an accident, after which it is quite possible that not only the brake system, but the entire car will need to be changed. So all of the above factors lead to rust, scratches, grooves, and other mechanical damage that can be easily identified by visual inspection.
In addition, the need to remove the drum also arises when it is necessary to assess the condition of the brake pad linings or when the brake cylinder breaks down.
Replacing the rear brake pads of a VAZ 2110 with your own hands (photo)
To find out when it is necessary to replace the rear brake pads of a VAZ 2110, you should focus not only on your own sensations or the appearance of squeaks when braking, but also on their actual wear.
You can assess the condition of the pads through the inspection window without even removing the drum. To do this, remove the rubber plug in the dust shield, pry it off with a screwdriver, and look at the pads. Their thickness should be more than 1.5 mm.
Use a screwdriver to pry off the plug and remove it from the shield.
If it is less, then they will no longer provide a quick stop after pressing the pedal. In addition, with such a thickness, the piston stroke of the cylinder will be greater than normal. Hence, leaks leading to loss of fluid, a drop in its pressure, that is, the entire braking system is at risk.
Rear wheel brake
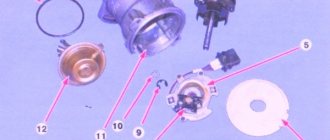
Device
Before disassembling, you need to know the structure of the braking system. The VAZ 2110 has hydraulic brakes with distributed circuits. One circuit is the front right and rear left mechanisms, the second circuit is diagonal.
The hydraulic drive includes a (also dual-circuit) pressure regulator. It helps regulate the brake fluid pressure on the rear brake systems. It is through the regulator that the fluid flows to both rear mechanisms.
Hydraulic brake circuit diagram
Adjustment is carried out through four chambers. Their design is as follows: two are connected to the main cylinder, and two, respectively, to both cylinders of the rear brakes.
For high-quality braking, it is necessary that the entire system works smoothly, there is correct adjustment and reliable mechanisms.
Parsing order
It is better to carry out the repair operation on an overpass (you can use an inspection hole), or just a flat area with a hard surface, because you will have to remove the rear wheels, naturally, first jacking up the car.
So:
- Remove the wheel and disk;
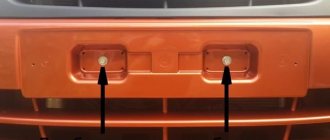
- We unscrew the guide bolts, of which there are 2, and remove the drum;
- A common problem is the drum sticking, so sometimes it is not so easy to remove it. The problem has long been solved by tapping a drum with a hammer (through a board);
- Using pliers, remove the tension spring;
- After this, a fixing guide spring holding the block;
- We remove the block from the support bar that is not connected to the handbrake rod. To do this, pull its free edge to the side and along the shield;
- Loosen the upper spring. To do this, you need to turn the block to the side until you can disconnect the spring;
- We do the same with the spring of the second pad;
- Remove the spacer bar;
- Disconnect the handbrake rod from the cable;
- We note to ourselves or sketch how the connection to the rod is made;
- Unhook the spring, remove the cotter pin, and disconnect the brake pad.
Thus, the disassembly process is completed.
Replacement
In principle, assembly occurs in the reverse order, although there are some peculiarities:
- To achieve normal brake fluid pressure, in the future, it is necessary to drive the piston of the brake cylinder inside;
- Connect the handbrake rod and the block, be sure to insert the cotter pin;
- Connect the guide spring to the brake pad;
- Connect the cable to the handbrake rod;
- Connect the upper spring to the installed new block;
- You need to rest the second shoe on the heel of the brake cylinder and pull its lower edge. The spring is tensioned, the bar can be inserted;
- All that remains is to insert the second block and place it in the slot of the bar;
- Using pliers, engage the spring with the second block;
- After making sure that the cable does not get affected by the movement of the parts that make up the brake mechanism, it is necessary to install the brake drum in place;
- All that remains is to tighten the guide bolts, then install the wheel.
We do the same with the other wheel.
Adjusting the pressure
First, you need to adjust the parking brake. This device always requires adjustment after repair work.
Secondly, the rear brakes are adjusted so that the system locks the rear wheels a little later than the front ones.
Knowing the structure of the brakes, loosen the bolt securing the pressure regulator, using a screwdriver, move the bracket of the regulator drive lever to create a gap of about 2 mm between the lever and its spring.
We carry out a test - we accelerate the car to 40 kilometers, then sharply brake. Someone observing the process from the outside notes whether the wheels are locked correctly. If the front wheels lock later than the rear ones, then the adjuster must be moved in the direction of decreasing the gap. Then test again until correct wheel locking is achieved.
Rate this article: Share with friends!
vazweb.ru
How to remove a brake drum without assistance?
It may seem that this is easy to do, but, unfortunately, this is not always the case, so let’s look at several ways in which it is possible to solve this problem. First, let's look at the most bloodthirsty method. We jack up the required wheel (from which it is necessary to remove the drum), and install wheel chocks under the others. Next, we dismantle the wheel, and along with it the guide pins. We place a splint under the bridge and then lower the car so that it sits on it as tightly as possible.
Now we get behind the wheel, start the car and engage third gear, as soon as the needle on the tachometer shows 3-4 thousand revolutions, sharply press the brake. Most likely, the drum will be torn off on the first try, but if there is no result, then try again. This method has a number of disadvantages, first of all, it is not safe, and there should be no one in the area, since the drum can break off and fly in any direction , and secondly, it cannot be used if the brake cylinder is not working properly.
Replacing rear brake pads on a VAZ-2112: photos and videos
The brake system of VAZ cars of the Baroque period, the tenth family, is virtually no different from the brakes of eights and nines. Perhaps this is one of the few passenger cars that used drum brakes at that time. Nevertheless, they need to be serviced, and if someone has not yet managed to change them to disc ones, then everything that can be read below will help you correctly replace the rear brake pads on the VAZ-2112 and other Ladas of the tenth family.
The video shows the detailed process of replacing rear brake pads on a VAZ 2110-2112.
Tool required for replacement
Minimum required. A hammer might also come in handy
So, for proper replacement you will need several tools that are not in the standard set, and in addition to them, you will need:
- a wheel chock, a brick made of red clay is also perfect in extreme cases;
- wheel wrench;
- standard set of keys;
- wooden block;
- decent hammer;
- a powerful awl or a long thin screwdriver;
- pliers, round nose pliers;
- clean brake fluid or magic spray WD-40.
Actually, after purchasing new brake pads, you can put on gloves and get to work.
Dismantling brake drums VAZ-2112, technology
The replacement process itself is simple and clear; just look at the photo and brief explanations and get started, even if the work is being done for the first time. It goes without saying that it is necessary to provide comfortable working conditions. At the very least, place the car on a flat surface, place anti-roll bricks under the front wheels and engage first gear. Now you can remove the bolts with a wheel wrench.
Next, we follow a simple algorithm:
- We install the jack and check whether the wheel chock is under the front diagonally opposite wheel.
If it is lying down, jack up the car and remove the wheel. We see a dirty brake drum. Broken nuts are easier to unscrew later. - Loosen the handbrake cable completely. If this is not done, it may be difficult to remove the drum from the hub. The fact is that the drum may have wear on the inside, on the working surface, and if the pads are not released completely, the lining may cling to the edge of the working, thereby preventing the drum from being dismantled. If the cable is free, we continue working.
- To access the brake mechanism, you need to remove the drum; to do this, unscrew the guide pins.
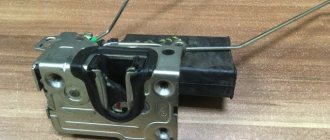
Brake drum and stud
- We try to remove the drum with our hands, if it does not give in, you can lightly tap it with a hammer on its inner diameter of fit on the hub. If this does not help, wet the hub-to-drum contact area with WD-40 spray or brake fluid. It will take some time for the magic of the “Vedashka” to work. Now, with gentle blows from the side of the fender liner, we knock out the drum.
Using rotating movements, pull the brake drum towards you.
- The inner working surface should not have deep scratches, and the presence of cracks or chips, of course, is unacceptable.
This brake drum is just for the scrapyard. The grooves are visible, he has already left his own
We inspect the drum for wear: scuffing, etc./ This brake drum is in good condition
- Once the drum is removed, we can assess the condition of the entire brake mechanism.
Brake mechanism without drum. You can see the brake cylinder, tension springs and the pads themselves
We take this opportunity and check the integrity of the boots on the working cylinder, inspect the brake shield for leaks. Ideally, the area underneath the drum should be dry and clean. Brake fluid stains and drips may indicate a faulty brake cylinder, and eliminating them will delay the work for an hour or two.
Changing rear brake pads
If the inspection shows that everything is in order with the mechanism, you can begin to dismantle the pads themselves.
The manufacturer allows a minimum thickness of the lining of 1.5 mm, however, this is a critical thickness. It is worth changing the element even if the thickness is about 2-3 mm.
Then everything is simple:
- Remove the tip from the lever, the cotter pin, do not lose the washer.
We take out the cotter pin
- Remove the handbrake lever. Now you need to remove the spacer bar. It can be removed later.
The spring can also be removed with pliers
- Removing the springs. Here you will have to play around if you don’t have a suitable tool at hand - and this is a long, strong screwdriver or good pliers. We hook the spring by the hook and remove it from the hole in the block.
Remove the block and springs
- That's it, the pads can be removed. We look at how far we have reduced the linings, clean the brake shield from dust and dirt, and once again make sure that the working cylinder is not leaking and the boots are in order.