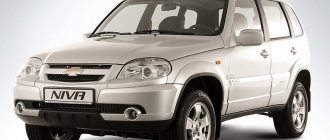
How to replace the alternator belt on a Niva Chevrolet
The generator belt has an important purpose - it transmits torque from the engine through the crankshaft to the generator. The latter charges the battery and maintains the functionality of all electrical equipment of the car. On an engine with air conditioning, it rotates the compressor clutch and other accessory drives.
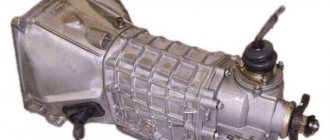
Characteristics of the standard belt
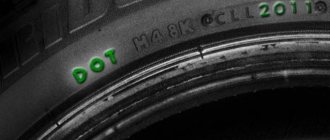
The alternator belt on the Chevrolet Niva - VAZ 2123 - has the factory designation 6RK 1888. Its dimensions are: length - 1888 mm, width - 21.5 mm, number of longitudinal ribs (streams) - 6 pcs. The poly-wedge type product can withstand loads of over 250 kg and has an elongation coefficient of no more than 0.7%.
The drive belt wears out over time and needs to be replaced. According to the maintenance regulations, this part must be changed every 50 thousand kilometers. You should not rely only on this figure - it is an average.
If the quality of the product is low, then it can either stretch or break after 20 thousand km, but a good quality belt will last all 70 thousand km. The service life is affected not only by mileage, but also by other factors. If there is mechanical damage on the drive pulleys, then over time the belt will become unusable.
According to the maintenance regulations, the belt on a Chevrolet Niva must be checked every 15 thousand kilometers.
If the following factors are detected, the product must be replaced:
- signs of wear (irregularities, cracks, abrasions, etc.);
- oil stains;
- individual threads are visible at the ends;
- the material peels off from the base.
A malfunction can be determined by characteristic signs:
- at high engine speeds a strong whistle appears;
- the battery charge indicator lights up on the instrument panel;
- consumers of electricity from the on-board network stop functioning.
If the belt breaks completely, the car cannot be started. To avoid this on the road, it is better to stock up on a new product in a timely manner and always carry it with you.
How to replace a belt on a Niva Chevrolet
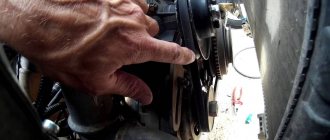
It is recommended to buy belts from well-known brands, the quality of which has been tested by time. The layout of the drive mechanisms is shown in the photo.
To work you will need a tool:
- screwdriver;
- jack;
- set of socket wrenches;
- mounting blade.
First, disconnect the battery terminals to prevent possible electrical short circuits.
If the car does not have air conditioning
Replacing the alternator belt on a Chevrolet Niva is carried out as follows:
- The on-board network must be de-energized; the battery terminals must not accidentally close the circuit.
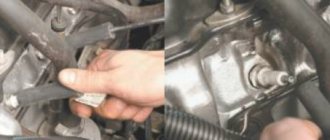
- The terminal block is disconnected from the crankshaft position sensor, then the mounting bolt is unscrewed and the sensor is removed.
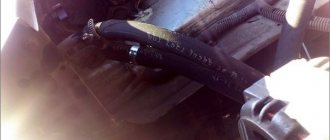
- The drive is removed from the power steering pump.
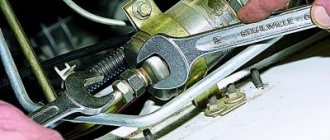
- The fixing nut on the generator mounting plate is loosened, after which the device can be moved towards the engine - for convenience, use a mounting spatula.
- The belt tension will loosen and it can be removed. To dismantle it, you will need to hang the left side with a jack and put the gearshift lever in fifth gear.
- By pulling the branch from the coolant pump pulley, the front wheel rotates, and the pull gradually moves onto the generator and crankshaft pulley.
- Rotate the water pump pulley and remove the belt completely.
- Installation of a new part begins with installation on the crankshaft pulley, after which it is put on the generator pulley and partly on the pump pulley.
- The wheel rotates again until the belt is seated on all the pulleys.
- The mounting blade returns the generator to its previous position.
All that remains is to check the tension and tighten the nut securing the unit to the plate. The crankshaft position sensor is installed and connected last.
If the engine is with air conditioning
If the car is equipped with air conditioning, an additional compressor pulley is added. To replace, you will need to install the car above the inspection hole or lift it on a lift, then remove the engine crankcase protection:
https://youtu.be/YjWw_GnGIv0
- Using a 13 mm wrench, unscrew the 4 bolts securing the protection, after which it can be removed.
- Using an 8 mm wrench, unscrew the screws holding the protection boots.
- The front mudguard is removed.
- The deviation of the belt tension force between the compressor and crankshaft pulleys should not exceed one centimeter; to check, you need to press it by hand.
- To replace, loosen the bolts securing the tensioner roller. If the air conditioner belt only needs to be tightened, then the roller bolt is turned clockwise, thereby tightening it.
- If replacement is needed, the bolt is unscrewed counterclockwise - the strap will loosen and can be removed.
Further assembly and installation of a new belt is carried out in the reverse order. During installation, it should be taken into account that the part must be put on so that it is closer to the inside of the drive pulley.
Tension adjustment
Installing the part is not enough; it is also important to know how to properly tighten the alternator belt on a Chevrolet Niva. If the tension is weak, the generator will not be able to operate normally and the battery will not receive an insufficient charge level. As a result, the battery will quickly fail. If you overtighten the belt, the alternator bearing will quickly wear out, as will the coolant pump bearing. The permissible deflection when pressing should not exceed 15 mm between the generator pulley and the pump.
Adjustment is carried out by moving the generator forward or backward. By moving the unit towards the engine, the tension is weakened, while away from the engine, on the contrary, it increases. To perform the work you will need a standard set of tools, the sequence of actions is as follows:
- Remove the engine protection and protective mudguards on the left.
- Using a wrench or socket, loosen the nut securing the generator to the plate and the mounting nut of the bracket.
- Using a mounting blade, move the generator towards the engine to loosen it or away from it to tighten it.
- Without loosening the force, tighten the bracket fastening nut, and then the adjusting plate fixing nut.
After this, the engine protection and mudguard are installed in place. The work on adjusting the tension is now complete. After 300-500 km, a control check of the tension level is carried out, and if necessary, it is adjusted.
Also, after replacing the belt, it is recommended to start the engine and turn on the maximum number of electrical consumers (high beam, heater, high speed). No extraneous noise should be heard from the part.
The work of replacing and tensioning the alternator belt on a Chevrolet Niva can be done by any car owner with his own hands. It is not necessary to contact a specialized car service for this. By following the step-by-step instructions, you can replace the product in 10-15 minutes without much effort.
Source: https://expertVAZ.ru/niva/chevrolet/zamena-remnya-generatora.html
Rules for adjusting gear tension
Adjusting the gear tension It should be taken into account that insufficient tension reduces the battery charge level and leads to wear of the mechanisms. At the same time, strong tension can cause damage to the bearings of the units. The optimal belt deflection between the generator and pump pulleys is 10-15 mm with an applied force of 100 N (10 kgf).
The adjustment procedure is as follows
:
- if there is a tension device, unscrew the bolt securing it and, moving, achieve the desired results;
- if there is no roller, loosen the alternator fastening and adjust the deflection indicator, and then fix the unit.
After a run of 500 km, you should once again check the gear tension level and, if necessary, eliminate the discrepancy with the norm.
Most VAZ-Chevrolet SUVs were and are produced with the “2123” engine. The simplest operation on it is to adjust the belt tension. Here we will look at how to tighten the alternator belt on a Chevrolet Niva - this word means the belt of auxiliary units. A separate drive is provided for the air conditioner. But he won't bother us.
The part in question is shown in one video. Let's see.
Replacing the air conditioner belt in a Chevrolet Niva | Car repair - ordering spare parts
The generator belt has an important purpose - it transmits torque from the engine through the crankshaft to the generator. The latter charges the battery and maintains the functionality of all electrical equipment of the car. On an engine with air conditioning, it rotates the compressor clutch and other accessory drives.
Alternator belt Chevrolet Niva without air conditioner size
Replacing the alternator belt on a Chevrolet Niva with air conditioning
Chevrolet Niva replacing the alternator belt in the field☝
Niva Chevrolet - replacing the generator and drive belt
how to replace a belt on a Chevy Niva
How to replace the alternator belt on a Chevrolet Niva with air conditioning?
replacing the alternator belt on a Chevrolet Niva
Replacing the NIVA alternator belt. Alternator belt after 25 km. on NIVA 21214
Shniva: belt replacement
The alternator belt whistles, breaks, falls off - WHAT TO DO? Just something complicated
Belt VAZ 2123 generator Chevrolet Niva BRT 21230-1041020-82; 2123-1041020
From the moment of its appearance and at the time of writing, all Chevrolet Niva cars were equipped with a single engine model - 2123. This engine is easy to maintain; almost all elements on it can be changed independently with a minimum set of tools. Belt drives are especially easy to adjust. They are installed on the generator and other engine auxiliaries such as air conditioning. Most of them can be changed independently of each other, so the Niva Chevrolet alternator belt with air conditioning can be changed as easily as on a simpler version.
Please advise which alternator belt is better for a Chevy Niva. 4x4 forum
If the belt simply breaks when it serves its purpose, then the situation with the chain is more complicated. Therefore, stretching can be determined by hearing, when the sound of a ringing rustle is heard from under the hood.
Drive belts produced in Germany, India, Japan.
If you bore it, the shoe will dangle on the axle, screw the bolt into place and tighten it. I unscrewed the tee with a spark plug wrench. I unscrewed the two nuts on top and 7 bolts in a circle from the timing drive cover, unscrewed the bolt on the gusset of the generator bracket, and removed the gusset.
I placed the crankshaft and camshaft marks behind the pulley, having previously unscrewed the spark plugs. I removed the valve cover, unbent the camshaft sprocket bolt stopper, and tore off the bolt with a 17mm head.
Generator Chevrolet Niva
A generator is an important part of any car, which is responsible for its power supply. With the help of this unit, it is possible to provide a continuous supply of electricity to all components, various systems and sensors, making its operation possible.
On the car, a unit with article number 9412.3701 is used as a standard generator. Such a generator can also be found on the injector of the VAZ-21214, VAZ-2131, VAZ-2123.
If the generator on a Chevrolet Niva fails, you can replace it with analogues, the most popular of which are presented in the table.
GeneratorArticleCost, in rubles
| VAZ-2123 (produced after 2003) | 5112.3771-30 T | 5370 |
| VAZ-2123 (produced after 2003) injector 14V 80A PRAMO | 5112.3771 | 4460 |
| VAZ-2123 (produced after 2003) | 9402.3701-04 | 4380 |
A generator for a Chevrolet Niva costs between 5,000 and 7,000 rubles. The price of the original unit depends on the region of purchase. Many owners prefer to use Start Volt at 120 amperes when the factory generator fails.
How to find out if the generator is faulty
When operating a Niva Chevrolet, certain difficulties and malfunctions sometimes arise. During a trip or long-term use of a car, various problems arise, and one of them is the failure of the generator.
Diagnosing a breakdown is quite simple. There are several manipulations that can be used to determine the need for repairs:
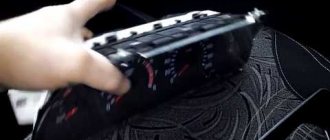
- The corresponding light on the dashboard lights up, indicating that the battery is constantly discharged.
- The battery drains quickly when the engine is running.
- The brightness of the light decreases as the engine speed increases. In this case, it is necessary to replace the generator brushes.
All of the above signs indicate that the generator urgently needs to be replaced or repaired.
Generator replacement
When problems are detected in the operation of the generator, most Chevrolet Niva owners turn to specialized service stations, where professionals carry out high-quality diagnostics of the vehicle and quickly deal with the problem.
However, if necessary, you can change the generator yourself if you know the structure of the car and prepare the necessary tools. In addition, it is better to familiarize yourself with the replacement algorithm in advance.
Tools
For work you will need the following tools and materials:
- wrench with different diameters;
- heads with different diameters;
- knob;
- poly V-belt.
Only when everything necessary is prepared, you can begin the main work.
Replacement procedure
To change the generator on a Chevrolet Niva, you will need to follow a few fairly simple steps.
- First of all, you should take care of the safety of the work being carried out. To do this, you need to put the car in a repair place, turn off the engine and remove the terminals from the battery.
- The next step is to remove the wire from the contact bolt, which is located on the rear panel of the generator. You will also need to remove the block from the assembly that secures the brushes.
- After this, you should begin dismantling the alternator belt. The belt is tensioned using a special plate called a tensioner. The tension can be adjusted using the fastening bolts; they need to be loosened. The plate is located in the area of the tension roller and is attached to the structure with three bolts. To unscrew them, you need to take an open-end wrench for two bolts, and use a wrench to loosen the third.
- Next, all that remains is to remove the belt and unscrew the generator mounting bolts. There are only two bolts - top and bottom, but they are massive, and you will need a wrench for a large diameter. If the bolts will not turn, you will need to hold them from behind.
Replacing the alternator belt on a Niva Chevrolet
One of the most common causes of generator failure is a broken belt, since its service life is the shortest compared to other car designs. A broken belt can be easily detected visually if you open the hood and look at the so-called belt drive pulley. If, when you open the hood, you see that the alternator belt on the Chevrolet Niva is intact, then it is likely that the bearings need to be replaced, but this can only be discovered after removing all the devices.
The main reason why generator repair is a waste of time and effort is winding damage. If this is the main cause of the breakdown, then you will have to rewind it or it is best to buy a new generator; the Chevrolet Niva will then last longer.
Of course, you can take it in for repair to a specialist who will make the appropriate repairs, but there are no guarantees that this will help, since there are no guarantees that the rewinding will be of high quality, which will lead to incorrect current generation. Brushes also fail quite often, this is due to the fact that they constantly rub against the rotor.
You can also replace brushes at home.
And so, if the alternator belt on a Chevrolet Niva fails, then it should be changed.
Replacement is required not only if it breaks, but also when it is very worn or cracked, and in order to prevent breakage on the road, an inspection should be carried out from time to time.
When should you change the alternator belt?
If you see the following damage, replacement should be made immediately:
1. If signs of wear, cuts or cracks are visible.
2. If the belt begins to peel and threads come out of it.
3. If there is oil on it and it is disheveled.
To replace it we will need the following tools:
1. Screwdriver It is better to have several or a set of screwdrivers.
2. You can use the standard jack that came with the kit.
3. Mounting.
4. It is advisable to have a universal set of keys.
Belt installation:
If the belt is purchased and it is new, you can begin installation:
1. De-energize the car by disconnecting the terminals from the battery.
2. Pull out the connector from the crankshaft sensor; this can be done by unscrewing the mounting bolt with a Phillips screwdriver. Then remove the sensor.
3. Lightly unscrew the device that is secured with a nut and move it towards the block.
4. Remove the belt that is worn out; this is easy to do since the device is loose.
5. The right side should be jacked up, placing emphasis on the wheels in advance. We put the field in fourth speed, since we will rotate the right wheel.
6. We pull it gradually, removing it from the pump pulley, we turn the wheel, gradually pulling out the belt from the pulley.
The belt that you have removed, as a rule, cannot be repaired, so after removing the old one, we immediately proceed to installing a new one.
1. First we throw it on the crankshaft pulley, and only then on everything else.
2. It is best when the procedure ends by putting it on the generator pulley. The wheel rotates all the time until it is completely dressed.
3. After the device is installed in its seat, it should be secured with a bolt.
You should know in what order it is thrown onto the pulleys:
· This is the Crankshaft Pulley.
· Then onto the tension roller.
· Then the right lower pulley.
· A roller that is located under the generator.
· Then the pump pulley
· And at the end is the generator pulley.
After all this, it should be tightened well. Since if the tension is weak, then the battery will not be provided with the charge it needs.
4. Install the sensor in its place.
On Chevys, LUZAR belts have proven themselves to be the best.
The only easy repair option is to replace it or you can tighten it; other problems that arise are usually eliminated only by removing it.
How to remove the generator
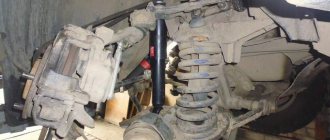
To remove the generator you need to use a ten key, loosening the nut that holds the base with the tension roller, removing all the nuts from their seats. Then unscrew the adjusting screw, having first found it. After making sure that the screw moves freely, unscrew it to the top of the platform. In the photo you can see where all these bolts are located.
We fold the belt off the pulley and unscrew the bolts that hold the device, this can be done with a thirteen key, and on the other hand with a seventeen key. We disconnect the two wires that are connected to the back of the generator, one is connected to the head of the bolt, the other is plugged in, and we disconnect them. Then we remove it from the seat.
As you can see, the process of replacing the alternator belt is simple, but very intensive, especially if there is still a need to replace the alternator with a Niva 2121. Therefore, you decide to carry out the repairs yourself or contact a special service.
Source: https://expertniva.ru/dvigatel/zameny-remna.html
Replacing the air conditioner belt.
To change the Niva Chevrolet air conditioning belt, you need to place the car on an overpass or inspection hole. After this, you need to remove the engine protection.
To do this, using a 13mm wrench, unscrew the 4 bolts around the perimeter.
After which you can remove the oil pan protection.
Using a 8mm head, unscrew the screws holding the protection.
Unscrew the front mudguard.
In order to check the tension, you need to press it with your hand between the compressor and crankshaft pulleys. The permissible deviation should be no more than 0.8 centimeters.
If it is worn out, then we proceed to replace it. To do this, use a socket wrench to loosen the bolts securing the tension roller.
If the air conditioning belt is in good condition, but is loose, you need to turn the bolt, tightening it clockwise, this will lead to tension.
Replacement is carried out if there are cracks, signs of delamination and breaks on the belt. To change, you need to loosen the bolt, to do this you need to rotate it counterclockwise.
After which it can be easily removed from the pulley. On Niva, a four-strand compressor with a length of 810 millimeters is used to drive the compressor.
The belt is put on so that it is closer to the inner edge of the pulley. Then you immediately need to check its tension.
After installing the part, reassemble the components in the reverse order.
Chevrolet Niva alternator belt: how to check and replace the auxiliary drive belt
The accessory drive belt is more commonly known as the alternator belt. It is important to understand that this belt, in addition to the car’s generator itself, also powers the power steering, air conditioning, etc. It is quite obvious that if problems arise with the drive belt, malfunctions in the operation of the mounted units will also inevitably appear.
For this reason, the said alternator belt needs to be checked and replaced periodically. The belt needs to be changed both when necessary (for example, in case of premature wear) and according to regulations (based on time and mileage), depending on what comes first. In turn, the Niva Chevrolet alternator belt is no exception.