Adjusting the tension and replacing the VAZ-21213, -21214 coolant pump drive belt
We check the belt tension by its deflection between the pulleys of the units.
1. With normal belt tension, its deflection under a force of 98N (10 kgf) should be 10–15 mm between the pump pulleys and the generator
2. or 12–17 mm between the pump and crankshaft . We adjust the belt tension by moving the generator (with its fastening nuts loosened): from the engine to increase the tension or to the engine to decrease the tension.
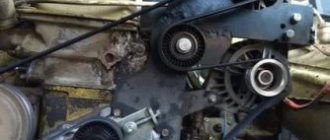
3. To replace the belt, loosen the nut securing the generator to the tension bar with the “17” head on the carburetor engine.
4. or a “13” head – on an injection engine. We move the generator towards the cylinder block to loosen the belt tension.
5. Move the generator, acting on it with a screwdriver as a lever in the slot of the tension bar:
on a carburetor engine;
6. on a VAZ-21214 engine.
Install the belt in reverse order. Turn the crankshaft clockwise two turns and check the belt tension. Excessive belt tension causes increased loads on the generator and pump bearings.
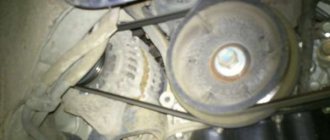
Alternator belt tightening sequence
Using a “17” wrench, slightly unscrew the upper fastening nut connecting the generator to the bracket.
Loosen the fastening nut at the bottom (just unscrew it a few turns).
If you need to loosen the belt, grab the generator and pull it towards you (if you need to tighten the belt, pull it away from you). After which it is necessary to tighten the nuts and check the operation of the generator.
Before starting the engine, turn on several main consumers, for example, the stove, high beams and heating. If the whistle disappears and the charging level remains at a normal level, then the work can be considered successful.
At the same time, remember that over-tightening is also unacceptable (this can lead to increased wear on the pulleys and belt).
If replacement is necessary, the sequence of actions is similar. Loosen until the belt is removed from the pulleys. Don't forget to read the article about replacing the timing belt.
There are situations when the alternator belt whistles from time to time, for example, when the temperature drops or humidity increases outside.
In this case, you can use special additives (sold in standard cans). The method of application is very simple.
It is necessary to spray the composition on the inside of the belt and pulleys. The cost of such products is from 500 to 1500 rubles.
If your car's alternator belt squeaks, you shouldn't immediately rush to the service station and make expensive repairs.
In most cases, the problem can be solved much easier and in a few minutes. And now you know how it's done. Good luck on the roads and of course no breakdowns.
Adjusting the tension and replacing the coolant pump drive belt Niva 2121, VAZ 2131, Lada 4×4 We check the belt tension by its deflection between the pulleys of the VAZ 2121 units. With normal belt tension, its deflection under a force of 98N (10 kgf) should be 1015 mm. between the pump pulleys and the generator. or 1217 mm between the pump and crankshaft pulleys. We adjust the belt tension by moving the generator (with its fastening nuts loosened): from the engine to increase the tension or to the engine to decrease the tension. To replace the Niva 2121 belt, loosen the nut securing the generator to the tension bar. head 17 on a carburetor engine. or a 13 head on an injection engine. We move the generator towards the cylinder block to loosen the tension of the Niva 2131 belt.
We move the generator, acting on it with a screwdriver as a lever in the slot of the tension bar Niva 2131: on an injection engine. On engine 21214, remove the crankshaft position sensor (see Removing the crankshaft position sensor). We remove the VAZ 2131 belt. On a carburetor engine, it has to be removed through the gap between the radiator and the casing. Install the belt in reverse order. Turn the crankshaft clockwise two turns and check the belt tension. Excessive belt tension causes increased loads on the bearings of the generator and pump of the Niva 2121. The original generator belt on the VAZ 2121 can serve the driver for about 100 thousand kilometers on domestic roads, such messages came from many owners of the people's favorite.
But it is not always possible to find an original alternator belt on the automobile market; the problem is that sellers tend to deceive gullible customers and the service life of the basement belt can be reduced by 2-3 times. Today we will tell you how to replace the alternator belt on a Niva with your own hands in a garage. When you already have a new alternator belt in your hands, you need to prepare a 17-mm open-end wrench and a convenient place for repairs. As people say, I'll leave this video here. Video. Do-it-yourself replacement of the generator and drive belt Dear users of our site, I recommend that you read the article on the topic with your own hands.
This instruction is suitable for both beginners and experienced drivers of the VAZ 2121. Replacing the alternator belt on a Niva 1. The image shows how to correctly loosen the alternator belt tensioner nut. 2. When the nut is slightly loosened, you need to move the car's alternator to the side to have good access to the belt. The arrow in which direction you need to move the generator is shown in the photo. 3. Remove the belt from the pump pulley, see the image for more details. 4. The alternator belt has been completely removed, now you can begin installing a new one. The cost of a new belt is about 100 rubles. We carry out the installation in the reverse order, also do not forget about tensioning the alternator belt, you can watch the video above about this operation.
Replacing the NIVA alternator belt. Alternator belt after 25 km. on NIVA 21214
The alternator belt on a Niva VAZ 21214 with power steering is changed after removing the belt from the power steering...
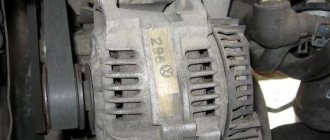
Removal and installation of the generator of the injection engine Niva 2121, VAZ 2131, Lada 4x4
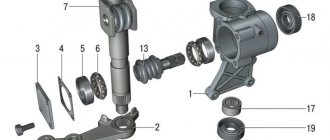
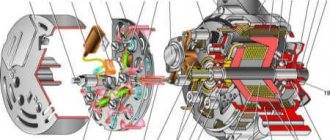
Generator device Niva 2121, Niva 2131, do-it-yourself repair
Disconnect the negative cable from the battery. Remove the oil pan protection plate and the right mudguard of the Niva 2131 engine (see Removing the oil pan protection plate and injection engine mudguards).
Disconnect the output wire “D” of the generator.
Having moved the rubber cover, use a 10mm wrench to unscrew the nut securing the wires to terminal “B”...
...and remove them.
Remove the VAZ 2131 coolant pump drive belt (see Adjusting the tension and replacing the coolant pump drive belt).
Using the “13” socket, unscrew the nut of the bolt securing the generator to the tension bar.
Using a 13mm wrench, unscrew the nut of the bolt from the lower mounting of the generator to the bracket on the cylinder block and remove the bolt. We take the generator out of the engine compartment downwards.
Having unclenched the three protrusions of the casing,...
...let's take it off.
Using a Phillips screwdriver, unscrew the two screws...
...and remove the voltage regulator with the brush holder.
Disconnect the wire and remove the voltage regulator with brush holder.
Use a 10mm wrench to unscrew the nut...
Replacing the NIVA alternator belt. Alternator belt after 25 km. on NIVA 21214
Generator belt
on
a NIVA
VAZ
21214
with power steering, it changes after removing
the belt
from the power steering
Replacing the NIVA VAZ 21214 power steering belt. Tensioning the NIVA power steering belt
Change the belt
NIVA
power steering 5 minutes. The pump bearing and seal will fail faster if...
...remove the sleeve and capacitor wire.
Using a Phillips screwdriver, unscrew the screw...
...remove the capacitor.
Using a Phillips screwdriver, unscrew the screw securing the rectifier unit and the three screws securing the ends of the stator windings.
The screws securing the ends of the Niva 2121 stator windings are equipped with insulating washers.
We remove the ends of the stator windings...
...and remove the rectifier block.
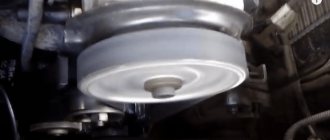
Using a 21mm spanner, unscrew the pulley mounting nut, holding the rotor with a 8mm hexagon.
Remove the washer and pulley parts.
Remove the washer from the rotor shaft.
Using a Phillips screwdriver, unscrew the four screws holding the covers together.
Using a sharp scriber or paint, we mark the relative positions of the covers and the stator for subsequent assembly.
Prying it with a screwdriver...
...we disconnect the front cover with the stator and the rear cover with the rotor.
Using a screwdriver, pry up the stator of the VAZ 2131.
. remove it from the front cover.
Using a drift that rests strictly on the end of the rotor shaft (so as not to damage the plastic bushing located under the slip rings),...
...knock out the rotor with the bearing from the back cover.
Using a puller, we press the bearing from the rotor shaft of the Niva 2121 generator.
We press the new bearing onto the shaft using a suitable piece of pipe, applying force to the inner ring.
Using a tester, we check the stator and rotor windings of the Niva 2131 generator for an open circuit or short circuit to the housing.
Nuances
When replacing a generator with a Niva 21213, 2121, 21214, a number of subtleties arise, and one of them is the location of the generator unit. It is located at the bottom of the engine compartment.
Actually, this is why problems arise with the operation of the structure: while driving, various contaminants get on the generator, and coolant drips. If you don’t want to constantly change the generator unit, it is recommended to move it upstairs.
To ensure that no problems arise during the operation of the car, it is important to monitor the condition of the car. First of all, it is recommended to regularly inspect the generator.
So, when the “battery” light blinks on the dashboard, if suspicious noises or creaking sounds occur, you should be wary and think that the generator is not working correctly.
Timely inspection will help to avoid unpleasant situations in the form of breakdowns of the constituent elements of the generator, and as a result, failure of entire electrical systems.
Read news about the new Niva
- Removal and installation of generator Niva 2121, Niva 2131
- Relays and fuses Lada 4×4 (VAZ 21214, 21314) » Lada.Online
- Tuning Niva 2121 with your own hands (photo video) - Self-repair of cars
- Ignition relay Niva Chevrolet where is it located
- Fuses and relays (location and purpose of fuses and relays) Niva Chevrolet
- Moving the generator to the top 21214
- Niva 2121, Niva 2131 and Niva Chevrolet. Let's compare?
- Niva 2121, Niva 2131 and Niva Chevrolet. Let's compare?
Replacing the VAZ 2121 Niva alternator belt. Photos, instructions on how to change the alternator belt on a Niva
This photo report shows in detail how to replace the alternator belt on a VAZ 2121 Niva . On average, the original alternator belt runs about 100 thousand kilometers, which is known from the reviews of many owners of this car.
It is important to understand that after replacing the belt with a new one, its lifespan may be slightly shortened, since a good belt is difficult to find.
Of the necessary tools, we only need a regular 17mm wrench, or you can take a ratchet wrench and a 17mm socket for it.
You can also check out our photo report on replacing the generator on a VAZ Niva
for repair of VAZ (Lada) 2121 (4x4)
Replacing the alternator belt on Niva
The alternator belt on a Niva can easily last 100,000 km, which has been tested by many car owners from personal experience. But with subsequent installation, its service life may be reduced, since choosing a real original belt can be very difficult. If you decide to replace it, then to perform this maintenance you will need a 17-mm open-end wrench or a socket with a ratchet and extension, as well as a universal joint.
So, the first thing you need to do is loosen the belt tensioner nut, as clearly shown in the photo below:
After the nut is loosened, you need to move the generator to the side so that the belt is free. Shown in more detail schematically in the picture:
And at this moment, when the belt is as loose as possible, you can remove it from the pump pulley:
And then from the generator drive, since it will already be completely free:
We buy a new one for about 80 rubles and replace it. Installation is carried out in the reverse order and do not forget about the tension so that the battery is charged normally.