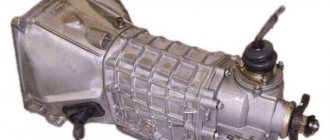
CV joint on Niva Chevrolet
With its help, torque is transmitted from the engine to the drive wheels. It's mostly front-wheel drive. Due to the CV joint, torque is transmitted uniformly, taking into account the fact that the wheel is at a different angle relative to the car.
On a Chevrolet, a grenade can be:
Like all other parts in the car, this unit has its own specific service life. Therefore, every Niva owner sooner or later is faced with the need to replace the CV joint.
Reasons for grenade failure
The CV joint can fail for the following reasons:
- Long service life of the mechanism . This is the most common cause of breakdown. Usually the part has to be replaced after 10,000 kilometers (on average), but it may happen that repairs are required even earlier.
- Sloppy driving . This could be sharp turns, driving on an uneven road at high speed, or turning the steering wheel when the car suddenly starts. In all these cases, the maximum load is placed on the CV joint.
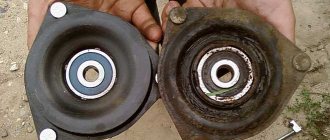
- Water, dust or dirt gets into the device . For this reason, the hinge may also fail prematurely. Water gets inside due to damage to the rubber boot. The protection can crack due to any factors during operation, so it is recommended to periodically check its condition.
Replacement procedure: step-by-step algorithm
There is no point in repairing a worn-out unit, so the outer CV joint of a Niva Chevrolet is always replaced. Replacing a damaged “grenade” is a labor-intensive operation. You will need a set of wrenches, pullers, and experience in performing plumbing work.
Outer CV joint
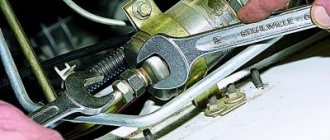
The damaged unit is replaced using an axle shaft with grenades removed from the vehicle. The body is raised with a car jack, a reliable stand under the car and wheel chocks are installed. This helps protect the repairman from possible injuries. Before lifting the car body, loosen the hub nut. You will need a head and an extension for the key. Next, you need to remove the wheel and unscrew the lower mount of the front shock absorber. Take it to the side and secure it with improvised means. Also unscrew the bolts on the ball joint.
Then they completely remove the nut on the hub and, pulling it towards themselves, take out the “grenade”.
The outer joint can be replaced without removing the axle shaft.
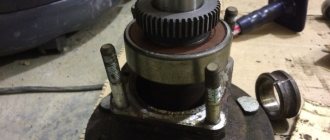
Release the boot mounting clamp and move it as far as possible on the axle shaft. A hammer with an extension is used to hit the body of the “grenade” until it is removed from the axle shaft. Before installing a new part, be sure to change the retaining ring on the axle shaft, since it is disposable. Installing the hinge is done in the reverse order.
Inner CV joint
This faulty unit on a Chevrolet Niva can only be replaced after the axle shaft with constant velocity joints has been completely removed. The “ear” and skis are released, which will allow you to rotate the bridge when removing the axle shaft. For ease of operation, the dismantled axle shaft with “grenades” should be clamped in a vice. Replacing the internal CV joint of a Niva Chevrolet occurs as follows:
- Remove the clamps securing the protective boots and move them as far as possible.
- Use a hammer and extension to remove the damaged “grenade”. A few blows are enough to dismantle the faulty part.
- Before installing a new hinge, carefully clean the splines and install a new retaining ring, since it is disposable.
- A new CV joint is installed on the axle, the protective cover is additionally filled with lubricant, and the boot is clamped with a clamp.
The axle shaft with new grenades is assembled and mounted in the reverse order. The process is fully presented in the video:
It will be possible to extend the service life of constant velocity joints if you monitor the condition of the protective covers on the grenades, avoid bad roads and use only high-quality spare parts.
Grenade replacement
This unit consists of parts that are constantly in motion. As a result, they may burst or wear out , requiring replacement.
The device can only be repaired if the owner of the car has identified damage to the boot in time, and therefore foreign substances have not yet managed to get inside the mechanism.
But this happens quite rarely, since it is almost impossible to detect damage to the boot in time. It should also be said that the cost of the CV joint is not high, and therefore it can be purchased if necessary.
Video about restoring the Niva Chevrolet CV joint
Troubleshooting
You can determine the malfunction of the grenade yourself . To do this, while the car is moving, turn the steering wheel in any direction until it stops. In this case, the driver will hear a crunching sound in the area of the front wheel. In this case, you need to replace the hinge.
During the repair process, it is important to determine whether it is necessary to change both hinges or one, because such work is recommended to be carried out only in a comprehensive manner.
Video on how to determine if a grenade is faulty
Changing a grenade on a Niva Chevrolet with your own hands
To replace a grenade, you must first remove the old one. In the process, you will have to dismantle the axle shaft along with the CV joint (you can find a disassembly video on the Internet). Then the car owner must perform the following actions:
- Clamp the removed assembly in a vice.
- Remove the old boot.
- Knock the CV joint off the axle using a hammer and a socket.
- Clean all teeth on the axle gear.
- Install the new joint on the axle.
- Place the boot and secure it with clamps.
- Install the axle with CV joint on the car.
Video about replacing a grenade on a Niva Chevrolet using a reverse hammer
Removal and installation of front wheel drives Chevrolet Niva
How to remove the front gearbox on a Chevrolet Niva
Place the front of the car on supports and remove both front wheels. We install an adjustable stop under the front axle gearbox.
Website about Chevrolet Niva. Remove the left drive in the same way. Install the drives and all removed...
Unscrew the nuts securing the suspension brackets of the front axle gearbox.
Unscrew the three nuts and remove the ball joint bolts from the lever. Move the axle aside. The connection between the cover and the gearbox is sealed with a cardboard gasket.
We disconnect the driveshaft from the front axle gearbox, as described here.
We install an adjustable stop under the front axle gearbox. We move the steering knuckle to the side. Similarly, unscrew the bolt securing the left drive bearing cover to the cross member bracket.
Unscrew the four nuts securing the front axle gearbox suspension brackets. We lift the gearbox with an adjustable stop until the eyes of the bearing caps come out of the crossmember brackets. The car is hung up and the front wheel is removed depending on the side where the inner CV joint needs to be replaced.
Disconnect the cardan from the front axle. Step-by-step replacement of the internal grenade Niva Chevrolet Unscrew the 3 nuts securing the bearing housing of the internal CV joint of the drive.
Unscrew the bolt securing the front axle bearing cover to the transverse part of the suspension. Unscrew the 4 nuts securing the front axle gearbox mounting bracket.
How to remove the front wheel drives of a Niva Chevrolet Published Removing the front wheel drives on a Niva Chevrolet car is carried out for their disassembly and repair, as well as when carrying out other work in which their presence will interfere.
Prepare a standard set of tools and perform the following sequence of actions: First of all, disconnect the front driveshaft from the front axle gearbox. Place the front of the car on supports and remove both front wheels.
Step-by-step instructions for a quality replacement
If the unit has just begun to signal a problem, then repair work can extend its service life. If it is completely worn out (diagnosis is recommended at a service station), it makes no sense to carry out work to resuscitate the parts or put the mechanism in order - a complete replacement is required.
In most cases, if there is severe wear, the outer CV joint on a Chevrolet Niva is replaced. It is important to remember that the upcoming process will require time and effort. The car needs to be driven to a special pit to facilitate access to the components and the CV joint itself.
Tools:
- wrenches (set);
- hammer with extension;
- pullers
Experience in plumbing is required if the replacement is carried out in-house.
Replacing the outer CV joint
To change the outer part of the pair in the assembly, you will need to completely remove the axle shaft with the “grenades” installed on it from the car. The sequence of actions in this case is as follows:
- the body needs to be lifted (a car jack is used);
- install a stand to minimize the likelihood of an accident if the jack fails to cope with the task;
- Anti-recoil shoes are installed.
Front wheel drives Chevrolet Niva
/ Chevrolet/ chevrolet-niva/ Transmission/ Front wheel drives
Design Features
| Rice. 5.9. Front wheel drive: 1 – internal joint housing; 2 – clamp; 3 – clamp for securing the cover; 4 – wheel drive shaft; 5 – protective casing; 6 – protective cover; 7 – thrust ring of the cage; 8 – separator; 9 – clamp; 10 – ball; 11 – outer hinge cage; 12 – retaining ring; 13 – outer hinge body; 14 – casing clamp |
Torque is transmitted to the front wheels from the front axle gearbox through the right and left drives. Both drives are identical in design. Each drive consists of a shaft 4 (Fig) and two joints of equal angular velocities installed on its splined ends.
The internal joint housing 1 is connected to the side gear of the front axle reducer. The outer joint housing 13 is connected to the front wheel hub. The holder 11 is connected to the housing 13 through balls 10, which are located in the grooves of the housing and the holder.
The race is installed on the splines of the shaft 4, rests against the ring 7 and is fixed on the shaft with a retaining ring 12. In the compressed state, this ring freely passes through the splined connection of the race 11, which allows you to both connect and separate the hinge and the shaft.
The inner hinge body 1 differs from the outer hinge body 13 in that it has straight grooves.
| USEFUL ADVICE Drive joints are very durable, their design life is almost equal to the life of the car. However, during operation they are changed or repaired quite often. Such work is quite expensive and labor-intensive. To seriously save money, regularly check the condition of the protective covers of the hinges and immediately replace them at the slightest damage. If water or dust gets into the hinge through a damaged cover, it will fail after several hundred kilometers. The sealed joint wears out extremely slowly. |
Removing and installing front wheel drives
You will need: keys “13”, “17”, “27”, a wrench for the wheel nuts.
| 1. Disconnect the front driveshaft from the front axle gearbox (see “Removing and installing the driveshaft”). |
| 2. Raise the car and remove the front wheels. |
| 3. Disconnect the shock absorbers from the lower arms of the front suspension (see “Replacing the front suspension shock absorber”). |
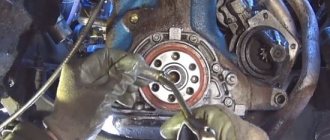
| 4. Unscrew three nuts securing the bearing housings of the inner hinge of the right and left drives. | 5. Remove the bolt securing the right front axle gearbox bearing cover to the front suspension cross member. |
| 6. Unscrew the four nuts securing the suspension brackets of the front axle gearbox. | 7. Unscrew the nut and remove the bolt securing the left front axle gearbox bearing cover to the front suspension cross member. |
| 8. Raise the front axle gearbox and secure it in this position in any available way. | 9. Remove the front wheel hub cap and unscrew the hub nut. |
| USEFUL ADVICE The hub nut is tightened with a large torque. Therefore, we recommend using a head with a strong knob. |
| 10. Remove the nut and centering sleeve. | 11. Compress the suspension spring by jacking up the lower arm. Unscrew the three nuts and remove the ball joint bolts from the lever. |
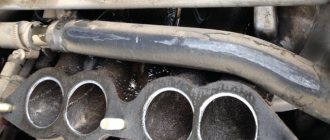
| 12. Move the steering knuckle to the side. | 13. Disconnect the exhaust pipe from the exhaust manifold and exhaust gas converter and take it to the engine (this operation is not required to remove the left drive). |
| 14. Pull the gearbox back and... | 15. ...remove the right drive. |
| 16. Remove the left drive in the same way. |
| 17. Install the drives and all removed parts in the reverse order of removal. When tightening the wheel hub nuts, adjust the play in the bearings (see “Checking and adjusting the play in the front wheel hub bearings”). |
Disassembly and assembly of front wheel drives
If you hear knocking noises in the front-wheel drive while driving when turning the car, check the constant velocity joints. If, when rocking the drive shaft by hand, play is felt or the dirt-proof covers are torn, such a hinge must be replaced. There is practically no point in disassembling the hinge. This is labor-intensive work, and if the cover is torn, dirt that has gotten into the hinge has already rendered the hinge parts unusable. The hinge parts cannot be replaced individually, and therefore the best option is to replace the hinge assembly, as well as its dirt-proof cover. As a last resort, disassembly is allowed to replace the grease of the internal joint as it is less susceptible to water and road dirt. The appearance of traces of grease on the hinge indicates that the cover is torn.
You will need: a screwdriver, sliding pliers, a hammer.
| 1. Using a screwdriver and sliding pliers, remove the large and... | 2. ...small clamps from the inner joint cover. |
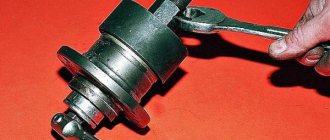
| 3. Slide the boot along the shaft. | 4. Knock the joint off the shaft using a hammer and a wooden spacer, striking the end of the cage. |
| 5. To disassemble the inner hinge, use a screwdriver to pry off the retaining ring of the cage. | 6. Remove the cage assembly with the separator and balls from the hinge. |
| WARNING Use any available means to mark the balls and grooves of the cage in order to install the balls in their original places. |
| 7. Using a screwdriver and pliers... | 8. ...remove the big one and... |
| 9. ...small clamps of the casing of the outer hinge cover. | 10. Slide the cover and... |
| 11. ... cover along the shaft. | 12. Knock the joint off the shaft using a hammer and a wooden spacer, striking the end of the cage. |
| 13. Remove the cover and casing from the shaft. |
| 14. Wash all metal parts with kerosene until the old grease is completely removed. |
| 15. Fill the hinge with CV joint grease-4 (the amount of grease for the outer hinge is 60 cm 3 for the internal one - 150 cm 3 ); |
| 16. Install the hinge and the removed parts in the reverse order of removal. |
Comments
No comments yet