How to install parking sensors: instructions, expert advice
Parking radar allows you to drive safely in tight spaces. Using sensors, the driver controls the distance of the car body to nearby objects, reducing the risk of collision. At the same time, the quality of operation of the parking sensors depends on the configuration of its installation. There are different ways to integrate and arrange sensors, as well as channels for their interaction with the control unit. Manufacturers recommend installing parking sensors with maximum coverage of the space in front of the car, but this is not always advisable. When choosing a wiring diagram, it is important to take into account many nuances, which will be discussed below.
Number of sensors and configuration of their placement
It is usually practiced to install sets of 4, 6 and 8 touch emitters. During operation, each sensor, by processing an ultrasonic pulse, allows one to estimate the distance to a third-party object. Sensing elements are located at the back and front of the car, and their specific number on each side depends on what configuration the parking sensors provide - 6 sensors are usually divided into 2 and 4. 2 are installed in the front, and 4 in the rear. The unevenness is due to the fact that the most dangerous “blind” spots are located behind.
The maximum set for 8 sensors assumes a single placement pattern - 4 sensors on each side. Experts do not recommend using 6 sensors on one side for the reason that they will provide too high sensitivity and a corresponding increase in the percentage of false positives. It is also recommended to install parking sensors while maintaining a distance from the ground and the distance between individual emitters. The height of the installation point from the road surface, according to the instructions, is 55-60 cm. The gaps between the sensors should be maintained in the range of 10-15 cm.
Installation using the tap-in method
This is a classic installation method that involves creating a hole in the car body or bumper. First you need to choose the optimal location for sensor integration. The mounting point should be located away from the protruding structural parts of the machine, including the towbar, spare wheel mount, towing eyes, etc. Next, the cable is installed that will connect the sensor and the control unit. Wires should not be placed in close proximity to the exhaust system or power harnesses of local electrical equipment. It is advisable to physically install the parking sensors in the holes made with the supplied drill. In this case, the optimal diameter will be ensured without the risk of getting a narrowed or widened niche. The sensor is installed in the prepared hole using rubber seals, which are also supplied in the kit.
Overhead installation
This method has the advantage of eliminating the need for a hole for sensor integration. It should be noted that the formation of the mounting niche is due to the need to fix the sensor element, as well as to lay a communication channel through the wiring. It is easier to install parking sensors using the overhead method, since in this case it is enough to use a special adhesive solution included in the kit. Actually, the electromagnetic tape of parking sensors is fixed using the same principle - an analogue of ultrasonic sensors.
As for wiring, overhead models most often work wirelessly. Therefore, the question of how to correctly install overhead-type parking sensors only involves making the correct markings, fitting them with glue and further adjustments.
Installation of other functional components
The minimum configuration of a parking radar, in addition to sensors, also includes a control unit and display. The first processes signals from sensors, and the second provides the driver with specific data about the distance to objects. The controller unit can be installed in the luggage compartment, but in such a way that it is reliably protected from mechanical damage, vibration and moisture. Installation is carried out using a special metal frame into which the block itself is inserted. How to install parking sensors yourself? To do this, it is enough to arm yourself with a screwdriver, complete screws or bolts. It is necessary to screw the frame into the prepared technical holes, and then install the controller using screws of a different format. The display is installed in a place visible to the driver - usually on the front panel. It can be fixed using brackets or attached with Velcro, which, however, is unreliable.
Connection diagram
Before connecting, you should disconnect the control unit from the power supply, and then visually identify the wiring channels. For example, parking sensors, 6 sensors of which are connected using the classic wired method, will provide for a two-way connection to the controller unit. That is, 4 lines will need to be connected to one side of the relay, and 2 to the other, directed towards the driver. On the front side of the control unit relay usually has connectors for connecting an information wire, power circuit, etc.
Wireless systems only involve connecting a controller unit and, in some cases, a display for power supply. Power must be provided only from the battery and on-board electrical power. Pulse sources are not suitable for this connection scheme. Compatibility with the voltage indicator should also be assessed. For example, Sho-Me parking sensors in standard versions can only be connected to sources with a voltage of 10-15 V.
General recommendations from installation specialists
To ensure stable signal reception, it is recommended to initially ensure the correct position of the sensors. Typically, do-it-yourself installation is carried out without taking into account the orientation of the sensitive sensor. Experts advise pointing the wide part of the rim upward. By the way, the premium Sho-Me parking sensors in the Y-2616 modification include 8 large sensors with pronounced metal rings. When installing them, it is especially important to follow this rule. Another tip concerns wiring insulation. All supply cables must not only be protected, but also be located in channels that prevent contact with metal structures or other elements of electrical equipment.
Conclusion
The technology for installing a parking radar is much more complicated than installing a rear view camera. This determines the fierce competition between these driver assistants, while in practice the sensors are more effective. And yet, a properly thought-out layout of sensors and communication lines helps to install parking sensors without any problems. The price of such services in specialized workshops can vary from 5 to 10 thousand rubles. depending on the complexity of the work. For the average car enthusiast, the main problem of this operation will be laying the cable infrastructure. Working with the on-board electrical network in itself imposes a high responsibility. However, you can choose an alternative method of wireless installation.
fb.ru
Installing and connecting parking sensors with your own hands: auto lesson from A to Z
Parktronic is a device designed to help motorists park a vehicle. Drivers, as they say, are divided into two types - those who never recognize such a device and those who simply cannot park without it. So how is it installed, what do you need to know about the parking sensor operation scheme - read about it below.
Gadget with display for parking
If you have decided to install parking sensors yourself on the body or bumper of a car, then first we will understand how the device works. Its main purpose is to signal to the motorist using sound and light pulses that the vehicle is too close to an obstacle. Today, there are many types of such devices, including those equipped with cameras that display images on the display of the radio, a separate monitor, or even the windshield.
So, if you decide to install parking sensors, then familiarize yourself with its operation diagram below:
- The circuit is equipped with several sensors, which, once connected, allow you to detect obstacles using an ultrasonic pulse.
- When the regulator detects an obstacle, a wave is returned to it.
- The regulator transmits an impulse about existing interference to the control unit, which subsequently processes the received data.
- As a result, if the connection and configuration were made correctly, the driver is notified of interference. This can be an audio signal, visual or complex. The distance to the object of interference can be displayed on the display of the radio or the device itself. But in fact, our car enthusiasts usually perceive only sound impulses.
Installing parking sensors yourself
How to install parking sensors, how do you drill holes and connect the device to the bumper? Is it possible and necessary to paint it, what color should it be painted, how to do everything correctly? Installing parking sensors yourself and setting it up is not a particularly complicated procedure. You will need time and, of course, a standard repair kit.
Do-it-yourself device installation diagram
So, installing parking sensors involves choosing the right device itself - in this case, you focus on your preferences, as well as your budget. So that you do not have to constantly make repairs, decide in advance which model you want to purchase. To do this, use online review monitoring to understand what type of devices other car enthusiasts choose and how they behave.
Having chosen the right device, all you have to do is drill holes in the bumper, install and paint the device in the appropriate color. Keep in mind that each vehicle has certain design features; as a result, drilling the bumper may take some time. Accordingly, if you do not want to receive an impulse from the asphalt or the sky, you need to immediately know how to properly drill holes in the bumper and install it in general on your car model.
Bumper markings for correct installation
The parking sensor kit should include instructions for drilling the bumper, connecting and setting up, from which you can fully understand how this procedure is carried out. If there are no instructions on how to install the devices in the kit, then it is better not to choose such devices. In this case, you can simply purchase a flashing device for yourself, which will be of no use, no matter how you adjust it.
So, if you do not want to face repairs, then opt only for high-quality parking sensors. In general, the procedure for drilling the bumper and painting the device in the appropriate color is universal for all types of parking sensors. If the manufacturer has proven its products to be of high quality, the kit will include not only instructions, but also a cutter to size the regulators. This cutter will allow you to correctly select holes for drilling a vehicle bumper (video author - Autoden TV).
How to install and connect the device?
How to properly install the device in a car bumper, how to adjust it and how to paint it in the desired color - we will talk about this further:
- First you need to properly prepare the place for installing the device. The gadget's electronic control unit is mounted in the luggage compartment; you need to choose the right installation location. You can mount the device under the plastic lining of the trunk or in the free space under the wing. This is not important, the main thing is that the control unit is not affected by moisture and other external factors.
- Now you can start preparing the bumper itself and first of all you need to wash it thoroughly. After this, taking into account the number of regulators that come with the device, you should correctly mark this body element. As a rule, modern gadgets are equipped with four sensors; in accordance with this number, the bumper can be correctly marked. As a rule, the outer two regulators are distributed to the lateral, radial parts of the bumper. The distance that remains can be divided into the appropriate number of parts, depending on the number of regulators that come with the kit.
- As for the marking itself, it can be done using a felt-tip pen or marker. In order not to spoil the color of the body, the marker is subsequently washed off with alcohol. It should also be noted that the marking is done in accordance with certain parameters of the gadget, that is, it is necessary to take into account the performance indicators of the device noted in the instructions. In most cases, the height from the ground is half a meter.
- Using a cutter, you need to drill the corresponding holes in the bumper, and then install the regulators into them. In most cases, the regulators are installed in their seats without problems, but to be more sure that they will not fall out, they can be glued on.
- Before painting the regulators in the desired color, they must be connected to the control unit, as well as to the monitor. To do this, use the diagram included in the kit. Next, you need to paint the sensor leads so that they match the bumper. In principle, the conclusions don’t have to be painted, it all depends on your preferences.
- The final stage will be diagnosing and testing the working condition of the gadget, and testing should be carried out with obstacles.
Installing the sensor in the bumper
In general, the process of installing the gadget is not particularly complicated; in principle, anyone can handle this procedure if desired. If you have doubts about this, it is better to pay once and trust the specialists, but be confident in the functionality of the device.
Video “Installing parking sensors at home”
How to install such a device on a car with your own hands - step-by-step instructions are presented in the video (the author of the video is Made in Garage).
AvtoZam.com
Installation diagram
The first step is to learn how to install parking sensors correctly. Each manufacturer necessarily includes instructions in the kit, which will present the parking sensor circuit.
As a rule, it looks like this (not for most models, for example, Renault Duster):
The document reflects the general principle of placing sensors around the perimeter of the car. By the way, the picture also contains a note about the rear view camera.
Brief description of the scheme:
- For more efficient operation of the obstacle and distance detection system, it is recommended to install four sensors on both bumpers.
- The rear view camera is located above the license plate.
- It is preferable to install the signal processing unit in the luggage compartment or under the driver's seat, but so that it is not damaged by passengers.
- The cables are located under the mat in a cable channel or other convenient place. They are long enough to make it easy to choose the most convenient path.
Installation procedure:
- First, the rear sensors are installed. To maintain the aesthetic appearance of the bumper, it is recommended to use masking tape. Especially if it has been recently painted. It will not leave marks and you can put a mark on it in the right place. The level of placement of the sensors is selected independently, but it is better that it be below the middle of the bumper.
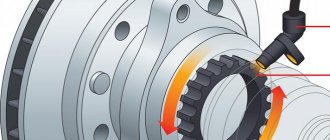
- When drilling, use a drill stand to ensure the holes are strictly perpendicular. Horizontal position is an important requirement for installing parking sensors.
- The next step is to install the sensors in the manufactured holes. To do this, the sensor is inserted with a cable inside. There are two designs of bumpers: with and without damper. Accordingly, you will also have to drill a hole in the damper. Then it is better to use stiff wire to thread the cable.
- When installing sensors, it is important to respect the location. To do this, the manufacturer marked them with Latin letters from A to D. Accordingly, the order of connecting the cables on the signal processing unit must also be observed. The sensors are fixed from the back using special locking rings.
- Before installing 4 sensors on a bumper of a color other than black, they must be pre-painted.
- The unit is installed in the trunk. This is the simplest option that does not require significant effort. You can mount it under the dashboard, where all the electronics are located. To install the device in the luggage compartment, it must be freed from the trim. The wires from the sensors are twisted into a single bundle with zip ties or electrical tape.
- The location of the unit should be chosen so that it does not interfere with loading and removing various objects from the trunk. As a rule, such a place is located on the side.
- The next step is to install the display and lay the cable to it. This part can be placed directly on the panel. You can also purchase a mirror with an integrated screen and connect the cable from the unit to it. An indicator display with red lights acts as indicators of approaching an obstacle. It can be installed at the rear for ease of observation during maneuvers.
- The module is powered by the reversing lamp, since the module is activated only when reverse gear is engaged. It is for these reasons that it is easier to install the device in the trunk. You can connect to the wires using rivets, which may be included in the parking sensor kit. If you don't have them, you can purchase them separately.
How to install parking sensors yourself
Installing parking sensors on a car yourself is a simple procedure. This article will describe in detail the entire installation process and provide useful tips.
Parktronic - what is it?
First, let's figure out what parking sensors are? After all, it may be that among motorists there are those who do not know about this system and have never heard of it. Some even have it on their car, but do not know how it works or what it is needed for.
Parking sensors with multiple sensors
What is it for?
Parktronic is a wonderful device that helps make parking a car much easier. Every year the number of cars in the world is growing. Russia is no exception, and especially Moscow, where there is nowhere for a needle to fall, the traffic is so dense sometimes. And among all this automobile chaos, you need to be able to park your car correctly. How can you do this if you just recently got behind the wheel of a car?
For these needs, parking sensors were invented, which the Russian driver quickly fell in love with. The fact is that our urban planning standards, according to which megalopolises and cities were built, are not at all designed for such a large number of cars. So you have to park them literally “nose to nose” in parking lots, which makes it impossible for an inexperienced driver or even a woman to park competently. At such moments, the parking sensor comes to the rescue.
Video about the operation of the parking sensors:
Operating principle of parking sensors
We figured out what the parking sensors do. Now let’s talk about what such a system is. This is a completely electronic device that monitors the distance between surrounding objects and the car body. If the distance becomes minimal, that is, critical and possible for a collision, the system sends a warning signal that allows the driver to react in a timely manner and correct the movement of the vehicle. That's all. Nothing complicated.
The electronic parking sensor system is simply stuffed with all kinds of sensors that issue warnings. The greater the number of sensors on one car, the more accurately the parking sensors will work. Let's consider what sensors are, what is their design?
Parking sensors are ultrasonic devices. We can say that these are transmitting and receiving devices with a very sensitive design. The sensors consist of two parts, where one emits a signal, and the second captures the signal reflected from the object, sending it to the head unit.
Parking sensors help prevent collisions
As for calculating the distance to an object, it depends on the difference between the released and received signal. Pure mathematics. The operating principle of this device will not surprise a physicist, since this knowledge has been used for a long time. For example, military radars and traffic police speed meters operate on this principle.
So. Parktronic consists of sensors, as mentioned above. And the more there are, the better. The number of sensors varies depending on the type of vehicle and its dimensions. The number of sensors also depends on the driver’s experience.
Four parking sensors
Types of parking sensors
In addition, parking sensors come in different models. Thus, parking sensors with forced activation are known. There are also permanently functioning models. It is clear that such a model will be inappropriate in city driving conditions, where constant signaling of critical approaches can tire the driver. Therefore, it would be appropriate to use parking sensors with forced on and off.
As for the signal given by the system to the driver, it may be different. The most common are audio signals, devices with a graphic scale and video monitors. And of course, the choice of monitor will depend on the skill and experience of the driver. Often modern parking sensors combine several types of signal: sound + scale or video monitor.
A beep is better than nothing. But it is not suitable for novice drivers, since it can be very difficult to understand the distance to an object from a changing signal. And the type of object that the sensor signals is sometimes difficult to distinguish. Either it’s a curb, or a branch, or the bumper of an expensive jeep.
There are different types of parking sensors
The digital screen displays the distance to a potential object in meters and is intended for those drivers who have an excellent eye and sense of distance.
The graphic display is also quite good. It is more informative than the sound signal and records the obstacle, the distance to it and its approximate location. The change in distance can be clearly seen on the graphic indicator scale.
Well, and video parking sensors, showing on the screen not only the object located along the course of movement, but even the trajectory itself. But an objective picture can only be seen when several sensors are installed on the car, and not just one.
Parking sensors with display installed in the car
And finally, modern models of parking sensors, which are equipped with high-tech things like measuring outside air temperature, human voice acting, and the like.
Front parking sensors and its installation
Why do you need front parking sensors? It turns out that, by and large, it is not needed, but it allows you to conveniently park next to low objects, such as a flower bed or a road side.
Installation of front parking sensors is carried out as follows: prepare everything necessary and then install it. First you need to understand the wiring inside the car. It is usually recommended to use twisted pair cable with a cross-section of 0.2 mm. About 12 meters of wire will be enough. Of these, eight meters will only go from the trunk, where the unit will be installed, to the front right headlight. From here two wires will go to the speaker and buttons: parking sensors and park assist. In addition, two more wires will go to the rear bumper, where two more sensors will be located.
In fact, two buttons: parking sensors and park assist - conditionally do not exist. You can install a regular parking sensor button or order a special one. You will also need to prepare the plugs for the buttons and the block, as well as the necessary contacts for the block and buttons. Don’t forget about the speaker plug, various types of electrical tape and corrugation for the twisted pair.
How the parking system works
As for the parts that will go on the outside of the car, these are 12 sensors, including rear parking sensors. Here it is worth knowing that the front side sensors are different from the rest (there are two of them). The brackets for the front side sensors are also different. Those who already have rear parking sensors on their car will need only eight sensors, not twelve.
You can take the wiring for the front bumper from a VW Touran. In fact, the wiring is designed for six sensors, but there is one caveat. In Turan, the front bumper wiring starts from the left headlight, and on some cars, such as Octavia, from the right. Although this does not matter much when pushing the plug into the bumper, knowing this nuance will come in handy when pinouting.
As for the rear bumper, two wires are added here and two plugs are installed to the side sensors. And of course, the installation of another parking sensor unit is required.
Video about installing parking sensors:
We begin, in fact, the installation procedure itself. Both bumpers, headlights, and trunk trim are removed. The dashboard, glove compartment, and right fender liner are removed. It is recommended to do everything according to the car diagram.
The wires should be pulled along the left threshold of the car all the way to the dashboard, from where branches go to the front speaker and buttons. Then we extend it further above the glove compartment to the plug in the body, located between the front door and the front right fender. A hole should be made in this plug, where the twisted pair should be packed in a corrugation and extended further with the fender liner to the headlight.
It is advisable to wrap all the wires with rag tape rather than ordinary tape to make it look nice.
Installation process and installation of parking device
Installing parking sensors using a different method
You can install parking sensors yourself in another way. Let's look at the example of the not too expensive parking sensor BEA 300, the price of which does not exceed 6,000 Russian rubles. By the way, this parking sensor seems to be specially created in order to install it yourself. In addition to it, there are covers for sensors, which, to be honest, are not needed.
Installing parking sensors of this type meant installing them in the bumper. This was indicated in the instructions. And the installation should be carried out without any additional elements.
Parking sensors are installed in the bumper
We arm ourselves with the necessary tools, the set of which must include 20 mm cutters for cutting holes in the plastic of the bumper. By the way, the original cutter is very expensive and the price for it can reach as much as 1000 rubles. Therefore, you can use an analogue. A good cutter should not be moved to the side during operation, and the cut should be smooth.
The bumper must be removed. It is recommended to remove the plastic trims inside the trunk and then peel back the soft upholstery. This is done in order to gain access to the bumper mounting bolts.
The bumper cover is removed. After this, two “10” bolts are unscrewed from the trunk.
Let's start unscrewing the mudguard screws. We use the star key at “6” for this purpose. Don't forget that several screws secure the bumper from below.
Removing the front bumper
After all the screws have been found and unscrewed, you can begin to remove the bumper. If problems arise and the bumper becomes stubborn, you can drop a little WD-40 into the places where the clips fit. After this, the bumper will definitely separate, and brute force will not help here, because you can damage the bumper.
Now you should put the bumper with the paint facing up and start making markings. You can stick masking tape to the places where the sensors are likely to be installed and measure the required distances. About 50 mm is usually left at the top. The distance between the first and last sensor is 60 cm, and between each sensor is 25 cm.
The center line of the bumper should pass directly through the central sensor.
It is clear that the removed bumper is a rather unstable structure. And this forces you to lean it against the door of a garage or other building, after placing pieces of rubber under the corners.
Bumper with holes for parking sensors
Now we carefully check all the markings and centers of future holes with a prick with an awl and begin to drill, preferably from the paint side. To prevent the plastic from melting under the action of the cutter, you can pour water on it. And you will have to drill with a partner. One will drill and the other will pour water. The holes should be 18 mm, although larger is possible, but then the sensor will fit in with a gap.
We place the drilled bumper on a rag and lay the wiring. We thoroughly clean and dry the surface, after which we treat the areas for gluing with liquid from a bottle. After this, we glue the sensors and pads under the ties.
We install the bumper in place by first pulling the wiring harness into a hole specially prepared for this purpose. We begin installation of the control unit. And we connect the car’s electrical circuit to it.
It is advisable to install the tweeter closer to the driver’s ears, and connect the power to the reversing lamp. As for the wires from the tweeter, they can be pulled under the sill covers and the emitter can be routed to the left pillar. You can also glue it there in the standard way under the seat belt bracket.
Video on how to install parking sensors yourself:
We check the operation of the system, and if everything works, then it’s time to start the car. We go to the obstacles and check the squeaker. Everything is working.
Like this. And nothing complicated. A little patience and everything will work out!
365cars.ru
How to install parking sensors
Parktronic is a device that scans obstacles that are in a limited visibility zone for the driver of the car and warns about them with a sound and light signal. The parking radar greatly facilitates parking in difficult city conditions, especially for novice motorists. However, many experienced car owners are skeptical about its installation. Motorists whose cars are equipped with standard parking sensors already on the assembly line do not regret it at all. Installing parking sensors with your own hands is not difficult, and self-installation will cost much less than buying a car already equipped with a parking sensor.
1
There are several types of parking sensors. Firstly, they differ in the number of installed sensors, which are installed on one or both bumpers at the same time. Secondly, they have a different system for warning the driver about danger: sound, sound and signal on the display, video image. Basically, parking sensors combine an audible and visual signal. Thirdly, parking sensors differ in the way the sensors are installed: open and hidden. The sensors detect an obstacle through the reflection of ultrasonic signals, transmit the signal through the ECU (electronic control unit), which processes it and provides information on the display and in the form of a sound signal.
2
When choosing a parking sensor, you should definitely pay attention to the instructions for connecting it to the car’s electrical network; it must be translated into Russian. It is mandatory to have and comply with the warranty period from the manufacturer and seller. The warranty may not be valid if the parking sensors are installed independently. You should also take into account the technical characteristics of the parking sensors: height suitable for the car bumper, range and sensitivity of the sensors.
3
Before starting work, you must thoroughly study the installation instructions and the diagrams for connecting the parking sensors to the vehicle’s on-board network. The control unit must be positioned taking into account practicality, accessibility and wiring length. It is convenient to place it in the trunk, but it should be accessible, not in the way, and not subject to mechanical damage.
4
To install parking sensors, the following tools are required:
- screwdriver or drill;
- key;
- cutter or drill of the same diameter;
- roulette;
- pencil;
- double sided tape;
- insulating tape;
- solvent.
5
We install classic parking sensors with 6 sensors (2 on the front bumper, 4 on the rear). It is necessary to mark the sensor. To do this, you need to know the recommended height of the sensors from the ground and their range. These numbers should be indicated in the instructions. To remove the bumper, to take into account its design, you need to start marking from the outermost sensors. The distance between the outermost sensors should be divided into equal segments, and the locations for the remaining 2 sensors should be marked with a pencil.
6
Use a cutter to make holes strictly perpendicular to the surface of the bumper. The sensors must be installed horizontally with no upward, downward or sideways deviation. The sensors should be mounted in the holes from the outside, the wires should be inside. Secure the sensors from the inside with special rings.
7
Collect the sensor wires into a bundle and secure with insulating tape, connect to the standard wires located in the bumper. The wires must pass inside the car through the technological opening. On the rear bumper - inside the trunk, on the front - inside the hood. Then you need to put the bumper in place and secure it with a standard mount. Everything is installed on the front bumper in exactly the same way.
8
Connect the control unit to the wires of the reverse lamps. Polarity must be strictly observed. The display can be mounted anywhere, as long as it is clearly visible to the driver. It can be secured with double-sided tape. Wires running throughout the vehicle interior should be hidden under floor mats to avoid damage. Before installing the control unit, the selected location for its installation must be wiped with solvent and wiped well. The unit must be attached with double-sided tape, then the system must be checked.
Before you go into the city, you need to test the sensor's response to various types of obstacles. The range of the sensors should be checked. This will help you get comfortable with their signals and understand the operating algorithm.
SovetClub.ru
What is needed to install parking sensors in the bumper
To install a packing radar yourself, you need to have:
- device with sensors (2, 4, 8);
- screwdriver and drills;
- cutter 22.5 mm;
- clamps, scotch locks;
- masking tape;
- roulette;
- pliers and awl;
- screwdriver;
- tester.
Having these tools will allow you to save on the work of a technician and install the system yourself.
It is possible to install parking sensors without drilling the bumper; there are models on the market that are simply glued to the bumper. However, we do not recommend purchasing such equipment as there is a high probability that the sensor will soon fall off.