Why the extra pedal?
The clutch is a structural element of a car that takes part in the transmission of torque to the wheels from the engine and allows this transmission to be briefly broken, which is performed by the driver when he presses the clutch pedal. When considering the question of its purpose and role in driving a car, it is impossible, at least briefly, not to touch upon the structure of such a mechanism.
However, before understanding the design of the control mechanism, it is necessary to make a reservation that it must be used quite carefully. It is not for nothing that when driving a car, the left foot does not touch the pedal, but should lie in a place specially provided for it. This is due to the fact that when the engine is disconnected from the wheels, the ability to control is sharply reduced; the car moves only by inertia. This type of driving is especially dangerous on wet or slippery roads.
In such cases, the same braking must be performed without pressing the clutch. Otherwise, the car may skid with unpredictable consequences, especially for beginners who are not ready for such a change in the car’s behavior. It is best to be guided by one general rule - when driving on a flat road, if there is no need to change gears, you should drive the car using only the gas and brake. The same applies to driving downhill; in this case, coasting or driving with the engine disconnected from the wheels should not be allowed.
The engine must always be ready to transmit and the wheels to receive the required torque. Only then do you retain full control over the behavior of the car. Therefore, you should use the clutch pedal only when necessary, only in cases where you cannot do without it, such as when changing gears or starting to move. Keeping in mind that you need to do this carefully and carefully, since during the gear shift process sudden dynamic loads may occur on various components of the machine.
Bleeding and adjusting the Chevrolet Niva clutch: step-by-step instructions
At the same time, breakdowns of the first category tend to quickly develop into the second.
Parts of an untimely adjusted clutch wear out quickly and require replacement. An unadjusted clutch drive causes inconvenience when driving a car - difficulties appear when changing gears or jerks when the car starts moving.
When should it be adjusted?
It is necessary to adjust the pedal free play and pump the hydraulic drive in the following cases:
- Pedal travel is too long. In this case, the clutch does not disengage completely (“drives”). This leads to difficult gear shifting and intense wear of the friction lining on the driven disk.
- Small clutch travel. In this case, the disc slips, especially under heavy load on the transmission (driving uphill, in high gear).
- Jerking, knocking or squeaking noises when changing gears or when the car starts moving.
Important: operating a car with an incorrectly adjusted or “aired” clutch drive leads to accelerated wear of gearbox parts.
The design of the Chevrolet Niva clutch coincides with a similar unit of the “classic” AvtoVAZ. The only difference is in the different dimensions of the working cylinder and, accordingly, in a larger and easier pedal stroke.
How to upgrade?
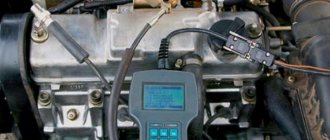
Before adjusting the mechanism, you need to bleed the hydraulic drive. To do this, you will need brake fluid, a container and a flexible tube whose internal diameter corresponds to the size of the fitting and a 10mm spanner.
The bleeding process is similar to removing air from the brake system. As with the brakes, the work is done with an assistant.
One person must press and release the pedal on command, and the second must open and close the fitting.
How to adjust it yourself?
To adjust the mechanism you will need keys 10, 13 and 17, pliers and a pencil. The operation is performed on a lift or inspection pit. The work order is as follows:
- Using a 10mm wrench, unscrew the locknut of the pedal travel limiter.
- By rotating the nut, set the free play within 0.4-2 mm.
- Tighten the locknut.
Then you need to go down under the car and adjust the free play of the pusher within 4-5 mm (to unscrew the nuts, you need wrenches 13 and 17). The check is performed as follows:
- Using pliers, remove the clutch fork release spring.
- Place a pencil against the boss of the lower mounting of the working cylinder.
- Make two marks: opposite the fork and 5 millimeters to the right.
- Pull the fork all the way back, selecting the free stroke of the pusher.
- The fork should stop exactly opposite the mark on the pencil.
If the gap does not correspond to the nominal one, you need to loosen the lock nut and rotate the nut to achieve the required parameters.
The final check is performed with the engine running. If everything is done correctly, the gears change easily, and the car starts to move if the pedal is released approximately ⅓ - ⅔ of the stroke.
Source: https://nivaexpert.ru/transmissiya/regulirovka-scepleniya-shevrole-niva/
How the clutch works
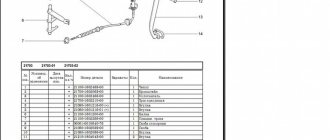
In its most general form, its design is shown in the figure below.
Without going into details, it should be noted the presence of such components as the flywheel (1), which is also part of the engine, as well as the driven disk (2), clutch basket (3) and, of course, the drive, which includes almost all other parts, including including the clutch pedal (11). Here it is only necessary to say that a rather enlarged and simplified presentation of the design is given, which in no way, however, interferes with the understanding of its meaning, the role of this mechanism on the machine. To properly understand the design, it is necessary to clarify that the drive connecting the clutch pedal with the mechanism itself can be:
- hydraulic, as shown in the figure above;
- mechanical;
- pneumatic;
- electric, etc.
Why is this necessary - to break the torque transmission from the engine
Everything is very simple. Depending on driving conditions, different torques are supplied to the wheels. Its value can be changed using the gearbox by selecting the desired gear. However, when the gears in the box are in mesh and spinning, it is impossible to change gear. Of course, you can try, but the result will be replacing the destroyed checkpoint. To avoid this in any driving mode, as well as at the beginning of movement, a clutch is used in the car’s design. If you press it, the connection between the gearbox and the engine is broken, as a result of which it becomes possible to calmly change gear or move off.
How to check and adjust a hydraulic clutch
The operation of a mechanical and hydraulic drive has its own design differences. In this regard, in order to adjust the hydraulic clutch, it is necessary to check the total length from the pusher rod to the fork. According to the standards, it should be about 5 mm.
Then disconnect the spring from the working cylinder bracket. There is an adjustment nut on the rod, by unscrewing which you can change the stroke of the fork to the desired result. The general concepts of changing the working and free play may differ depending on the vehicle manufacturer. Before you begin self-adjustment, you need to read the manual for your vehicle or watch training videos:
As you can see, there are no particular difficulties in adjusting and setting the clutch. However, a beginner should carefully follow all instructions and advice from experts. To get the most effective result, it is better to first become familiar with the operating principle of the clutch mechanism.
About some malfunctions
From the above figure it can be seen that in addition to the clutch itself, others are involved in its operation. There is probably no need to say that only their good condition, as well as other drive elements connecting the clutch pedal to the basket, ensures safe driving conditions. As an example, we can consider the various possible situations in which the associated malfunctions may occur.
Free pedal travel
One of the parameters characterizing the serviceability and correct adjustment of the entire system is the free play of the clutch pedal. This is the name of the distance that the clutch pedal freely travels before it is activated. Free play appears due to the presence of gaps in individual components and drive elements. It is clearly shown in the figure above and should not exceed thirty-five millimeters. The gap is felt as if the clutch pedal moves without effort when you press it. In other words, at first, when you press the pedal, it moves freely, and then resistance to movement begins to be felt. This gap - movement without effort - is called free movement. Its too high value indicates significant wear of parts or the need for adjustment. If this is not done, problems may occur with starting or shifting gears.
The clutch pedal has failed
When the pedal is pressed, it goes down without any effort, without returning to its normal position. There may be several reasons for this, here are some possible ones:
- The clutch cable is torn at the point where its tip is sealed (in the case of a mechanical drive). Such a defect can be eliminated by replacing the cable, and it must be carried out in a service center or workshop;
- The return spring (9) has flown off or burst. In cases where the spring has flown off, then after putting it back in place, the defect - the clutch pedal has failed - will be eliminated. Otherwise, you have to get to the workshop again.
- The shift fork (14) broke, which is why the clutch pedal failed. It is clear that in this case, repairs are possible in a garage or workshop;
- air has entered the hydraulic drive system. Then it is necessary to bleed the drive to remove trapped air.
Functions and principle of operation of the clutch pedal
When you press the clutch pedal to the floor, the engine is disconnected from the gearbox - the clutch is disengaged. To start the car moving, you need to engage the clutch, that is, release the pedal. The clutch disc (consists of two discs) is splined on the gearbox input shaft (i.e., rigidly connected), and sandwiched between the basket and flywheel (engine) rings.
When you press the clutch pedal, the spring releases the ring on the basket, and it moves away from the flywheel. The clutch disc is released and rotates independently of the flywheel. That's it, change gears. We release the clutch pedal, the release bearing releases the spring, the rings converge, and the disc is clamped. Go.
Step-by-step instructions for replacing the clutch in a Chevrolet Niva
The Niva Chevrolet car is characterized by the presence of a manual transmission that has a clutch. If it is not available for various reasons, it is recommended to take the vehicle to a service station for replacement. This is an expensive procedure, so in order to save money, you can install the clutch yourself.
The principle of operation of the Chevrolet Niva clutch
A clutch is a unit that transmits torque from the engine to the gearbox . If it does not work properly, difficulties in shifting gears are observed, and engine performance also deteriorates.
The clutch has the following operating principle :
- When the car owner presses the pedal, the clutch is transferred to the pressure fork through a hydraulic drive. It puts pressure on the release bearing, which ensures its displacement towards the motor.
- The bearings compress the petals of the springs installed in the clutch basket.
- This ensures the rotation of the drive and driven disks. They have independent movement, which leads to a break in the connection between the engine and the gearbox.
- After the pedal is released, the springs relax, so all clutch parts return to their original position.
- After connecting the disks, torque is retransmitted from the engine to the gearbox input shaft.
There is gradual wear of the release bearing , friction linings and other clutch parts. This requires partial or complete replacement of the device.
Common clutch malfunctions - why bleeding is needed
The reasons for wear of the mechanism are varied . If the friction linings are severely worn or burnt, it is recommended to replace the disc. If oil gets on the friction linings of the driven disc, this indicates that the sealing parts are not working properly. The disk is washed and the cause of the leak is removed.
There are malfunctions in which the clutch does not disengage completely . This is observed when:
- Warping or end runout of the driven disk. For minor damage, repairs are carried out. A serious problem requires replacing the drive.
- Loose rivets on friction linings. The driven disk is replaced along with all other parts.
- Warping and distortion of the pressure plate, which requires its replacement.
If characteristic noises appear when you press the clutch pedal or when you release it, disassemble the clutch system and repair the damage.
If the master or slave cylinder is broken, the pressure fork or return spring breaks, the pedal will fall when pressed. This is observed when the hydraulic drive becomes airy, which requires pumping the system.
When does it make sense to repair and when to replace?
If the release bearing, as well as the main and working cylinders are faulty, the system is repaired . If noise occurs, the release bearing must be replaced. This part and the release fork are disengaged. The fork is moved to the side and the bearing is removed.
Before installing a new bearing, it is recommended to clean the installation site. Before installation, the bearing and seat are lubricated with a special compound called Litol-24. Assembly is carried out in reverse order.
The purpose of the master cylinder is to transmit impulses from the pedal to the working parts of the clutch . If it does not turn on and off completely or fluid leaks out, then the cylinder must be repaired or replaced.
Before repair, the part is removed and inspected. In the absence of major signs of wear and mechanical damage, the part is repaired. To do this, you need to flush the part with brake fluid.
The functionality of the clutch drive is ensured by the slave cylinder . To connect the master and working cylinders, a steel tube is used, on the lower edge of which a rubber hose is placed. Liquid periodically leaks through the rubber connection. After removing and repairing the part, bleeding is carried out. The clutch also needs to be adjusted.
To bleed the drive, put a hose on the working cylinder . One of the ends is placed on the valve of the part, and the second is lowered into the liquid. Depress and hold the clutch pedal. The procedure is carried out more than five times. After this, the valve is opened to release the air. The actuator adjustment will be successful if there is fluid leakage without air after opening the valve.
If the fork breaks, you do not need to remove the gearbox to replace it . Replacement is done using pliers, a carrier or flashlight, a hammer, a sharpener and a screwdriver. Pliers are used to remove the return spring.
The bolts on the clutch slave cylinder are unscrewed and the rod is uncoiled , which needs to be pulled out of the fork. After removing the protective glass, the plug is removed.
Using a sharpener, the new fork is refined. The ends are chamfered and the rivets are ground down to a height of 0.5 millimeters. The release bearing is rotated in the hatch.
The tips of the spring are directed towards the hole and a fork is inserted . She is carefully driven into the hatch using a hammer. It is recommended to check whether the spare part is adjacent to the ball joint. The antennae of the support are directed so that they cover the support. All other manipulations are performed in reverse order.
Basic rules for working with the clutch pedal
– The left foot should always be ready to change gears, that is, to move to the clutch pedal. Most cars have a special area designed to rest the left foot. Or you can place the heel of your left foot on the floor and lean your foot against the body of the car in a position that is comfortable for you.
– Do not constantly keep your foot on the clutch pedal: your foot gets tired, the clutch gets tired and fails faster. The clutch release bearing, although it is designed to operate in constant rotation mode, is under increased load even when the pedal is lightly pressed and its service life is reduced.
As soon as the desired gear is engaged, the left foot is freely placed in a convenient place next to the clutch pedal. While in a traffic jam, if you do not have to move away immediately, it is better to turn on the neutral speed and release the clutch pedal.
– Always release the clutch completely when changing gears, for which the pedal should be pressed all the way.
– The left foot is intended for only one pedal – the clutch.
– Press the clutch pedal quickly, “all the way” and without jerking, in one movement.
– Smooth release of the pedal is ensured by pressing on it with the middle part of the foot, with the balls of the foot. In this case, the heel of the foot should be lifted off the floor and the entire leg should be lifted up, not just the foot, that is, the shin and knee work.
Parts and consumables:
A faulty clutch release bearing can be determined without removing it from the car, for which you need to press the clutch pedal with the engine running. If there is additional noise when you press the clutch pedal, the clutch release bearing is faulty and needs to be replaced.
Apply grease to the contact surfaces of the bearing, cylinder and clutch release fork. Warning When installing the clutch, apply lubricant to all moving parts, but do not use excessive amounts of lubricant, as this may cause the clutch to slip.
Unscrew the nut securing the pipeline, and then the two nuts that secure the cylinder itself, and remove it.
How to adjust the clutch drive
When installing, all steps are carried out in reverse order. Sometimes, when the clutch is not completely disengaged due to a fluid leak, it becomes necessary to replace the clutch slave cylinder. First, the cylinder hose end is loosened. The bolts of the bracket securing the working cylinder to the crankcase are unscrewed, and the bracket itself is removed.
Next, the pusher is removed from the shutdown fork, which is removed along with the protective cap. At the same time, see if the plug needs to be replaced. Disconnect the clutch slave cylinder from the hose end. Install a new cylinder and bleed the hydraulic drive.
Source: https://iaarus.ru/niva-shevrole/regulirovka-scepleniya-na-nive-shevro.html
What does freewheeling mean?
What does this concept mean? It characterizes the freedom of movement of the clutch pedal until it is activated. You can feel it when you press it. At the very beginning, as soon as you start pressing the pedal, it will move quite freely. That is, you don’t feel much resistance.
After activation, you will notice the appearance of greater rigidity when pressing. It is this interval, while you press without much effort, easily, that is called a free stroke.
How do you know when it’s time to check this indicator? Everything is very simple! Just pay attention to how the car behaves when you change gear.
If you encounter shocks or slight jerks at the very beginning of the movement, or if the gear shift is accompanied by noise, then you should definitely check the free movement of your car. So, start the engine and slowly release the pedal.
If the car begins to move as soon as you start to let go, your car does not have free movement. If the car does not move and the pedal is completely lowered, the norm has been exceeded.
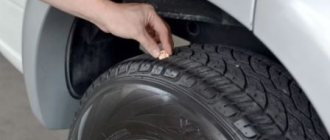
Find a regular ruler in your arsenal. With it you can measure the distance from the floor to the rubber pad on your pedal. The average norm is 160 mm. If your measurement results in more, you need to make an adjustment. Press the pedal carefully. Then, using a ruler, measure the distance when it moves freely until resistance appears.
Check the resulting value with the technical requirements of your car. This figure must fall within the acceptable limit. If it differs from the standard indicators, then it’s time to work a little in the garage.
Free play of the clutch pedal - prevention and care of the system
To monitor the condition of the clutch mechanism, it should be checked after the next 20,000 km mark. Repair and adjustment are required if a fluid leak is detected due to ruptured hoses or when the clutch accelerator stroke is increased.
Even a novice driver can set the pedal free play. To do this, it is first important to make sure that there is no air in the hydraulic system.
First of all, fill the drive reservoir with liquid to the required level, put the hose on the bleeder valve and unscrew it half a turn. Dip the free end into a jar of liquid.
Now push the clutch all the way in so that all the fluid flows out. Close the valve and release the pedal. Add the missing amount of liquid to the tank and repeat the entire process in the same order.
The system is considered to be pumped if the leaking liquid does not contain air bubbles. Then it’s time to screw the valve and close it with a protective cap.
Don't forget to check if there is fluid in the drive tank; if necessary, add it immediately. Now is the time to turn to direct adjustment of the pedal.
How much free play should the pedals have?
There are acceptable limits to this term. For each model or brand of car, this figure must be in accordance with the technical requirements. Sometimes an incorrectly adjusted free play causes trouble. And this is not only incorrect clutch operation.
In worst cases, this state of affairs can lead to breakdown. The car's clutch will not work with the entire plane of the discs in the case of a large idle speed. If it is small, slipping may occur. As a result, parts will wear out faster.
To prevent such unpleasant cases and ensure proper operation of the car, it is advisable to do such a check as often as possible. And if the test result requires it, regulate it as well.
The clutch accelerator will require a change in cable length if the fork free play exceeds 3mm. To check it, you need to move the fork back. If this value does not correspond to this value, the clutch pedal free play is adjusted using a special nut located on the threaded part of the cable.
Not only the clutch assemblies need periodic adjustment, but also the brake drive mechanism, since over time it will naturally wear out, that is, an increased amplitude of the pedal will form.
As manufacturers recommend, after even a new car has traveled 2,000-3,000 km, it is necessary to check the technological clearances in the brake system components.
With a working brake mechanism, the unimpeded accelerator stroke (with the engine turned off) should be within 5 mm. If there is a lot of free play in the brake pedal, the gap is set by moving the brake light. What are the dangers of regulatory violations?
Measuring and adjusting the free play of the clutch pedal
In all the described cases, the car owner should look into the mechanisms of his vehicle. How to make the adjustment? First, we will describe how to measure the pedal stroke and then correct shortcomings in this value.
You should:
1. Place the car on a level surface.
2. Press the brake until the pedal stops and lock it in this position. The easiest way is to use a hammer.
3. Place a ruler next to the pedal, resting its end on the floor. Mark the distance of the pedal from the floor.
4. Release the pedal without lifting the ruler from the floor. Place the upper part of the ruler on the accelerator and take measurements.
5. Press the pedal until you feel noticeable resistance. Take measurements.
The difference between the top position and the last reading will be the amount of free play.
After receiving the results, it will become clear whether adjustment of the brake pedal free play is necessary. If it is still required, then to do this you need to loosen the brake light lock nut only 1 turn.
By screwing or unscrewing the switch, set the required gap between it and the brake pedal. After completing the described adjustment, tighten the lock nut and re-check the stroke as described in the previous paragraphs.
The clutch accelerometer is also adjusted by a nut, it is located on the cable.
Subscribe to our feeds on social networks such as Facebook, Vkontakte, Instagram, Pinterest, Yandex Zen, Twitter and Telegram: all the most interesting automotive events collected in one place.
During the operation of the car, due to wear of parts, large free play of the clutch pedal appears, and the brake accelerator often suffers from this. This may be caused by abrasion of the friction linings of the disk or a violation of the adjustments of the casing levers. If you lack experience, trying to fix these problems yourself is not recommended.
Adjusting the Chevrolet Niva clutch
Chevrolet Niva cars have a dry clutch. It is driven by a hydraulic mechanism. If the clutch malfunctions, it needs to be adjusted. Here are a few signs that require immediate diagnosis:
- increased pedal play. If, when pressed, the pedal exceeds its travel according to the standard, this means that the clutch is not completely disengaged. In this case, the disc does not fully contact the flywheel. Untimely repairs can lead to severe wear and tear.
- Pedal travel is too small. Such a defect can lead to slipping of the gasket. At the same time, engine power drops greatly.
- The appearance of jerks when starting off. It is also possible that shocks may occur in the transmission.
The appearance of all these signs indicates the presence of problems with pedal adjustment. If they are ignored, this can lead to clutch replacement and costly repairs.
Adjustment procedure
- Adjustment of the Chevrolet Niva clutch is carried out with the engine turned off. It is also better to disconnect the battery so as not to accidentally start the engine when the shaft rotates.
- The gearbox is moved to the neutral position. The master cylinder is installed with a gap of half a millimeter from the pusher. This distance is sufficient to disengage the clutch disc. Subsequently, the pedal travel is adjusted.
- The pedal travel should not exceed 3 millimeters. Adjustment must be made by changing the position of the locknut and bolt. By tightening them you can adjust the stroke amount.
- The pusher should move freely no more than 4-5 millimeters. To adjust it, you need to adjust the stop nut.
- Also, to adjust the pusher, you can change the position of the lock nut.
The total free play of the pedal should be within 25-35 millimeters. To more accurately adjust the clutch pedal, it is necessary to work on an inspection hole or lift.
The difference between adjustments on the Chevrolet Niva
The clutch in the Chevrolet Niva is reinforced. For this purpose, thickened metal of larger diameter was used. Damper springs are used for compression. The hydraulic clutch option compensates for wear.
Clutch discs are balanced when assembled. They are usually called a basket. This component is located in an aluminum housing. When adjusting the Chevrolet Niva clutch, it is necessary to install a new drive disc. The springs pressing the disk may be defective.
To avoid frequent adjustments, the device is equipped with a working cylinder. This component allows automatic clearance changes. If it fails, the assembly is replaced.
The driven disk is located between the flywheel and the shaped cup disk. A special overlay is applied to it using rivets. When worn, its thickness decreases and the rivets can scratch the disc and cause beating.
When installing, the hub should face the basket. It is important to align the hub hole and the main pin.
The driven disk with a riveted friction lining is located between the flywheel and the drive disk of the shaped cup. The disc splined bushing sits loosely on the input shaft.
Replaced when worn, if the thickness of the lining decreases to 0.2 mm and the rivets begin to leave scratches on the pressure plate.
The cause may be axial runout, weakening of rivets, cracks, breakages, or scuffing on the friction material body.
It is installed with the protruding part of the hub in the direction of the shaped basket. In this case, the centering pin should align with the hole in the hub.
The stamped shaped clutch release fork has a recess for a ball joint and its two ends rest against the release bearing clutch. The ends of the fork, periodically wearing out, are restored by welding pads on them to the thickness of the factory sample.
The release bearing is sealed, maintenance-free, and requires no flushing. Moves along the cylindrical part of the sleeve. The appearance of noise or whistling at the moment of squeezing indicates the need to replace the bearing.
The pedal assembly is connected to the master cylinder located in the engine compartment. Together with the pusher, it forms one unit with the piston of the main unit.
The main, working hydraulic mechanisms are communicated through a steel tube and a reinforced hose. The slave cylinder is mounted on the clutch housing using a bracket.
When the pedal is pressed, the main piston creates fluid pressure, which causes the pushrod and fork to move the release bearing clutch.
The hydraulic drive operates on DOT-4 brake fluid, the reserve of which is contained in the reservoir and communicates with the main one through a hose. Hydraulic bleeding is provided by a fitting located on the (working) cylinder.
Replacing the master cylinder
- New clutch master cylinder under the hood.
- The procedure includes:
- Pumping out brake fluid from the reservoir with a rubber bulb
- Unscrewing the tube, removing the hose from the fitting and unscrewing the fastening nut and removing the cylinder.
- Installing a new one follows the steps in reverse order.
Source: https://expertniva.ru/transmissiya/regulirovka-stsepleniya-shevrole-niva.html
Free play of the clutch pedal - prevention and care of the system
To monitor the condition of the clutch mechanism, it should be checked after the next 20,000 km mark . Repair and adjustment are required if a fluid leak is detected due to ruptured hoses or when the clutch accelerator stroke is increased. Even a novice driver can set the pedal free play. To do this, it is first important to make sure that there is no air in the hydraulic system.
First of all, fill the drive reservoir with liquid to the required level, put the hose on the bleeder valve and unscrew it half a turn. Dip the free end into a jar of liquid. Now push the clutch all the way in so that all the fluid flows out. Close the valve and release the pedal. Add the missing amount of liquid to the tank and repeat the entire process in the same order. The system is considered to be pumped if the leaking liquid does not contain air bubbles. Then it’s time to screw the valve and close it with a protective cap.
Don't forget to check if there is fluid in the drive tank; if necessary, add it immediately. Now is the time to turn to direct adjustment of the pedal.
Motorists magazine
The Chevrolet Niva has long established itself as a reliable car with good off-road qualities. The car is equipped with a manual transmission, which receives engine torque through a standard single-plate dry clutch.
The SUV's clutch is constantly closed with a central diaphragm spring and is driven by a hydraulic drive. A reinforced clutch is also installed on a Chevrolet Niva, it differs in that it has a larger diameter, has a much more powerful damper, double damper springs, and has a thicker disc.
Over time, as with all other cars, the time comes when it is necessary to repair and replace the clutch.
There are several ways to check the clutch , namely:
- You need to put the gear in neutral and start the engine, wait until it warms up to normal temperature and after the engine starts running at minimum speed, depress the clutch pedal and engage reverse gear. If the gear engages easily, then the clutch is working properly, but if you hear squeaks when the gear is engaged, then the clutch needs to be repaired;
- While driving, you can also check the clutch. You need to change gears one by one and listen to see if there are any extraneous noises; if so, you need to go to a service station;
- Also, if the clutch malfunctions, it begins to slip; when you pick up speed, the engine picks up speed, but the car just keeps going. In this case, it’s also time to go to the service station.
If the clutch doesn't work, don't immediately panic and go to the store for a new one. Perhaps you just need to bleed the hydraulic drive.
How to bleed a hydraulic drive?
When bleeding the hydraulic drive, the very first thing to do is put the hose on the valve of the working cylinder, and lower the other end into a container with brake fluid. After this, you need to press the clutch pedal and hold it, this must be done five times. Next, open the valve and release the air, this must be repeated until liquid flows.
Replacing clutch cylinders
In some cases, it is necessary to replace the clutch cylinders. The Chevrolet Niva clutch master cylinder requires replacement if the system does not turn on or turns on poorly. When replacing, you need to pump out all the fluid and disconnect the clutch master cylinder from the hose, and when installing, repeat everything in reverse.
When replacing the working cylinder, you need to loosen the hose, remove the working cylinder bracket, remove the pusher and after that, remove the working cylinder itself. After installing the new one, we bleed the system.
Also, sometimes clutch problems arise due to incorrect settings of the clutch pedal itself. Adjusting the clutch on a Chevrolet Niva is very simple: first you need to loosen the lock nut on the cable, and then adjust the clutch pedal travel. The free play of the clutch pedal should be 1-3 mm.
How much free play should the pedals have?
The clutch accelerator will require a change in cable length if the fork free play exceeds 3mm. To check it, you need to move the fork back. If this value does not correspond to this value, the clutch pedal free play is adjusted using a special nut located on the threaded part of the cable.
Not only the clutch assemblies need periodic adjustment, but also the brake drive mechanism, since over time it will naturally wear out, that is, an increased amplitude of the pedal will form. As manufacturers recommend, after even a new car has traveled 2,000-3,000 km, it is necessary to check the technological clearances in the brake system components.
With a working brake mechanism, the unimpeded accelerator stroke (with the engine turned off) should be within 5 mm. If there is a lot of free play in the brake pedal, the gap is set by moving the brake light. What are the dangers of regulatory violations? In the absence or extremely small stroke, spontaneous braking may occur, which leads to overheating of the pads and brake drums.
How to adjust the Niva Chevrolet clutch with your own hands: video
Adjusting the clutch on a Chevrolet Niva
Knowledge of the structural design of the mechanism provides the basis for starting an independent adjustment procedure.
The process is considered an inevitable stage of repair in the case of:
- Exceeding the standard pedal travel, which leads to incomplete disengagement of the clutch. In this case, the driven disk is not completely adjacent to the flywheel with its plane. The situation comes down to intense wear of the lining.
- Small free play causes slipping of the ferrado (lining), that is, incomplete pressing of the disc. This reduces torque and reduces engine power.
- The appearance of a jerk, creaking, noise, shock in the transmission when the clutch is abruptly engaged, starting off.
The episodes, one way or another, indicate incorrect adjustment of the pedal travel and bearing release. And this leads to a decrease in the resource of the driven disk.
Adjustment algorithm
- So, before starting the adjustment process, you should turn off the ignition. This procedure eliminates the possibility of an accidental flash under the piston and accidental starting of the engine.
- By moving the gearbox lever to the neutral position, a gap of 0.1–0.5 mm .
Such a small gap is sufficient to disengage the disk (driven) from engagement. It is regulated by the pedal travel limiter. Move the lever to neutral position. - Its free distance should not exceed 3 mm . Otherwise, loosen the locknut and rotate the bolt to fix the stroke and tighten the locknut.
- The free movement of the working cylinder pusher (4–5 mm ) is regulated by loosening the stop nut.
- The last part, also located on the pusher, is tightened with a lock nut. By the way, a special template is used to determine the stroke of the pusher.
Features of the clutch on the Niva Chevrolet
The clutch mechanism on the Niva Chevrolet is reinforced with a thicker, larger diameter disc with dual damper springs.
The pressure plate and driven plate are balanced as an assembly and are called a basket or shaped cup. The unit is housed in a cast aluminum casing with a wide plane attached to the engine. The drive (pressure) disk is replaced only if the contact plane is severely worn or the springs are defective.
The Niva Chevrolet clutch is self-adjusting automatically by the working cylinder. Omitting minor parts, the unit, if repairs are necessary, is replaced as an assembly.
Components
The driven disk with a riveted friction lining is located between the flywheel and the drive disk of the shaped cup. The disc splined bushing sits loosely on the input shaft.
Replaced when worn, if the thickness of the lining decreases to 0.2 mm and the rivets begin to leave scratches on the pressure plate.
The cause may be axial runout, weakening of rivets, cracks, breakages, or scuffing on the friction material body.
It is installed with the protruding part of the hub in the direction of the shaped basket. In this case, the centering pin should align with the hole in the hub.
The stamped shaped clutch release fork has a recess for a ball joint and its two ends rest against the release bearing clutch. The ends of the fork, periodically wearing out, are restored by welding pads on them to the thickness of the factory sample.
The release bearing is sealed , maintenance-free, and does not require flushing. Moves along the cylindrical part of the sleeve. The appearance of noise or whistling at the moment of squeezing indicates the need to replace the bearing.
The pedal assembly is connected to the master cylinder located in the engine compartment. Together with the pusher, it forms one unit with the piston of the main unit.
The main, working hydraulic mechanisms are communicated through a steel tube and a reinforced hose. The slave cylinder is mounted on the clutch housing using a bracket.
When the pedal is pressed, the main piston creates fluid pressure, which causes the pushrod and fork to move the release bearing clutch.
DOT-4 brake fluid , the reserve of which is contained in the reservoir and communicates with the main one through a hose. Hydraulic bleeding is provided by a fitting located on the (working) cylinder.
Measuring and adjusting the free play of the brake pedal
In all the described cases, the car owner should look into the mechanisms of his vehicle. How to make the adjustment? First, we will describe how to measure the pedal stroke and then correct shortcomings in this value. You should:
- Place the car on a level surface.
- Press the brake until the pedal stops and lock it in this position. The easiest way is to use a hammer.
- Place a ruler next to the pedal, resting its end on the floor. Mark the distance of the pedal from the floor.
- Release the pedal without lifting the ruler from the floor. Place the upper part of the ruler on the accelerator and take measurements.
- Press the pedal until you feel noticeable resistance. Take measurements. The difference between the top position and the last reading will be the amount of free play.
After receiving the results, it will become clear whether adjustment of the brake pedal free play is necessary. If it is still required, then to do this you need to loosen the brake light lock nut only 1 turn. By screwing or unscrewing the switch, set the required gap between it and the brake pedal. After completing the described adjustment, tighten the lock nut and re-check the stroke as described in the previous paragraphs. The clutch accelerometer is also adjusted by a nut, it is located on the cable.