Active participant
Khabibulin
Participant
Nottingham
Newbie
I changed it, the neck of my gas tank was completely rotten, I bought it for 1000 rubles. In good used condition.
Active participant
I changed it, here is the report - replacing the gas tank neck
1. I googled a little for maximum similarity with our neck. I chose from Daewoo Nexia. 2. I went for analysis and bought it in excellent condition for 500 rubles. At the same time, the neck is made of plastic (does not rot) 3. I removed the original one - two clamps on the gas tank, three screws under the cover on the wing. And I also cut off the braided wire connecting the original neck to the frame. 4. An attempt to replace “as is” failed due to excessive length at the donor neck. It was not possible to bend it reasonably. 5. Attempt No. 2 - install by cutting off the excess - failed due to different diameters at the point of connection to the gas tank. 6. On the third attempt, I installed only the neck, connecting the original hoses from the neck to the gas tank. True, I had to make a little extra work by filing the holes for attaching the neck under the cover on the wing. 7. Did a test refueling. Nothing is flowing.
Pros: 1. Cheap. 2. Available. 3. Easy. 4. The original cover remains.
Cons: 1. The hole for the gun is small. It is not clear whether it is possible to leave the gun turned on unattended. 2. I’m not entirely sure, but when I opened the gas tank cap I heard a pop.
How to remove the gas tank filler neck and install it correctly
I installed the neck incorrectly. I will turn it counterclockwise by 90 degrees.
We're sorry, but the requests coming from your IP address appear to be automated. For this reason, we are forced to temporarily block access to the site.
To continue, please enter the characters from the image in the input field and click "Submit".
Cookies are disabled in your browser
. We will not be able to remember you and correctly identify you in the future. To enable cookies, follow the tips on this page.
Why did it happen so?
Perhaps the automatic requests do not belong to you, but to another user accessing the network from the same IP address as you. You need to enter the characters into the form once, after which we will remember you and be able to distinguish you from other users exiting from this IP. In this case, the page with the captcha will not bother you for quite a long time.
You may have add-ons installed in your browser that can make automatic search requests. In this case, we recommend that you disable them.
It is also possible that your computer is infected with a virus program that is using it to collect information. Maybe you should check your system for viruses.
If you have any problems or would like our support team, please use the feedback form.
Arrangement of elements
| Pos. | Spare part no. | Name |
| A | — | Option 110 |
| B | — | Option 90 |
| 1 | — | Fuel system radiator |
| 2 | — | Fuel filter |
| 3 | — | Fuel tank |
Fuel filler neck with cap
The fuel filler neck is located on the panel in the right rear quarter, behind the hatch. The sunroof is opened by an electrical switch on the instrument panel that controls the release solenoid.
The filler hole is closed with a plastic cap on a thread that screws onto its neck. The cap is ratcheted to prevent overtightening and provides a seal around the neck to prevent fuel vapors from escaping. The filler cap has a valve that releases excess fuel pressure to the atmosphere at approximately 0.12 - 0.13 bar and opens in the opposite direction at a vacuum of approximately 0.04 bar.
The filler hole is connected to the fuel tank via a molded, flexible, high-density polyethylene (HDPE) hose.
Design and operation of a fuel tank in a car
Now that we understand how many liters of gasoline a fuel tank can hold, we can talk about its design. On passenger cars it is placed in the rear of the body, under the passenger seats. At the same time, it is covered with a durable metal plate to avoid deformation during a collision, and is also insulated from overheating using special heat-insulating gaskets.
Read more: New cars are more expensive than 5,000,000 rubles
The next thing that needs to be said is that gas tanks nowadays come in different shapes, these features depend on the car model, engine size and other similar differences. At the same time, the principle of operation remains similar, there are only small differences that do not affect the overall operation.
Car tank design
The part to start with is the fuel tank cap with a lock and the hatch that closes it. Immediately behind the cap there is the only part of the system that is visible to the naked eye - this is the neck of the fuel tank, through it, or rather through its filler part, fuel enters the “gasoline storage”.
Next, the neck is connected to the gas tank pipeline. The diameter and cross-section of the pipeline are such that the filling capacity is 50 liters of fuel per minute (quite an impressive figure, considering that the total volume of the fuel tank is about 55 liters).
The next extremely important part is the electric fuel pump. With its help, gasoline enters the general engine system at the required pressure. The pump is also equipped with a special sensor that shows the level of gasoline filling the fuel tank. If there is little fuel left, the corresponding light on the dashboard will light up. It must be said that this must be monitored, because if there is constantly not enough gasoline, the pump will run idle and may burn out.
The fuel tank is one of the main components of any car. Even if this car is refueled with gasoline or diesel, it must have a gas tank, because otherwise there will be nowhere to fill the fuel. Also, for obvious reasons, it is very important that the gasoline container is sealed, durable, located in a protected location and has a locking fuel tank cap.
Fuel tank
Let's start with the fact that the volume of the fuel tank in passenger cars is on average 55-65 liters (of course, it can be 35 liters or 85). Regardless of the class of the car, the fuel used and other characteristics, this displacement should be enough to cover a distance of 500 kilometers or more.
Materials for the manufacture of fuel containers in cars are divided into three types:
- Steel
- Aluminum
- Compressed polyethylene (plastic)
Regarding these three materials, modern fuel tanks for passenger cars are made of plastic.
This is done due to the fact that plastic is not susceptible to corrosion and its molecular density is ideal for flammable substances.
And to increase the strength of the gas tank, the walls are thickened with additional layers, so the output is an excellent sealed container for fuel that can withstand high pressure.
As for metal gas tanks, sheets of metal are welded during their production. These gas tanks are best suited for diesel. Aluminum materials have taken root best in the use of liquid gas.
The volume of the fuel tank of a modern car, as a rule, allows you to travel at least five hundred kilometers. It does not matter what is used as fuel - gasoline, diesel fuel or liquefied gas.
So what is this important element of the fuel system?
A fuel tank is a container for safely storing a certain type of fuel, preventing its leakage and emissions due to evaporation. It is installed in the most protected place.
So, on passenger cars it is usually placed under the rear seat, since this area is least susceptible to deformation in a rear impact. On trucks, the tank or tanks are located along the sides between the front and rear wheels.
The tank is attached to the car body or frame with strap clamps. To provide it with additional protection from damage, the lower part can be covered with a metal sheet. To avoid heating of the tank and its contents from parts of the exhaust system, thermal insulating gaskets are used.
Three materials are used for the manufacture of tanks: steel, aluminum and plastic (high-density polyethylene). The latter is most often used in the production of passenger cars.
Plastic is convenient because it allows you to make the best use of the installation space and make a container of any shape, which means getting the maximum capacity of the fuel tank.
The main advantage of this material is that it is not susceptible to corrosion. However, at the molecular level, plastic is permeable to hydrocarbons.
To prevent micro-leakages, tanks are made multi-layered, and the inner surface in some designs is coated with fluorine.
Metal tanks are welded from stamped sheets. Aluminum is used to store diesel fuel or gasoline, and steel is used for gas.
The volume of the fuel tank of a modern car, as a rule, allows you to travel at least five hundred kilometers. It does not matter what is used as fuel - gasoline, diesel fuel or liquefied gas. So what is this important element of the fuel system?
A fuel tank is a container for safely storing a certain type of fuel, preventing its leakage and emissions due to evaporation. It is installed in the most protected place. Thus, on passenger cars it is usually placed under the rear seat, since this area is least susceptible to deformation in a rear impact.
On trucks, the tank or tanks are located along the sides between the front and rear wheels. This is due to the fact that most impacts in the event of an accident are one way or another in the forehead, and the chances that someone will fly into the side, and even more so into the fuel tank, are quite small.
The tank is attached to the car body or frame with strap clamps. To provide it with additional protection from damage, the lower part can be covered with a metal sheet. To avoid heating of the tank and its contents from parts of the exhaust system, thermal insulating gaskets are used.
Dear readers, I am glad to meet you again on the pages of the blog! This time I would like to talk about a machine component, which, at first glance, is very simple and, it seems, does not deserve a separate article dedicated to it. But this is, in fact, a mistaken opinion. Today we will look at the design of a car’s fuel tank and the design features of this important unit.
Fuel tank
The fuel tank is located at the bottom of the vehicle, between the chassis side members.
The support is attached to the chassis with six screws. When the mount is attached to the chassis, the tank is protected by foam pads adjacent to the chassis center cross member. Additional protection is provided by a protective cover, which is installed in the front right corner of the tank.
The fuel tank is made of HDPE. The fuel tank is a sealed unit with the only possible access to the inside through a hole in the fuel pump module flange located at the top of the tank.
The reflective metal coating is attached to the tank with two threaded rivets and serves to protect the tank from heat generated in the exhaust system.
How to replace a gas tank in cars
Replacing your vehicle's gas tank is a simple project you can do yourself to save on costly repairs. Rust, severe dents, or leaking tanks are all candidates for replacement vehicles. The tank is located at the rear of the vehicles directly below the cargo compartment. It is held in place by two steel straps that attach to the frame rails and run underneath the tank, keeping it snug against the many fasteners on the body. It can be helpful to have a second person on hand to balance the tank during removal and installation, but this can be done yourself if you don't have help.
Under the hood:
- How to Replace the Gas Tank on a Jeep Cherokee
- How to Replace the Gas Tank on a Ford F-150
- How to replace the gas tank on a Subaru Legacy
How to Replace the Gas Tank on a Jeep Cherokee
Make sure your gas tank is empty or drain the gas using a siphon hose before removing it.
Raise the rear of the Jeep using a floor jack located under the rear differential. Place the jeep on a set of jacks under the rear axle struts. Work on a level, hard surface to prevent the Jeep from moving.
Place a jack under the old tank to support it as you remove the bolts. Locate the two nuts on the J bolts at the front of the tank. Remove the nuts using a deep socket and a ratchet or wrench. If the bolts are heavily rusted, you may need to cut them with a reciprocating saw and replace them.
Once the J-bolts are removed, let the straps fall to the ground and slowly begin to lower the tank using a house jack. On the front of the tank you will see the electrical connections and fuel lines that attach to the tank.
Remove the fill hose from the filler inlet on the tank using a screwdriver to remove the hose clamp.
Remove the fuel lines from the tank. On older models, you will need a screwdriver to remove the clamps and rubber hoses. On newer models, you will need a fitting removal tool, which can be purchased or rented at most auto parts stores.
Disconnect the electrical connections from the body of the Jeep to the tank and lower the tank to the ground. Remove the tank from under the Jeep so you can remove the fuel pump and sensor from the tank.
Position the retaining ring that holds the fuel tank unit and the fuel sending pump in the tank. Remove it by turning it counterclockwise until it unlocks. Use a flathead screwdriver and hammer to turn it, being careful not to damage it.
Remove the sender and pump from the tank and install it in the new tank, oriented the same as it was in the old tank. Install a new gasket and retaining ring to secure it.
Position the new tank under the Jeep and jack it up until you can reinstall the fuel lines and electrical connections. Raise the tank all the way and support it with a jack and a piece of wood.
Install the filler hose onto the tank inlet and secure it with a clamp. Tighten it with a screwdriver, but do not tighten the clamp too much as this will damage the rubber hose.
Lift the tank all the way into the Jeep and install the tank support straps. Install the nuts on the J bolts and tighten them until the straps hold the tank securely. It should be snug, but don't tighten the nuts so tight that you press or crush the tank with the straps.
Place a jack under the rear differential housing and lift the Jeep off the jack stands. Remove the stands and lower the Jeep to the ground. Add fuel to the tank, check for leaks, and test drive the Jeep.
Items you will need
- Siphon hose (optional)
- Jack
- Jack is standing
- SAE and Metric socket
- SAE or Metric wrench set
- Reciprocating saw
- Screwdriver
- J bolts
- Fuel tank
- Fuel Tank Belts
How to Replace the Gas Tank on a Ford F-150
Slide the floor jack under the rear of the F-150 and raise the jack until the head touches the bottom of the gas tank.
Open the fuel tank cap and disconnect the fuel filler flange with the socket kit. If your F-150's gas tank has a removable filler neck, you don't need to do this. If the tank and filler neck are one assembly, depending on the year and configuration of your F-150, you may need to access the flange fasteners from below.
Unscrew the fuel tank mounting straps and let them hang. Slowly lower the fuel tank using a house jack while a helper holds the tank steady. Once it's down a few inches, reach down and disconnect the wiring harness from the fuel pump and fuel lines. On a newer model F-150, you may need to disconnect the fuel filler neck at this point.
Lower the tank all the way, making sure no lines or filler neck are obstructing tank removal, and slowly guide the tank back and out from under the F-150. You may need your assistant for this.
Lift the tank off the jack and set it aside. Wrap a rag around the tip of the screwdriver and place the tip on the fuel pump retaining flange. Tap the screwdriver with a rubber mallet to loosen the ring and remove the fuel pump. Insert the pump into the new tank with a new O-ring.
Place the new tank on a jack and roll it under the F-150. Raise the tank until you can reconnect the fuel lines, wiring harness, and filler neck. Raise the tank as far as it will go, then return the retaining straps into place and reinstall the retaining strap bolts.
Reinstall the filler flange in the reverse order of how you removed it, if you had to remove it at all.
Items you will need
- Set of sockets
- Paul Jack
- assistant
- Screwdriver
- rag
- Rubber hammer
- New fuel pump o-ring
- New tank
How to replace the gas tank on a Subaru Legacy
Park your Subaru Legacy on a level surface. Lift the rear of the car into the air using a car jack and place the car on the jacks.
Remove the cover, remove the black negative connector on the battery and close the cover.
Wear safety glasses securely to protect your eyes from fuel.
Drain the remaining fuel into the faulty gas tank. Use the fuel siphon kit and place the hose into the tank from the gas tank cap, create suction using the vacuum pump from the kit and empty the tank into the drain pan.
Remove the exhaust manifold assembly that connects to your gas tank. Use a metric ratchet to remove the bolts. The exhaust manifold kit includes the exhaust pipe, muffler and attached fuel lines. Save the bolts for reassembly.
Remove the fuel filler tube attached to your Legacy's fuel housing outlet. Use your metric ratchet set to unscrew the fuel tank pipe and use a flat head screwdriver to remove the brackets that raise the pipe. Place the bolts and screws in a separate pile for the spare gas tank.
Remove the faulty gas tank. Use your metric ratchet set to remove the brackets, loosening the bolts holding the tank in place. Save the bolts.
Install a spare gas tank. Bolt the new gas tank using brackets and bolts starting in step 6 with a metric ratchet set. Securely fasten the brackets in place.
Connect the fuel filler tube to your Legacy's fuel outlet. Use the bolts and screws from step 5 to assemble them into place, securing the bolts and screws with a metric ratchet set and a flat-head screwdriver.
Screw the exhaust manifold assembly to the spare gas tank. Use the metric ratchet set and bolts from step 4 to reattach the assembly. Check the fuel lines carefully for leaks.
Items you will need
- Protective glasses
- Jack
- Spare gas tank
- Metric ratchet
- flat screwdriver
- Fuel siphon
- Jack is standing
Related articles:
- How to change a GMC gas tank
- How to Remove the Gas Tank on an F-250
- How to Replace a 1998 Chevy Blazer Fuel Pump
- How to replace a Ford Ranger fuel pump
- 1996 Cadillac Deville fuel pump installation
- How to Replace the Fuel Pump on Cadillac Cars
Fuel tank ventilation system
The filler pipe is equipped with a ventilation system, thanks to which air and fuel vapor are forced out of the tank during refueling and released into the atmosphere through the filler neck.
The breather outlet in the tank serves to control the "full fill" height of the tank. When fuel closes the outlet, fuel vapor and air are blocked from leaving the tank. As a result, the fuel filler pipe is “back-filled” with fuel and the fuel nozzle is cut off. The location of the outlet is such that when the nozzle is turned off, the space for fuel vapor is approximately 10% of the total tank capacity. By providing space for vapors, the Roll Over Valve (ROV) is always above the fuel level, allowing vapors to escape and ventilate the tank.
The ROV is welded to the top surface of the tank. The ROV is connected to the ventilation pipeline to the atmosphere. The ROV allows fuel vapor to pass through it during normal vehicle operating conditions. If the vehicle rolls over, the valve closes, ensuring the tank is sealed and preventing fuel from spilling through the ventilation line into the atmosphere.
The ventilation piping to the atmosphere includes a two-way valve that allows pressure to be released to one side and air to flow into the tank when the system is operating under vacuum conditions.
Half full or half empty?
Tank placement is a challenging task for engineers. After all, you have to take into account the load on the car, which, when refueling under a traffic jam, can fall on one side. We have to somehow divide the tank, turning it into a kind of butterfly. Well, or position it so that even when fully refueled, other devices compensate for the load on one of the sides. When choosing the location of the tank, the risk of damage in a collision is also taken into account.
Any tank is equipped with a ventilation system. In hot weather, fuel tends to evaporate, and the increased vapor pressure can even rupture the tank. And when gasoline or diesel fuel runs out, the pressure in the container drops - it can flatten. The ventilation system not only prevents this, but also traps fuel vapors, preventing them from being released into the atmosphere. A special valve prevents fuel from spilling when the car rolls over or rolls over.
As a rule, modern tanks also have an electric fuel pump module built into them. It is important to remember: pumps for modern car power systems do not like to run “dry”, as a result they quickly fail. Therefore, do not allow the fuel to run out completely, try to refuel as soon as the reserve light comes on, because the fuel pump is not cheap, and even the cost of replacing it...
Read more: Repairing a charger for a car battery, how to repair and troubleshoot
Fuel level sensor
The fuel level indicator sensor is located inside the fuel tank. The sensor assembly assembly is accessed through an opening in the top of the tank. The block flange is fixed in working position and sealed using a steel retaining ring.
The fuel sensor assembly includes a top cover flange that contains an electrical connector for connecting the sensor and two steel fuel line connections.
The flange is sealed by a rubber seal installed between the flange and the retaining ring housing.
The top cover is attached to the swirl chamber assembly using two spring-loaded steel struts. Springs securely fix the vortex chamber at the bottom of the tank.
The vortex chamber ends with a cavity in which the fuel level indicator sensor is located.
How does a car's gas tank work?
Tanks for different car models have different structures. The reason for this is the desire of engineers to make the best use of the available installation space .
Moreover, the design of the fuel tank may vary even for the same model. This depends on the type of body and engine; it can also be influenced by the design of the injection system and fuel system, and the climate version.
The filler neck is used to fill the tank. This is the only part of it that can be seen from the outside of a car. The neck is located on the right or left above the rear fender. This is not of fundamental importance, it is just a matter of habit.
True, for some distracted drivers it is better for it to be on the same side as the driver's door, this will minimize the risk of leaving the gas station with a fuel nozzle in the tank.
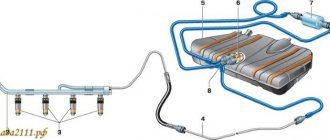
The filler neck is connected to the tank by a pipeline. Its cross-section provides a throughput of up to 50 liters per minute. The neck of the fuel tank is closed with a screw-on lid, and everything is hidden from the outside by a hatch that can be opened from the passenger compartment using a mechanical or electric drive, or manually if there is no lock on it.
Fuel enters the power system through an intake connected to the fuel outlet line; excess fuel flows back through the fuel drain line. The intake is closed with a mesh designed for rough mechanical cleaning of fuel.
For diesel cars, the intake can be equipped with a fuel heating system. Many diesel owners replace the standard intake with a heated one, or purchase heating nozzles.
An electric fuel pump is placed in the fuel tank of a car with a gasoline engine, which pressurizes the fuel into the system. The fuel level in the tank is controlled using a sensor combined with a pump into one device.
The sensor consists of a float and a potentiometer. When the fuel level changes, the float rises or falls, causing the resistance of the potentiometer to change. As a result, the voltage in the circuit changes, and the arrow on the dashboard changes its position.
If the fuel tank has a complex structure or large volume, two sensors can be installed in it, operating in parallel.
To properly supply the engine with fuel, atmospheric pressure must be constantly maintained in the tank. The ventilation system copes with this function. It neutralizes the vacuum that occurs during fuel production (the fuel tank ventilation valve is used for this), helps remove excess air that gets inside during refueling, and does not allow the pressure in the tank to rise excessively due to heating of the fuel.
Design and operation of the fuel tank ventilation system
Due to vacuum, the container may become deformed, resulting in:
firstly, the volume of the fuel tank will decrease; secondly, the fuel supply may stop. There is also the possibility of damage to the intake or fuel pump. If the pressure is too high, the container may simply burst.
Modern cars are equipped with a closed-type ventilation system. In other words, the tank does not have direct contact with the atmosphere. Despite the fact that the design of this system differs on different machines, they have a number of common elements.
The fuel tank ventilation valve is struggling with vacuum. In essence, this is a regular check valve that opens at the moment when the vacuum in the tank reaches a certain value. After it opens, the internal pressure equalizes the atmospheric pressure.
During refueling, fuel vapors are removed using a vapor recovery system through a ventilation pipeline, after which they enter the adsorber, where they condense. When the adsorber capacity is full, its purge system is turned on, and the fuel enters the intake manifold and mixes with the working mixture. In a similar way, the pressure that increases when the fuel tank heats up is released.
Fine fuel filter
The fuel filter removes particulates from the fuel and also separates water that accumulates at the bottom of the filter.
The fuel filter is located on the chassis to the right of the fuel tank. Fuel supplied to and returned from the engine passes through a filter. Connections are made using quick-release devices.
The rear steel cover is secured to the chassis side member using four M8 threaded screws.
The filter is screwed to the mounting plate with two M8 threaded bolts.
The steel protective cover is secured to the back cover using a special lock with a 1/4 turn.
The filter is equipped with an internal air venting device, which ensures that air enters the engine along with fuel only in small, controlled quantities.
The thermostatic diverter valve is fully closed at 45 degrees Celsius and directs fuel directly into the tank. When the diverter is open, fuel is recirculated through the filter to the engine.
The fuel filter is equipped with a replaceable cartridge-type filter element with a threaded fastening, which is sealed against the filter housing with rubber seals. The lower section of the cartridge is equipped with a threaded tip for draining water.
In countries where low quality fuel is used, cartridge life may be reduced.
Fuel tank: device, types, principle of operation
An automobile fuel tank is an important structural element of the internal combustion engine fuel system. The main purpose of the tank is to store automobile fuel, and this can be, for example, gasoline, diesel fuel, gas, etc. The functions of the fuel tank also include preventing possible fuel leaks and preventing emissions of harmful substances formed during the evaporation of fuel.
In passenger cars, fuel tanks are usually installed directly under the rear seat in the maximum protected area from a rear impact. To securely fasten the tank to the car body, special tape-type clamps are used.
The bottom of the tank on some cars is protected by a metal plate. To protect the tank from overheating, which is possible due to the contact of the tank with the exhaust system pipe, thermal insulating gaskets are used.
Each vehicle has its own fuel tank, taking into account the design features of the vehicle. As a rule, they try to make the tank volume such that the fuel supply allows an average of 500 km to be driven. Diesel cars, as a rule, can cover a significantly greater distance on one fill-up due to their efficiency.
Fuel cooler
The fuel cooler uses coolant from the radiator to reduce the temperature of the fuel returned to the tank from the high pressure fuel pump.
The cooler is fixed to a bracket, which, in turn, is mounted to the inner left rail of the chassis. The bracket has two grooves into which the plastic protrusions of the cooler housing are inserted. The cooler is mounted on the bracket using an M8 threaded bolt.
The cooler is equipped with four quick-release connections. Fuel inlet and outlet; supply and return of coolant.
Low fuel level indication and run-dry strategy
The “run-dry” strategy is used to maintain the fuel system fill level close to the conditions of fuel depletion in it. It ensures that a minimum amount of fuel always remains in the vortex chamber.
A yellow light on the instrument panel lights up, warning of low fuel level (next to the fuel level indicator), that is, that there is no more than 15% left in the tank. The fuel gauge indicates that the tank is empty when there is still 11% fuel left in the tank.
When 4 liters of fuel remain in the tank, the run-dry strategy is initiated. Engine misfire occurs after approximately 1 mile (1.6 km), after which the engine stops. The engine can be restarted in misfire mode and will continue to run for another mile until the engine stalls again. This can be repeated until the tank inlet appears above the fuel level, causing the engine to experience fuel starvation and permanent loss of power. Restarts after stops in run-dry driving mode are not recommended.
Fuel tanks of passenger cars
To roughly understand the numbers, you need to refer to the technical parameters of the cars.
The new Lada Vesta from the Russian concern AvtoVAZ is equipped with a tank with a capacity of 55 liters. This is a fairly high figure, and its closest competitors - Kia Rio and Hyundai Solaris - are equipped with 43-liter tanks. The larger Volkswagen Tiguan is equipped with a tank with a capacity of 58-64 liters (depending on the specific modification), and such huge cars as the Toyota Land Cruiser, with high fuel consumption, have 93-liter tanks.
As for sizes, this is much more complicated. Some manufacturers make rectangular tanks, the size of which can be approximately 60x40x20 cm. There are tanks with completely different sizes, and some manufacturers adapt these fuel containers so that they fit into the design. Their size cannot be described by three or four parameters.
As for trucks, the KamAZ vehicle is popular, the fuel tank of which, depending on the model, can have a different volume. The minimum capacity is 125 liters. However, due to high fuel consumption, KamAZ is not able to travel a long distance (and even with a load) on such a tank, so the manufacturer has provided other tanks that are used on this vehicle. Thus, the KamAZ fuel tank can have a capacity from 125 to 600 liters in increments of 50 or 40 liters.
There may also be non-standard modifications of 700 liter tanks. The fact is that not only the manufacturing plant produces fuel containers, third-party manufacturers can also do this. In general, there is little chance of finding products on the market; most often you will find tanks from third-party manufacturers.
The second popular truck is GAZelle. Despite the fact that this vehicle is a truck, the GAZelle’s fuel tank holds only 60 liters of gasoline. And this is very inconvenient, given that the car’s fuel consumption is quite high. Consequently, when driving long distances you have to take extra fuel cans with you.
Read more: How a turbocharger works
Some owners of these cars replace the old, small tank with a new one. Third-party manufacturers produce fuel tanks for GAZelle with a capacity of up to 150 liters.
All this allows us to conclude that the fuel tank is a changing, not a constant quantity, and it is different for different cars. Even two identical models can use completely different fuel containers with different capacities.
Huge trucks like SCANIA 113 even have tanks of 450-500 liters. The DAF XF can have a fuel capacity of 870 liters, while the heavy-duty MAN F90 truck has a 1,260 liter tank. This is simply an incredibly large capacity, and the small 45-liter tanks of passenger cars look simply ridiculous in comparison.
Mitsubishi Eclipse slut carrier › Logbook › Fuel tank filler neck repair!
...And I thought I had a lot of fuel, but it turns out it’s flowing by...
In general, immediately after buying the car, I went to the gas station, fed the horse, inserted the gun, locked the lever, and went to the cashier to pay “to the full.” I stand, stand... And then I decided to go out to the car. I look, and under the car there is a puddle the size of Lake Baikal! I immediately took out the gun, scratched my turnip and returned to the seller, and he explained to me that I needed to fill it a little at a time, because... The tank was changed, and the neck was not adjusted... Well, ok! And so I suffered for almost three months, I even learned to “write” at a gas station so that gasoline would not leak out. But it still leaked out, only I didn’t see it anymore, because... assembled in the lower casing...
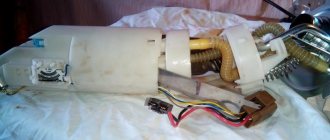
So, here we go! I did everything at home, using only a jack, no holes or lifts. Behind the wheel under the neck there is a casing, it is attached to clips, I saw only two, I picked them out (immediately for ejection), I did not see the two on top, but they came off easily. Immediately before my eyes is this picture:
But gasoline flowed into this lower casing and accumulated there, so I did not see that gasoline was spilling.
I thought about taking out the neck, so I unscrewed the lid glass; it was held on by two of the three bolts (the bolts on 
Theme Options
Search by topic
Report: On the restoration (replacement) of a rotten gas tank filler pipe (team)
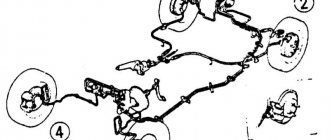
When trying to refuel, a stream of gasoline and a puddle on the asphalt were discovered under the car. Upon closer examination, the following emerged. The filler pipe (from the neck to the gas tank) runs outside the body in the wheel arch and is protected by a plastic casing. The space between the casing and the body was completely clogged with earth, and in such conditions the pipe rotted to the point of delamination of the metal, even gasoline began to leak through it. Traces of rust also appeared on the body itself in this place.
Repair options include replacing the pipe with a new one (from 5,000 on Exist) or from disassembly, or replacing it with a gas-resistant rubber hose with clamps (so far I like this option better).
I wrote it just in case someone might find it interesting and useful. Just in case, take a look at how things are going for you.