How to clean a fuel pump
The fuel tank is the main location of the fuel pump. Its operating principle is that the control unit, immediately after turning off the ignition, forces the gasoline pump to turn on and continue its operation for some time. And this makes it easier to start the engine next time.
The crankshaft position sensor is activated when the engine rotates. The control unit immediately starts the gasoline pump when receiving the signal. But if this signal is not received from the sensor, the gasoline engine, as well as the electric pump, will be stopped. This property increases the battery life. There is a separate relay that helps control the pump in the control unit. If the fuel pump does not turn on, then the first thing to check is the relay.
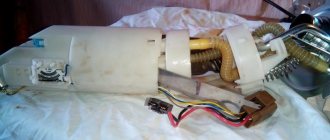
The uniqueness of Nissan Almera (Nissan Almera) is that the fuel pump has an integrated design, which has a filter designed to clean the fuel. Replacement can only be done together, that is, assembled, since the structure cannot be separated, because it is one-piece.
But this operation is expensive. As a result, we can suggest cleaning the fuel pump on your Nissan. (Although if you still decide to replace the fuel pump, the steps are almost identical to preparing for cleaning).
To clean the fuel pump, you first need to remove it.
Now you can start replacing the filter:
- First you need to remove the rear seat cushion.
- Remove the filler cap and relieve pressure if you have not already done so.
- Unscrew the three black mounting bolts of the inspection hole cover. These bolts are most often plastic, so be careful. For this procedure you will need a wrench.
- Remove the return hose, which is secured with a latch. Press the latch.
- Place the container under the hose, from which up to half a liter of fuel will flow out.
- Now you need to remove the second hose, from which fuel will no longer flow. Be careful when handling hoses. There is a high probability of damaging them.
- Disconnect the harness and float connectors for measuring the fuel level in the tank.
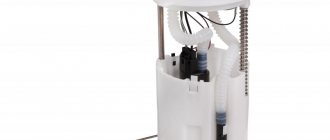
- Take out the fuel pump assembly, which is a metal casing.
- Now you need to carefully disconnect the fuel hose.
- Remove the pump casing, having first removed the float with another sensor.
- Now you have reached the fuel filter. Replace the necessary parts, after cleaning the seats. It is also recommended to clean the strainer on the fuel pump.
- Assembly is carried out in the reverse order of dismantling.
- Reinstall the fuse for the fuel pump.
- Start the engine and check the engine's performance and overall behavior.
Replacing a fuel filter or fuel pump, or even simply cleaning it, takes no more than one hour. It is strongly recommended that all operations be performed with gloves.
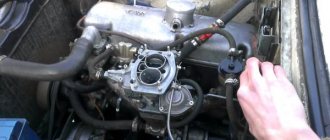
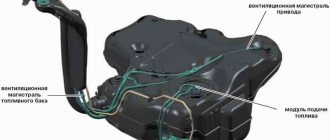
Removing the fuel pump
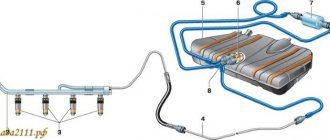
First you need to remove the rear seat element. The gasoline pressure must be relieved in the fuel line. The fuse box, which is located under the dash on the driver's left side, must be open. There is usually a marking on the top (cover) that makes this fuse easy to find as it is labeled FUEL PUMP. It should be in the second column (fourth from the top), and also have the designation 15A. The fuse must be removed from the socket. Start the car, and after 3-5 seconds the engine will stall on its own. This action must be repeated until the engine no longer starts (this usually works after 3-5 attempts). After that, wait a minute and repeat the steps. If everything is done correctly, the pressure will be released almost to the limit, that is, to the end.
If you do not want to find the fuse, you should disconnect the connectors from the flange (located under the seat) of the fuel tank. There is no need to remove the hoses immediately.
You need to remove the filler cap and then relieve the internal pressure in the gas tank. We unscrew the three black plastic bolts and remove the hole cover for inspection. Afterwards, the large plastic nut must be unscrewed by hand. We should be able to see a white glass, where the fuel pump is installed. This is a cylinder measuring 10 by 3 centimeters. Some models have an internal mesh, which is usually yellow with dirt.
The return hose must be removed by accurately pressing the plastic latch. This hose extends from the beginning of the engine, as well as an arrow that is directed to the fuel pump. With a little pressure, approximately one small glass of gasoline will flow out of the hose. The second hose will also need to be disconnected, but in this case nothing will leak out. The most important thing is that you need to be careful so that they are not damaged when removing them.
The connector with the harness must be removed and the fuel level meter, that is, the float located in the tank, disconnected. And then you need to remove the fuel pump itself.
Now you can start cleaning the fuel pump itself.
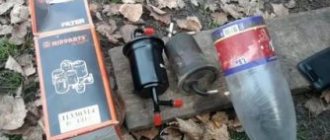
What tools are used during dismantling/installation
To carry out “technical treatment” you will need:
- set of wrenches;
- screwdrivers with flat and Phillips blades;
- cleaning agent, for example, acetone;
- you need to stock up on containers (up to 500 ml) to collect gasoline, which will definitely flow out of the pump hose;
- don't forget the rags. Don't skimp on this item.
This is interesting: Review of the Chevrolet Aveo hatchback and sedan: technical specifications, configurations and prices for 2020
Please note! For your own safety, when replacing the element in question, you should have a working fire extinguisher on hand.
Cleaning the pump
Attention! If this procedure does not produce results, then replacing the fuel pump is inevitable.
You should disconnect the fuel hose (it is always rigid), as well as the sensor and do not forget about the float. Then you need to bend the latches (there are 3 of them) of the pump casing. There, below, under the casing, there is a filter.
After cleaning, you need to assemble it all in the opposite order.
Materials used in these operations:
- rags (required quantity);
- small basin;
- a small glass, approximately 300 ml, to collect gasoline flowing from the hose;
- a fire extinguisher is a must (you never know what can happen);
- cleaning products (acetone, liquid intended for washing the injector).
This procedure takes an hour or two on average. Doing the work yourself can save you quite a bit of money, but it will get you a lot dirty.
Frequency of replacing the fuel filter
The resource of the fuel filter directly depends on the purity of gasoline poured into the Almera Classic tank. On average, mesh replacement is required after covering 35-50 thousand km. The fine fuel filter lasts longer. It will become necessary to change it when the mileage exceeds 80 thousand km.
Dirty mesh
Condition of the fine filter at 100 thousand km
Symptoms of the need to replace the fuel filter are presented below:
- the car drives jerkily;
- the fuel pump operates with extraneous noise;
- starting the engine is difficult;
- the dynamics of Almera Classic have deteriorated significantly;
- the power unit stalls during intense acceleration;
- The motor does not take the load well.
Pump relay
Knowing the exact location of the fuel pump relay in the Nissan Almera H16 is not so important. The element in H16 should be looked for on top of the fuse block, that is, on the cover. The most important thing is that under the hood the relay is located in a block. This rule applies to both Nissan Almera Classic and Nissan Almera N16.
Article number and approximate cost of the branded fuel filter Nissan Almera Classic and its analogues
Coarse and fine filters are included in the fuel cup. They do not have their own article numbers and are not sold separately from the module. Therefore, it is impossible to purchase branded filters on Almera Classic without purchasing a complete glass.
The original fuel module has part number 1704095F0B. Its cost varies from 12,000 to 18,000 rubles. There are also analogues of the original glass on sale. The table below shows the best alternatives to the original fuel module.
Table - Analogs of the fuel module for the Nissan Almera Classic car
| Company manufacturer | Article number | Estimated cost, ruble |
| Messmer | 770065A | 2300-2700 |
| Bosch | 986580908 | 2800-3500 |
| Blue Print | ADG06819 | 2200-2600 |
| HKT | GIP522 | 2400-3000 |
| Krauf | KR7537M | 3200-4500 |
The fuel module has a very high price, so it is irrational to completely change it if only the filters are clogged. Therefore, car owners found a way out of this situation.
Despite the fact that the original fine filter is not available for sale separately, there are identical consumables for other machines from third-party manufacturers. The table below shows brands of fuel purifiers that are suitable for the Almera Classic car.
Table - Fine fuel filters for a Nissan Almera Classic car
| Brand | vendor code | Approximate price, ruble |
| SCT | ST399 | 300-350 |
| Japan Parts | FCH22S | 400-450 |
| Nipparts | J1330507 | 300-350 |
| AMP | FF0820 | 500-600 |
| Sakura | FS2813 | 720-1000 |
Fine fuel filter
In addition to the fine fuel filter, third-party manufacturers also produce meshes. The most suitable consumables for restoring a glass are those presented in the table below.
Table - Fuel filter screens for a VAZ 2112 car with a 1.5 liter engine
| Firm | Catalog number | Approximate price, ruble |
| WEBER | 21121139200 | 55-100 |
| Cliff | 21121139200 | 95-120 |
| FARET | 21121139200 | 90-150 |
| Zommer | KRFS2112 | 130-210 |
| StartVolt | SFF0115 | 50-110 |
Relays in various versions of Nissan Almera
The fuel pump relay is usually located in the engine compartment; in this case, the marking of this element will be K5. The compartment will be located to the right of the battery, meaning on the passenger side. The lid is held in place with latches that are very easy to snap off. There is one more place where the required element can be located - this is the safety block. It is located next to the driver's right foot. There is a plastic cover that will need to be opened to access the relay. This relay is mainly blue in color.
How to determine a fault in a relay
The main sign of problems in the operation of the fuel pump is the failure of the pump, that is, it simply does not turn on. If the fuel pump on the Nissan Almera N16 does not turn on, then you should not immediately go for a new one; you should check the relay, which, most likely, is the main problem. You can check this assumption by replacing the relay with another one, which you don’t have to buy, since you can use what you already have.
We repeat, but this is important: if the fuel pump does not work, then you should check the relay, since in most cases this is where the whole problem lies.
Replacement
Replacing it is very simple, it is probably the easiest thing in the entire car maintenance list. Although this can be competed with by checking the oil level (which is very simple) or refueling (which is even simpler?).
The following algorithm of actions should be performed:
- First of all, you should open the hood.
- Then open the cover of the relay block (held on by latches (usually three)).
- Find the relay labeled K4. The large relay should be on the bottom left, two smaller ones above it, and what we need will be located on the right side of them.
- Pull out the element. The latches must be snapped off from below in order for the relay to be removed.
- Insert new.
In emergency cases, when you urgently need to drive, and there is no extra relay, you can use a mechanism relay, which you definitely will not need. For example, you can use a fog light relay.