Replacing the fuel pump: features, instructions
The fuel pump in the power supply system of an injection engine is an electromechanical device that pumps fuel from the tank, creating the required level of pressure in the line to ensure injection by injectors. Subject to operating conditions, the BN operates properly, on average 250 thousand km. However, if you drive with an empty tank, neglect to replace the pump screen, use low-quality fuel, or do not flush the tank in a timely manner, the fuel pump will need to be replaced much faster.
This mesh causes damage to the fuel pump.
Boosting and tuning the engine also affects the service life. Higher performance injectors installed on a car require reflashing the ECU while maintaining the standard fuel device, which begins to operate at the maximum limit, which leads to overheating and subsequent breakdown. These and the listed reasons, natural wear and tear, eventually require the driver to replace the fuel pump.
You can check the serviceability of the BN on an injection car by connecting a pressure gauge to the ramp. The noise when turning the ignition key in the form of a hum and buzzing indicates the operation of the pump - pumping fuel, creating pressure. If there are no operating signs, this may indicate a malfunction of the entire structure or its individual parts.
Common signs of failure are:
- Intermittent movement of the machine;
- Floating engine speed at idle;
- Reduced dynamic performance of the car;
- Retarded engine starting.
To begin the replacement procedure, you must remove the device. It is located in the tank, directly immersed in gasoline. In most cars, the fuel pump is located under the bottom in the rear. You can get to it through the salon.
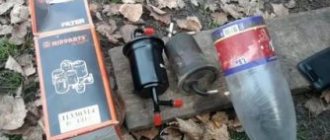
To dismantle the pump you will need the following tools:
- set of heads;
- open-end wrenches;
- tubular wrench;
- special key.
Despite the differences in the fastenings of devices of different brands, the principle of removal remains unchanged.
Important! Immediately before removal, it is necessary to reduce the pressure from the supply system.
This is done in two ways:
- disconnect the pump connector while the engine is running, wait until it stalls;
- release a certain amount of fuel by pressing the rack valve located under the hood.
Once the pressure has dropped, you can begin to dismantle the fuel pump. Be sure to disconnect the terminal on the battery during operation. Next, you should adhere to the following algorithm:
- remove the electrical connector (chip);
- loosen the clamps on the fuel lines (return line for returning gasoline to the tank, fuel supply pipe).
Now you need to remove the lines themselves from the fuel module. Before doing this, you need to pay attention to the type of attachment to the fuel pump terminals. As a rule, the standard fastening is unscrewed using a fitting using an open-end wrench.
DIY replacement
How to remove a fuel filter from a car tank
When performing a replacement yourself, you must follow the standard procedure - instructions. Upon completion of the resource, the old TF is dismantled and a new one is installed in its place.
A characteristic feature may be the location of the filter and other subtleties. To carry out dismantling, professional tools may be needed, the preparation of which must be ensured in advance.
On carburetor systems
On carburetor systems, the TF is located mostly under the hood. The material from which it is made is plastic or low-melting metal. As for installation, it is quite simple. It will be easy to replace even for a beginner.
- Release the clamps on both sides of the TF.
- Pull out the element.
- When installing a new one, do not confuse the direction of fuel flow (it is indicated by an arrow on the body). That is, it must be placed along the flow of fuel.
- After installing the clamps, you need to manually pump in fuel using a special manual pedal of a mechanical fuel pump.
Replacing a BMW fuel filter
If a slight whistling sound is heard during pumping, this indicates a seal failure. Using strong clamps, you can achieve reliable fastening.
Important! The TF should not touch the surface of the block.
On the injector
On injection internal combustion engines, fuel is supplied under high pressure. For this reason, the TFs of such systems are necessarily made of metal, fastening is carried out using threaded connections. Filters are installed on the injectors either in the engine compartment or under the bottom of the car.
Next you need to do this.
- Relieve pressure in the system by removing the required fuse (which is responsible for the fuel pump) from the mounting block.
- Start the engine and wait until it stops on its own.
- Dismantle the old TF and install a new one.
Once the replacement is complete, you must put the fuse back, and then try to start the engine. Most likely, the power unit will not start on the first try, since it takes some time to stabilize the operating pressure.
On diesel
On diesel cars, replacement is carried out taking into account the fact that the system is extremely sensitive to fuel quality. Due to a large amount of debris, the injector nozzles tend to become clogged, which negatively affects the performance of the engine.
Diesel fuel filter
Diesel engines have two types of TF: coarse and fine cleaning. The factory service life of the latter is no more than 20 thousand kilometers. Installed in the front of the car. Replaced like this.
- The wheel and fender liner are dismantled.
- The tray unscrews.
- The water sensor chip is disconnected.
- The fittings are removed.
- The removed elements are equipped with new rubber bands and copper sealing washers included in the kit.
- The water sensor and plug are installed on the new TF, after which it is secured to the car.
During installation, do not hit the water sensor with a hammer. The entire operation must be performed extremely carefully. If assembled correctly, the color markings on the TF body should match the color of the fittings. At the end, be sure to fill the filter with diesel fuel to prevent air from getting inside the diesel system.
You can also change the fuel injection filter with your own hands. The manual for using a foreign car almost always contains instructions on how to do this.
Do I need to change the entire module assembly?
Repairs are carried out after determining the cause of the malfunction:
- First you need to unscrew the fuel lines, then the pressure ring using a tubular wrench, depending on the brand and mounting options. There are indicator arrows on the fuel pump itself and other parts of the device (remember how they are located, this will help during reassembly);
- Remove the O-ring, and then carefully remove the BN from the tank without damaging the float sensors;
- There is a rubber seal on the seat of the fuel module. We also take it out by pulling it up.
The final stage of replacement is the installation of a new pump with the replacement of rubber seals, sold separately or as a set. During installation, ensure the correct position of the pump, paying attention to the arrows on the pump itself, rings and covers. In some cars they should converge in one line, in others the arrow on the pump should point to the rear of the car. Therefore, when removing it, it is recommended to remember the original markings.
Assembly is carried out in reverse order. It is recommended to tighten fasteners to the permissible torque. Elements that are overtightened may burst. If you don't tighten it, the pump will hang in the tank, which is also wrong. Upon completion of installation, you need to attach the lines, connect the terminal and power connector. During installation, it is important not to break the sensor for determining the gasoline level in the tank in order to avoid replacing them in the future.
Flushing the pump mesh is necessary if, during diagnostics, the fuel module does not produce the required pressure or operates at the maximum possible limit to maintain it. To clean it, you need to dismantle the BN located under the seat. In addition to the mesh, the gas tank itself will need to be flushed, especially if the vehicle has been in use for a long time. Such measures are necessary because debris and dirt in the tank can accelerate the failure of the new filter. After washing or replacing the pump filter, you need to clean the injection nozzles and the pressure regulator in the rail. Such measures will help eliminate extraneous noise in the pump.
When is it necessary to replace the fuel pump motor? Then, after washing, the BN continues to make noise. Replacement is also necessary in cases of low fuel pressure or sudden changes in fuel pressure, which are visible at the time of diagnosis using a pressure gauge. If the BN whistles or hums, this is also a reason for replacement. In this case, you can save money on repairs and not replace the fuel pump assembly. The pump is dismantled and then disassembled into parts. The motor is sold separately, the worn one is removed, a new one is installed. The fuel sensor and housing, if they are in good condition, are left from the old BN.
How to remove the quick release from the fuel pump?
It is necessary to carefully press the buttons on the sides of the fitting and pull it away from the fuel pump module. If the quick-release connector does not come out, slowly treat it with a liquid wrench, blow it with a compressor and repeat the procedure. After this, dismantling can be carried out.
Carefully remove the connector from the fuel pump module
When is it necessary to repair the contacts inside the module, or more precisely at the power terminal?
A restoration procedure is required when contacts burn out. As a rule, a burnt contact is the cause of insufficient current, and therefore low pressure in the system. Repair work can be carried out at a service center or repaired yourself. Let's consider one of the options on how to do this. We remove the pump chip and carefully look at the contacts. If one of them is burned out, it needs to be cleaned with a needle, the rest should be pressed onto the chip. To enhance the pairing, the contacts in the BN connector can be slightly bent. These measures will help return the fuel device to operating mode, without complete replacement.
Basically, this picture happens on VAZ fuel pumps
Replacement for VAZ ten
New Bosch fuel pump
A popular car that has a submersible pump installed. The procedure for removal is as follows.
- The negative terminal of the battery is removed.
- The pressure in the system is released. To do this, you can remove the fuse that controls the operation of the fuel pump.
- The seat of the rear sofa in the cabin is dismantled.
- There is a hatch covered with a lid under the seat.
- After removing the cover, a block with wires will be visible, which is disconnected from the harness. To do this, it will be enough to squeeze the plastic latch.
- Next, the clamp is loosened and the hose tip is pulled out, secured with a nut. Then the fasteners of the supply hose and return are unscrewed.
- It is immediately recommended to check the condition of the seals built into the hose tips. Their condition is checked for tearing, loss of elastic qualities, and drying out. Worn parts must be replaced.
- The pump is secured with 8 nuts and counter washers (with elastic properties). They must be carefully unscrewed.
- Now you can remove the pump, but this should be done extremely carefully. First of all, you need to lift and tilt the fuel pump to remove the FLS float (fuel level sensor).
Article on the topic: Auto scanner elm327 - review and reviews
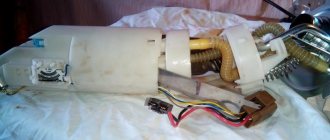
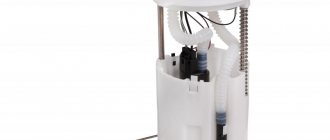
Fuel pump and its design
If the pump was able to be properly checked and verified that it is working, it is put back into place and all dry seals are renewed. If the fuel pump is damaged, it must be repaired or replaced.
Important recommendations for work.
- The fastening nuts must be tightened firmly, overcoming the resistance of the springs. However, it is important not to overtighten.
- When installing the drain hose, pay attention to its tip. It should face towards the front of the car, and the tip of the supply hose should face in the opposite direction.
- To prevent dirt from getting inside the mechanisms, it is recommended to blow the entire working area with air before removing the pump. Today there are quite convenient compressors on sale that pump air under pressure. In extreme cases, a vacuum cleaner is also suitable. It is especially important to do this on used cars, where a lot of dirt can accumulate over time.
The dismantling of the fuel pump on other cars is carried out in almost the same way. But it has its own characteristics.
Check the removed fuel pump
A malfunction in the pump does not always mean that the device itself is broken. The reason may be in any part or unit. For example, a common problem is a blown fuse. Each brand has its own location, which is described in the instructions. Often, you need to look for the fuse box on the left side of the steering wheel or under the hood.
To check the condition of the pump, diagnostics are needed. After assessing the condition of the fuse, the voltage on the device is checked. It is necessary to exclude damage related to the battery. Using a tester (multimeter), the voltage at the terminal is measured. No results? So you need to check the contacts. They must be in place and connected to ground. Oxidation or breakage of one contact can cause failure of the entire fuel module system. If a break is excluded, but the voltage reading drops by more than 1 volt, then the contact is oxidized or there is a problem in the wiring. If everything is fine with the contacts, then the problem is in the BN.
The operation of the pump will be checked according to the following scheme:
- Fuse. If the pump does not buzz when you turn the ignition, you need to check the plate on the BN fuse; it should be solid;
- Relay. If you don’t hear clicks from it, you need to check the relay coil for breaks by connecting a 12 V lamp to the contacts;
- Nutrition. To check the supply to the pump, it is necessary to connect a voltmeter to the connector; the operating voltage should be from 12 to 12.5 V. The resistance of the stator winding is measured at the moment the power is supplied;
- You can check the BN for functionality if you directly supply power from the battery. This test method will show the performance of the pump. Also at this stage it is recommended to check the level of contamination of the coarse filter;
- Pressure testing can be carried out in several modes: static and dynamic. Measuring the pressure in these conditions will show the performance of the injectors and check valve. The optimal pressure level is from 3 to 3.7 atm (depending on the brand of car). After the car is started, the pressure in the ramp should not drop sharply.
Dismantling
Removing the filter is quite simple. The work algorithm will depend on which access of the two above takes place in a particular Mazda troika model. If the filter is located under the rear wheel, you must disconnect all hoses that are present from the part. These are fuel pipes and must be handled with care.
Next in line are the mounting bolts. But there is no need to rush with them; before that, you should find the arrow on the filter, which indicates the correct installation position. It is best to make a mark right on the spot where the arrow was located exactly. This will help avoid problems in future installations. All that remains is to mount the new part in place.
If accessed through the interior, dismantling will be a little more difficult. The hatch can simply be cut out, while the tank will remain in place. You can disconnect the cover by lightly tapping it around the perimeter of the black part; it should rotate during the process.
Yes, it is necessary to remove the fuel pipe. Now you need to pull the white case and carefully take everything out. It is important not to damage the float wire, otherwise you will have to do more serious repair work.
Replacing the gasket under the fuel pump
It is recommended to replace the rubber seals, including the pump gasket located under the fuel pump. This part is intended for one-time use, so it is not reinstalled after the device is removed.
Ring gasket
What to do if the pump fitting is broken? It requires urgent repair or replacement with a new one. It depends on the specifics of the breakdown, whether the fitting on the cover of the fuel pump module has broken, on the pump itself, or whether we are talking about the fuel supply and return fittings. If the problem is serious, it is recommended to purchase a new kit along with a cover, sold at a car service center.
Car won't start after replacement
Car won't start after replacing fuel pump? This phenomenon is not uncommon. In many cases, this is not a problem. The car cannot start immediately because the pump takes time to pump up the pressure that was previously reduced. To bring the pressure to the optimal level, you need to turn on the ignition for 5 seconds so that the instrument panel lights up. Next, turn the engine with the starter. If it doesn't work on the first try, you should wait about a minute and try again.
If cranking the starter does not help start the engine, then one of the following reasons may be occurring:
- errors were made when assembling or connecting the BN;
- the new fuel module is faulty;
- the car's security system has gone down or a blockage has occurred;
When installing and connecting a new pump, failures of various types are possible: from malfunction of the valves on the fuel pump to breakage of contacts, terminals or connectors.
It is important to identify the exact nature of the problem and determine its type - electrical or mechanical. The simplest breakdown relates to the power supply to the fuel pump; it either exists or it doesn’t. If we are talking about an immobilizer or alarm system, then the anti-theft system can turn off the power supply to the BN, preventing the car from starting. Don't forget about filter clogging either. If the valves are stuck, the device can operate and produce characteristic sounds, but at idle.
The listed malfunctions prevent fuel from entering the ramp, so the engine cannot start. To clearly determine the cause, it is important to make sure that there is no gasoline in the rail. Next, it is recommended to dismantle and connect the BN from the dimensions or batteries directly. This method is considered the fastest for checking the device.
Replacing a fuel pump with your own hands: step-by-step instructions, features and recommendations
In this article we will talk about how to replace the fuel pump on various cars. In total, there are two injection systems on gasoline engines - injection and carburetor. The latter is rarely used and is no longer installed on new cars, since engines with such injection do not meet environmental standards. Today, carburetor engines can be found exclusively on motorcycles, gasoline generators, saws, and mowers. Injection systems are installed on all cars.
Design of the carburetor injection system
Before replacing the fuel pump on a VAZ, it is necessary to consider its design. There is nothing complicated about it, but the work is influenced by many factors. In fact, the entire design of the injection system consists of several elements:
- Fuel tank.
- Highways.
- Carburetor.
- Fuel filter.
- A fuel pump driven by a camshaft.
To understand how a pump works, you need to understand its design.
How does a fuel pump work?
Let's figure out how the pump works. It consists of a housing in which there is a membrane and two valves - inlet and outlet. The membrane is acted upon by a spring, which returns it to its original position. When replacing the fuel pump mesh, you will have to completely disassemble the housing. In some cases, you may have to install a repair kit. It includes gaskets, membrane and valves.
The pump is driven from the camshaft - it has an ellipse-shaped section. The convex part of the camshaft pushes the rod, which drives the fuel pump mechanism. At the same time, the spring is compressed, the membrane moves, the inlet valve opens, and the outlet valve, on the contrary, closes. Gasoline is injected into the pump chamber. When the membrane moves in the opposite direction, the intake valve closes, the exhaust valve opens, and gasoline flows through it to the carburetor.
Please note that a filter must be installed in front of the pump to clean gasoline from harmful impurities.
When to change the pump?
When replacing a fuel pump, you need to perform simple manipulations, but what can lead to this work?
A list of reasons why the fuel pump malfunctions is given below:
- Rod wear can be solved by replacing it. In some cases, it is sufficient to remove one or more gaskets installed under the housing.
- Destruction of the membrane leads to gasoline leaking out of the housing. Air leakage begins, no pressure is created at the outlet.
- Valve malfunction - usually due to excessive heat. When cooled, valve operation returns to normal. As in the previous case, no outlet pressure is created.
And, naturally, physical damage to the pump housing leads to the fact that it stops working normally.
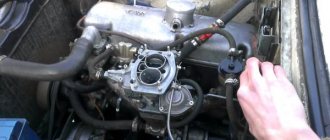
How to change a gasoline pump on carburetor engines
The procedure for replacing a fuel pump on carburetor cars is not complicated. First, you need to turn off the engine and let it cool to make repairs more comfortable. Then perform simple manipulations:
- Remove the hoses from the inlet and outlet of the fuel pump.
- Unscrew the two nuts that secure the pump housing to the motor.
- Carefully remove the housing.
- Remove the pump rod and remove the old gaskets.
Reassemble in the reverse order, change the rod if necessary and install a sufficient number of gaskets. It is important that the rod protrudes no more than 1.2 mm above the surface.
Fuel filter location
Location of the fuel filter under the bottom of the car
The fuel filter on a car is located at the rear left near the fuel tank. It is attached to the vehicle body using clamps.
From a different angle
Signs of contamination
The first evidence that the element is clogged is the car twitching at high engine speeds. If you do not replace the filter element at this moment, the machine will move jerkily and at low speeds.
Replacement frequency
Clogged fuel filter cutaway
The car manufacturer recommends replacing the filter element every 30,000 kilometers. But if you take into account the quality of fuel at domestic gas stations, then replacement should be done after 15,000 kilometers.
A few words about its replacement
Details about the replacement in the material: replacing the fuel filter on a Lada Kalina
- Relieve pressure in the system. To do this, you need to remove the fuel pump fuse (it is located under the cover near the gearshift lever). There is an electronic unit that has three fuses. You need to remove the middle one from the socket. Start the car and wait until it stalls on its own.
- Clean the filter and its mounting from dirt.
- By pressing the clamps, the hoses should be pulled to the side.
- The filter can be removed by hand. The element can also be attached to the body using a bolt. It depends on the Lada Kalina model. To remove such an element you need to use the key at “10”.
The bolt and chips for attaching the hoses to the fuel filter are marked
- Install a new element on the car and reassemble in reverse order.
Adviсe
- Before disconnecting the hoses from the filter, you need to remember their location. To do this, you can take a photo. There is also an arrow on the filter itself that indicates the direction of fuel flow. The new element must be installed so that the arrow points towards the motor.
- After installing the new filter, you need to replace the pump fuse and turn the ignition on/off several times to pump fuel into the system. If after this the engine does not start, the procedure should be repeated again.
Injection injection system
The injection system looks a little more complicated - it uses an electrically driven pump. It is placed inside the fuel tank and has a mesh filter for cleaning gasoline.
When replacing the fuel pump filter, you will have to completely remove the entire unit along with the fuel level sensor. The system works as follows:
- When the ignition is turned on, power is supplied to the electronic control unit.
- All sensors are polled, including the one that measures pressure in the fuel line. If the pressure is insufficient, the control system sends a pulse to the fuel pump switching relay. The pump turns off after the nominal pressure is reached in the line. You may hear a humming sound when you turn on the ignition.
- When the engine starts, the fuel pump works intermittently - it turns on and then turns off. The frequency depends on what operating pressure range is “sewn” into the control unit.
- When the engine stops, the electric pump also turns off.
In general, as you can see, nothing complicated. Let's now move on to fuel pump failures.
Preparation
If you plan to replace the filter or do anything with it in general, it is better to do some preparatory work to be on the safe side. First, you need to relieve the pressure in the fuel line system. There is a special fuel system fuse in the fuse box, which is located under the hood opposite the driver's seat. It's called F24 - F/PUMP 15A. It must be completely removed.
When the fuse is finished, you can start the car and calmly wait until it stalls. This will mean that the remaining gasoline has been burned and you can continue to interfere with the system. For future convenience, it is recommended to remember the gas tank arrow on the dashboard. All that remains is to remove the terminal and you can start replacing.
What kind of breakdowns can happen?
On a Ford Focus, replacing the fuel pump is carried out in approximately the same way as on any other injection car. But what can lead to such, frankly speaking, expensive repairs?
Let's look at what malfunctions can happen to the pump:
- Failure of the switching relay or fuse.
- Impeller destruction.
- Wear of the brush assembly.
- Damage to electrical wiring.
- Failure of the stator or rotor winding.
- Filter element clogged.
In general, these are all the breakdowns that can occur with the fuel pump on any car. Moreover, the pump will have to be removed and repaired only in cases 2, 3, 5 and 6. In other cases, there is no need to remove it.
Signs of pump failure
Before replacing the fuel pump on a Nissan or any other car, you need to make sure that it is the one that is faulty. One of the main signs that the fuel filter is clogged is that when you turn on the ignition, the pump runs for too long and makes a loud noise. This suggests that he cannot quickly gain pressure. As a rule, this does not happen abruptly - it cannot be that everything worked perfectly yesterday, but today it pumps poorly. If this happens, then the reason is most likely not in the filter, but in the pump itself.
Replacing the pump
To replace the fuel pump, you need to arm yourself with a set of tools. After this, proceed to dismantling:
- You fold down the rear seat and underneath there is a niche with a pump installed.
- Disconnect the block with wires.
- Remove the tubes and hoses that go to the fuel pump.
- Unscrew all the nuts that will secure the housing to the gas tank.
- Carefully remove the pump along with the fuel level sensor.
- Disconnect the pump from the fuel level sensor.
If it is not possible to replace the pump, repair it. To do this, as a rule, it is enough to install new brushes.
But it also happens that one or more windings on the rotor or stator fail. In this case, of course, it will be easier to install a new electric pump. But if you have suitable wire or working spare parts from old pumps, you can try to repair it. As a rule, this is quite difficult to do - the damage is usually so severe that the pump elements cannot be restored. Therefore, the best way out is to install a new or used device.
After repair work, everything must be reassembled in the reverse order. And don’t forget to install a rubber gasket, otherwise gasoline will start leaking out. When replacing the fuel pump mesh, you will have to perform similar manipulations, but you do not need to install a new electric drive.
Ford Focus Fan
We remove the Ford Focus 2 fuel tank to wash or replace it. We carry out the work on an inspection ditch or overpass, preferably with an empty tank. Relieving pressure in the power system If there is more than five liters of fuel left in the tank, it must be selected.
How to remove the gas tank on a lift
Disconnect the power wire from the battery terminal.
Before removing the gas tank, it is necessary to drain the gasoline, or so that there is less than half in the tank! and don’t forget: that the Ford Focus 2-restyling tank volume is 1.6 - 55 liters in the container.
How to drain gasoline from a fuel tank
We insert a hose into the hole in the tank and pump out gasoline using a rubber bulb.
Before you begin the process of replacing the fuel tank, you need to do a number of manipulations. First, you need to relieve the pressure in the fuel system, this can be done in two ways. 1st:
- Remove the fuel pump fuse shown in the photo, then start the car and let it run until it stalls.
Let's take out this fuse
We start it and wait until the car stalls. Then we start it again and turn the starter for 10.15 seconds. If the car does not start, it means the pressure has been released. Using pliers, taking it by the edge so as not to break it, unscrew the factory screw. Remove the fuel supply hose, after which, as in the previous case, you need to start the engine.
Secondly, after the pressure in the system has been relieved, we disconnect the battery terminal, you never know... It’s still
By pressing on top of the latch (green) of the tip of the plastic tube for removing fuel vapor from the canister, disconnect the tip from the canister purge valve tube.
Unscrew the screw securing the aluminum protection
Next, carefully bend the protection (faster disassembly)
We put a jack under the gas tank and lift it so that in the process the tank
And this is what it looks like; (Focus 2 gas tank)
We put a jack under the tank
6. Place a jack under the gas tank and lift it so that the Ford gas tank does not fall on you in the process.
Unscrew the tank mounting clamps.
loosen the clamps and remove the two hoses (it is better to remove them as indicated in the photo, because from the other
we pull it out together with the guides and disconnect the wiring harness block from the fuel module.
Disconnect the fuel pipes and hoses
Use a screwdriver to pry up the bracket and, pressing your finger on the latch (white) of the tip of the plastic tube of the fuel module, disconnect the tip from the fuel supply tube to the engine (for clarity, shown on the removed tip of the tube)
Disconnect the hose from the fuel filter; gasoline may leak.
We remove the pipe from the neck of the gas tank and unscrew the lid of the fuel tank Ford Focus 2. Using a 13" socket with an extension, unscrew the bolt of the front fastening of the clamps that press the fuel tank to the bottom of the body.
Remove the pipe from the neck of the gas tank
How we see a leak in the neck of a Ford Focus 2
Remove the pipe from the neck of the gas tank
Using a screwdriver, loosen the fastening clamp and remove the fuel tank hose from the ventilation pipe.
Remove the pipe
...by pressing the latch of the tip of the plastic tube for discharging fuel vapors from the fuel tank to the adsorber, disconnect the tip from the fuel tank fitting.
Then disconnect the terminal from the fuel pump
Then disconnect the terminal from the fuel pump
And the last terminal on the gas tank is on the edge
And the last terminal on the gas tank
We lower the jack with the gas tank and slowly pull it out. Well, that’s basically all. We install the Ford Focus 2 fuel tank in the reverse order. Fill the tank with fuel, turn on the ignition and check the tightness of the fuel line connections.
Related posts:
How to remove the front fender liner Ford Focus 2
Replacing the gear selector oil seal on a Ford Focus 2
Cleaning the Ford Focus air conditioner evaporator
DIY fuel pump replacement
The gasoline pump in the power supply system of an injection gasoline engine is an electromechanical device that pumps fuel from the gas tank and creates the necessary fuel pressure in the fuel line necessary for the most efficient dosed injection of fuel injectors. If a number of conditions are met during vehicle operation, the fuel pump will serve properly for quite a long time (on average, about 200-250 thousand km or more). It should be borne in mind that regular driving with an empty tank, refueling with low-quality fuel with a high content of impurities and debris, ignoring the need to periodically replace the fuel pump screen, flush the fuel system and the gas tank itself lead to the fact that the gas pump breaks down much faster.
Another factor that affects the service life of a submersible electric fuel pump is unprofessional tuning and boosting of the engine. More efficient injectors are installed on the car, the pressure regulator in the fuel rail is changed, the ECU is reflashed (chipped), etc., but the fuel pump remains standard. As a result, the pump constantly works at the limit of its capabilities, heats up and quickly breaks down. For the reasons stated above, as well as as a result of natural wear and tear, drivers often need to replace the fuel pump. Next, we will look at how to change the fuel pump yourself.
Causes of clogging
Mechanical fuel cleaning is the main task of any TF. But, like all mechanisms, the filter is subject to wear. As a rule, its service life depends on several components:
- Maintenance of the fuel system;
- fuel quality;
- operating conditions, etc.
The average resource regulated by the manufacturer is no less than 30 thousand kilometers, but there are exceptions. Moreover, this is confirmed by practice - almost every second Russian motorist replaces them ahead of schedule.
Replacing the fuel filter on a Volkswagen
In most cases, replacement ahead of schedule occurs due to the following things.
- Rust forms inside the cleaning element.
- The tubes become clogged and oxide accumulates in the pipes.
- The TFs are not made of very high quality, which is affected by their budget.
- The fuel poured into the tank contains many unnecessary impurities.
This happens over years of use when rust accumulates on the surfaces of brass tubes and rubber hoses. Accordingly, the greater the mileage of the car, the faster its TF fails.
To replace the TF, you should not only follow the manufacturer’s data and speedometer readings. It is necessary to take into account all the above factors, monitor the cleaning element, and monitor its condition. To make it easier to control this, they came up with a TF with a transparent body. The degree of contamination in such elements is very easy to determine by the color of the fuel inside. If it darkens and loses its transparency, then the TF requires replacement.
A clogged TF can also be determined by indirect signs.
- The engine stalls by itself.
- The car jerks when driving, especially on inclines.
- The power of the internal combustion engine is reduced.
- Fuel consumption increases sharply.
Nowadays, no one is safe from low-quality liquid fuel. You also need to be careful when purchasing a new filter. It’s better not to chase cheap models - original products will last much longer, saving the money spent on them.
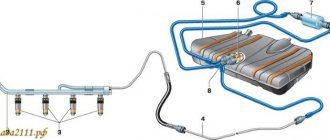
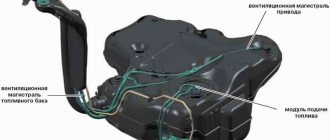
Where is the fuel pump located
When faced with the need for repair or replacement for the first time, many car enthusiasts ask where the fuel pump is located. The pump is located directly in the gas tank and is in direct contact with the fuel, that is, it is immersed in gasoline. On most civilian vehicles, the gas tank is located at the rear of the vehicle under the floor.
The fuel pump is installed so that it is located at the top of the gas tank. Thanks to this placement, the pump can be accessed directly from the cabin. To do this, you need to remove the rear sofa, since the fuel pump is located directly under the seat on the left or right side.
Frequency of replacing the fuel filter
Fuel filters consist of two stages, but they are not always integrated into one housing.
The first stage is usually a metal mesh or fibrous media capable of filtering contaminants on the order of 100 microns , approximately twice the thickness of a hair. Under normal circumstances, this mechanism will work for the entire life of the car, about 400,000 km or so, but a dirty batch of fuel can clog it in one tank. Depending on the vehicle, the replacement interval for the second stage component can vary from 35,000 to 245,000 km . The frequency of replacing this part is approximately every 25,000 kilometers or at least once every two years .
The second stage is where things get serious in terms of filtration levels and efficiency. Fuel filters can be rated by capacity and flow rate. 40 micron fuel filter should capture more than 98.7% of particles larger than 40 microns , about the same size as dust that you can barely see. This is approximately the maximum particle you can pass through the electronic fuel injection (EFI) port - the fuel injector opening between 100 microns and 150 microns . Diesel and GDI HPFP are more sensitive to contaminants and are therefore protected by fuel filters as small as 2 microns , about the size of a bacteria. It provides good protection for HPFP ports and fuel injector ports down to 50 microns .
The first step when replacing the fuel filter is to determine its location. Some cars have it in the tank, while others have it built-in or cartridge-based. Inline fuel filters can be located anywhere between the fuel tank and the fuel injectors - they can be located under the vehicle, along the frame or in the engine compartment. Cartridge ones are usually mounted on the engine or in the engine compartment.
Fuel filters in the tank are designed to last for a long time. Replacing the fuel tank filter usually requires removing the fuel tank or accessing it through the vehicle's floor panel. On the other hand, built-in and cartridge ones must be serviced regularly. However, fuel contamination or part damage may require you to replace the fuel filter sooner. Replacing this part is usually a simple process if you can easily access it.
How to remove the fuel pump
To answer how to change the fuel pump, you need to study the procedure for removing the fuel pump.
Removing the fuel pump and replacing it involves dismantling the device. To extract, you will need a special key for removing the fuel pump (puller), open-end wrenches, a tubular wrench, and a set of sockets. We add that the fuel pump mount may differ on different cars, although the general principle remains almost the same.
You can do this as follows:
- turn off the negative voltage on the battery;
- on the fuel rail under the hood, press the valve through which a certain amount of gasoline will flow out;
You can also go the other way. First, remove the terminal from the battery, then turn off the power to the fuel pump by removing the electrical connector from it. Then the terminal is put back on the battery and the engine is briefly turned with the starter. After a short period of time, the remaining fuel will leave the system. On some cars, the engine may even start and then stall.
So, the fuel pressure has dropped, now we proceed to remove the fuel pump. Remember, the terminal on the battery must be disconnected during work! The first thing to remove from the pump is the chip (electrical connector), if this has not been done previously. Then you need to pay attention to the fuel lines (1 fuel supply pipe and 1 return line to return fuel to the gas tank). On these tubes, you should loosen the tightening of the clamps and clamps (if any), which usually secure the electrical wiring sections to the lines to supply power to the pump.
How to remove the tube from the fuel pump
Now you need to remove the lines themselves from the fuel pump. To figure out how to remove the hose from the fuel pump or disconnect the line, you need to accurately determine the method of attachment to the pump terminals. Often, the standard fastening of the fuel supply line is implemented in the form of a nut (fitting), which must be unscrewed with an open-end wrench. The so-called return line can be secured with a clamp.
Removing the fuel pump and replacing
After unscrewing the fuel lines, you will need to either unscrew the pressure ring of the fuel pump with a special puller, or use a tubular wrench to unscrew the nuts (which depends on the method of mounting the fuel pump on a specific car model).
- Before starting removal, it is worth noting that there are special arrow indicators on the pump and other fixing elements. We recommend remembering their position, which will facilitate subsequent reassembly.
- Then you need to remove the special o-ring. After removing the ring, you can remove the fuel pump from the tank. During removal, care must be taken, since devices for determining the fuel level in the gas tank (float sensor) may be attached to the fuel pump body.
- After removing the pump, there may be a rubber seal on its seat. For example, on cars of the VAZ family this seal is fixed on studs. This seal also needs to be removed by simply pulling it up.
The completion of the fuel pump replacement procedure is the installation of a new fuel pump, as well as the replacement of all rubber seals, which must be included in the kit or purchased separately.
We would like to add that during installation you should:
- Make sure that the pump is positioned correctly. To do this, there are special arrow-shaped markers on the pump itself, covers and pressure rings (depending on the make and model of the car). On some cars the arrows should line up, on others the arrow on the fuel pump should point towards the rear of the car. It is for this reason that it was recommended above to remember the position of the indicated arrows before removal.
- Also, in the process of placing the pump, you should carefully handle the float and other solutions to determine the fuel level in the gas tank. Often, during unprofessional installation, such elements are bent or broken, after which there is a need to replace them.
If the fasteners are over-tightened, they may break. If the fuel pump fixing elements are not tightened enough, then the pump may dangle in the tank, which is unacceptable. After the pump is installed, all that remains is to attach the fuel lines back, connect the pump power connector and the terminal to the battery. This is what replacing a fuel pump with your own hands looks like.
Replacing the fuel tank
After removing the old gas tank, you will need to perform the following operations to install a new one:
- Install a new fuel level sensor gasket and lower the sensor together with it into its place in the tank.
Then lift the tank, first from the rear, then from the front, install it on new clamps, screwing them to the body with new bolts.
After that, go into the cabin and connect the fuel level sensor and pump to the connectors.
Close the hatch, screw it on and put the seat cushion in place.
After installation, you must make sure that all fuel lines and sensor wires are connected
After replacing the tank, you need to make sure it is working: start the engine, see if there are any problems with the fuel supply or leaks due to poor connections.
Today, you can repair and replace the gas tank on a “ten” at any service station. However, this procedure is not considered difficult to perform independently. Therefore, it is more advisable to remove, repair or change the gas tank yourself.
Solid fractions are constantly deposited in the gas tank of a car. Some of them simply sink to the bottom, others settle and form a kind of hard crust. Both clog the fuel pump filter first, and subsequently the filter, which can adversely affect the operation of the carburetor or injector.
Accordingly, the car will not only begin to become “dull,” but parts will also wear out much faster. There are a large number of ways in which you can determine the level of contamination of a gas tank, but any specialist will tell you that it needs to be cleaned periodically.
At the same time, no liquid will help fully, while removing and cleaning the gas tank will help get rid of plaque and the entry of its fractions into the fuel system. Ideally, this entire procedure for cleaning the VAZ 2110-2112 gas tank should be performed with an assistant, but if he is not there, you will have to “tighten up” a little.
First of all, you need to dismantle the tank itself. To do this, you need to remove the rear seat, unscrew the screws securing the fuel pump cover and remove it. After this, we start the engine so that it selects the remaining gasoline from the fuel system (before this, we turn off the contact group that powers the gas pump itself so that fuel from the tank does not enter the fuel system).
Then disconnect the fuel hoses. Unscrew the bolts securing the pressure ring of the VAZ fuel pump and remove it. Now the fuel pump can be removed and set aside. Further work takes place from the bottom of the car.
Near the fuel filter, you need to remove the air hose clamp and remove the hose. In the same way, disconnect the hose coming from the filler neck and the pipe that collects fuel vapors.
On the side of the fuel supply pipe, on which the fine filter is installed, you need to loosen the bolts of the tight-fitting clamps, and then release the clamps themselves. It is now that an assistant will come in handy - he will help support the tank during the following steps.
After the clamps are released, make sure that the gas tank is not connected to any fitting or hose. Now it can be removed. To do this, you need to move the tank towards the pipe that connects the resonator and the muffler, tilt it and bring it under the brake hoses. Then remove the gas tank from behind the exhaust system pipes and remove it.
First of all, you should remove the remaining gasoline and particles that did not have time to settle at the bottom. To do this, you can simply rinse the tank with any detergent, even dishwashing detergent.
After this, it is best to plug all the holes with available materials (rubber plugs, rags, improvised plugs) and pour one of the special tank cleaning products inside (the gas tank should be in the same position as it is on the car).
The liquid needs some time to “acidify,” but you can speed up the process in an old-fashioned way: you can pour a large number of foreign metal objects, such as nuts, bolts, washers, small pieces of fittings, etc. into the tank. After this, shake the gas tank well for at least half an hour.
This way, most of the plaque will simply be erased. Then drain the “spent” suspension, shake out the remaining “working material” and rinse the tank. It is better to wash with gasoline.
After the gas tank is washed, it is best to blow it out with a compressor - a powerful air flow will remove all settled microparticles. If this is not possible, then you can wash it several times, letting it dry completely.
Of course, this process may take 2-3 days, but the result will be obvious - the service life of the fine fuel filter will increase significantly, and the car will respond better to pressing the gas pedal.
After the gas tank is cleaned, it must be installed in the reverse order of dismantling. It is advisable to replace the hose and pipe clamps with new ones, so as not to look under the bottom again.
Heading
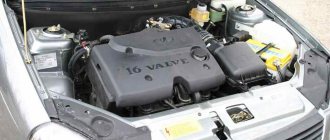
The VAZ 2110 car is a small class sedan that is still produced at various factories in several countries around the world. This model is one of the first to have an injector system under the hood. The injection system made it possible to achieve a high maximum speed with a small engine volume and low consumption. The start of serial production of this particular model paved the line between the classic Zhiguli and the new generation of cars from AVTOVAZ.