It would seem like a minor element, but it’s still unpleasant when something is faulty in the car, especially if we are talking about a car in an expensive price category. In addition, malfunctions of the gas tank cap or flap are fraught not only with aesthetic, but also with purely technical problems. The constant smell of gasoline, the inability to close the hatch tightly, as a result of which it slams when driving, an increased likelihood of fuel spills and fire during an accident. Do you need similar problems? It’s easier to contact our service; the cost of repairs is quite low, and it will take no more than an hour to eliminate most defects.
Let's take a look and find out what the cause of the breakdown is. We will repair or replace spring-loaded gaskets, clamps, and hatch fasteners. If it is not possible to restore individual elements, we will select and install a new part, followed by painting it to match the existing color. It will not be a problem for us to find a cover or hatch even for exclusive car models. But we recommend that you sign up for the service in advance; we will select the components upon arrival at the agreed time and will not keep you waiting for results.
- Acura
- Alfa Romeo
- Audi
- Bentley
- BMW
- Cadillac
- Chevrolet
- Chrysler
- Citroen
- Daewoo
- DAF
- Datsun
- Dodge
- Fiat
- Ford
- Geely
- Great Wall
- Hino
- Honda
- Hummer
- Hyundai
- Infiniti
- ISUZU
- Porsche
- Renault
- Saab
- Scania
- SEAT
- Skoda
- Smart
- SsangYong
- Subaru
- Suzuki
- Toyota
- Volkswagen
- Volvo
- GAS
- ZIL
- KamAZ
- UAZ
Schedule: from 8:00 to 22:00
Cost of repairing a gas tank flap
Local painting of the hatch, gas tank cover 2-3 hours 1300 rub. Complete painting of the hatch, gas tank cover 2-3 hours 1300–2000 rub.
Why are the prices for local and full painting the same? — Because the hatch is such a small part that there is no point in painting it locally (it is painted completely). The same applies to some other works.
Scratches and scuffs
Shallow (superficial) 10 min 300 rub. Average 2-3 hours 1300–2000 rub. Deep 2–4 hours 1500–2600 rub.
Local polishing 5 min 200 rub. Express polishing 10 min 500 rub. Restorative polishing 10 min 500 rub.
up to 5 cm 2-3 hours 600–1500 rub. up to 10 cm 2-3 h 1000–2000 rub. up to 15 cm 2-3 hours 1000–2000 rub. up to 20 cm 2-3 hours 1000–2000 rub. over 20–25 cm 2-3 hours 2500 rub.
Cracks are not penetrating damage
up to 10 cm 2–4 h 1000–1500 rub. over 10–15 cm 3-4 hours 1000–1800 rub.
Removing and installing the sunroof and gas tank cap 5 min from 0 rub.
Gas tank repair from RUB 2,000. Repair of wing arches from 1000 rubles. Trunk repair from RUB 3,000. Bumper repair from 2000 rub. Door repair from RUB 3,000. Rear door repair from RUB 3,000. Hood repair from RUB 3,000. Repair of mirror cap from 500 rub. Wing repair from 2000 rub. Complete body repair from RUB 50,000. Repair of the floor (bottom) from 2000 rubles. Threshold repair from 2000 rub.
Generalized repair diagram for the gas tank cap and mechanisms
Let's look at the most incredible option so that you have a general understanding of what is being done and how. So, let's assume that some idiot tore out your gas tank cap and jumped on it (scratched it, dented it). We are not considering a replacement option, only repairs.
- Step 1 Inspect and evaluate cover repairs. Send us photos of the damage to the hatch with a detailed description, where it is attached to the body, as well as the make and model of the car. We will assess the damage based on the photos sent and offer one of two options - purchasing a new or used cover or repairing the existing one. You can also call us by phone and tell us about the damage. The third option for inspection is face-to-face; come to our service center and find out the exact timing and cost of repairs (it will take no more than 5 minutes).
- Step 2 Repair the cover. At this stage, the master will straighten the geometry of the hatch to the desired one, and if the fastenings were torn off, he will restore them. If the fasteners were plastic and they cracked or broke off, then the technician will weld a suitable piece of plastic. If the fastenings are metal, then they are probably intact and will need to be slightly adjusted, or, in extreme cases, welded. The entire tin along the hatch is finished, let's move on to the next stage.
- Step 3 Repair of fastenings. If the mechanisms (opening, closing, holders, fasteners, clamps, springs) are also damaged, then the technician will repair them or install new ones. In some cases, installation/dismantling/repair of mechanisms will require disassembly of interior/trunk and fender liner elements.
- Step 4 Painting. At this stage, the unevenness, scratches and chips remaining after straightening are cleaned, puttied with several layers of putty, and sanded. After which several layers of paint or varnish are applied, which are pre-selected according to the VIN code of the car or using special equipment. The hatch takes a couple of hours to dry. At this stage, the repair work can be considered complete.
- Step 5 Installation. After the cover is restored, the master will install it in the niche, secure it, check how it opens and closes, the gaps and, if necessary, adjust it.
This is how simple repairing a gas tank flap looks like. Of course, our proposed repair option is exaggerated. In the given example, we would recommend ordering a new one or finding a used one from disassembly, repainting it and installing it, unless, of course, your gas tank cap is rare and you can no longer find them on sale.
Detailed classification of gas tank caps
The motorist must understand that the cap is not just an element that blocks access to the tank. In a modern car, it also performs a number of other functions: it stabilizes the pressure inside the fuel tank, isolates gasoline or diesel fuel from the negative influence of the external environment, etc.
The fuel tank cap is an important functional element of the car.
The design of the element depends directly on the shape of the neck of the fuel tank. To the greatest extent, everything is determined by the diameter of the thread and the type (it can be external and internal). The depth of entry of the lid into the neck, volume, etc. also matters.
The cover material is always selected taking fire safety into account. This is especially important for cars equipped with gasoline systems. This type of fuel tends to explode under excessive pressure and is more sensitive to the effects of vapors.
Structurally, covers are divided into several types:
- The first option is the simplest. The lid is equipped with a single function - isolating the fuel liquid from the atmosphere.
- The second option is a complex system equipped with valves. The latter ensure stability of pressure inside the tank.
- Lids with lock. In addition to their basic functions, they protect the fuel tank from unauthorized entry.
- Models with memory. Such covers are specially designed for forgetful motorists; they are connected to the tank neck or hatch with a chain.
The cover with a plastic holder or chain is specially designed for forgetful car owners
In addition, covers are classified according to the type of locking mechanism:
- bayonet type, which close by changing the angle;
- threaded;
- shut-off, like on metal cans.
Bayonet and threaded caps are most often used. The first ones are easier to close and open, but they are rarely installed on passenger cars, mostly for tractors and trucks.
Threaded caps can be either internal or external threaded. The difference is in the location of the main and counter threads on the neck of the tank or the cylindrical surface of the lid.
Covers are also divided according to ventilation parameters:
- How to adjust the trunk on a VAZ?
- Valveless models are installed in fuel tanks that have autonomous systems for stabilizing pressure and capturing fuel vapors.
- Single-valve lids are equipped with tanks in which only a fuel vapor recovery system is used, but there is no separate stabilization system.
- Finally, lids with two valves are installed on tanks without autonomous systems. Their purpose is to stabilize the pressure when the gasoline level drops and to release fuel vapors.
Single-valve lids are most common these days. This is due to the design features of modern car models, equipped only with an autonomous fuel vapor recovery system.
Covers are also classified according to the type of theft protection:
- Standard options that do not have any protection.
- Models with a padlock suspended on special brackets.
- Lids with a conventional lock, the cylinder of which is vertically built-in.
- Code caps.
- Models with a lock that can be opened with the ignition key of a specific vehicle.
Standard covers have become more common because they are easy to install. However, recently there has been a demand for lids with combination locks. The padlock is practically out of use today. And covers with a lock that can be opened with the ignition key are found on some top foreign cars.
Fuel tank caps can also be classified according to the presence of additional components:
- with chain or plastic connector;
- with a special grooved handle for easy opening.
And finally, they can be metal or plastic, universal or designed for one car model.
How to open different lid models
Fuel tank caps can open in different ways. As a rule, this is easy to do on domestic cars, but on foreign cars it is much more difficult. To open the code hatches, you have to set the required ratio of numbers. In a word, as many models as there are so many ways of opening.
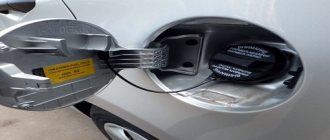
- A hatch that opens by pressing the corresponding button in the cabin.
It is located either on the driver's side door or on the armrest. The gas cap control button is located on the driver's door - A cover that can be opened using a standard remote control for the central locking system. In this case, the hatch wiring is paralleled with the door locks.
- A version of the hatch that opens with a lever with a picture of a gas station. The lever, like the button, is located on the threshold of the driver's door.
- Simple lids open by lightly pressing them until they click. Then, holding the notch, you need to pull the hatch towards you.
The lid with a recess opens by pulling towards you
About repairing the gas tank flap
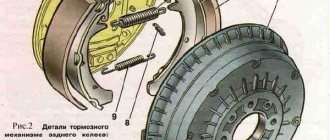
The main diseases of the gas tank lid and flap
Most often, problems are associated with careless handling when opening and closing and the forgetfulness of the driver in a hurry to leave the gas station.
We had to deal with and fix the following problems:
- The fastening plastic leash is broken ; it will take 5–10 minutes to replace it.
- Incorrect operation of the spring-loaded valve mechanism , preventing the flow of air into the tank - this malfunction can affect the operation of the engine. We will disassemble, clean, and, if necessary, replace springs or seals.
- Damage to the latch or lock of the gas tank flap. To repair a lock, most often you will need to replace the cylinder. If we are talking about a retainer, then in 90% of cases we can restore it. After that, we sharpen it, polish it, and the hatch will close again without problems, like new.
- Broken hatch fastenings. Car owners most often come to us with this problem when they decide to remove this element for tinting before painting. In 80% of cases, we will eliminate such defects by restoring and strengthening fasteners. By the way, for dismantling we also recommend contacting our service; removal takes literally 5–10 minutes, but eliminates the associated problems. In addition, we are ready to take on local painting with 100% color matching. Traces of repainting after the work of our craftsmen are difficult to notice even during a professional examination.
- Inability to open the gas tank flap yourself. A fairly common and unpleasant situation, especially if there is gasoline left at the bottom of the tank. We will provide prompt assistance in such cases, even without waiting in line, because the problem requires a quick solution. We will open the hatch without damaging 95%, without affecting the installed drive and other elements.
- In some cases, it is necessary to restore broken hatches. We will solder most plastic models and provide reinforcement if necessary. After stripping, priming and puttying, we will paint it and install it in its normal position. By the way, local painting may also be required if the paintwork is damaged by fuels and lubricants; we will provide assistance in this case as well.
Product exchange
Before sending components from knr-parts.ru to the client, the products are diagnosed for defects. In a situation where your problem occurs during the period specified in the civil code, and the technical malfunction arose due to a manufacturer’s defect, the product can be returned under warranty and replaced with a similar one.
Warranty period
1) Original components and accessories - 6 months 2) Analogs of original components - 14 days 3) New equipment. Turbocharger - 12 months 4) Refurbished equipment. Turbocharger - 6 months 5) Refurbished equipment. Starters, generators - 9 months 6) Previously used parts - 10 days
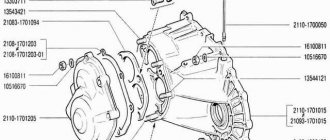
Welcome to the pages of the BZ of my M4!
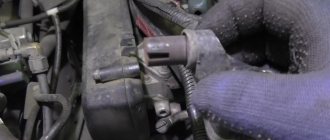
One winter I stopped at a gas station and couldn’t open the gas tank flap. I drove away from the pump so as not to delay the line and, using a screwdriver wrapped in electrical tape, pressed the hatch cover. The mechanism for opening the gas tank flap on the M4 is designed like this:
Either water got into the sink and froze somewhere, or something else, but the button (in the diagram it is number 5) that fixes the hatch cover is no longer recessed into the body (in the diagram it is number 4) is enough to open the lid . I didn’t want to figure it out in the cold, I just pressed a little on the plate on the hatch, which hooks up with the button. But at the same time, the hatch cover, when closed, is not flush with the body and sticks out. Finally got around to it over the weekend. I didn’t want to disassemble the floor to adjust the hatch opening handle, so I went a different route. In the trunk, on the left, there is a technical hatch in the trim. Having removed it (there are grooves into which you can insert a screwdriver and use it as a lever to press the hatch cover outward), we gain access to the second end of the cable on which the locking mechanism is located.
This is such a collective farm renovation!) Maybe there is another option? Nobody did? I wonder how this could be solved from the other side of the cable - from the passenger compartment?
Cover repair
If the cover is subject to adjustment, it is removed and repaired. Most often, the hatch and the drive cable that controls the lid from the passenger compartment are replaced.
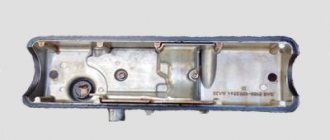
Replacing the hatch
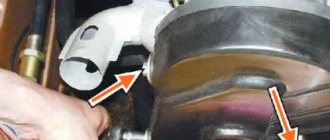
The cover hatch was described in detail above. It is supported on guides, which can easily be broken if careless. For example, on a Volvo car, the guides often break in these places.
The antennae of the hatch break in these places
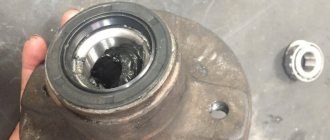
You can make homemade fasteners by re-drilling the holes with a thin rod, as shown in the photo.
Drill holes with a thin drill bit
And then screw in the bolts, cut off their heads, and bend them. The result will be perfect new mounts.
We bend the bolt and get the perfect fastening
Replacing the cable
To get to the cable, you need to open the car trunk, lift the trim from the side of the compartment (from the tank side), remove the plastic door sill moldings, under which the cable is routed.
We remove the plastic moldings to get to the cable
Next you need to do this:
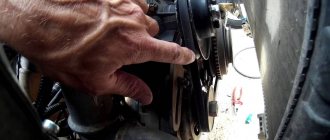
- Under the rear seat trim there is a lever that is responsible for opening the lid.
You can also see the bolt here. It should be unscrewed. The cable mechanism bolt must be unscrewed - Then pull the mechanism along with the cable towards you.
The mechanism with the cable must be pulled towards you - Change the cable by removing it from the mechanism and install a new one.
Video: DIY cable replacement
As an important element of the fuel system and the entire vehicle, the gas cap deserves periodic inspection. This responsibility falls on the shoulders of the car owner himself, who must be able to notice and correct faults in a timely manner.
Home →Maintenance and Repair →Repair →
Many motorists are familiar with the situation when the fuel tank cap refuses to open. Such a small thing, which few car owners pay attention to, can cause serious inconvenience if it is impossible to open it, especially if this happened right at a gas station, while the car has an empty gas tank. At such moments, some motorists manage to achieve their goal in various ways, showing incredible ingenuity, while others, on the contrary, may panic, especially if the service is far away.
The gas tank flap often does not open in cold weather, but trouble also happens in warm weather. Despite all the working order of the mechanisms that drive the vehicle, the car will go nowhere until it is refueled, so if such a problem arises, you will have to take measures to eliminate it. Depending on the reason that provoked the situation, different ways to resolve the issue are used.