Replacement of anti-roll bar elements Lada Kalina 1117 2004 - 2013
Tools:
- Straight box spanner 17 mm (2 pcs.)
- Driver for socket attachment
- Knob attachment 13 mm
- Soft metal drift
- Small flat screwdriver
- Knife
Parts and consumables:
- Soap
- Water
- Aerosol lubricant type WD-40
- Stabilizer bar cushions
Notes:
We carry out the work on an inspection ditch or overpass. Removal of the right stabilizer bar link is shown. The left pillar is removed in the same way.
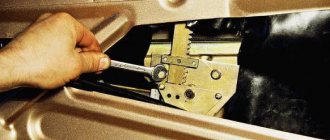
1. Using a 17mm spanner, unscrew the nut securing the stabilizer link to the front suspension arm, holding the bolt with a wrench of the same size.
2. Use a soft metal drift to knock out the bolt.
Soft metal knockouts.
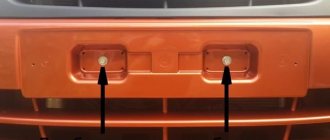
3. To make it easier to remove the strut from the stabilizer bar, unscrew the two nuts securing the stabilizer pad bracket on the right side (as shown below). Lowering the right part of the stabilizer, remove the strut from the stabilizer bar.
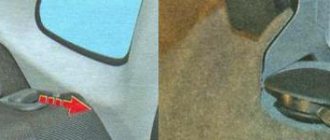
4. As a rule, on cars with high mileage, worn struts can be easily removed. If the stand cannot be removed immediately, we recommend inserting a thin screwdriver blade between the rod rod and the rubber bushing and pressing out the rubber. After this, a penetrating liquid such as WD-40 should be injected into the resulting gap and, shaking the strut from side to side, remove it from the stabilizer bar.
5. We install the new rack in the reverse order, having first cleaned the end of the rod and lubricated it with a soap solution.
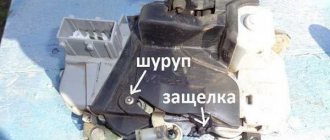
6. To replace the stabilizer bar cushions, unscrew the nuts of the bolts securing the stabilizer bar struts to the arms and remove the bolts.
Using a 13mm socket, unscrew the nuts securing the pillow bracket.
7. Remove the bracket and stabilizer link from the rod (see above).
8. Remove the cushion from the barbell.
9. As a rule, worn-out cushions can be easily removed from the bar, but if there is difficulty, cut the cushion with a knife and remove it.
10. Install the new pillow in the reverse order, lubricating the rod and the hole in the pillow with soapy water.
11. Replace the cushion on the other side of the stabilizer bar in the same way. To remove the anti-roll bar, disconnect the additional muffler pipe from the catenary collector, as described here. We disconnect the stabilizer bar struts from the front suspension arms and remove the stabilizer bar cushion brackets (see above).
Remove the anti-roll bar.
12. Install the anti-roll bar in the reverse order.
The article is missing:
High-quality photos of repairs
Removing the anti-roll bar link
1. Using a 17 mm spanner, unscrew the nut securing the stabilizer link to the front suspension arm, holding the bolt with a wrench of the same size.
2. Use a soft metal drift to knock out the bolt.
3. To make it easier to remove the strut from the stabilizer bar, unscrew the two nuts securing the stabilizer pad bracket from the desired side.
4. With the right side of the stabilizer lowered, remove the strut from the stabilizer bar.
Note:
As a rule, on cars with high mileage, worn struts can be easily removed. If the stand cannot be removed immediately, we recommend inserting a thin screwdriver blade between the rod rod and the rubber bushing and pressing out the rubber. After this, a penetrating liquid such as WD-40 should be injected into the resulting gap and, shaking the strut from side to side, remove it from the stabilizer bar.
5. Install the new stand in the reverse order, having first cleaned the end of the bar with a brush and lubricated it with soapy water.
Removing the anti-roll bar cushions
1. To replace the stabilizer bar cushions, unscrew the nuts of the bolts securing the stabilizer bar struts to the arms and remove the bolts (first photo of the article).
2. Using a socket with a 13 mm socket, unscrew the nuts securing the airbag bracket to the body and remove the bracket.
3. Remove the stabilizer link from the rod (see above).
4. Remove the pad from the barbell.
Note:
Typically, worn pads can be easily removed from the bar, but if you have difficulty, cut the pad with a knife and remove it.
5. Install the new cushion in reverse order, lubricating the rod and the hole in the cushion with soapy water.
6. Replace the cushion on the other side of the stabilizer bar in the same way.
Removing the anti-roll bar
1. To remove the anti-roll bar, disconnect the stabilizer links from the front suspension arms and remove the stabilizer bar cushion brackets (see above).
2. Remove the stabilizer bar.
3. Install the anti-roll bar in reverse order.
The article is missing:
- Photo of the instrument
- Photos of parts and consumables
Replacement of parts (rubber bushings, mounting brackets and the bar itself) of the anti-roll bar on a Lada Granta car is carried out during operation as they fail, which is detected visually for rubber elements by the condition of the rubber itself, and for brackets and the bar by the presence of mechanical defects and deformations. To carry out repair work, prepare a standard set of tools and perform the following sequence of actions:
- We lift the front part of the body with a jack and install it on the stops, first remembering to brake the car by placing stops under the rear wheels.
- On each side, unscrew one nut securing the stabilizer bars to the suspension arms. Remove the nuts and take out the bolts.
- Now you need to remove the rod mounting brackets by unscrewing two nuts securing them on each side. Then we remove the stabilizer itself along with the struts.
- Inspect all parts for mechanical damage and signs of operational wear, replace, and then install in the reverse order.
At this point, the repair work to replace parts of the anti-roll bar on the VAZ 2190 has been completed.
We check the chassis and transmission every 15 thousand kilometers.
The parts of the chassis (wheels, suspension arms, anti-roll bar, rear suspension beam, shock absorbers and suspension springs) and transmission (front wheel drive shafts) must be free of deformations, cracks and other mechanical damage that affect the shape and strength of the parts.
Use only factory-made support stands.
We make sure there is no play (knock). If there is a knock on the front wheel, ask an assistant to press the brake pedal. If the knocking noise disappears, it means the wheel bearing is faulty, and if the knocking noise remains, then the ball joint is most likely worn out.
To check the serviceability of the ball joint, insert a mounting blade between the suspension arm and the ball joint housing. Be careful not to damage the ball joint boot.
We replace ball joints with torn or cracked covers.
...and we try to move the lever along its axis and along the axis of the bolt. If the lever moves freely, without effort, it means that the silent block of the lever is badly worn or damaged and needs to be replaced. Tearing, cracking and bulging of the rubber bushing of the silent block are unacceptable.
If ruptures, cracks or severe deformation are detected on the rubber pads and bushings, they must be replaced.
To check the condition of the silent blocks of the rear suspension arms...
The suspension springs must not be damaged. Tearing, cracking and severe deformation of rubber bushings, cushions and compression buffers of shock absorbers are unacceptable.
Source: https://avtozam.ru/vaz/zamena-stabilizatora-lada-granta-vaz-granta.html
Malfunctions
The main sign of a failed support bearing is a knocking sound (dull knocks) in the area of the shock absorber strut. It may indicate that:
- the rubber gasket is damaged or deformed;
- The bearing itself is damaged.
Failure of the support bearing may occur due to:
- resource spent;
- penetration of dirt and moisture;
- exceeding permissible loads;
- mechanical damage due to shock absorber malfunctions.
How to identify a malfunction
To diagnose a support bearing failure, open the hood and remove the “cup” cover. Place your palm on the shock absorber housing and rock the front of the car. If you hear a knock and feel the corresponding vibration with your hand, the bearing is clearly faulty.
When to change
The service life of the “supports” is on average 50-100 thousand km, depending on the conditions in which the car is operated. After this resource has expired, it is recommended to change them. Replacement is also necessary if any malfunctions are detected.
Late diagnosis, as well as ignoring bearing failure, threatens to destroy the shock absorber structure and other suspension elements.
Stabilizer struts for Lada Kalina
Anti-roll bars are part of the vehicle suspension structure, the functional purpose of which is to equalize dynamic loads on the body during maneuvering.
Structurally, the struts are located between the stabilizer and the wheel hub, as a result of which they experience serious loads during vehicle operation - failure of faulty parts can provoke loss of controllability and an accident on the road.
ManufacturerArticle Structural arrangementClass of componentsApproximate cost, rub.
| AvtoVAZ | 1118-2906050 | Front axle | Budget | 450 |
| AvtoVAZ | 2190-2906050 | Front axle | Budget | 510 |
| AvtoVAZ | SS40111 | Front axle | Premium | 770 |
| AvtoVAZ | 2108-2906345 | Rear axle | Budget | 460 |
| AvtoVAZ | 1118-2906050 | Rear axle | Budget | 525 |
| SS20 | SS40134 | Rear axle | Premium | 750 |
Note! When selecting components for the Lada Kalina, it is necessary to check the part numbers with the VIN number of the car - otherwise there is a possibility of purchasing incompatible spare parts that differ in form factor and size from the stock version.
How to identify faulty racks: diagnostics at home with a guarantee of accuracy
The critical level of wear of the anti-roll bar struts on the Lada Kalina can be diagnosed by taking a closer look at the behavior of the vehicle - it is advisable to replace components in the following cases:
- When overcoming obstacles on the road, shocks are felt or extraneous sounds are heard in the suspension area;
- When moving in a straight line at low speed, the car spontaneously changes its trajectory;
- The car sways when reaching maximum speed or as a result of emergency braking;
- During maneuvering or when entering a turn, a strong body roll is observed;
- You feel a strong vibration load in the steering wheel or have difficulties in driving the car.
If several factors are similar, an urgent diagnostic inspection of the vehicle's chassis and suspension system is required. The best option would be to contact a certified service station, but you can detect the presence of worn-out struts at home - all you need is:
- Turn the steering wheel to the side all the way in any direction and, holding the disc, try to turn the wheel to the side - if you feel play, you need to disassemble the wheel liner and inspect the struts; you may have to change the struts soon;
- Next, we inspect the stabilizer bushings for mechanical deformation or leaks of technical fluid - detection of defects indicates depressurization of the structural unit, which will lead to moisture and small abrasive particles getting inside and grinding down the hinges in the future;
- Then we drive the car into the inspection hole and ask a partner to help - when periodically pressing on the car’s suspension under the fender liner, you need to place your palm on the outside of the strut - the feeling of play indicates the deterioration of the strut hinges and the formation of free space in the area of the wheel hub.
Note! The best option is to carry out a full diagnostic of the chassis every 15,000 km, which will prevent the possibility of accidental breakdown and promptly replace worn out parts.
Remember, if problems with the struts are identified, the parts must be replaced with new ones as soon as possible, otherwise the operation of the vehicle is not safe. Neglecting maintenance only makes the situation worse and increases the cost of future repairs.
Replacing stabilizer struts on a Lada Kalina with your own hands: detailed instructions for beginners
Dismantling and installing racks on Kalina occurs according to an intuitive scenario, however, if the vehicle maintenance instructions are not followed, inexperienced mechanics may experience some difficulties. The entire front of maintenance work can be easily performed with one pair of hands and will require no more than 40 minutes for each stand. Also, to replace components you will need a lift or a good jack, a set of wrenches or sockets, a hammer, Torx sockets and WD-40 fluid. To install new racks on Kalina you need:
- First, drive the car onto a level area with a solid foundation and place wheel chocks under the second axle of the car. Next, we stick the gearbox selector into the position of any gear and set the handbrake. If you have access to a lift, it will be safest to use it to service the chassis - since during repairs it is possible to pull out the jack from under the car;
Note! When preparing the car for replacing the struts, it is necessary to turn on the parking brake. When lifting the vehicle body, the suspension relaxes, as a result of which the struts lose dynamic tension, which lengthens the spring and interferes with comfortable dismantling. The clamped handbrake allows you to secure the suspension in a static position.
- Next, we release the fixing bolts and dismantle the wheel, after which we proceed to remove the brake mechanism. To make repairs faster, you can unscrew only the upper fastening, and simply release the lower one, which will allow you to turn the mechanism to the side without completely removing the structure;
- Then we clean the strut and bushings from dirt and treat them with WD-40, after which we leave the fixation points to remove any traces of corrosion. It is important not to try to dismantle the oxidized nuts, as this can lead to thread breakage - to remove a rack with a broken thread on the mount, you will have to disassemble the entire chassis of the car, which will significantly increase the repair time;
- After the parts are loosened, unscrew the fasteners and pull out the stand. Next, we clean the seats around the entire perimeter of the structure from dirt, and if desired, treat them with an anti-corrosion compound. It is also recommended to replace the bushings and sealing elements before installing a new rack;
- We install a new rack and assemble all the elements of the car according to these instructions in the reverse order. To increase the service life of components, it is recommended to lubricate all fixing fasteners with any technical composition before installation - this will prevent premature corrosion and reduce the rate of play formation between the connecting elements;
- A similar procedure is carried out with the remaining parts of the suspension. It is important to replace the anti-roll bar struts in pairs, that is, along the perimeter of the suspension axle - otherwise the service life of the new part is reduced and the controllability of the vehicle as a whole is deteriorated.
Replacing struts on a Lada Kalina will not cause difficulties even if you do the repair yourself, which will allow you to save a lot on car maintenance - the average price of this procedure at a service station is approximately $15-25, which is the cost of a full set of “Standard” class struts.
Source: https://zapchasti.expert/podveska/stojki-stabilizatora/stojki-lada-kalina.html
How to identify faulty racks: diagnostics at home with a guarantee of accuracy
The critical level of wear of the anti-roll bar struts on the Lada Kalina can be diagnosed by taking a closer look at the behavior of the vehicle - it is advisable to replace components in the following cases:
- When overcoming obstacles on the road, shocks are felt or extraneous sounds are heard in the suspension area;
- When moving in a straight line at low speed, the car spontaneously changes its trajectory;
- The car sways when reaching maximum speed or as a result of emergency braking;
- During maneuvering or when entering a turn, a strong body roll is observed;
- You feel a strong vibration load in the steering wheel or have difficulties in driving the car.
If several factors are similar, an urgent diagnostic inspection of the vehicle's chassis and suspension system is required. The best option would be to contact a certified service station, but you can detect the presence of worn-out struts at home - all you need is:
- Turn the steering wheel to the side all the way in any direction and, holding the disc, try to turn the wheel to the side - if you feel play, you need to disassemble the wheel liner and inspect the struts; you may have to change the struts soon;
- Next, we inspect the stabilizer bushings for mechanical deformation or leaks of technical fluid - detection of defects indicates depressurization of the structural unit, which will lead to moisture and small abrasive particles getting inside and grinding down the hinges in the future;
- Then we drive the car into the inspection hole and ask a partner to help - when periodically pressing on the car’s suspension under the fender liner, you need to place your palm on the outside of the strut - the feeling of play indicates the deterioration of the strut hinges and the formation of free space in the area of the wheel hub.
Note! The best option is to carry out a full diagnostic of the chassis every 15,000 km, which will prevent the possibility of accidental breakdown and promptly replace worn out parts. Remember, if problems with the struts are identified, the parts must be replaced with new ones as soon as possible, otherwise the operation of the vehicle is not safe
Neglecting maintenance only makes the situation worse and increases the cost of future repairs.
Remember, if problems with the struts are identified, the parts must be replaced with new ones as soon as possible, otherwise the operation of the vehicle is not safe. Neglecting maintenance only makes the situation worse and increases the cost of future repairs.
VAZ anti-roll bar: why is it needed and how to install it?
Car enthusiasts who are interested in tuning domestic cars asked questions: “Why do we need a stabilizer bar for VAZ cars. What is its advantage? We turned to a famous racer for help. Bronze medalist of the Russian Drag Racing Cup in the FSA class 2017, director of the Rostov tuning store Clubturbo Vladimir Tretyak gave a clear answer.
Alexandra Budilka learned about the details and nuances of VAZ tuning
— Vladimir, why are anti-roll bars installed on cars?
— Most VAZ sports cars, which are designed for racing on good quality tracks, have a fairly low suspension height and a low center of gravity. Body roll in such cars is usually not very noticeable due to the use of stiff suspension springs. But even with these cars, body roll when cornering can become a problem. To reduce roll, a stabilizer bar is used! The stabilizer comes into operation when the body rolls 3-4 degrees and prevents further development of the roll.
Anti-roll bar VAZ
— What material is it made from?
- Made of spring steel. It works like torsion springs: the more the car rolls, the stronger the resistance of the stabilizer, of course, within the strength of the material from which the stabilizer is made.
— How is the anti-roll bar installed? Can I do this myself or should I seek professional help?
— Those who are well versed in cars can easily install the stabilizer themselves, but if you wish, you can turn to specialists for help. Here I would like to note the important role played by the rubber hinges for attaching the stabilizer. Using several rubber hinges during installation, we cannot count on 100% rigidity of the stabilizer. Loose or worn stabilizer mounts reduce its effectiveness. When the stabilizer links are tilted, its effectiveness also decreases. When lowered, they begin to look up, this not only worsens the operating conditions of the stabilizer, but also increases the load on the stabilizer struts, which begin to “break.”
Anti-roll bar VAZ
In order for the stabilizer bar to be effective enough to prevent the development of roll or keep it within a given range, our tuning store has special brackets for attaching the stabilizer. They allow it to be more firmly secured to the side members of VAZ cars. Also, such brackets change the angle of his shoulders, bringing their position back to horizontal.
Anti-roll bar VAZ
— Will the stabilizer struts break out?
— When installing the brackets, there should not be such a problem, as well as deformation of the bushings for its fastening when lowering the suspension.
The bracket increases the efficiency of the stabilizer, and I advise car owners to pay special attention to this. If anyone has any more questions, our tuning specialists and I will answer them in the Rostov tuning store Clubturbo for Dovator 144/4. Tags Clubturbo Vladimir Tretyak anti-roll bar VAZ tuning VAZ
What is anti-roll bar LADA “Kalina”
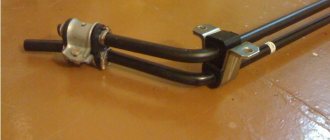
The suspension of the LADA Kalina, like any modern car, includes an anti-roll bar. This is a rod with a round cross-section. The part, made of high-strength spring steel, is attached to the body with clamps at two points through rubber bushings. Taking into account the location of components and assemblies located in the lower part of the car, the stabilizer has a complex shape, vaguely reminiscent of a U-shaped one. The ends of the stabilizer are connected by wheel suspension arms to redistribute the load between them. When a lateral body roll occurs, one end of the stabilizer goes down, the other goes up, and the middle part twists, providing resistance. The more the Kalina rolls, the stronger the counteraction of the stabilizer. The Kalina transverse stabilizer does not interfere with the vertical and horizontal vibrations of the body while driving. Its task is to reduce roll when turning and improve wheel adhesion to the road surface.
Anti-roll bar repair
The suspension is a multi-component unit of the car. This element includes a stabilizer, which is responsible for reducing roll and skidding during turns and braking, as well as for vehicle stability in any situation on the road.
The racks act as stabilizer elements and take a significant part of the loads, thanks to their wide functionality. The main task of these parts is to reduce the sway of the car while driving.
The struts connect the suspension to the body, creating a single whole mechanism thanks to which the system functions.
Many car owners are interested in the issue of self-repair and replacement of stabilizer strut elements.
The fact is that a full replacement of such elements costs a considerable amount, and repairs at a service station are also expensive.
Independent high-quality repair of struts is an inexpensive and short process, and knowledge of the tricks and nuances will allow each driver to carry out a range of work without compromising the current condition of the car.
Types of structures
The repair process differs in some features, depending on the type of fastening used in the car model. There are two types of parts:
- Ball joints are installed on a significant part of modern cars. They break due to insufficient production of lubricant and wear. Restoring such stabilizer elements can be problematic and sometimes impossible.
- Bushings - this type can be found much less frequently, however, there are not many problems during operation.
Let's consider all the stabilizer struts and the intricacies of their own repair.
Ball elements
Restoring them, as already mentioned, is not easy. Typically, the restoration process involves replenishing the amount of lubricant in the boot. The following actions are envisaged:
- Removing the support. The stages depend on the specific make and model of the machine, as well as its technical features.
- Determination of wear. You need to move your finger and determine how easily its rotation is ensured. If there is a crunch, repair is impossible.
- Restoring the flare of the ring that secures the boot. To do this, take a tube and place it in a vertical position.
- With your finger down, the support is inserted into the tube. Next, the retaining ring is removed using pliers.
- Use a screwdriver to lift the boot, which is then folded up and filled with lithol using a brush.
- The boot that covers the hinge must be sealed using a thin wire wrapped around the boot.
- The retaining ring is placed in its original place, and the functionality of the hinge is checked. Movement and movement of the finger should be difficult.
Attention! A part that has been restored has a shorter service life compared to faulty elements, so during operation it is important to take into account that such supports can be driven after 1,000 km.
Repair of structures with bushings
Typically, such models are used on expensive machines and are easy to repair.
To repair the rack yourself, you will need to acquire bushings; it is better to give preference to polyurethane options. This approach will make the service life of the spare part longer.
The procedure for carrying out the work is quite simple:
- The stabilizer links are removed using a special removal tool.
- The parts are inspected and the condition of the stabilizer tips is taken into account: if there is a noticeable increase in wear, the rod is completely replaced.
- The support to be removed is clamped in a vice. Using a hammer, knock out the bushing head. Usually this stage of repairing racks with your own hands goes without problems.
- The new bushing is lubricated with oil and placed in place of the old design, and clogged. The main thing is to secure the element correctly, since each model has a different method of fastening.
Replacement
Tool:
- jack;
- wheel wrench;
- open-end wrench 19;
- open-end wrench 17;
- socket wrench 13;
- pliers;
- ring wrench 22 and open-end wrench 9;
- special puller for tie rod ends;
- 2 special spring ties.
Execution order
- We park the car on a level surface and put it in gear.
- We jack up its front part on the desired side and remove the wheel.
- Using pliers, unscrew the nut securing the steering tip to the strut and unscrew it with a 19 mm wrench.
- Using a tip remover, remove the tip pin from the shock absorber strut. As a last resort, the finger can be knocked out by prying it up with a small pry bar and carefully tapping it from below.
- Using a 19mm wrench, unscrew the 2 nuts securing the strut to the steering knuckle. If necessary, hold the bolt heads with a 17 wrench.
- Using a 13 mm socket wrench, unscrew the 3 nuts securing the support to the body.
- We remove the entire shock absorber.
- We install two ties on the shock absorber spring and compress it until the upper part of the shock absorber is released.
- Using wrenches 22 and 9, unscrew the upper support nut on the upper side of the shock absorber.
- We remove the support, disassemble it, and remove the worn support bearing.
- We install a new one in its place.
- We install the shock absorber in the reverse order.
Replacing Kalina stabilizer bushings
To identify the car and reliably select the stabilizer bushing for Lada Kalina 1117 1117 Station Wagon , you should carefully select the vehicle modification. To do this, use clarifying information with data containing: power, measured in horsepower (example 103 hp), engine size (example 1.6 liters), type (example gasoline) and model + engine code, as a rule, this parameter rarely used, but you can only find it in the vehicle title, you can also pay attention to the drive axle (there are rear, front or all-wheel drive), and a mandatory parameter is the release date, which divides the vehicle model into restyling, pre-restyling, first and last year production.
This data serves to uniquely install spare parts during a certain production period, as manufacturers are constantly upgrading cars off the assembly line.
Select the vehicle modification to search for the stabilizer bushing
Engine: volume - 1.4 liters, power - 90 hp, type - petrol, model - VAZ-11194. Drive: front. Year of manufacture: 2008-present. time
Engine: volume - 1.4 liters, power - 88 hp, type - petrol, model - VAZ-11194. Drive: front. Year of manufacture: 2008-present. time
Engine: volume - 1.6 liters, power - 82 hp, type - petrol, model - VAZ-21114. Drive: front. Year of manufacture: 2004-present time
Engine: volume - 1.6 liters, power - 84 hp, type - petrol, model - VAZ1110. Drive: front. Year of manufacture: 2010-present time
Engine: power - 82 hp, type - electric motor. Drive: front. Year of release: 2013-present time
In the next step, for an expanded selection, you can enter the vehicle's Vin code to go to illustrated catalogs, where you can find the layout of parts down to the bolt and duplicates that are not in the catalog of analogues.
Replacing Kalina stabilizer struts is a fairly common question among VAZ owners. Next, you will learn how to change stabilizer struts on a viburnum.
- First of all, remove the wheel. The front axle needs to be lifted. This means that both front wheels should not touch the ground. To do this, use two jacks or lift the car on a lift.
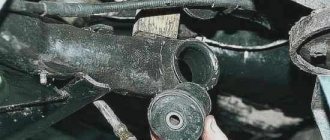
The stabilizer link is the connecting link between the stabilizer and the wishbone of the front suspension.
in the stabilizer link wear out or it simply breaks in half. Let's treat it with WD40. A breakdown stabilizer bar is accompanied by extraneous knocking in the front suspension when driving over uneven surfaces and large rolls of the Kalina when cornering.
- Unscrew the lower part of the stabilizer link from the lever. To do this you will need two keys No. 17. With one we unscrew the nut, with the second we hold the bolt from turning.
- The upper part of the stabilizer is put on the stabilizer rod through a rubber bushing. We remove it by hand, turning it. Or, if it doesn’t give in, we knock it down with a hammer. You can also lubricate the rod with silicone grease.
Thanks for subscribing!
- In the same way, using silicone grease, we put the new strut on the stabilizer bar.
- Insert the bolt, aligning it with the hole in the transverse arm. And tighten the nut using two No. 17 wrenches.
Now we install the wheel.
And we can go. When driving over uneven surfaces, loud metallic knocks are heard, and when cornering, dull thuds are also heard. The reasons, as always, there are a million of them, two of which interest us can be identified - wear of the rubber bushings of the stabilizer struts and wear of the bushings directly on the stabilizer bar. It is not difficult to identify this malfunction; just hang up the front wheels, climb under the car and pull the struts and the anti-roll bar itself. If suspicions are confirmed, it is necessary to perform simple, but quite important repairs.
First we dismantle the stabilizer bars
To perform this operation you will need: two 17 mm wrenches, a special extension, a hammer and penetrating liquid.
1. We hang the front axle of the car assembly using a jack and fixing the car with special supports. By default, the parking brake is set and wheel chocks are installed for the rear wheels.
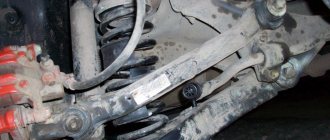
2. Using two wrenches, unscrew the nut securing the stabilizer bar to the wishbone (1).
Then, using a special extension, we knock out the bolt securing the strut to the lever (2).
Remove the strut from the stabilizer bar beam (3).
3. Installation is carried out in the reverse order of removal.
Now let's replace the anti-roll bar bushings
To do everything described below you will need: a 13 mm wrench and, in severe cases, a special penetrating fluid (WD40).
1. It would be a good idea to hang the front axle of the car completely on a lift. But, in a private garage, it is surprisingly rare to install a lift, so we hang the wheels using a jack and special supports. Don't forget about the wheel chocks for the rear wheels. Apply the parking brake fully.
2. Remove the stabilizer struts (described in detail above). Then, unscrew the two nuts securing the anti-roll bar mounting bracket (4).
We repeat this action on the other side. At the same time, while unscrewing the last nut, we hold the stabilizer beam with our other hand so that its fall is not unexpected.
3. Remove the anti-roll bar assembly and replace the rubber bushings. Installation is carried out in the reverse order of removal.
kalina-2.ru
Direct replacement of the front wheel bearing Lada Kalina
Now we will describe in detail the replacement process, with a description of all operations, how to remove and install all hub components.
- First, remove the decorative cap on the hub nut.
- Unlock and loosen the hub locknut itself.
- Unscrew the hub bearing locknut using a socket wrench.
- Remove the wheel and then unscrew the brake disc.
- Now we unscrew and remove the brake caliper, and secure it to the stand with wire.
- These bolts secure the repeater mechanism to the telescopic strut of the Lada Kalina.
- We unscrew these bolts with a key “17”, remove the Kalina rotary flywheel.
- Now we loosen the bolts that secure the ball joint to the knuckle.
- We disconnect the ball joint from it and remove the Kalina CV joint from the hub.
- Now the Lada hub together with the turning mechanism can be easily removed by hand.
- We place the entire structure on the jaws of a vice, and using a mandrel of a suitable diameter and a hammer, carefully press the hub, striking the end of the hub, NOT THE BEARING.
- The hub will fall out, leaving the inner part of the part on it, and the outer part in the knuckle body, as in the photo:
- Next, remove the retaining rings from the knuckle body using pliers.
- Now the rings will not interfere with pressing the outer part of the wheel bearing out of the housing with a puller.
This is also done using a hammer and a mandrel, holding the body in a vice.
Replacing stabilizer bushings for VAZ 2107
The purpose of the stabilizer is to reduce the roll of the car when passing uneven roads and when performing maneuvers.
On the seven, the stabilizer has four attachment points: two internal ones, which are located on the body spar, and two external points on the lower suspension arms. The outer bushings are subject to greater wear due to the significant load on them. But replacement of the VAZ 2107 stabilizer bushings is recommended, for all attachment points.
Tool for replacing stabilizer bushings yourself
- A set of keys;
- hammer;
- jack;
- vice;
- soap solution;
- flat screwdriver;
- WD-40;
- stabilizer bushings (original parts number – 2101-2906040);
Sequence of work
It is better to carry out all work related to replacing stabilizer bushings on an overpass or inspection pit.
Before disassembling the units, all threaded connections must be treated with WD-40 liquid: the stabilizer mounting brackets are constantly exposed to moisture from the road surface, as a result of which rust forms on them.
Signs of the need to replace stabilizer bushings
The main signs of wear on the stabilizer bushings are knocking and squeaking noises when the car is moving on an uneven road. In this case, it is necessary to immediately replace them with new ones.
To check the condition of the bushings in a garage, you need to strongly shake the stabilizer in the vertical direction. The wear of the bushings will certainly manifest itself as a creaking or knocking sound, and play will be felt in the connection of the stabilizer with the side members and levers. With serviceable bushings, the “stabilizer-spars-levers” combination creates the impression of a single whole.
Replacing stabilizer bushings
There is no need to remove the sway bar to replace the outer bushings. It is enough to remove the mounting brackets. Bracket connections are exposed to water and dirt. Therefore, in addition to a set of keys and a mount, you will need a tool that makes it easier to work with rusted threads. For example, WD-40.
The procedure for replacing the outer bushings is as follows:
- Treat the threads of the studs holding the brackets with an anti-rust agent.
- Unscrew the nuts and remove the brackets, remembering their location.
- Press the stabilizer up, inserting a pry bar between it and the lower arm.
- Remove old bushings.
- Inspect the stabilizer at the bushing attachment points. If significant wear is noticeable, replace it with a new one.
- Put on new bushings.
- Install the brackets and tighten the nuts. It is better to tighten smoothly, in three stages, gradually increasing the force.
To replace the inner bushings, the anti-roll bar must be removed. To do this, you will have to unscrew the brackets at all four mounting points.
Rear anti-roll bar VAZ 2107
In the rear suspension, the role of a stabilizer is performed by the VAZ 2107 transverse link. If you need to further increase the stability of the car, it is necessary to carry out tuning by installing a rear stabilizer bar.
The rear stabilizer of a VAZ 2107 can be made from the front stabilizer of a VAZ 2110. You will also need studs, clamps (or a pipe for their manufacture), one VAZ 2110 torque rod, two VAZ 2110 stabilizer struts and stabilizer rubber bands with fastening clamps.
THIS IS INTERESTING: How to remove a Ford Transit heater radiator
To work, you need a grinder, a welding machine, a blowtorch, a drill, and a vice.
The procedure for manufacturing and installing the rear stabilizer is as follows:
- Prepare clamps for attaching the rear stabilizer to the bridge by cutting them from a pipe with a diameter of 57 mm.
- Shorten the VAZ 2110 stabilizer by 5-6 cm and bend it 90 degrees, preheating it with a blowtorch. It must be cooled in air; the use of water or oil for cooling is unacceptable.
- Make two stabilizer mounts to the suspension from the VAZ 2110 jet rod, welding them to the stabilizer strut.
- Assemble the structure by installing the bushings.
The steel stabilizer bracket 2107 in the form of a bracket is used to attach the transverse link connecting the lower arms of the front wheels. In classic models of Zhiguli 2101-07 there are 6 such elements. As is the case with other components of these machines, maintenance of the anti-roll bar can be performed by the owner himself, if he so desires. The main thing is to have time and understand what this service involves.
Purpose and design of the unit
VAZ 2101-07 cars use a front stabilizer, whose task is to distribute the load on the chassis when turning, keeping the car in a horizontal position. Without it, under the influence of various forces, the car body will begin to tilt strongly to one side, which, even at average speed, can lead to a coup.
Source: https://kekso.ru/avtovaz/kak-pomenjat-rezinki-stabilizatora-na-vaz-2107/
Operations for replacing the wheel bearing of Lada Kalina
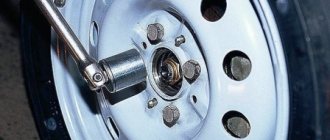
The work of replacing the wheel bearing of a Lada Kalina can be carried out on a level surface, but it is more convenient to do so on an inspection ditch or a lift. Remove the hub cap. Using a narrow chisel, straighten the dented shoulder of the hub bearing nut in two places. Apply the handbrake, engage first gear and place shoes under the wheels.
Use a 30mm socket to loosen the hub bearing nut. The nut is tightened with a large torque, so the head and knob must be strong enough to transmit the necessary force. Loosen the wheel mounting bolts. We hang up the front part of the car (namely both front wheels, because otherwise the anti-roll bar interferes with dismantling, pushing the suspension elements up). We remove the wheel, brake pad guide together with the caliper, and tie the brake disc with the caliper so that they do not hang on the brake hose.
Unscrew the hub bearing nut completely and remove the washer. We pass bolts about 130 mm long with an M12 × 1.25 mm thread through two diametrically opposite holes in the brake disc.
We screw the bolts into the holes of the hub to a depth equal to its thickness.
By sharply hitting the bolt heads with the brake disc, we press out the hub.
We unscrew the fastening of the ball joint to the steering knuckle (see the article “Removing the ball joint from Lada Kalina”) and remove the CV joint from the bearing hole.
In another method of dismantling the hub, we first disconnect the ball joint and remove the CV joint from the hub.
Rotating the hub, we knock it out of the steering knuckle through a soft metal drift.
Remove the retaining ring.
Using a puller, we press the bearing into the cup located outside the steering knuckle, while the bolt presses on the inner ring of the bearing through the washer from inside the knuckle.
Almost always, when pressing out the hub, a bearing ring remains on it, which is difficult to remove due to the tight fit on the hub.
You can use a puller if its paws fit into two small grooves on the hub. If the puller does not provide the required force, then...
...pry it up with a screwdriver and remove the dirt protection ring...
...and use a chisel to move the bearing ring.
We remove the ring and, if necessary, use a file to clean out the nicks on the hub.
We install the mud ring and seal it on the hub. Clean and lubricate the inner surface of the steering knuckle.
Use a puller to press the new bearing into the steering knuckle. In this case, the large puller washer rests on the steering knuckle from the inside so as not to damage its mud rings, and when pressing, the new bearing can be pressed through the old bearing, which will transmit force only through the outer ring. Installing the retaining ring
Use a puller to press the hub into the bearing. Now the puller washers rest against the inner race of the bearing and the hub. We carry out further assembly in the reverse order, tighten the bearing nut to the prescribed torque and be sure to lock it by jamming the collar.
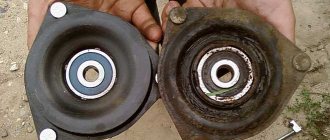
The support bearing is the main element of the upper support of the front shock absorber strut, which serves for its movable connection with the body. While the car is moving, it experiences enormous shock loads, a significant part of which is taken by the “support”, absorbing and distributing them.
The support bearing itself is a rubber cage of a certain diameter with steel balls placed around its circumference. It is protected from above and below by thick rubber gaskets.
Anti-roll bar, rear suspension, A 110.2916.010
Anti-roll bars prevent the suspension from moving differently, thereby reducing car body roll when moving along a curved path.
Nowadays, most modern cars have independent suspension on the front and rear axles, and usually both suspensions are equipped with anti-roll bars. To prevent variable suspension travel and reduce car body roll when moving along a curved path, specialists for VAZ vehicles of the 2110 family, in combination with a front anti-roll bar (diameter 21mm), suggest using a rear anti-roll bar with a diameter of 14mm. Since by increasing the rigidity of the front stabilizer by increasing its diameter (up to 21mm), in order to maintain the car’s turning, it is necessary to increase the angular stiffness of the rear suspension. The simplest way to achieve this is with the help of an additional stabilizer welded into the center of the open section of the lever connector. In this case, different diameters of the additional stabilizer will provide different angular rigidity.
For use with 21mm diameter front stabilizers, a 14mm diameter rear stabilizer is required. In any case, the selection of suspension elements, as well as the adjustment itself, should be trusted to specialists, and the products must be certified by the relevant manufacturer. Therefore, we can assume that the use of “reinforced” stabilizers is effective if a number of conditions are met, including:
1. Application on a dynamic car that provides higher lateral acceleration values. 2. The use of tires with increased grip properties and more rigid in the lateral direction. 3. Application on a relatively new car, the rigidity of the body of which is not weakened by high mileage on bad roads. 4. Apply appropriate suspension settings (vertical stiffness and damping forces), as well as suspensions with high lateral stiffness.
Rear suspension stabilizer bar installation diagram
Rice. 1. Rear suspension beam and additional rear suspension anti-roll bar (diameter 14mm) - A110.2916.010
1 — levers 2 — lever connector 3 — stabilizer (torsion part) 4 — connector amplifier 5 — shock absorber mounting bracket 6 — hub unit flange 7 — rear suspension arm hinge
Dimensions: 121x5x4 cm.
Weight: 1.47 kg.
The Spare Parts-Service online store offers motorists all the parts and accessories they need for their vehicle. Now you don’t need to search for a long time for trusted suppliers of car spare parts, because our catalog has everything at attractive prices.
Lada Kalina - front wheel bearing
The front wheel bearing marking is 6-256707 AKE12.
When choosing a manufacturer of spare parts for the front hub for the Lada Kalina, the question arises about the manufacturers. Let's list Russian manufacturers:
- 23 PZ (Vologda, VBF marking) - good value for money;
- SPZ-4 (Samara, SPZ GROUP marking) - medium quality option;
- EPK (Saratov, marking 3PZ, VPZ) - not an expensive option, choose if you find 23 PZ.
- Craft, APP - not recommended for purchase.
Kalina front wheel bearing price
Of the options presented above, the cheapest third is EPK. The cost is on average 500 rubles. 23 PZ produces such products at a price of 700 rubles. The LSA brand, a Slovak factory, is also sold, expensive but at the same time high-quality products.
Front wheel bearing Kalina - dimensions
Parameters and dimensions of bearing 6-256707: Hole diameter: 35 mm; External diameter: 68 mm; Height: 37 mm; Speed: 3500 rpm.
How to identify a faulty stabilizer link before it breaks on the highway
The average lifespan of stabilizer struts on a Lada Grant is 40-50,000 km, however, if budget segment components are installed or used on roads with insufficient surface quality, the replacement procedure may be required much earlier. The most pronounced signs of deterioration of stabilizer struts are the following factors:
- When driving straight at low speed, the car wobbles its wheels;
- When driving at low speed, the car spontaneously deviates from the set course;
- There is a strong vibration load on the steering wheel or an increased consumption of power steering fluids is observed;
- When driving near maximum speed, the vehicle's suspension begins to sway;
- There are creaks or impacts in the area of the ball, strut or wheel of the car.
Remember, if these factors are present during operation of your car, it is necessary to diagnose the chassis. The best option would be to check at a service station, but the inspection procedure can also be carried out at home - all you need to do is:
- Turn the car's steering wheel all the way and try to turn the wheel, holding the disc with your hands - the feeling of play when the wheel moves indicates that the base of the joint and the wheel hub are worn down. This factor reduces vehicle controllability;
- Next, we try to rock the car by chronologically pressing on the wheel liner - successful completion indicates serious deterioration of the struts. In this case, it is prohibited to operate the car until the chassis is completely repaired;
- Then we inspect the stabilizer struts for deformation - worn bushings or leaks of technical fluids also require prompt replacement of components.
By making it a rule to carry out a full diagnostic inspection every 10,000 km, you will completely protect yourself from accidental breakdowns or critical situations on the road, and will also increase the life of the vehicle as a whole. Remember, timely replacement of components will cost much less than emergency repair of the system after the fact.
Replacing the wheel bearing Lada Kalina - installing a new part
- After pressing out, we take out the puller; the fist without a bearing looks like this:
- Clean it from dirt and wipe the inside - the seating surface.
- Install the retaining ring on one side.
- On the other side, press in the new wheel bearing using a puller or press and secure it with a locking ring.
- Let's return to the hub, first remove the protective ring.
- Next, we clamp the part in a vice and use a sharp chisel to move the bearing race from the hub of the Lada Kalina by 1 cm.
- Now we hook the clip with a puller and pull it off the hub.
- We press the hub into the inner race of the new part.
- Now the whole assembly is assembled.
- Reassemble the assembly in reverse order. (See points No. 10-No. 1.)
Replacing the anti-roll bar on a LADA
The suspension parts of the LADA “Kalina” wear out when driving on uneven roads and require periodic replacement. The Kalina anti-roll bar is a strong and durable part that requires replacement only as a result of an accident. The repair of this unit consists of replacing the bushings, the rubber of which does not withstand long-term use on our roads.
What is anti-roll bar LADA “Kalina”
The suspension of the LADA Kalina, like any modern car, includes an anti-roll bar. This is a rod with a round cross-section. The part, made of high-strength spring steel, is attached to the body with clamps at two points through rubber bushings.
Taking into account the location of components and assemblies located in the lower part of the car, the stabilizer has a complex shape, vaguely reminiscent of a U-shaped one. The ends of the stabilizer are connected by wheel suspension arms to redistribute the load between them.
When a lateral body roll occurs, one end of the stabilizer goes down, the other goes up, and the middle part twists, providing resistance. The more the Kalina rolls, the stronger the counteraction of the stabilizer,
The Kalina transverse stabilizer does not interfere with vertical and horizontal vibrations of the body while driving. Its task is to reduce roll when turning and improve wheel adhesion to the road surface.
Signs of malfunction of the anti-roll bar LADA “Kalina”
Malfunctions of the suspension stabilizer appear when cornering and driving over uneven roads. The cause of the malfunction is broken bushings or poor tightening of the nuts of the clamps holding the stabilizer bar. This manifests itself as follows:
- there is a knocking noise under the hood when driving through potholes and potholes;
- the car begins to “go to the side” when driving in a straight line and you have to constantly adjust its trajectory (this is especially noticeable at speed);
- the car sways and rolls heavily when turning or braking;
- Excessive roll appears during maneuvering.
You can independently check the bushings and stabilizer mounts as follows:
- turn the wheels to the side until they stop, freeing up space in the wheel well;
- grab the Kalina stabilizer with your hand and pull strongly in different directions;
- If there is the slightest play, the stabilizer bushings must be replaced.
A more detailed analysis of the condition can be made by driving the car onto a pit or lift. This way you can determine exactly where the knocking is coming from and which part needs to be replaced.
What is needed to replace the Kalina stabilizer
To replace the anti-roll bar you will need:
- standard set of socket wrenches (socket wrenches can be used);
- WD-40 liquid;
- jack;
- special device (extension);
- hammer;
- stabilizer bushings “Kalina”;
- stabilizer's pole;
- stabilizer bar.
To access the mounts of the struts and stabilizer, you must place the car on a viewing hole or a lift.
How to replace the Kalina stabilizer
To replace the bushings and stabilizer on a car, you need to perform the following steps:
- install the car on a lift or inspection hole (in the latter case, you need to place wheel chocks under the wheels);
- treat threaded connections with WD-40;
- unscrew the left and right nuts securing the stabilizer struts;
- unscrew the nuts holding the left and right stabilizer mounting clamps;
- dismantle the struts, bar and stabilizer brackets;
- Unscrew the nuts securing the stabilizer links to the arms;
- knock the stabilizer struts off the rod using a polymer or wooden hammer;
- inspect the stabilizer pads (bushings) and, if necessary, replace them with new ones;
- inspect the condition of the stabilizer bar;
- if the ends of the rod are in different planes or it has other signs of deformation, a new rod should be used;
- inspect the condition of the stabilizer struts and their bushings;
- replace worn bushings and deformed struts with new ones;
- lubricate the threaded connections with graphite lubricant;
- install the bar and stabilizer pads on the car;
- tighten the nuts of the stabilizer mounting clamps;
Tip: when using split pads, the nuts must be tightened until the gap in them is eliminated. To do this, first tighten the front, then the rear fastening nut.
- tighten the nuts holding the Kalina stabilizer struts;
- if the replacement work was carried out on a lift, it is necessary to lower the car to load the wheels;
- make a final tightening of the threaded connections of the clamps and stabilizer struts (4.5-5.3 kgf and 1.3-1.6 kgf, respectively).
Replacing stabilizer struts on a Lada Kalina with your own hands: detailed instructions for beginners
Dismantling and installing racks on Kalina occurs according to an intuitive scenario, however, if the vehicle maintenance instructions are not followed, inexperienced mechanics may experience some difficulties. The entire front of maintenance work can be easily performed with one pair of hands and will require no more than 40 minutes for each stand. Also, to replace components you will need a lift or a good jack, a set of wrenches or sockets, a hammer, Torx sockets and WD-40 fluid. To install new racks on Kalina you need:
First, drive the car onto a level area with a solid foundation and place wheel chocks under the second axle of the car. Next, we stick the gearbox selector into the position of any gear and set the handbrake. If you have access to a lift, it will be safest to use it to service the chassis - since during repairs it is possible to pull out the jack from under the car;
Note! When preparing the car for replacing the struts, it is necessary to turn on the parking brake. When lifting the vehicle body, the suspension relaxes, as a result of which the struts lose dynamic tension, which lengthens the spring and interferes with comfortable dismantling
The clamped handbrake allows you to secure the suspension in a static position.
Next, we release the fixing bolts and dismantle the wheel, after which we proceed to remove the brake mechanism. To make repairs faster, you can unscrew only the upper fastening, and simply release the lower one, which will allow you to turn the mechanism to the side without completely removing the structure; Then we clean the rack and bushings from dirt and treat them with WD-40, after which we leave the fixation points to dry off traces of corrosion
It is important not to try to dismantle the oxidized nuts, as this can lead to thread breakage - to remove a rack with a broken thread on the mount, you will have to disassemble the entire chassis of the car, which will significantly increase the repair time; After the parts are loosened, unscrew the fasteners and pull out the stand. Next, we clean the seats around the entire perimeter of the structure from dirt, and if desired, treat them with an anti-corrosion compound
It is also recommended to replace the bushings and sealing elements before installing a new rack; We install a new rack and assemble all the elements of the car according to these instructions in the reverse order. To increase the service life of components, it is recommended to lubricate all fixing fasteners with any technical composition before installation - this will prevent premature corrosion and reduce the rate of play formation between the connecting elements; A similar procedure is carried out with the remaining parts of the suspension. It is important to replace the anti-roll bar struts in pairs, that is, along the perimeter of the suspension axle - otherwise the service life of the new part is reduced and the controllability of the vehicle as a whole is deteriorated.
Replacing struts on a Lada Kalina will not cause difficulties even if you do the repair yourself, which will allow you to save a lot on car maintenance - the average price of this procedure at a service station is approximately $15-25, which is the cost of a full set of “Standard” class struts.
Replacing stabilizer struts and bushings — Lada Kalina Sedan, 1.6 l., 2005 on DRIVE2
When replacing the pads, I noticed cracked bushings and deformed rubber bands of the stabilizer struts. I decided not to wait for the cold weather and replace it while it was still warm outside. I wanted to buy everything made of polyurethane, but there weren’t any in the store, so I took regular ones.
Stabilizer struts and bushings
I did the replacement in a pit, put bricks under the front wheels and the muzzle became higher, it was much more convenient. I smeared liquid soap on the barbell and removed the elastic bands.
Old bushing with cracks
Rod without posts and bushings
Only during the removal process I got tired and decided to remove the stabilizer bar for some reason). I put on new rubber bands, and adjusting the rubber bands on the bar was a little difficult.
Sleeve
Left-hand side
Right side. I checked the daisies at the same time - they are normal
This bolt broke off. Rukozhop)
During translational movements, there is a slight play in the backstage cardan. H.z. is this normal...
And this shaft has a little play
When tightening the nut that secures the bushing to the body, the bolt broke off, I didn’t seem to tighten the nut very tightly, in the future I’ll tighten it more carefully). Then I adjusted the distance between the cardan and the rocker, because the gearbox lock pin touched the lever during installation. The noise from the suspension has certainly decreased, and crickets in the cabin are now more audible).
Price: 400 ₽ Mileage: 94,000 km
www.drive2.ru
Replacing stabilizer struts at home: servicing Granta correctly
The work of installing new struts on Grant is not difficult due to the absence of complications in the design of the chassis - you can replace components with new ones with your own hands and without specialized knowledge. The entire scope of work will require no more than 1.5 hours of time to replace each element, as well as the availability of sockets or wrenches, a jack and hexagonal Torx, which come with the car. To replace the racks you need:
- First, prepare the vehicle for safe servicing, namely, park it on a level area and place wheel chocks under the wheels of a bridge that cannot be repaired. Next, squeeze the handbrake and engage any gear using the selector;
Note! After lifting the car with a jack, the car's suspension system will lose the force of dynamic tension, which will relax the struts to the maximum - the hand brake allows you to fix the suspension in a stable position and secure the repair procedure. Remember, without the handbrake on, it is quite difficult to pull the rack out of the raised position!
- Upon completion of the preparation procedures, we lift the required part of the vehicle with a jack and dismantle the wheel and brake mechanism. For convenience, the brake mechanism does not need to be completely removed - just unscrew the upper fastenings and release the lower ones, then turn the structure to the side;
- Next, we get to the racks and clean all the dirt from the parts, after which we treat the fixation units with WD-40 liquid. Under no circumstances try to unscrew the oxidized nuts - the licked threads will force you to cut out the struts along with the fasteners, which will significantly increase the repair time and require disassembling the entire chassis;
- After the mount is loosened, carefully unscrew the fixing nuts and pull out the racks. If the springs are old and have sagged a lot, you can raise the suspension using a second jack - just install the device directly under the car's axle and lift the suspension.
- Now you can install a new rack, but before installation it is recommended to clean the entire suspension from traces of scale or deposits, and also treat it with a Motul-type anti-corrosion agent. When installing components, it is important to replace all damaged nuts, as well as pre-lubricate all fastening elements with any technical compound - this will significantly increase the service life of the new part;
- At the end of the maintenance procedure, we assemble the entire structure according to these instructions in the reverse order. The remaining stabilizer struts along the entire perimeter of the vehicle are changed in a similar way, regardless of the structural location of the bridge.
This is interesting! To carry out a similar procedure on domestic cars, service station employees ask for approximately $10 for each element, which significantly increases the cost of servicing the car.
Replacing struts with your own hands does not require specialized skills and is carried out according to an intuitive scenario, which allows you to save a lot on car maintenance without losing the quality of the final result - it’s better to buy struts of higher quality than to overpay for such a simple operation!
CHOOSE SECURE PAYMENTS After payment you will receive an electronic cash receipt