General principles
The nuances of installing speakers in the rear and front doors may differ, but the general principles are as follows:
- It is better to carry out all work carefully;
- audio preparation is available in all models, even in the absence of standard speakers;
- it is better to select speakers 16 cm for the front doors, 13 cm for the rear;
- It is better not to cut standard connectors, but to purchase adapters;
- to improve sound quality, it is necessary to install sound insulation;
- The speakers are installed on spacers.
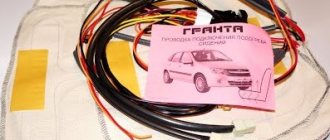
Installing acoustics on a Lada Vesta involves purchasing not only speakers, but also a spacer, if one is not available. Some craftsmen cut out a transition frame from plywood. The purchase kit includes:
- spacer,
- rivets for its installation,
- adapter for connecting acoustics.
Before you begin installing a standard multimedia system, you need to know what is included in the audio preparation of the Lada Vesta. Starting from the Classic version, there is a minimum required for connecting a car radio, i.e. All the necessary harnesses and wires have already been installed in the Lada Vesta in order for the standard acoustics to be connected.
There are no wires for tweeters in the triangle of mirrors. When installing a multimedia system in a Lada Vesta, just pull out the plug. To do this, carefully remove the bar; behind it there are ISO and FAKRA connectors for connecting an antenna, as well as USB and AUX connectors. You can install a standard multimedia system or a 1DIN radio in the resulting hole.
Installing a radio in a Lada Vesta is not very difficult; just connect the appropriate harnesses.
It should be taken into account that without significant modifications it is impossible to mount a 2DIN car radio.
Installing speakers in Lada Vesta has its own subtleties.
Speaker installation
In order to install speakers in the front doors of Lada Vesta, no special preparation is required; it is enough to remove the layers of insulating material at the places where the speakers are attached. For installation it is necessary to cut out the gaskets. If you are using acoustics of a suitable diameter, you can cut pads from felt.
Speaker Installation
Installing 16 cm speakers in the front doors has its own peculiarities. The standard fastening involves fastening with 3 self-tapping screws, therefore, to install 16 cm acoustics, you need appropriate spacers for the speakers in the Lada Vesta. The diameter and thickness depend on the size of the speakers in the doors that are supposed to be installed.
No adjustment is required, you need to ensure that the speakers do not come into contact with the car body, the gap should be approximately a centimeter. According to the proven scheme, acoustics are installed in the rear doors.
Installation of an audio system in the rear doors
There are 3 types of speaker systems:
- Coaxial. In this option, all available speakers are located in one housing. The most acceptable option in terms of price and quality.
- Component. This audio system has 3 speakers, each of which is responsible for reproducing its own frequency level. The speakers are located in different housings on the same platform. It is the best in quality, but also the most expensive.
- Broadband. There is one speaker that reproduces all frequencies.
Standard speakers Lada Vesta
The basic version of the Lada Vesta has a wideband speaker. But not everyone is satisfied with the quality of playback in this format.
To reinstall the audio system, you need to purchase spacers for the speakers. They will help avoid vibration, rattling and other unnecessary sounds, and ensure purity of sound.
In order for the sound to be of high quality, you need to purchase speakers with a little more power than what comes from the radio. Fitting dimensions for speakers on Lada Vesta doors:
- front – 160 mm;
- rear – 130 mm.
Be sure to consider how thick the stand is.
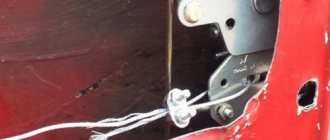
First of all, it is necessary to remove the insulation where the speaker is attached. If the standard speakers are being replaced, then the old speaker system must be dismantled. There may be a piece of pull rod left inside the rivet. It needs to be carefully knocked out and the caps drilled out.
Speakers with a diameter of 16 cm are attached to 3 self-tapping screws. Be sure to use a spacer. Separate adjustment is not required, but the gap between the acoustics and the body should be about a centimeter.
Installation of speakers in the rear doors of Lada Vesta is carried out according to a similar algorithm. The hole for the speaker is the same size as in the front doors. When installing the casing, the algorithm is as follows:
- Remove the window regulator handle if it has a mechanical drive.
- Remove the door handle trim to gain access to the two screws.
- Unscrew the screws, unclip the rivets and remove the door card.
First of all, it is necessary to remove all the insulating material from the seats where the speakers will be located. When replacing standard speakers, it is necessary to disconnect the ground, remove the trim and baffles. Carefully pull the speaker system towards you and disconnect all wires.
When installing speakers measuring 16 cm or smaller, wood spacers are sufficient and there is no need to cut metal.
Mandatory for those who have Vesta under warranty
Important! When installing, please note that the plug is not standard, but from Renault Nissan. In order not to lose the possibility of warranty service, you must purchase an adapter type CT55-17 or ZRS-AG-22.
Reassembly of all equipment after installation is carried out in the reverse order. The casing is securely fixed and the process is considered complete.
For the Lada Vesta car, not all trim levels have standard acoustics. But audio training is everywhere. Therefore, it is easy to install speakers with your own hands on both the front and rear doors at the owner’s request. To ensure high-quality sound, you should not forget about the spacer and make sure that the speaker fits comfortably into the depth of the door, where there is a seat for it. It is better to select a size no larger than 16 cm in diameter, then there will be no problems during installation.
Acoustics
Next, the actual installation of speakers in the doors of the Lada Vesta begins.
First, all insulating material is removed from the seats where the speakers will be fixed. The door layout in this case is the same as that of the Renault Logan. Instead of the usual 4 mounting holes for speakers, there are only 3. If you intend to install acoustics with a diameter of 16 cm or less, then you will not have to cut the steel. Wooden spacers will be sufficient. As for the thickness, it should be such that the installed speakers do not interfere with the assembly of the doors.
Connectivity is not that simple. The fact is that there is already wiring in the doors from the factory, but the plug is non-standard - not from AvtoVAZ, but from Renault-Nissan. You cannot cut it, as this will lead to loss of warranty rights. The only way out is to separately buy and install an adapter like CT55-17 or ZRS-AG-22.
Separate installation of the mesh in the door cards is not required. Therefore, all that remains is to assemble everything in reverse order.
A clear example of installing speakers in the doors of a Lada Vesta is shown in the video.
Recommendations for removing the casing
The speakers can only be installed by removing the trim from the car doors. This process must be done with care to avoid scratching the plastic. The casing is attached with self-tapping screws and 4 “hedgehogs”. They often break when dismantling the casing, so it is better to get spare ones.
To pry off the plug and window lifter buttons, you must use a card, not a screwdriver.
It is impossible to install a sound system in a Lada Vesta car without removing the door trim. When dismantling the cladding, be extremely careful not to scratch the plastic. Under no circumstances should you use a screwdriver; we only use a plastic card.
To dismantle the plug at the end of the door, pry it off with a card; there are special recesses at the bottom. In the same way, the window lift buttons are dismantled using a card; the fastening antennae are located at the back and on the sides in front of the MUS.
Removing the trim
Removing the trim
Removing the trim
Removing the trim
The casing itself is attached, in addition to self-tapping screws, to 4 more “hedgehogs”. They will definitely break if you do not use a special removal tool. The Lada Vesta has hedgehogs from Nissan or Renault, but if you modify the grand ones, which are much stronger and cost several times less, you can save money.
Thus, the trim from the left door is removed. Removing the trim on the right side has its own characteristics. There is no need to remove the power window buttons and look for the secret screw plug. Simply remove the handle cover. To do this, you need to pry the plugs from the bottom; there is a special groove in it, using a plastic card. Then you need to unscrew two 10 mm screws, the next step is to remove the trim, as with the left door.
Lada Vesta Luxe
AvtoVAZ has equipped the top version of the sedan to the maximum:
- Multimedia system with navigation (7" color display with TouchScreen, FM/AM with RDS function, USB, SD card, AUX, Bluetooth, Hands free), 6 speakers;
- Standard speakers in spacers (16 inches);
- Tweeters in mirror triangles (item 281489095r).
Let us remind you that instructions for installing speakers are in a separate article. By the way, it is possible to connect an amplifier or a rear view camera to Vesta’s standard radio.
Hello everyone) today I want to tell you how I installed music in my West) As I wrote earlier, the audio preparation in the West is somewhat different from the audio preparation on other Lada models, since the door has a Nissan (or Renault) connector for connecting their native speakers, which cannot be cut, otherwise all electrics will be void of warranty. I’ll make a reservation right away, after the last entry the guys sent me an adapter in the comments that can be ordered on the Internet, but the problem is that, firstly, it’s a wait, and secondly, it costs from 150 rubles apiece, and a minimum order must be ordered 4 pieces. And this is the least expensive option, there are also more expensive 200))) In general, I’ll return to the connector later, but now about the installation itself:
For acoustics itself, I bought a pioneer 180ub head and jbl 602 speakers. Why did I buy this particular one? Yes, because, by and large, I’ve been sick of car audio for a long time, and I don’t really want to invest in this business again)
Let's start with installing the GU, there will be practically no problems with this, we press the plug under the GU with our fingers from above and below, take it out, then we see the ISO connectors, connect them to the GU, everything is connected in addition to the GU antenna, to connect the antenna, you need to find an adapter from the Nissan connector to a regular one, and enjoy the sound... and also find the connector itself in the panel, which is not known where it is located, if it is even present in the classics, although there is an antenna, that means it should be))) but I’m not interested in the radio, I listen flash drives)
and now the most interesting thing))) removing the door trims, you have to remove them, put the speaker through the windows, and fixing it is unlikely to work, and even if it does, you still won’t be able to get to the plug))))
There are instructions for this on YouTube, at this link:
But I didn’t find instructions on the Internet for the right door, so I’ll tell you in more detail about the nuances of removing the trim on it))) Firstly, you don’t need to remove the power window button on it, and there is no secret self-tapping screw in it, just unscrew the handle, this is done as follows : on the bottom side of the handle there are grooves into which you can put a card, and by lifting the cover of the handle, remove it; inside there will be two 10mm key screws that need to be unscrewed, and that’s it, the same as on the left door. Don’t forget to remove the corners for the tweeters, which are installed opposite the rear-view mirrors.
In general, when you remove the casings, you will see the hole for the speaker sealed with Shumka, tearing it off, you will find that the holes for the screws for the speakers correspond to the Renault version. and installation of conventional speakers without spacers is not advisable, BUT! if you want, you can push them in, which is what I did, for this I pasted a vibra around the perimeter of the hole so that it would press the speaker along the perimeter, because the speaker can only be screwed on with 2 self-tapping screws, and even then, the holes even for them are located a bit narrow, but if the speaker lift it above the door, then everything can be screwed in at an angle, and everything will sit quite firmly. Again, I repeat that this option is extremely undesirable, it must be done through spacers, I just personally need the music to play in the background, and no, no listen, that’s why I was lazy and didn’t make them)
now the very moment that I spoke about at the beginning, this is the same adapter))) in general, wait a month for it to arrive, there was no particular desire, so what I came up with (although 1 person in the comments suggested this idea) I went and bought it at in the store there were 4 thin daddy terminals, as well as terminals for connecting speakers, I soldered the whole thing on the job while I had the opportunity, and put the same terminals that I inserted into the plug on heat shrink, right at the root, so that nothing would short-circuit, after Why else did I additionally wrap the whole thing with electrical tape))
Read more: How to wash frosted glass without streaks
here, by the way, it is very important not to blunt it and not immediately confuse the polarity) By the way, for those who are interested in whether there is wiring for the tweeters, I will say that I did not find it, apparently it is only available with the multimedia package, and you will have to pull it yourself )))
And then we close the upholstery and enjoy the sound))) although no, you won’t be able to enjoy the sound if, before installing the upholstery, you don’t glue the mesh under the speaker))) yes, while you don’t have any music, it stands quite tightly, but all this density ends after 5 minutes of listening to music, and the rattle from it will be such that it won’t seem a little)))
By the way, an interesting point, in the video they paid attention to the disgusting noise in the doors, but when I removed the trim, the doors turned out to be quite well glued with some kind of vibration-type material, only instead of foil on top there was Movil)) and the door was not only glued along the outer shirt, as well as from the ends) although only up to half the door)))
By the way, I don’t know how it happened, but the music plays quite well, the sound is quite high-quality and clear, of course there is no deep bass, but here it’s more likely a matter of the GU and the acoustics themselves)))
Now, immediate answers to popular questions: 1) dimension for the speakers, 16 cm 2) depth to the glass, deep enough, I didn’t tear off the factory splen, I didn’t put my hand in there, but it feels like there’s still room enough to reach the glass. 3) the distance from the standard hole and the casing is also decent, the spacers should fit in easily)))
Installing music in a car yourself is not an easy task. You need certain knowledge on the connection diagram and how to work with the casing. You can install speakers in the Lada Vesta in the front and rear doors, at the request of the owner. Both processes have their own nuances. The quality of the speakers also matters. In models that do not have standard speakers, audio preparation is still carried out. How to install speakers yourself
Vesta's standard MMS
All versions of Vesta, with the exception of the basic one, have MMS installed. The minimum configuration of the car is equipped only with an audio system. The main functions of the MMC are playing audio files from removable media, receiving radio signals, navigation, parking assistance with video playback from the rear view camera.
The MMC on the Lada Vesta is located in the central upper part of the console and complements the updated modern design. The system is equipped with a good filling with the following characteristics:
- processor CSR S3681 B036BK K609B CPU SiRFatlas VI 800mhz Cortex A9;
- RAM Micron D9PSK 2X 256MB DDR3-1600 Clock Rate 800 MHz MT41K128M16JT-125 IT:K;
- internal memory 2 GB Micron NQ283 NAND FLASH 2gb MT29F2G08ABAEAH4-IT;
- internal memory 8 GB SDMMC 8GB SAMSUNG KLM8G1WEMB-B031;
- bluetooth CSR 8311 Bluetooth v4.1 BlueCore® CSR8311 QFN Automotive;
- WI FI CSR 6030 Wi-Fi IEEE 802.11b/g and n;
- digital video decoder AKM8859 DIGITAL VIDEO DECODER PAL/SECAM/NTNC AK8859VN;
- audio AK7757VQ Audio DSP with 24bit 3ch ADC 4ch DAC MIC Amp;
- power controller MPS MP4570 Automotive Power Systems;
- TPS65150 Low Input Voltage, Compact LCD Bias IC With VCOM Buffer;
- TJA1042 high-speed CAN transceiver;
- CAN and K-Line controller Freescale S9S12G96F0CLF;
- controller Fujitsu 32-bit ARMTM CortexTM-M3 based Microcontroller.
The following elements are used to manage and play files:
- seven-inch touch screen;
- “Mode” key – select modes;
- “MUTE” – mutes all sounds;
- Volume control – pressing once turns the device on or off;
- microphone for the ability to talk on the phone without hands - Handsfree;
- “Reset” – button to reboot the device;
- slot for reading a removable SD card;
- connector for reading information from removable USB media and connecting various gadgets;
- AUX connector for connecting headphones or external audio devices.
In addition to the buttons near the touch screen, MMS functions on the Lada Vesta are controlled using duplicate buttons located on the steering wheel:
- volume control;
- selection of file and radio playback modes;
- turning off all sounds;
- button for navigating through folders and tracks on removable media; in another mode, the buttons are responsible for accepting/ending an incoming call.
Photo 2 (Additional controls on the steering wheel)
Such equipment first appeared on AvtoVAZ cars. Previously, a standard audio system and MMC without duplication on the steering wheel were offered. Thanks to this, Vesta can compete with budget foreign cars of the same class in approximately the same price segment.
The system combines several different devices that should be in every modern car. The main one is the audio system, consisting of a 7-inch touch screen. Its peculiarity is its resistive base and the need to press with a stylus or other similar object. The input method is not the most progressive, but in weather conditions with sudden temperature changes, the resistive screen works without failure. The sound is reproduced through six speakers to create surround sound.
The system recognizes most SD and USB drives, but with a limitation - the media should not contain more than 1024 files and 256 folders. The flash drive must be formatted to FAT 16 or 32 with a maximum number of partitions - 4. Cards supported by MMC Lada Vesta:
- SDHC no more than 32 gigabytes;
- SD no more than 4 gigabytes;
- USB 2.0 and 3.0 no more than 64 GB.
The user is warned by the instructions that the download speed depends on the number of files on the drive. The optimal solution would be a medium that contains only audio and video files.
Files supported by MMC:
- WMA audio codec, bitrate no more than 128 kbps, sampling 44100 Hz;
- video codec WMV3 with a frame rate of 25, bitrate 750 kbps.
Before use, it is recommended to convert all files to the required parameters. For these purposes, the manufacturer recommends the free Freemake Video Converter program. When playing back, keep in mind that the files will be played in the order they were recorded.
MMS modes
The multimedia complex involves the use of the following modes:
- "Radio". Allows you to receive and play radio signals, search for radio stations with an automatic memorization function for up to 8 positions. Displays the current radio station on the screen.
- "Audio". Intuitive audio player that plays audio files through 6 speakers. There is an equalizer with the ability to select presets or customize it yourself. Audio files can be played via Bluetooth from an external device, but in this case information about the file being played is not displayed on the screen. Supported formats: MP3 up to 320 kbps, WMA up to 320 kbps, WAV up to 24 bits and FLAC.
- "Video". To view videos, you will need a converter. Video files must meet the following requirements:
- AVI with a frame rate of up to 30 frames per second and a resolution of no more than 720x536;
- MP4 with a resolution of no more than 1920x1080, frame rate up to 30;
- MOV with support for standard codecs;
- MKV with support for standard codecs, frame rate up to 30 and resolution 1920x1080.
- "Photo". For viewing photos, the radio screen in the car is not the best option. But if necessary, you can view images in most formats.
- "Telephone". Used for hands-free phone calls via speakerphone. You first need to synchronize your smartphone with the system and download the phone book.
- "Navigation". Movement according to maps and according to the guidance of the navigation program "CityGID 7". Allows you to install third-party cards. Disadvantages include the lack of image rotation, the inability to download maps online, the lack of construction of alternative routes, it does not show traffic jams over long distances, and there is no satellite view.
Selection of speaker systems
For high-quality sound of the played soundtracks, it is recommended to purchase a 2-component system, which contains separate tweeters and mid-bass midrange/bass speakers. In this way, a high-quality sound stage can be formed.
That is why it is recommended to place them in front. The role of the subwoofer is played by cheaper coaxial speakers, which are installed in the rear of the car. To install tweeters and connect them to the radio, you need to install additional wires.
HF speakers are installed in the triangles of the Lada Vesta mirrors. If you need a budget option, then you should buy coaxial system speakers. You will not get the effect of frequency diversity to obtain a sound stage, but the musical sound of the broadcast programs will be good. No additional system configuration is required.
Speaker selection
There are 3 types of speaker systems:
- Coaxial. In this option, all available speakers are located in one housing. The most acceptable option in terms of price and quality.
- Component . This audio system has 3 speakers, each of which is responsible for reproducing its own frequency level. The speakers are located in different housings on the same platform. It is the best in quality, but also the most expensive.
- Broadband . There is one speaker that reproduces all frequencies.
To reinstall the audio system, you need to purchase spacers for the speakers. They will help avoid vibration, rattling and other unnecessary sounds, and ensure purity of sound.
In order for the sound to be of high quality, you need to purchase speakers with a little more power than what comes from the radio. Fitting dimensions for speakers on Lada Vesta doors:
- front – 160 mm;
- rear – 130 mm.
Be sure to consider how thick the stand is.
Malfunctions of MMC Vesta and methods for their elimination
MMC Lada Vesta is the first of its kind on AvtoVAZ cars. It is still far from ideal - sometimes various malfunctions can occur. For example, the radio cannot boot, hanging on the “LADA” logo. To resolve this issue you need to do the following:
- remove removable media from the USB port;
- disconnect the battery terminals and turn off the power to the on-board network for a few minutes;
- format the USB or SD card in FAT 32 format and create an empty text file explorer.txt in the root directory;
- connect the battery terminals and reboot the system (the desktop should appear).
If this method does not help, then you will need to change the software - flash the radio. The next problem is related to navigation - the device cannot find satellites. To fix the problem, you will need to restart the MMC. Then you need to disconnect the battery terminals for a few minutes, reset the settings to factory settings or reflash the device. This method is applicable if the display turns white, the sound disappears, the backlight does not work, or the radio freezes when trying to connect a smartphone.
If you do repairs or firmware yourself, you can forget about the warranty. In most cases, systematic malfunctions can be eliminated by installing fresh software from the manufacturer.
Adviсe
Technically, installing music yourself in Lada Vesta is not difficult. By adhering to a few simple rules, any motorist can handle the work. Consider these rules:
- All work must be done very carefully to avoid damage to the plastic upholstery;
- The car already has audio preparation; you only need to install harnesses to connect the front speakers;
- You cannot cut off standard connectors, but you need to buy and use adapters;
- Before installing audio, it is recommended to soundproof the Lada Vesta doors to obtain improved sound characteristics;
- Install the speakers on the spacers.
Tips when installing an audio system
As we can see, the installation of acoustic components in the LADA Vesta interior is not capable of generating difficulties and dead ends. The main thing for the owner is to adhere to simple but useful rules, namely:
- We carry out the entire list of manipulations extremely carefully, without breaking the fasteners or scratching the panels.
- Since audio preparation is initially present, we just need to connect the speakers and head unit.
- We do not cut off the standard connectors, but stock up on the previously specified adapters.
- Before directly installing the dynamic heads, we soundproof the door panels.
- Installation of the speakers is carried out on previously prepared gaskets.
In the places where the speakers are mounted, spacers are placed under the speakers; this gives purity of sound. By the way, the standard radio of the Lada Vesta plays, in my opinion, at a decent level, all because there are spacers there. They must be installed so that: the speakers do not touch the casing, so that there is no rattling, vibration, or constant noise. Automakers provide different options for car audio preparation that make it easier to install music. Lada Vesta does not have speakers and acoustics everywhere. The standard multimedia acoustic system is fully included in the luxury Lada Vesta car; the standard speakers have good sound. The Lada Vesta comfort version includes an audio system + 4 speakers, and does not have tweeters in the mirror triangles. There are speakers in the doors, their size is 16 cm or 6 inches. The Lada Vesta classic (basic version) does not have a radio and speakers; in place of the radio there is a plug - “everything for the people!” The classics only have wires for connecting an audio system, coupled with standard holes for speakers (Acoustic system). To learn more about the topic, read the article to the end!
Firmware MMS Lada Vesta
If you have experience flashing smartphones, then you won’t have any difficulties reinstalling multimedia software. If there is a warranty, this should be done by the dealer. You can do the firmware yourself:
- A firmware image is downloaded to a FAT 32 SD card, which must contain the files chain.bin, NK.bin, chain.lst, TINYNK.bin.
- Exit to desktop.
- Open the file Windows/OEM_Settig.exe.
- Click the Upgrade OS button and start the firmware process.
After completing the procedure, you need to reboot the system while holding down the volume key - this is a radical measure. Updating to a more stable version will help eliminate malfunctions. Even a beginner can cope with this if he follows step-by-step instructions:
- Turn on the device.
- Insert removable media into the slot with the pre-loaded image for updating.
- Press “i” (information) on the display.
- On the pop-up window, you need to successively click on 4 dots in the corners of the screen.
- In the new window, click on “Software”.
- Click on “SW Upgrade”.
- In the pop-up menu, click “Upgrade”.
- The update application will open, where you need to select one of three modes. Update Radio will update the shell, Update Navi will update the navigation system, and Update OS will update the operating system.
- Having selected the desired mode, press “OK”.
All that remains is to wait for the process to complete, during which the system will reboot several times.
Firmware from third-party developers or violation of software installation rules can lead to freezes and inability to boot. The described method will help you deal with this problem by de-energizing the on-board network and starting the desktop using a removable card and an empty explorer.txt file. The situation can also be corrected by reformatting the drive or flashing the device using software from the manufacturer.
Results
Installing music yourself is not an easy task and not everyone can do it, even though the audio system in the car is fully configured. You need to know both the connection diagram and have the skills to work with sheathing. Most ordinary owners are advised to give their own car in order to install speakers in the front doors of the Lada Vesta. You can buy speakers for installing acoustics in a car at dealerships.
Nowadays it is difficult to imagine a modern car without a working receiver or listening to a high-quality soundtrack. Many trim levels of new cars do not have speakers installed in the Lada Vesta. Starting with the Comfort package, the Lada Vesta comes with factory speakers.
Lada Vesta SW Nevesta › Logbook › Sound improvement
Hi all. I hasten to share another new thing for the Bride. I bought speakers for the front doors.
I decided to take inexpensive ones, because... There are currently no plans to install an amplifier. I also immediately took spacers.
There are no wires in the kit, so I bought a meter of wire 2x0.75 for the mids, and 2x0.25 for the tweeters was at home. I bought clamps and borrowed pliers from a friend so that everything would be like Feng Shui. Complained. There were no plugs for wires for the crossover, and there was no point in looking, I wanted everything faster. But I got out of the situation. I made the wires with forks and soldered them. It turned out not bad at all.
I didn’t buy adapters for standard wires; in our city it costs 165 rubles. I didn’t want to take it for a piece. because their price is 60 rubles. You can check it on the Internet, here is the article number ZRS-AG-22/ I looked on YouTube how you can get out of the situation. Here's the actual solution:
We take the smallest “dads” and sharpen them with a file from the sides and that’s it. To be sure, you can secure them with electrical tape. I fixed the tweeters in a well-known way. On hot glue.
At the top and bottom I inserted foam garbage for reliability, on which a film for the thresholds was wound.
And the anti-squeak helped me as much as possible according to Feng Shui, to hide all the wires in a soft fur coat.
Well, a little bit of the installation process
By the way, under the speaker spacer, I glued madeline onto the metal, in which I wrapped the wires.
The sound has become clearer due to the tweeters. But while the difference is insignificant, the speakers should play out, but at the same volume level it became a little louder, also due to the tweeters. The standard speakers sound like it's coming from a pipe. The sound from these speakers is richer. But the “head” also needs to be changed. I'll save up for an Android radio. By money: Speakers - 3356 rubles; Spacers - 280 pairs; Wires and terminals - 110 rubles; Madeline STP (2 rolls 19x2000mm) - 50 rubles. Total: 3796 rubles. If anyone needs it, I can sell my original Dinas. Rubles for 500. Played since September 2020. I can also offer grills from JBL, also 500 wooden.
Price: 3,796 ₽ Mileage: 8,100 km
Correct adjustment and configuration of equipment
An instrument called an oscilloscope is best suited for this purpose. However, it is practically inaccessible to the average car owner. In this case, you can use a simple method:
- Turn off the input pulses coming from the amplifier.
- Set the regulators to the minimum level.
- After turning on the music, select a volume of about 90% and a medium tone.
- Give a signal to one channel, and then distort the signal and slightly reduce it in the opposite direction.
- Turn off the signal. Repeat this with other sources.