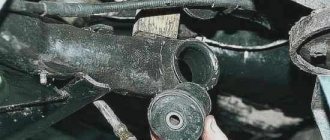
Do I need to lubricate the stabilizer bushings when replacing them?
Here's how they change it in Service (personal observation from various mechanics who changed the front and rear bushings): they removed the old bushings, sprayed the stabilizer with something (lubricant?), did not wipe off the dirt with anything, after a couple of seconds they installed new ones and tightened them on a lift.
Moreover, the service master, whom I contacted for clarification, said that the bushing should not be fixed on the stabilizer, it should be rotated on the stabilizer. The issue of tightening the nuts under load was not even raised, since there are no holes in the Service, only lifts. After that, I came across unverified information on the Internet that the bushings should not be rotated, otherwise they themselves will wear out after 15 thousand km, and the stabilizer (the cost is many times more expensive than inexpensive bushings) will need to be replaced.
Your comments? In particular, if something is done incorrectly, how to correct it and how to behave with the Service?
And I once installed Novosibirsk polyurethane, like this -
a) it creaked like hell until it was lubricated b) the front died during an oil change, replaced it with the original, but for some reason it stood fine in the back, so I sold the car with it.
So the question is - what kind of polyurethane?
I lubricated the silicone with silicone so that it would not creak and would not lubricate the original.
In addition, there is another popular way - to wrap the stabilizer axis with thin sheet metal, and then put rubber bands on top. This is usually done when the wear on the stabilizer at the points of contact with the rubber bands is large enough. Then yes, you still need to apply lubricant to the stub so that it is between it and the sheet of metal. I did this in the back, because there was already a decent amount of output there for almost three hundred thousand, I used tin from an ordinary tin can, about fifteen thousand are already there, they don’t ask to be eaten. But this is a folk method, services do not use this)
As for everything else that you wrote, it’s paranoid). There is nothing complicated or scary about these elastic bands, they can be tightened as you like, they are on c-blocks.
if the lubricant does not dissolve the rubber of the bushings, then you did the right thing by lubricating it; if it dissolves, then you screwed up;
under load (in the working middle position of the suspension), the silent bands are tightened, and this is done completely without a hole, just a jack is placed under each wheel and raised, turning the nuts on a lift under the bottom is a dozen times more convenient than from the hole; don’t worry, everything’s fine;
Stabilizer bushings. Signs of malfunction. Consequences.
For the best damping of vibration and force impacts on the car body, the vast majority of suspension elements are connected by means of elastic elements. The same applies to the stabilizer. To secure it, special bushings (rubber bands, cushions) made of durable rubber or polyurethane are used. Over time, as the vehicle is used, these bushings may begin to deteriorate and noticeably lose their elasticity. The result of this is unsatisfactory operation of the stabilizer =. More serious defects may begin to appear, which will only grow faster over time.
Diagram of the stabilizer device and its fastening elements
The first symptom indicating replacement of the bushings will be a slight knocking sound from the suspension. A similar knock can be observed with “tired” shock absorbers. Only in the case of bushings it will be heard not only on potholes and potholes, but also when entering relatively sharp turns. At the same time, the car often feels excessively rolly and sluggish. The knocking sound that appears will be a consequence of play that has arisen in the connecting nodes of the stabilizer arms due to worn bushings.
If measures are not taken in time, the knocking will only intensify in the future and will begin to accompany the operation of the suspension everywhere due to increasing deformation and destruction of the bushings. Body roll and excessive play in the steering wheel may occur. The car may “yaw” not only when turning, but also when braking or changing lanes. Most car manufacturers recommend changing stabilizer bushings every 30–40 thousand mileage. However, in our conditions it is better to focus on bushing wear. Therefore, a sudden knocking sound and slight rattling in corners will be clear signs of an impending component replacement.
As a popular method of checking the bushings for serviceability, it is proposed to drive the speed bump diagonally in 2nd gear. A dull knock appeared in the area of the pedals - most likely due to the hub bushings. You can also just crawl under the car and inspect everything yourself. A worn bushing will be pleased with the presence of cracks and abrasions characteristic of worn and cracked rubber. Auto mechanics sometimes also call these cracks “daisies.”
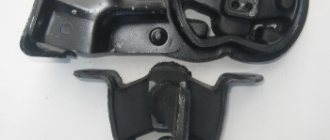
Stabilizer bushing and bracket for its fastening
Also, the rubber of the bushings can simply harden and lose the necessary elasticity. If you can’t get a good look at the stabilizer bushings, just swing your hand strongly up and down and to the sides on the stabilizer itself. If you feel play, creaks and knocks in the lower part of the suspension, it means that the bushings have become unusable.
But for the best results, it is, of course, better to drive onto an overpass, an inspection hole, or use a lift. The only tools you will need are a crowbar or a mounting spade, which you simply need to rest against the bottom of the car and slightly “shake” the stabilizer where it connects to the body. If you feel noticeable play or loss of elasticity, then it’s time to think about replacing the bushings.
How and how to lubricate stabilizer bushings: step-by-step instructions with photos and videos
Stabilizers are responsible for the car's ability to maintain balance when cornering. The bushings, in turn, protect them from wear at the attachment point, and also reduce vibration when driving on uneven roads. However, squeaks may occur while driving, even if the parts are original and have recently been replaced. To get rid of unpleasant symptoms, you can lubricate the bushings, but it is important to carry out this operation correctly. To do this, it is convenient to use simple techniques to determine the need for lubrication and select the appropriate product.
The procedure for performing work on replacing stabilizer bushings
If the anti-roll bar bushings are faulty, perform the following work:
- Car wash;
- Raising the car on a lift;
- Removing car wheels;
- Removing the fender liner or other plastic protection;
- Removing fasteners from stabilizer elements;
- Removing the fastening from the stabilizer bushing bracket;
- Replacing the bushing with a new one.
On some car models, to facilitate the bushing replacement procedure, it is necessary to remove the engine crankcase protection. Assembly is carried out in reverse order. For ease of installation of this elastic element, the bushing is split.
The stabilizer bushings must be replaced after 30 thousand kilometers or when the above symptoms of malfunctions appear. To avoid “yaw” of the car when driving, both stabilizer bushings are replaced, regardless of the degree of wear of both. To increase the service life of the elastic element of the anti-roll bar, during each maintenance it is necessary to clean them from dirt, since its particles in the bushing-stabilizer link interface are a source of additional wear.
Why are stabilizer bushings needed and what are they?
The main purpose of the bushings is to dampen vibrations that appear when moving along the road surface. They are installed only on modern cars and protect suspension elements from wear. The shape of these products depends on the make and model of the car. The part in contact with the metal is covered with a protective fabric; polyurethane models often have a corrugated surface.
Depending on the material, bushings are divided into two types - rubber and polyurethane. The original ones are always made of rubber and are black or greenish in color. Polyurethane began to be used in this industry not so long ago; usually the products have a bright color, for example, yellow or red.
Why are bushings used?
Novice car enthusiasts are naturally interested in why these same stabilizer bushings are needed on a car. The answer to this question is quite simple.
Let's start with what a stabilizer bushing is and where it is located on the car. This is the name given to the special elastic element used to connect the stabilizer itself to the body. You can call it a kind of gasket or intermediate element.
This immediately answers the question of where this element should be located and what it should be responsible for.
Bushings can directly influence the noise level generated by the suspension while driving and the stability of the vehicle.
The main feature is that the part is made of elastic materials. This is rubber or polyurethane. The use of such materials ensures that the suspension does not emit any extraneous sounds when the wheel height changes. You can imagine how the car would behave if the stabilizers were connected to the body directly, metal to metal.
Bushings serve as a connecting element between the suspension and the body. They are in constant interaction, and the bushing provides a certain margin for bending. The latter necessarily arises and changes the distance between the body and the stabilizer when going over bumps on the road.
To summarize, we can highlight the following functions of bushings:
- vibration damping;
- noise reduction;
- reliable fixation of body elements and suspension;
- ensuring smooth running.
Although this is a small part made of elastic material, its role in the design of the car is enormous. And a malfunction leads to dangerous possible consequences.
Do I need to lubricate the stabilizer bushings?
If a part is made of polyurethane, it can withstand higher mechanical loads than rubber and does not corrode like metal. The operating temperature range for this material is from -60 to +80 degrees. It is not destroyed under the influence of lubricants and petroleum products. Lubrication will not only not harm polyurethane bushings, but will also increase their service life.
Lubrication is required when replacing polyurethane bushings - the lubricant simplifies installation and reduces wear on the part. In the instructions, manufacturers usually indicate the need for this procedure. Even the presence of an inner fabric layer does not help, because it wears out quickly. Therefore, you cannot do without lubrication; otherwise, a month after installation, unpleasant squeaks may appear, especially noticeable in damp weather.
Home / 401 Mitsubishi Lancer Repair Encyclopedia 9 / 238 Description of repair and maintenance work on the front and rear stabilizers on the Mitsubishi Lancer 9
Replacing struts/bushings of the front and rear stabilizers on the Mitsubishi Lancer 9
At the current speeds that modern cars develop on the road, they require maximum controllability and obedience the car to the driver and this is especially important when maneuvering and turning. Mitsibishi Lancer IX is no exception and also has technical solutions to give the car maximum stability on the road when driving. The main component in a car's suspension for stability at speed is the anti-roll system.
What is a stabilizer bar? In very simple terms, this is a metal rod with which the left and right wheels of the car are connected to each other. And it is this rod (stabilizer) that synchronizes the operation of the suspension, and its work is especially important when the car rolls during a turn.
The cost of replacing struts and stabilizer bushings on a Mitsubishi Lancer IX
| Name of works | Lancer IX 1.6 (rub.) | Lancer IX 2.0 Sport (rub.) | |
| 1 | Replacing front stabilizer struts on Mitsubishi Lancer 9 | 550 | 550 |
| 2 | Replacing front stabilizer bushings on Mitsubishi Lancer 9 (for 2 pcs.) | 1250 | 1250 |
| 3 | Replacing rear stabilizer struts on Lancer 9 (for 2 pcs.) | 600 | 600 |
| 4 | Replacing rear stabilizer bushings on Mitsubishi Lancer 9 | 500 | 500 |
Cost of spare parts: Replacement of stabilizer struts/bushings on Mitsubishi Lancer 9
| Spare parts | Lancer IX 1.6 | Lancer IX 2.0 Sport | |
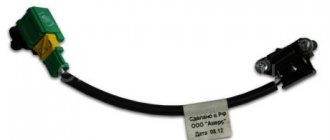
| 1 | Rear stabilizer struts for Mitsubishi Lancer 9 (for 1 piece) | 4056A037 /1180r. | 4056A037 /1180r. |
| 2 | Front stabilizer bushings for Mitsubishi Lancer 9 (for 1 piece) | MN100250/4 00r. | MN100250/4 00r. |
| 3 | Front stabilizer struts for Lancer 9 (for 1 piece) | 4056A161/ 620 rub. | 4056A161/ 620 rub. |
| 4 | Rear stabilizer bushings for Mitsubishi Lancer 9 (for 1 piece) | MR589637/ 350 rub. | MR589637/ 350 rub. |
What is he doing? At that moment when the car begins to turn at speed, then, as we were taught at school, a centrifugal force from the center of the turning circle begins to act on the car, trying to push our car beyond the radius of the turn itself (circle). And now our one and a half ton Lancer begins to enter the turn at speed and its body begins to roll to the outer side of the turn and the steeper the turn and the more
The higher the speed, the more our Lancer begins to want to ride first on two wheels, and then completely roll over. And this is where our iron rod (stabilizer) comes to work. Which starts our car exactly as much as the body is pressed against the wheels of the outer side of the turning radius, to press the body against the wheels of the inner turning radius. Due to this, the body of our car rolls much less during a maneuver, continuing to remain on its wheels and move on.
Not complicated in design, but very important in operation, the stabilizer works much more clearly and copes with its task if all its connections are in good condition and have no wear or play. To prevent the stabilizer from becoming loose in the bushings attached to the body, the stabilizer bushings on the Mitsubishi Lancer 9 are checked during each maintenance on the Lancer. If a mechanic conducting maintenance on a Mitsubishi Lancer 9 notices wear on the front or rear stabilizer bushings, then the station immediately coordinates the replacement of the stabilizer bushings on the Lancer 9 with the owner.
In addition to the stabilizer bushings, through which the stabilizer itself is attached to the car body, the stabilizer is twisted through the stabilizer struts to the levers and there are also rubber bushings on the stabilizer struts themselves. When producing rubber bushings on stabilizer struts on a Mitsubishi, the entire strut is changed. And the main thing is that the mechanic who performs the work: replacing stabilizer struts on a Mitsubishi Lancer 9, installs the struts correctly and correctly secures the stabilizer itself in the rubber bushings.
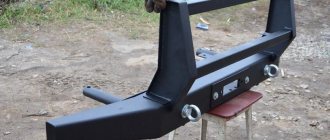
| Correctly installed front stabilizer strut on Mitsubishi Lancer 9 |
| Retightened front stabilizer strut on Mitsubishi Lancer 9 |
When replacing the front stabilizer struts, it is very important not to overtighten the strut nut, because the overtightened rubber bushings of the stabilizer struts will not perform their function and knocking noises from the suspension on the Mitsubishi Lancer 9 will occur when driving.
The photo clearly shows the overtightened struts of the front stabilizer on the Mitsubishi Lancer 9. Because of this, the lower rubber bushing does not perform its function at all and does not fix the stabilizer.
If the stabilizer links and bushings are not checked in time, the stabilizer link may break and the operation of the stabilizer is reduced to nothing, which greatly affects traffic safety.
When you don't need to lubricate bushings
If the suspension is working properly, it is not necessary to unscrew the parts and check the amount of lubricant. As long as there are no unpleasant knocking or squeaking noises, no maintenance is required. When a spare part does not fit in shape or diameter, unpleasant noises most often appear during trips. But by lubricating this unit, the motorist will not solve the problem; he will have to install a product that is suitable in size. This also applies to damaged bushings with cracks or tears - they only need to be replaced.
On the left is a new bushing, on the right is an old damaged bushing
Rubber bushings often do not require lubrication, unless the manual says so, or there are no squeaks. Usually they are also treated before installation, but with different substances. However, the stabilizer must be cleaned of contaminants, and the part in contact with it must be treated with a silicone lubricant. Often, in this case, talc - baby powder - is used to reduce friction and preserve the safety of the installed part. In most cases, it is already applied by the manufacturer to the inside of the product.
Sequence of work
- The car is securely fixed when jacked up.
- The wheels are unscrewed and removed. There is an engine protection shield in the right wheel arch. Its fastenings are unscrewed and the shield is removed.
- Most of the fasteners under the bottom are pretty acidic, so to speed up the process of replacing stabilizer bushings, they need to be thoroughly treated with a WD 40 solution, which removes corrosion.
- Using an open-end wrench, we fix the finger on the left post. It is slightly hidden from direct access, so you need to find the grooves almost by touch.
- We throw a spanner, preferably a ratchet, onto the nut that secures the shock absorber. Unscrew both fasteners.
- Having freed the stabilizer struts from their fastenings, we disconnect them from the shock absorber strut.
- We install a jack under the left rear part of the subframe. With its help, the subframe is fixed so that when the fasteners are removed, it does not suddenly jump off the studs. A metal plate of considerable size must be placed under the supporting head of the jack so as not to deform the subframe.
- Smoothly lower the jack a few centimeters from the body. Thanks to this, the subframe also lowers slightly, opening access to the bushings.
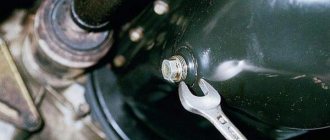
- A pipe is inserted into the resulting gap, and the subframe is further pressed down. A stopper is inserted into the resulting gap. A 27mm head is suitable; when installing it between the body and the subframe washer, it is better to use pliers. This will save your hand from injury if the pipe slips off the subframe washer.
- We generously water the bracket fastenings with WD-40. We unscrew the bolts gradually, without pressing too much.
- Remove the freed bracket from the bushing, and then remove the bushing itself.
- We install the bushing from the new kit. The cut on the part should be directed strictly back. We position the new part exactly in the place of the old one.
- Install a clamp over the bushing. Lightly tighten the fasteners with your fingers, and then tighten them with a wrench, tightening all the bolts one by one and evenly.
- The stopper, for which the key head was used, is removed. The subframe is lifted by hand and screwed to the body.
- All of these steps are performed in the same way with respect to the second clamp.
- Once the bushings are in place, both posts are screwed into place.
IMPORTANT! Before installation, all threaded parts of fasteners are coated with graphite lubricant to avoid sticking.
When performing the above work, you should be careful and pay attention to safety precautions. In general, such work can be done with your own hands. Naturally, the design of different car brands differs significantly, so the replacement instructions are rather of a general recommendation nature. For more detailed information, a series of videos on carrying out this type of repair for various brands of cars is presented. Video on replacing stabilizer bushings on a Ford Explorer:
Video Chevrolet Aveo 3 - split bushings used in this model make the repair process quick and easy.
Nissan X-Trail Video:
Video explaining workflows for Renault Logan:
The anti-roll bar is an interesting thing. Its main feature is that it is often underestimated by car enthusiasts, especially those who have recently driven or have never seen anything cooler than a “nine” with leaking shock absorbers. Indeed, you can completely remove it and throw it away - the car will still drive. It's really bad.
No need to heel!
If cars always drove in a straight line, without accelerating or braking, a stabilizer would not be needed at all. Its work begins every time the car tries to tilt. Whether it's lateral roll when turning or longitudinal roll when braking, the stabilizer tries to keep the body parallel to the road surface. And despite the elementary design, he does it well.
The stabilizer is just a rod connecting the subframe to the wheel mount (today we will talk about the MacPherson front suspension, so let’s put it more simply - with the suspension arm). It should be noted that MacPherson really, really needs the use of a stabilizer, mainly due to some compromise in the design. The camber angle there is static, but during roll it changes due to the peculiarities of the suspension design. Why is this bad? Because changing camber angles inevitably reduces the area of contact between the tire and the road. And the only way to avoid this phenomenon is to reduce the roll. This is where the stabilizer, which works like a torsion bar, helps: with a lateral roll, the opposite ends, fixed in the levers, begin to move in different directions, twisting the middle part. The resulting moment prevents further relative movement of the wheels, reducing roll. As you can see, it works very simply.
But in order not to become a fan of the cult of the stabilizer, it is necessary to say a few words about its shortcomings. Firstly, the stabilizer willy-nilly reduces the suspension travel. Of course, this is not critical for a passenger car, but for an SUV it can be harmful. Well, secondly, you shouldn’t get carried away with replacing the stabilizer with something more rigid, which some car owners sometimes like to do. In their opinion, a more durable stabilizer will help to almost completely avoid rolls and turn the Zhiguli into a Formula 1 car. This is a very dangerous misconception.
The first thing Kulibin will encounter with an arm-thick piece of iron in the front suspension is an unexpectedly easy drift due to an unhealthy imbalance of the grip of the front and rear wheels with the road (it will be insufficient for the rear wheels). It must be understood that the engineers who developed the suspensions carefully calculated not only each of the suspensions, but also their joint work. And if you incorrectly interfere with the operation of one of them, the overall controllability will decrease, although the roll, quite possibly, will become a little less.
So, what does the bushings have to do with it, and why change them? As I already said, the stabilizer must be able to twist from multidirectional forces on the right and left wheels. If it is welded or rigidly attached to the subframe in any other way, it will be deprived of this opportunity, which is why it is attached to it using bushings. Over time, they wear out, and the stabilizer begins to “walk” in them.
This play, like any other, increases the degrees of freedom of the part, which nullify all its ability to prevent roll. And then, when cornering, the car begins to lean on its side more than it should.
Not every car enthusiast will immediately notice this, so they change the bushings in other cases: if wear is detected during suspension diagnostics, or if it is already starting to knock. However, the second situation is usually more typical not due to physical wear, but due to a good impact or other mechanical impact.
So, we have come to understand that bushings must be replaced periodically, and this is completely normal. Let's see how to do this.
What will you need?
What's great about this renovation is that it's inexpensive. And I would even say that there is no point in doing it with your own hands, no matter how skillful they may be. Therefore, let's go to the service center and just watch how a specialist does it.
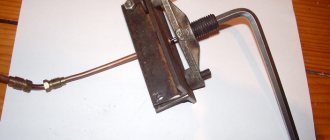
You will need a minimum of tools: an 18 mm socket and a 10 mm wrench (or socket). But look at the wrench: why has life crippled it so much? In fact, what we have in front of us is not just a key, but the Modernized Special Tool of Alexey Teleshov, we will call it that.
Since we will be changing the bushings on Logan, we will have to take into account some of its features, so such a tricky key may come in handy. In addition, you will have to look for a lift, and quite possibly a hydraulic strut (we used it, in any case) along with an angle grinder. So, despite the apparent simplicity, everything is not so simple.
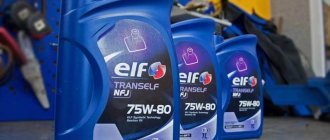
Now about the cost of spare parts. There is no point in chasing the original, there are very worthy manufacturers, especially since the bushing is a piece of elastic, and it is not so difficult to do something there. Therefore, we pay attention to two popular models: the French Sasic for 160 rubles and the Belgian Sidem for 180. We will choose Sasic.
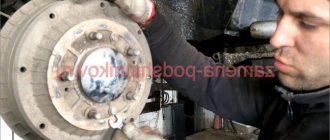
We go into the box and get on the lift.
As usually happens with threaded connections at the bottom of the machine, they have all long since become covered with a layer of dirt and have become sour. Therefore, before starting work, it makes sense to spray the bolts with WD 40. We wait a little and pull out the same key with a broken fate and try to unscrew the bolt ten from the top (seen in the photo).
Naturally, this is as useless as asking a cat to quickly walk through an open door (if you have a cat, you will understand the futility of the plan). But in this case, the design of the Logan suspension itself helps us: this bolt is usually simply cut off, because its purpose is unclear to anyone, even in the heavier and off-road Duster this unit is made simpler and a little more gentle (and the bolt has a smaller diameter). Therefore, the specialist draws a mark with a white marker at which it will be necessary to cut off the ear of the clamp. Now it’s up to the “grinder”: cut off this ear and move to the other side.
The vehicle suspension is one of the most important parts, subject to heavy loads and taking on all the impacts of a rough road. Thanks to its operation, the driver can feel comfortable and not be afraid that while driving the situation may get out of control. However, due to heavy loads, especially when driving on bad roads, which is not uncommon in the Russian Federation, its parts often fail. The most common problem is broken stabilizer bushings. Let's take a closer look at why this happens and how the stabilizer bushings are replaced.
How to lubricate stabilizer bushings
It is better to use silicone-based products that do not react with polyurethane and rubber. They do not contain oils, which collect dirt and lead to accelerated wear of the unit. They are also recommended by General Motors specialists. For best results, use the product in aerosol form for treatment, and apply the same product from a tube. Below are the most common products containing silicone:
- Silicot is universal, with a thick consistency, suitable for use at temperatures from -50 to +230 degrees.
- Liqui Moly Silicon Spray - colorless, made in the form of an aerosol, prevents parts from drying out, protects against ultraviolet radiation.
- Cyatim-221 is made on the basis of silicone oil, yellowish-brown in color, supplied in metal cans. Designed for contacting rubber-metal surfaces, does not dissolve in water. Operating range: minimum temperature - 60 degrees, maximum + 150.
For help in choosing a lubricant, you can see the table below.