Soldering a plastic bumper
This is the most common method for repairing cracks, so let's start there. And first of all, let's decide what we need for work.
Tools and Supplies
- Household soldering iron.
- Grinding machine with a set of metal brushes.
- Metal mesh for bumpers.
- Sandpaper (coarse).
- Spray.
- Primer.
- Dye.
- Car varnish.
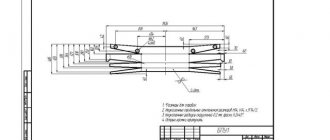
Sequence of actions when soldering a damaged bumper
- The bumper is thoroughly cleaned of dirt, the damaged area is washed (for this you can use household dishwashing detergent).
- Using a metal brush, remove the layer of varnish and paint from the edges of the cracks.
Damaged area of the bumper, cleaned with a wire brush
The edges of the cracks are soldered at several points with a household soldering iron.
The broken fragment of the bumper is carefully trimmed with an ordinary stationery knife
The inner side of the bumper, soldered with a household soldering iron
A special mesh is soldered into the bumper to strengthen the seam
The damaged area of the bumper is carefully sanded and ready for painting.
Video: soldering a broken plastic bumper
Sealing a plastic bumper
This procedure is somewhat more complicated than soldering, and will require much more patience from the car owner, since the glue hardens much longer than hot plastic.
Tools and Supplies
- Universal adhesive based on epoxy.
- Putty.
- Sandpaper (coarse).
- Solvent.
- Rags.
- Fiberglass patches.
- Primer-adhesion activator.
- Primer for plastic.
- Dye.
- Car varnish.
Sequence of actions when sealing a broken bumper
- The damaged area is thoroughly cleaned with coarse sandpaper on both sides, after which it is degreased with a solvent (white spirit is also suitable for this purpose).
- A layer of adhesion activator primer is applied to the cleaned inner surface. After the soil has completely dried, a layer of universal epoxy-based glue is applied to it, on which, in turn, fiberglass patches are installed:
Fiberglass patches are applied to the bumper over epoxy adhesive
The outer side of the bumper is treated with automotive putty
Before painting, the bumper is sanded with coarse paper.
Automotive primer is applied to the outside of the sanded bumper
The damaged area is primed and spray painted
Video: sealing a cracked plastic car bumper
So, it is quite possible to repair a crack in the bumper on your own. Some will prefer to solder it, others will try to seal it. The main thing to remember when soldering is to not press too hard on the soldering iron. You can simply pierce the plastic right through, which will result in another hole that will not be so easy to repair.
Often in traffic you can find a car with a cracked or deformed buffer. What can you do, no one is immune from unsuccessful parking or a minor accident. However, this is not a reason to continue driving a car that has lost its “brilliant” appearance - there is practical experience in restoring this element to its original condition.
Bumper repair process
The types of plastic determine the repair operations. Carbon fiber, fiberglass, polypropylene, polyurethane - each of these materials has a different structure. Therefore, when repairing, craftsmen use a strictly defined approach for each type of plastic.
If it is necessary to carry out complex repairs, holes in the structure of the unit that need to be sealed and fused, it is better to turn to professionals.
What you will need
Tools:
- heat gun or air dryer;
- gas pistol;
- electric soldering iron
Special hair dryer for bumper repair
Materials:
- sandpaper (grinding) paper;
- clear varnish;
- enamel matching the original color of the bumper;
- repair mesh;
- fiberglass;
- putty;
- primer;
- adhesive material.
A retail chain sells a repair kit for repairing car bumpers. Car owners use silicone tape with an adhesive layer or liquid plastic. Scratches can be removed with a primer spray, applying several layers. After drying, the bumper is painted in its original color. All damage disappears after such repairs.
How to prepare
Remove the bumper, remove dust, dirt, oil stains, and wash. Inspect what damage there is and how serious it is.
Next, tools and materials for restoration are selected. When the bumper has light scratches, there is no severe damage or holes, it does not need to be dismantled.
General information about the subject
External plastic structural elements are mainly made of thermoplastic plastics. The technology for restoring such products is based on welding, which allows you to get rid of through cracks and even recreate broken fasteners. Actually, the procedure is not much more complicated than preparing and spray painting a damaged area of a car body.
Some car enthusiasts claim that we simply repair the bumper with our own hands using metal brackets. But an experienced car owner knows that like can be treated with like, that is, repair plastic rods are used for soldering. Their composition, color and profile are different; the required rod is selected according to the markings on the buffer.
You need to know the material!
Making the right choice means guaranteeing quality repairs, because inappropriate materials can significantly shorten the life of the automotive element. To find out what a cracked bumper is made of, just carefully examine the inside of the part. Depending on the labeling, the following conclusions are drawn:
- PP – polypropylene base.
- ABS (GF, PAG 6) – hard plastics.
- PUR – polyurethane.
Stage 1: repairing a car bumper with your own hands in the garage
To perform the repair you will need certain tools. These can be both ordinary household appliances and professional tools. The ideal kit includes the following items:
- Orbital sander or sanding block.
- Grinding wheels of various grain sizes.
- Mini drill like Dremel or drill.
- Clamps and rubber spatula.
- Soldering iron and hair dryer.
- Metal tape.
Materials for restoring a cracked buffer may include:
- Putty and primer.
- Brass mesh for crack reinforcement.
- A can of paint or a can of spray paint.
- Plastic repair rods of the required configuration and composition.
Preparatory activities
The damaged part must be dismantled to eliminate, firstly, excess stress in the crack area. Those who have already done such work will say that now we clean the bumper and only then repair it with our own hands.
The cracked parts fit together. For reliability, they are fixed with metal tape on the outside of the part. If the gaps are quite significant, then you will need clamps to clamp the edges of the cracks. Their number depends on the complexity of the repair.
Repairing deep damage to the body
A scratch that penetrates the car to the metal carries the risk of corrosion and is subject to immediate restoration. The principle of eliminating damage is to remove rust and fill it with special paint-cementing compounds. Removing deep scratches on a car without painting is carried out according to the following scheme:
- The surface of the car is washed, degreased, and dried.
- If the damage has become corroded, oxidized metal particles are removed: the recess is treated with a rust converter. If the scratch is fresh, it is filled with primer for better paint adhesion.
Deep damage along the entire side of the machine
- After the treated surface has completely dried, the car's scratches are painted - paint specially designed for local repairs (for example, Touch-Up, produced in the form of a pencil) is applied inside the recess. Some car owners, in order to remove scratches from the car body, use special kits from car manufacturers, consisting of paint and varnish that are ideal for the car’s paintwork.
- When the paint and then the varnish have dried, the area is treated with abrasive polishes - coarse and fine abrasive. If possible, the surface is sequentially sanded with both compounds, but you can get by with just one.
- The last step in removing a scratch on a car is rubbing it with a restoring polish, which adds shine to the surface.
Removing chips on a car without painting is carried out according to the same scheme.
Restoring a polypropylene bumper
When restoring PP-based parts, reinforcing mesh is not used. The process begins with installing a nozzle with a nozzle with a diameter of 5-7 mm on the hair dryer. Further work is carried out according to the following points:
- On the inside of the buffer at the junction of the cracks, use a Dremel-type mini-drill to make a groove for the plastic rod.
- Using a hair dryer, melt and place the repair rod in the prepared groove.
- Clean the front part of the bumper with an orbital sander with a P240 attachment and repeat the welding procedure in the same way as on the inside.
- Grind the cooled seam from the outside using a nozzle with the same grit P240, and then remove dust from the surface.
Puttying and painting
- Use a special putty for plastic to smooth out the unevenness, trying to keep the layer to a minimum.
- Dilute the primer with solvent 3:1 and apply two coats to a degreased surface. Drying time for the first layer is 15 minutes.
- Apply a developing layer of a contrasting color, followed by sanding with a wheel or sandpaper with grit P800 and P1000.
- Eliminate detected defects using nitro putty followed by sanding with P1000 sandpaper.
- Remove dust with a damp cloth and degrease the part, then paint the plastic with decorative paint with an overlap of 50-100 mm. Apply the paint in 3-4 layers with intermediate drying cycles.
Anyone who is interested in how to properly repair a bumper with their own hands in the video should take into account an important detail. 30-40 minutes after applying the last layer of paint, the part should be varnished. Thus, we obtain a flawless appearance of the repaired part. Don't forget to follow a few simple rules:
- You should try to apply a minimum layer of putty.
- Allow a temporary pause for the putty layer to completely harden.
- Treat the putty area with a sanding wheel or sandpaper with a grit of P800, and then with a grit of P1000.
- It is advisable to apply a developing layer of primer.
Methods for removing scratches
There are many methods to correct the defect if you scratched the bumper. The most basic of them are aimed at masking damage to the top layer when the paintwork is not touched. These include polishing pastes with different sizes of abrasive, as well as wax products like pencils that fill cracks with a special substance.
Painting is a way to completely damage the production paint layer. When spot painting, it is enough to remove a layer of paint from one area, sand it well and then apply a new layer of a suitable color. If scratches are noticeable over the entire area of the part, the entire bumper must be repaired, with the old paint completely removed.
The deepest scratches without breaks require surface restoration, for which several layers of putty are used. Instructions for using all these methods are provided below.
Wax pencil
For those who have only slightly scratched the bumper, purchasing a wax pencil will be enough. Before using it, you must clean the bumper using special products, and then degrease it with a solvent.
It is best to use a wax marker at moderate temperatures in a warm, windless room. The wax is applied in several layers, and between approaches it is necessary to take breaks so that the layers have time to dry. Apply first with transverse movements, and then with longitudinal ones. It is advisable that the product does not fall outside the damaged area, and if this does happen, then you need to remove the wax using an ordinary napkin. After applying the last layer, the area to be treated should be lightly polished. In addition to filling scratches, such a pencil creates additional protection for the surface - but for this it is better to choose wax of increased hardness.
Before use, do not forget to shake the pencil slightly, and then close it with a cap so that the product does not dry out.
Video on using a wax marker
Coloring
Coloring is, of course, a much more detailed and complex process that requires special tools and materials. Any painting begins with cleaning the bumper, and it does not matter whether you are going to remove it or carry out all the work right on the spot. As in the previous case, the part must be washed, dried and degreased. To polish and remove the old coating, you will need a sanding machine, as well as sandpaper of varying degrees of grit.
- First you need to thoroughly machine the bumper around the entire perimeter; for hard-to-reach places you will need sandpaper, which we use by hand. Then a primer is applied to the surface in two layers, and the bumper is left to dry.
- When the composition has hardened, the bumper is cleaned again and then you can begin painting. In order for the color to adhere well, the part can be slightly heated beforehand.
- The paint is applied using a sprayer or a special gun. It will take about 3 layers, then the surface is varnished.
- For more complex damage, it is advisable to use putty along with the primer.
What are bumpers made of?
By mentioning that modern bumpers are made of plastic, we somewhat simplify the real picture, because polymers are a very wide group of substances with different mechanical properties and chemical reactivity. Some melt and form well when heated, but do not dissolve well in technical liquids such as acetone, while with others everything happens exactly the opposite.
Therefore, before you start repairing cracks, it is worth finding out what your bumper is made of and the properties of this substance. For those who are able to find and read the markings on the back of the part, here is a list of material designations.
- PE – polyethylene.
- PUR – polyurethane.
- PC – polycarbonate.
- ABS – butadiene styrene.
- PVC – polyvinyl chloride.
- PP – polypropylene.
- GPR is fiberglass, a composite of heat-resistant binder and polyamide resins.
- PBT – polybutylene terephlorate.
A complete list and description of properties is worth looking at on our website. If you are unable to recognize the material, you will have to use the scientific method. In the process of experiments, both joyful and disappointing discoveries can await you.
For example, bumpers made of polyethylene can be easily repaired using household soldering irons, but gluing them is a real pain. Impact-resistant ABS plastics will soften only under the influence of a gas torch or a repair hairdryer, but the edges of the crack are set well by most adhesives. Including from the family of so-called instant, cyanoacrylate. Fiberglass can only be worked with glue based on epoxy resins.
How to remove scratches on a bumper without painting
The bumper is scratched, but you don’t have the time or money to paint it at a car service center? It doesn’t matter, you can remove scratches from the coating without painting, by doing it yourself.
Let's consider popular methods of restoring the aesthetic appearance of a bumper without the use of painting materials.
Polishing minor scratches and abrasions
Polishing with chemical products can be used to remove scratches and abrasions on a plastic bumper only if they are shallow and the bumper itself is not cracked. To polish and remove chips you will need WD-40 and an ordinary rag.
Any chemical is suitable for polishing. composition intended for such purposes. The product can be purchased at almost every auto store for little money.
The process of eliminating minor damage and abrasions using a VD-shki:
1) Using a sponge with water, clean the damaged area from dust and dirt. Let it dry a little.
2) Spray the spray onto the damaged area.
3) We vigorously rub and polish the scratched area with a rag until the surface is smooth and no scratches are visible.
- Simplicity and accessibility;
- Speed of execution.
General repair rules
Before starting work, it is necessary to fix the edges of the crack, giving the part a shape that at least approximately corresponds to the original one. For this purpose, small clamps or coarse packing tape are suitable, which are glued to the side that will be repaired last. This is usually done outside.
If the plastic is viscous - it is planed without much effort, long, soft chips are formed, then the ends of the cracks do not need to be drilled. This is usually done with polyethylene parts. Rigid polycarbonate and ABS plastic are prone to further cracking, so try to determine as accurately as possible where the crack ends and drill a hole there with a diameter of no more than 1 mm.
All parts must be at least washed and dried, and if you are going to use glue, they must be degreased. Do not use gasoline as a solvent and cleaner; it is now not of the quality to be trusted recklessly. An aerosol can with foam cleaner is ideal. It consists of 90 percent acetone and is easy to apply - no jars or brushes are needed.
To remove or not to remove the bumper is, of course, up to you. But, if you want to achieve a good result, it is better to do it. Moreover, on the inside you can find markings and find out exactly the material from which the part is made.
The varnish on the bumper is cracked
Wait until spring, you never know
SkyUser
You'll give it to the painters in the spring. It looks like my varnish is cracked. I scored. As soon as it starts to peel off completely, I’ll send it to paint.
It looks like my varnish is cracked. I scored. As soon as it starts to peel off completely, I’ll send it to paint.
bumper, she's such a thing
Yeah, I already checked the strength of the bumper and headlights against the fence once.
The weakest link was the headlight glass.
What if you pick up a can of spray paint and clean the cracks with fine sandpaper, or is it better not to?
You can't hit the tsyet with a spray can. unreal. You can paint it yourself only with a compressor if you have certain skills.
SkyUser
You know, you hit somewhere. You can’t paint it over with a spray can... it will look collective farm. If it's just the varnish that's cracked... try sanding it and varnishing it.
I advise you to paint the entire bumper. with the selection of paint. Normal equipment stores have it. Bring a sample.. or drive up in a car.. and they’ll mix the exact same paint for you.. according to color. Taking into account fading, or even the same paint with the same number may turn out to be lighter... or vice versa. Before painting, the bumper needs to be sanded with fine sandpaper to remove the glossy varnish. so that the paint has something to cling to. Don't forget to varnish!
You know, you hit somewhere.
Yes, they bumped, but not me. I bought this, everything is clear, I’ll wait until spring and do it there. As I understand it, it will cost about 2.5 tr. maybe it's not worth it then
SkyUser
fill out your profile
I don’t know where you are from. in Moscow it may be more expensive.
Whether it’s worth it or not... that’s a matter of everyone’s taste. This nonsense does not affect the speed
about 2.5 tr. maybe it's not worth it then
Definitely listen to the fact that you should wait for the heat, the bumper can be repaired many times before then.
If you want it to not be conspicuous, you can tint it with a spray can. I would recommend NEWTON paint, it will lay down and hold up normally, it won’t look like a collective farm because it won’t be noticeable except in the sun, but you also need to apply varnish.
If you have somewhere to get a compressor and a normal air gun, then it’s better to paint it normally (you can do it yourself), the money is the same as buying cans of paint and varnish with primer.
I think that it is better to paint with a stain with a blender than the entire part; you can do without matching, which is cheaper and will turn out great. but you need experience. I can tell you what. (you shouldn’t paint it completely because there are problems with cleaning. I won’t dwell on this)