Delivery by Russian Post (cash on delivery, no prepayment)
Advantages: the most widespread network in Russia, delivers to any corner of the country, including remote ones. Flaws:
- high cost of delivery of heavy or large parcels, as well as the weight of one parcel should not exceed 20 kg;
- long delivery times and queues in large cities for receipt.
To send your order by Russian Post:
- Place an order in our online store by phone or on the website (registration is not necessary);
- After we receive it, our manager will contact you by phone to clarify the cost, delivery time and your wishes. Next, we will pack your order carefully and then send it to you;
- You will receive the tracking number of the shipment via SMS from us and from the Russian Post; the message will indicate the full cost of the purchase, including delivery to your locality (that is, the cost of your order plus the cost of delivery by cash on delivery). You can control the status of the order coming to you using our tracking service, as well as independently, on the Russian Post website using the track number;
- To the Post Office, you will only have to pay the cost, including delivery.
Delivery time may vary depending on how far your locality is from Togliatti and usually ranges from 5 to 14 days.
The cost of delivery is calculated based on the volume, weight of the selected product and the distance to the recipient's settlement.
Required for sending:
- indicate full name recipient;
- Your mailing address;
- Your phone number (contact);
- Post office code.
Russian Post commission for cash on delivery service:
- purchase price up to 1,000 rubles. – 70 rubles + 5% of the amount;
- purchase price from 1,000 to 5,000 rubles. – 80 rubles + 4% of the amount;
- purchase price from 5,000 to 20,000 rubles. – 180 rubles + 2% of the amount;
- purchase price from 20,000 to 500,000 rubles. – 280 rubles + 1.5% of the amount.
Russian Post - Delivery of goods up to 20 kg throughout Russia. https://www.pochta.ru
Delivery time and cost Track the parcel Calculate delivery by mail
Elevator kit for the field: which one to buy and how to install it yourself
Making a Niva-2121 elevator with your own hands, the drawings, the dimensions of which are freely available, will not be difficult.
Thanks to such a trick, you can make your car more stable on the road and overcome a lot of obstacles with it. Of course, to bring a truly high-quality Niva elevator to life with your own hands, you will have to work hard. The process will take time and require effort, because even the easiest elevator requires a significant immersion in the technical aspects of the issue. However, the end result will live up to all expectations, allowing the modest Niva to show its exceptional side.
Conventionally, the installation can be divided into 2 stages: installation of the rear and front suspension. It all starts with a fairly ordinary procedure - removing the wheels and releasing the silent blocks. Now, in order for the Niva-21214 to be securely fastened, a jack should be installed under its ball joint and the car should be raised until the spring is completely compressed.
All that remains to be done in the future is to unscrew the ball joints and remove the stabilizer. During operation, it is very important not to damage the brake hoses located in the immediate vicinity. Those bolts that are located at the wheel must be replaced with their extended equivalents.
A stabilizer is installed on the lower and upper ball joint. Now the front suspension lift can be considered fully improved and ready for work. It remains to do a similar, albeit slightly more complex, lifting for the rear suspension.
For these purposes, you will need another tool - a semi-automatic welding machine. With its help, additional parts will be installed on top of the standard cups, which will definitely have to be welded. Such a lift of the rear suspension can lead to its movement forward, which is strictly unacceptable. To prevent such a development of events, all rods need to be slightly lengthened.
It would be a good idea to lengthen the size of the brake adjuster rocker arm and move the lower cup slightly. Particularly vulnerable at this moment is the driveshaft crosspiece, which is more than easy to touch in the heat of work. And it is the new size of the cups and filigree work that will protect it from premature failure.
The final battle is the attachment of shock absorbers and a mandatory visit to the service station. Now the rear and front springs of the Niva are reinforced. Any, even the most harmless tuning needs vigilant monitoring by a professional. And even more so, an improved Chevy Niva with your own hands.
The domestic SUV VAZ Niva is an excellent analogue to modern imported SUVs and even some all-wheel drive jeeps. This machine was initially distinguished by its light weight, high ground clearance and high maintainability. However, for more confident off-road driving, some car owners make their own suspension lift. “Niva” then rises another ten centimeters and is able to overcome a lot of obstacles.
To increase ground clearance, it is best to use the factory lift kit and follow the instructions that came with it. In this case, to make a suspension lift, the Niva (VAZ-2121) will be upgraded in no more than 1 day.
We will divide all the work into two parts. At the first stage we will modernize the front suspension, at the second - the rear. So, let's get to work. First, remove the wheels and release the silent blocks. Next, install a jack under the ball joint, place a board under the latter and raise the car until the spring is compressed.
Also interesting: Engine tuning: Niva 4x4 - increasing power using common methods "
After this, we install the ties on the spring, tighten it and unscrew the shock absorber mount. Next, remove the lower and upper ball joints and remove the stabilizer. Release the lever and remove the spring. How is the suspension lift done? The Niva remains stationary for now, and at this time we turn the wheel hub to the side and place it on a stand. It is important not to damage the brake hoses.
Now we move on to the second stage of our lifting work - modernization of the rear suspension. Here you need to prepare a semi-automatic welding machine, and drive the car into the inspection pit. The first step here is to install a few more cups under the springs. These parts are installed on top of the standard ones using bolts.
If you use this method of modernization, the suspension (Niva VAZ-2121 and Chevrolet Niva) will, of course, become more reliable and suitable for off-road driving. However, at the same time, you will have to forget about alloy wheels - only stamped ones can be installed on such a car. It is worth paying attention to the fact that increasing the diameter of the wheels will lead to greater torque - then you will have to change the gear ratios of the main pairs. In addition, after such an upgrade you will need to install a limited-slip differential on the rear axle, and this is again an additional expense.
Hello, dear friends! Today I propose to talk to you about the elevator kit for the Niva. This could be a Chevrolet Niva, that is, series 2123, or the more “our” Niva Urban, 2131 or 4x4, and representatives of the 2121 series, that is, 21213, 21214. It all depends on what kind of car you have at your disposal.
Russia, Ukraine, Belarus and a number of other countries are the greatest admirers of Niva cars. They are affordable and provide many benefits.
Some people prefer to do everything themselves. I can’t say that modifying the front and rear suspension of a Niv car will be an easy job in a minute. No, you will have to spend a lot of effort, time and patience on this.
You can find out how much such a service costs at a service station. The price for a professional lift is steep, so not every owner of a not-so-expensive crossover like the Niva is willing to spend that kind of money, having the opportunity to do everything themselves. And if you put a power bumper and an expeditionary trunk on top, it will turn out great. At least now on a round-the-world trip on Niva.
Currently, there are 4 ways to lift a Niva car:
- Installation of rigid long springs and a spacer over the upper ball.
- Installing spacers under the spring cup and a spacer above the upper ball.
- By installing large wheels (a significant disadvantage is that the arches will need to be cut).
- Lowering the beam down to the desired height.
Further, for a better understanding, all methods will be considered separately.
The first two methods are the easiest to perform. However, at the same time, these methods are incorrect, since with this design the lower arm moves lower relative to the body, as a result of which the car is lifted.
Experts consider the third method to be more correct. Since when lifting is carried out, the suspension will retain the driving characteristics that were specified at the factory during manufacture. Therefore, by making a lift in this way, the driver does not sacrifice the speed of the car in any way. In addition, this will help avoid unwanted steering and changes in the operation of the braking system.
Also interesting: Timing marks on a Chevrolet Niva car
This way you can install large radius wheels without cutting the arches.
Lifting the front end occurs by installing directed washers under the lower spring pad (this creates the desired angle of the front spring). A washer is installed under the upper lever under the spring, in other words, we unload the lever. After this, you need to swap the steering knuckle arms. Thanks to this, the tie rod ends will go from top to bottom. Sometimes during the installation of an elevator, shock absorbers, springs, and spacers are changed.
In the rear, a lift is made by installing new rear spring cups, which are bolted above the standard ones. In addition, the brackets are changed to move the rear shock absorber mounting point higher by 5 cm.
The short upper rods of the rear axle are enlarged or adjusted so that the shank rotates more easily and does not bite the spider. In addition, the reaction rods of the rear axle are strengthened with an angle or by installing double ones.
Also, if the need arises, you can install a long brake hose, bleed the brakes, adjust the rear spool and adjust the spring bumpers.
- For lovers of tourism and travel. It's no secret that most people like to get away from the city.
- For various types of competitions: trials, rally raids, trophy raids.
If you lift the front suspension, the result is an increase in the distance to the surface in front. However, this will be enough to prevent squats on the beam, since the front takes up more than 60% of the total weight of the car.
In addition, the vehicle's airtight permeability improves. This occurs as a result of an increase in departure and entry angles and a decrease in the radius of transverse and longitudinal maneuverability. But lifting in this way significantly reduces the performance of CV joints and factory boots.
The Niva lift can be carried out either independently or in a car repair shop. In special stores you can purchase a kit for Niva, which was produced at the factory. However, it is worth remembering that this is still an intervention in the car. Therefore, you need to carry out this process yourself only if you have knowledge and experience. If you are in doubt, it is best to turn to professionals.
To lift the front suspension of a Niva Chevrolet, you need to do the following:
- Raise the car with a jack and remove the wheel. We take the second jack, install it under the bottom of the ball and lift it until the spring is compressed. When the spring is compressed, it must be tightened with a special device
- We loosen the bracket at the shock absorber and remove the two ball joints along with the stabilizer
- We remove the spring. We move the hub to the side and install it on the holder
- We change the outer wheel bolts to longer ones, to do this we bend the bump stop by 4 millimeters
- We install washer spacers between the cup and the lever
- Install the spring, cups and spacers. Center them relative to each other and jack up the lever
- The stabilizer and ball return to their place, screw the shock absorber
- The hub returns to its place and then we install the wheel back
Delivery by transport company (cash on delivery, no prepayment)
Advantages:
- the cost of delivery of heavy and large-sized orders is much cheaper than that of Russian Post;
- There are practically no restrictions on the weight and dimensions of cargo;
- There is a wooden crate service - this is an additional guarantee of the integrity of the order.
Disadvantages: unfortunately, there are branches only in cities.
The estimated cost of delivery for an order up to 30 kg is 450 rubles.
List of transport companies with which we cooperate:
- TC "PEK" (cash on delivery service available);
- TC "Business Lines";
- TC "Energia";
- TC "KASHALOT" (KIT) (cash on delivery service available);
- TC "SDEK" (cash on delivery service available);
- TC "DPD";
- TC "ZhelDorExpedition";
- TC "VOZOVOZ";
- TC "Baikal-Service".
To send your order by transport company:
- Place an order in our online store by phone or on the website (registration is not necessary);
- After we receive it, our manager will contact you by phone to clarify the cost, delivery time and your wishes. Next, we will pack your order carefully and then send it to you;
- You will receive a shipment tracking number from us via SMS or email (if available). You can monitor the status of the order coming to you using our tracking service, as well as independently, on the transport company’s website using the track number. After the order reaches your locality and the manager of the transport company contacts you, you need to receive the order at their office or order home delivery;
- Upon receipt from the transport company, you pay the cost of delivery and order.
The cost of delivery is calculated based on the volume, weight of the selected product and the distance from the city of Tolyatti.
To send an order you must:
- indicate full name recipient;
- Your locality and region;
- series, number of passport or driver's license;
- Your phone number (contact).
TC "Business Lines" - Urgent delivery of goods from 1 kg throughout Russia. The exact cost can be found on the official website of the delivery service - https://www.dellin.ru
Delivery time and cost Track the parcel View the list of branches
TC "PEK" - Guaranteed safety of cargo for the entire duration of cargo transportation, clear information support, delivery of goods throughout almost the entire territory of Russia, Belarus and Kazakhstan in optimal terms and accurately calculated cost of services. The exact cost can be found on the official website of the delivery service https://pecom.ru/ru/calc
Delivery time and cost Track the parcel View the list of branches
TC "SDEK" - Low tariffs compared to foreign courier companies, while the quality of the services provided meets modern international logistics requirements. Developed network of own representative offices. The exact cost can be found on the official website of the delivery service https://www.cdek.ru/calculator.html
Delivery time and cost Track the parcel View the list of branches
TC "ZhelDorExpedition" - Serves only large cities and towns. The exact cost can be found on the official website of the delivery service - https://www.jde.ru/branch
Delivery time and cost Track the parcel View the list of branches
TC "Energia" - Cargo transportation in Russia, CIS and China. The exact cost can be found on the official website of the delivery service https://nrg-tk.ru
Delivery time and cost Track the parcel View the list of branches
TC "KASHALOT" (KIT) - Delivery of cargo from 1 kg to 20 tons throughout Russia and Kazakhstan. The exact cost can be found on the official website of the delivery service https://tk-kit.ru/calculate
Delivery time and cost Track the parcel View the list of branches
TC "Baikal-Service" - Transportation and delivery of consolidated cargo by road across Russia. The exact cost can be found on the official website of the delivery service https://www.baikalsr.ru
Delivery time and cost Track the parcel View the list of branches
TC "DPD" - Transportation and delivery of groupage cargo by road in Russia. The exact cost can be found on the official website of the delivery service https://www.dpd.ru
Delivery time and cost Track the parcel View the list of branches
TC "VOZOVOZ" - Transportation of groupage cargo by regular delivery routes between Russian cities. The exact cost can be found on the official website of the delivery service https://vozovoz.ru
Delivery time and cost Track the parcel View the list of branches
Jet thrust on a VAZ.
Jet rods for VAZ 2101-2106 Classic and Niva, like previous products, are presented from several manufacturers. Here you can buy Sitek jet rods on the 08 silent block; such jet rods are mainly used on VAZ 2105-2107 to improve handling. Niva Urban jet rods, which have proven themselves on Niva 2121 and Niva Urban cars. Jet rods with adjustable Panhard rod. An adjustable panhard rod is necessary to return the rear axle to the desired position when changing the height of the car body. The adjustable panhard rod is presented in our store in different versions and with different silent blocks. Here you can choose and buy an adjustable panhard rod in the desired design. And also for particularly precise adjustment of the position of the rear axle, you will find a set of reaction rods, where all reaction rods are adjustable.
You can make payment in one of the ways convenient for you:
- To a SberBank or Alfa-Bank card. The most profitable method for the buyer, as well as the most convenient one, is to use the Sberbank Online service, Alfa-Click, an ATM, or through an operator at the bank. After placing your order, the manager will send you the card details. If you do not have a SberBank or Alfa-Bank card, you can also top up your card using the details at any SberBank or Alfa-Bank branch. Payment is credited within an hour.
- Yandex money. Customers who have Yandex.Wallet can quickly and easily pay for an order in our online store, the commission will be 0%.
- Yandex.Checkout is an online payment acceptance service. A convenient option with a large selection of payment methods for your order: plastic cards of any banks, including credit cards, in cash through terminals, ATMs or phone shops, Qiwi Wallet, Yandex.Money, WebMoney, from your phone balance, purchase on credit (payment in installments) . Please carefully check which email address you provided during the ordering process, as you will receive a receipt for payment for your order. Yandex.Checkout commission for transfer will range from 3% to 6% .
- QIWI wallet. If it is more convenient for the client to use a QIWI wallet or, if it is not available, to pay through the nearest QIWI terminal, the manager will provide you with the wallet number. Commission 0%.
- Payment at any bank using an invoice or receipt (+3% to the cost). If you do not use electronic wallets and plastic cards, we provide the opportunity to make payments at any bank in Russia. The site manager will send you a pre-filled receipt “Form No. PD-4” by e-mail; please carefully check the e-mail address you provide. The bank commission will be approximately 3% and depends on the bank itself
- Cash on delivery upon delivery by the Transport Company (payment for purchase upon receipt of the order).
- Cash on delivery upon delivery by Russian Post (payment for purchase upon receipt of the order). The order arrives at the post office, after which you pay its cost and pick it up, in which case the Russian Post charges a commission.
Steering Chevrolet Niva
- Repair manuals
- Repair manual for Chevrolet Niva 2002+.
- Steering
7.0 Steering Features of the design Inspection and check of the steering of the vehicle Checking the tension and adjustment of the power steering pump drive belt Replacing the fluid in the power steering hydraulic system Replacing the power steering hydraulic system reservoir Bleeding the hydraulic system...
7.1 Design features Fig. 7.1. Steering: 1 – lateral thrust; 2 – bipod; 3 – average thrust; 4 – pendulum lever; 5 – adjusting coupling; 6 – suspension ball support; 7 – right steering knuckle; 8 – suspension ball joint; 9 – right steering knuckle lever; 10 – bracket for pendulum lever…
7.2 Inspection and check of the steering control of the vehicle. Location of the steering control elements on the vehicle: 1 – steering mechanism; 2 – left steering rod; 3 – middle steering rod; 4 – pendulum lever; 5 – right rod end with ball joint assembly; 6 – right steering rod General check of the steering R...
7.3 Checking the tension and adjusting the power steering pump drive belt You will need: “13” keys (two), a bit or a mounting blade. 1. Check the belt tension by deflecting the branch between the pulleys of the power steering pump and the crankshaft. The belt should fit snugly against the pulley, but the belt should not be over-tensioned, so as not to…
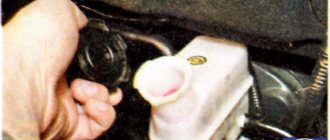
7.4 Replacing the fluid in the power steering hydraulic system Replace the fluid in the power steering system if it is excessively contaminated. The manufacturer does not give clear recommendations on the frequency of replacing fluid in the hydraulic system, so we recommend replacing it after six years, regardless of its condition. For use in a factory-made amplifier hydraulic system...
7.5 Replacing the power steering hydraulic system reservoir Replace the reservoir if the filter located in it is excessively dirty; we also recommend replacing the reservoir once every two years, regardless of the condition. You will need: a 10mm wrench, a screwdriver. 1. Unscrew the tie bolt of the tank bracket...
7.6 Bleeding the power steering system The need for bleeding arises when air gets into the hydraulic system during repair work or when it loses tightness during operation. A sign of air in the system is the steering wheel jamming when you try to turn it sharply. In addition, the pump makes increased noise in...
7.7 Adjusting the gap in the engagement of the roller with the worm If, after checking the steering on the car, it turns out that all its elements are in normal condition, and the play on the steering wheel is increased, the reason for its increase may be the increased clearance in the engagement of the roller with the worm of the steering mechanism. In this case, adjust the geared...
7.8 Removing and installing the steering wheel The steering wheel is removed to replace it if damaged or to replace the steering shaft. 1. Disconnect the wire from the “–” terminal of the battery. 2. Set the wheels to the straight ahead position. 3. Remove the sound switch cover from...
7.9 Replacing steering shafts Steering shafts are replaced if their threaded or splined shanks are damaged, there is play in the cardan joints of the intermediate shaft, or if they are bent in an accident. Replacing the intermediate shaft You will need “13” keys (two). 1. For ease of operation, remove the lower shaft casing...
↓ Comments ↓
1. Car structure
1.0 Car structure 1.1 General information about cars 1.2 Passport data 1.3 Car keys 1.4 Controls 1.5 Heating and ventilation 1.6 Doors 1.7 Seat belts 1.8 Adjusting the position of the front seats 1.9 Adjusting the steering wheel
2. Recommendations for use
2.0 Recommendations for operation 2.1 Safety rules and recommendations 2.2 Tools and accessories 2.3 Running in the car 2.4 Operating the car during the warranty period 2.5 Checking the car before leaving 2.6 Replacing the air filter entering the cabin 2.7 Using a jack 2.8 Towing the car
3. Problems along the way
3.0 Malfunctions along the way 3.1 The engine does not start 3.2 Malfunctions of the fuel injection system 3.3 No idle speed 3.4 Interruptions in engine operation 3.5 The car moves jerkily 3.6 The car accelerates poorly 3.7 The engine stalls while driving 3.8 The oil pressure has dropped
4. Engine
engine piston of the fourth cylinder to the TDC position of the compression stroke
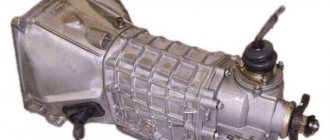
5. Transmission
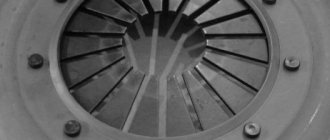
5.0 Transmission 5.1 Clutch 5.2 Possible malfunctions of the clutch, their causes and solutions 5.3 Gearbox 5.4 Possible malfunctions of the gearbox, their causes and solutions 5.5 Transfer case 5.6 Possible malfunctions of the transfer case, their causes and solutions 5.7 Driveshaft 5.8 Possible malfunctions of the driveshaft , their causes and solutions 5.9 Front wheel drives
6. Chassis
6.0 Chassis 6.1 Front suspension 6.2 Possible malfunctions of the front suspension, their causes and solutions 6.3 Rear suspension 6.4 Possible malfunctions of the rear suspension, their causes and solutions 6.5 Shock absorbers
7. Steering
7.0 Steering 7.1 Design features 7.2 Inspecting and checking the steering on the vehicle 7.3 Checking the tension and adjusting the power steering pump drive belt 7.4 Replacing the fluid in the power steering hydraulic system 7.5 Replacing the power steering hydraulic system reservoir 7.6 Bleeding the power steering system 7.7 Adjusting the gap in the roller engagement with worm 7.8 Removing and installing the steering wheel 7.9 Replacing steering shafts
8. Brake system
8.0 Brake system 8.1 Device features 8.2 Useful tips 8.3 Checking and adjusting the brake system 8.4 Replacing brake fluid 8.5 Bleeding the hydraulic brake system 8.6 Master brake cylinder 8.7 Vacuum brake booster 8.8 Pressure regulator 8.9 Replacing hoses and pipelines of the hydraulic brake system
9. Electrical equipment
9.0 Electrical equipment 9.1 Design features 9.2 Fuses and relays 9.3 Generator 9.4 Possible generator malfunctions, their causes and solutions 9.5 Starter 9.6 Possible starter malfunctions, their causes and solutions 9.7 Ignition switch (lock) 9.8 Replacement and maintenance of spark plugs 9.9 Engine control system
10. Body
10.0 Body 10.1 Design features 10.2 Removing and installing front fender liners 10.3 Removing and installing front fenders 10.4 Removing and installing decorative trims on the front fenders and doors 10.5 Replacing buffers 10.6 Removing and installing radiator trim 10.7 Removing and installing the hood 10.8 Removing, installing and adjusting the lock and hood lock drive 10.9 Tailgate
11. Vehicle options
11.0 Vehicle options 11.1 Clutch release master cylinder 11.2 Electromechanical power steering 11.3 Brake system
12. Car care
12.0 Car care 12.1 Checking the car before leaving 12.2 Washing the car
13. Purchase of spare parts
13.0 Purchasing spare parts 13.1 Engine oil 13.2 Greases 13.3 Coolants 13.4 Brake fluid
14. A trip to the service station
14.0 A trip to the service station 14.1 Useful tips
15. Winter operation of the car
15.0 Winter operation of a car 15.1 How to prepare a car for winter 15.2 Recommendations for starting the engine in severe frost 15.3 What is useful to buy for winter 15.4 Useful winter tips
16. Preparation for technical inspection
16.0 Preparation for technical inspection 16.1 Recommendations 16.2 List of malfunctions and conditions under which the operation of vehicles is prohibited 16.3 Changes to state standards regulating the maximum permissible content of harmful substances in the exhaust gases of vehicles 16.4 Standard form of diagnostic card for instrumental control points
17. Applications
17.0 Appendix 17.1 Appendix 1. Tightening torques for threaded connections 17.2 Appendix 2. Basic data for adjustments and control 17.3 Appendix 3. Fuels and lubricants and operating fluids 17.4 Appendix 4. Filling volumes 17.5 Appendix 5. Lamps used on vehicles 17.6 Appendix 6. 17.7 Appendix 7.
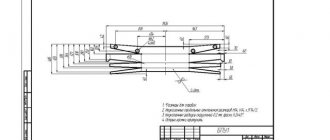
Replacing the lower silent blocks
In addition to hanging the car, removing the wheel, disconnecting it from the lower ball joint, remove the shock absorber from the lower mounting to the spring cup.
Disconnect the stabilizer clip from the link.
Lower the lever and pull out the spring.
After securing the lever axis with a 19 mm wrench, unscrew the 24 mm nut and remove the washer.
Carefully knock out the axle using a metal rod.
Remove the thrust washers.
Remove the lower arm; do not remove the spring cup.
Using a puller or a heavy hammer, press out the silent block.
Replacing the silent blocks of the front and rear levers with new ones is carried out in a similar manner to the disassembly process. For pressing, use a puller or tool head.
Perform final tightening and adjustment with the machine on its wheels. At the end of the process, do not forget to visit the stand to adjust the wheel alignment parameters.