Replacing the timing belt and tension pulley on a VAZ 2114-2115
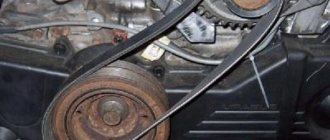
The design of all pre-wheel drive VAZ cars, starting from 2108 and ending with 2114-2115, is almost the same. And as for the timing belt design, it is completely identical. The only thing that may differ is the crankshaft pulley:
- on older models it is narrow (as will be shown in this article)
- on new ones it is wide, so the alternator belt is also wide
So, if you decide to replace the timing belt on your car, you should keep in mind that this must be done in two cases:
- The maximum permissible mileage is 60,000 km, as prescribed by the manufacturer AvtoVAZ
- Premature wear that prevents the belt from continuing to be used
So, in order to perform this repair ourselves, we will need the following tool:
- Socket or open-end wrenches 17 and 19 mm
- 10 mm socket head
- Ratchet handles in different sizes
- Flat screwdriver
- Special tension wrench
Other ways to adjust the roller
If you look at the standard and proper operation of the timing belt, then the tension roller should be located exactly in the middle of the pump and camshaft gears. However, some VAZ-2114 owners, in order to avoid the belt slipping, thus the belt, receiving the greatest bend in its upper part, is more firmly fixed in its place.
All tension roller components for VAZ-2114.
Not a tricky way to adjust the belt
There is another simple way that helps VAZ-2114 owners avoid the belt slipping by adjusting the position of the tension roller.
In order to fix it in this position, it is necessary to pre-make a blank in the form of an aluminum half-washer
(an aluminum can works well - approx.), which must be fixed between the spacer ring and the cylinder block.
Such a need can arise only if the spacer ring has differences in its thickness. You can take its measurements yourself, using only a caliper.
Camshaft and crankshaft
New camshaft gear
Also, judging by the numerous reviews of “our tubers”, it is possible to eliminate the occurrence of timing belt slippage after replacing the camshaft and crankshaft gears.
However, such a procedure can bring results if the car’s mileage on old spare parts is at least 100 thousand kilometers. Otherwise, such a replacement may not bring the desired result.
Rust on the crankshaft gear
Crankshaft gear rusted
This situation arises as a result of the lack of dirt protection. The gear rusts and begins to work incorrectly.
Instructions for replacing the timing belt on a VAZ 2114 + video review of the work
To get started, the first step is to fulfill some conditions, namely: remove the alternator belt, and also set the timing marks - that is, so that the marks are aligned on the camshaft with the cover and on the flywheel.
Next, you can proceed directly to removing the timing belt, which will be clearly shown in the video clip:
It is worth noting that when replacing the timing belt, you should immediately change the tension roller itself, since it is because of it that in some cases a break occurs. The bearing may jam and then the belt will break. Also check if there is any play in the operation of the pump (water pump), and if there is any, then it must be replaced.
If the pump breaks, then over time you may notice a defect such as the side part of the belt being eaten away. This occurs due to the fact that the water pump pulley moves from side to side, thereby moving the belt away from straight-line movement. This is why damage occurs.
When installing, pay special attention to belt tension. If it is tensioned too loosely, it may cause several teeth to jump, which is unacceptable. Otherwise, when the timing belt is overtightened, premature wear occurs, and a high load appears on the entire mechanism as a whole, including the pump and tension roller.
Gas distribution system VAZ-2114
It will not be a secret to anyone that over time, any part will wear out and require replacement; for some, this period is measured in hundreds, for others, tens of thousands of kilometers.
Timing mechanism diagram
As for the gas distribution mechanism system, and specifically its belt, replacement should be done at the end of its service life, or if there is visible damage to it.
However, it should be noted that when , a problem may occur such as the belt sliding out of its place, which in turn can lead to eating (wear - approx.) of the edge of the belt, which in the future will only contribute to its wear, breakage and subsequent replacement.
We hasten to please you
The VAZ-2114 car was equipped only with a volume of 1.5 and 1.6 liters, which may indicate that when the timing belt breaks, the pistons and valves do not meet and the latter do not bend
, which certainly has a beneficial effect not only on subsequent repairs, but also on the car owner’s wallet.
see also
Audi spare parts - which ones are best to buy?
- 0 0 1k
Original Renault spare parts. How to distinguish from a fake
- 18 0 9k
Which timing belt is better?
- 503 27 217k
Timing belt
- 0 0 74k
Replacing the timing belt
- 45 6 83k
Many owners of front-wheel drive VAZs are concerned about the problem of why the timing belt is eating ? Most often this question is asked by owners of the following VAZ models - 2108, 2109, 2110, 2112, 2114, Kalina, Priora, Grant (and this problem occurs on engines with both 8 and 16 valves). There is only one general answer to the question raised: the belt is skewed. And this, in turn, can happen for a number of reasons - the pump is installed unevenly, the roller is of poor quality, a washer of the wrong size is installed between the roller and the block (or it is missing altogether) and some others. Each of the listed problems is solved in its own way. In most cases, work to eliminate the causes can be carried out independently, provided you have the appropriate experience and tools. This will save money, and the repair work itself does not take much time and effort.
Reasons why the timing belt eats
In total, there are seven main reasons why the timing belt eats. To begin with, we will simply list and describe them, and in the next section we will talk about how each problem can be solved.
- Incorrect belt tension . In particular, if the belt is overtightened, then a situation is possible where wear occurs on one of its edges, since a significant friction force is generated there.
- Poor quality belt . Sometimes a situation occurs when domestic manufacturers produce low-quality belts that are made from material that does not meet standards or in violation of production technologies. Especially if the belt is cheap and of some unknown brand (simply a fake). Its cross-sectional surface may not be flat, but may have the shape of a cone or oval.
As practice shows, the last described reason occurs most often. And car enthusiasts have invented a universal method with which they can correct the situation.
Where does the belt slip and why?
Note! The belt can slip either towards the engine or in the opposite direction from it.
This happens regardless of how exactly it was installed in the middle of the gear, since the reason for this is not only the belt itself, but also the elements and mechanisms accompanying its operation. In order to solve this problem, you need to use the methods described below.
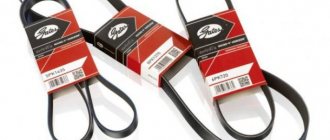
Timing belt
In modern times, in the automotive spare parts market, facts of counterfeits and low-quality products are becoming more and more common.
The top is the original timing belt and the bottom is a fake.
Specifically touching on the issue with the timing belt, we can talk about its uneven structure, increased elasticity (the ability to stretch excessively - approx.), as well as the presence of significant differences between the two edges (distortion - approx.).
The degree of straightness of the newly installed belt can only be determined on the mounted mechanism.
And, if even minor deviations are observed after starting the engine, then the reason is in the belt.
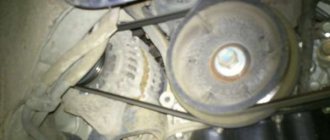
Belt is on and tight
water pump
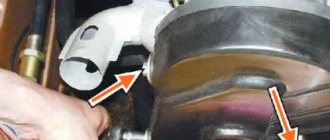
The timing belt can slip due to play in the pump (pump - approx.). It is very easy to determine its presence; you just need to grab the working surface of the gear with your hand, and if there is even the slightest play, the unit must be changed. In this case, read the material: “choosing a reliable pump for the VAZ-2114”
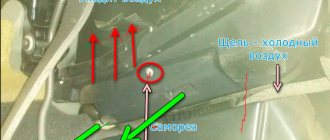
Leaks on the cylinder block from the timing side indicate that the pump has failed
Tension roller
The next element that needs to be diagnosed when the timing belt is slipping is the tension roller.
Although it may seem like a simple part, deviation from its performance specifications can significantly affect the overall correct operation of the part. In simple terms, a curved roller will not be able to provide the belt with linear movement , wearing out and moving it to the side.
The diagram is clear and understandable.
Another reason for discussions on popular forums about the belt moving to the side is the installation of rollers of different types, because the analogue has a different, slightly modified design.
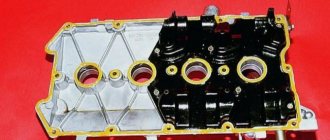
The difference between the rollers
The difference between these two spare parts is that the old side has a different shape, made of metal, while the new one is made of plastic.
Therefore, as the theory shows, a spare part made of plastic causes much less friction than its metal counterpart.
Troubleshooting methods
Now we list methods for eliminating these causes. Let's go in the same order.
- Belt tension . First you need to check the tension level and compare it with the one recommended by the car manufacturer (usually indicated in the technical documentation for the car, also can be found on the Internet). If this value is higher than the recommended value, then the tension must be loosened. This is done using a torque wrench. If you don’t have one, then it’s better to contact a car service. As a last resort, you can perform this procedure “by eye,” but use the indicated devices as soon as possible. You can also use a regular dynamometer and a regular wrench for this.
- Poor quality belt . If the two edges of the belt have different stiffness, then a situation will arise where the timing roller eats the belt from the softer side. You can check this by replacing its right and left sides. If after replacement the second side does not wear out, then the belt is to blame. There is only one way out, and it consists in purchasing and installing a new, higher quality part.
- Wear of pump bearings . To diagnose this problem, it is necessary to dismantle the belt and check for play on the toothed pulley. If there is play, it means the part needs to be replaced. Bearings cannot be repaired.
- The pump is installed crookedly . This situation is possible if, during the previous replacement, the adjacent surface was poorly cleaned, and small particles of the old gasket and/or pieces of dirt remained on it, but if this happens, then most likely you will understand this by the leak that appears after filling the antifreeze and starting the engine. When installing a new pump (or even an old one, if it is in good condition), be sure to thoroughly clean both surfaces (including the bolt holes), both on the pump itself and on the motor housing, and install a new gasket. In some cases, instead of a gasket, sealant is placed under the pump.
- Problems with the video . The video needs to be reviewed. It should have minimal play and a flat working surface. To check, you can use a ruler or other similar object of the required width. It also makes sense to check the presence of grease in the bearing. If its quantity is small, it should be added. If the roller is of poor quality, it must be replaced. It is almost impossible to repair the bearing, much less the roller surface.
- Damage to stud threads . To correct this situation, there are two options. The simplest is to use a saw with the appropriate diameter for turning internal threads and/or a die for turning similar threads on a stud. Another option is more labor-intensive and involves completely dismantling the block in order to restore the specified thread. This method is used if for some reason it is impossible to use the sword.
Installing washers under the roller