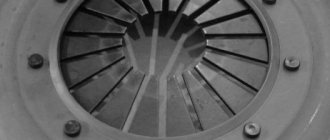
Device characteristics
Using the clutch, it is possible to prevent sudden changes in load, which ensures a smooth start of the car from a standstill. The clutch also protects the entire gearbox from the loads of inertial moments that appear as a result of a sharp slowdown in the rotation of the crankshaft with the engine running at the moment when the driver changes gear. On Gazelle cars, a hydraulic clutch system is installed. It has gained wide popularity on many models of modern cars. The design of the hydraulic mechanism is based on the clutch master cylinder. Gazelle “Business” is also equipped with it. The main problem that the cylinder solves is the transmission of impulses from the pedal to the working element of the system. With the help of this unit, the machine starts. The mechanism also makes it possible to switch up and down gears.
Below we will look at the design of the clutch master cylinder. The Gazelle is a commercial vehicle, so at times it requires servicing. What problems happen with the clutch, how to repair, maintain and, if necessary, change this unit? Let's tell you about everything in order.
Hydraulic drive device
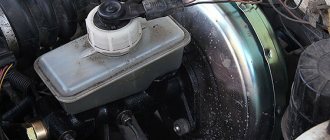
Among the main components that are included in the design of the element, a pusher can be distinguished. With its help, the pedal communicates with the mechanism. This is also the cylinder itself, the piston, plugs and the return spring. How is the clutch master cylinder constructed? “Gazelle” is equipped with a unit with 2 halves, which are divided by a special partition. The upper part is created for working water, which in the process comes from the tank. There, in the upper part, a certain supply of water is stored. If the clutch and hydraulic drive are adjusted normally, then its level should be no less than three-quarters of the volume.
The lower half contains the work area. In the usual initial state, the cylinder piston is pressed by a spring against the wall dividing the cylinder into two zones. There is a gap between the piston and the pusher. Due to this, the liquid enters the working part. When the driver presses the pedal, the pusher moves and closes the gap. Liquid can no longer flow from the upper zone to the lower zone. The piston moves and the force is transferred from the driver's foot directly to the working cylinder. Due to the fact that the sizes of the piston and the outlet hole are different, the hole increases. This is completely enough for the clutch to work. This design simplifies the effort placed on the pedal. This force is completely enough to disconnect the internal combustion engine from the box. When the pedal is released, a spring will act on the piston. Also, due to the pressure in the hydraulic system, the pedal will be able to return to its basic initial position. The pusher will also move to this position. Because of this, the liquid will again seep freely into the lower container of the cylinder.
Replacing hydraulic clutch fluid
“Do it yourself” or “Consult a specialist”?
The far from simple economic situation forces many car enthusiasts to save on service and take on a number of issues related to car maintenance.
The thing is that some of them can actually be solved on your own. But for most, you should seek the help of a specialist. On this page we will look at how such an important procedure as replacing fluid in the clutch hydraulic drive is performed, and draw a conclusion! Even those who have spent only a couple of weeks behind the wheel understand perfectly well that your “survival” on the road largely depends on the quality of the clutch. By decoupling the crankshaft and gearbox, a properly designed clutch gives us the ability to quickly shift. Having a normal clutch, the car does not stall and moves smoothly. Our nerves remain fine. Attention on the road remains stable. Is it important? Of course it is important!
But if you ignore the regulations for timely replacement of clutch fluid, driving will be difficult!
Liquid leak
Replacing the clutch master cylinder on a VAZ 2101-VAZ 2107
Do you want to find out more thoroughly about how to change the clutch master cylinder?
on VAZ 2101-VAZ 2107? And also enthusiasm.
Replacing the clutch master cylinder on a VAZ (classic Lada).
in this video I change the clutch master cylinder
The master
is replaced in the same way ...
Repair may be useful if a shortage of working water is found. The reasons may be breaks or damage in the cylinder cuff, or a violation of the tightness of the connections. In this case, it is recommended to check whether the level in the expansion tank is sufficient. If there is not enough water, then add it. Then from time to time the level is inspected during routine maintenance or technical inspection. From time to time, the usual addition of working water may not help. Then a thorough inspection is carried out, the location of the leak is identified and then the tightness is ensured. In this case, you don’t have to repair it, but simply change the clutch master on the Gazelle.
Diagnostics and replacement of hydraulic clutch fluid Solaris
Diagnostics are carried out both in the engine compartment and under the bottom of the car. In order to ensure full access, it is advisable to use an inspection hole or a lifting mechanism.
By default, 1.8 liters of fluid are refilled into the clutch system, of which 1.2 liters are added to the system, and the rest to the expansion tank.
The main goal of diagnostics is to exclude circuit leaks, the integrity of the metal pipe, and the main release cylinder. If at this stage the technician has no comments, the clutch fluid should be replaced.
Preparatory stage: new DOT-4 fluid in a volume of 2.0 liters, rags, additional lighting is required, a set of automotive tools, funnels, heads, rubber hose.
The main points when replacing fluid are:
- Add new DOT-4 to the maximum level in the expansion tank. This is necessary in order to avoid air suction when the level reaches below the permissible level.
- The technician removes the protective cap at the fitting for pumping fluid; it is located opposite the Hyundai emblem on the radiator grille, if you draw a straight line.
- A rubber hose is put on the fitting for bleeding.
- Using a key set to “10”, the fitting itself is unscrewed half a turn to allow the liquid to flow out with a minimum flow. The end of the hose is located in an empty container for draining the waste.
- After making sure that the liquid flows freely from the fitting, screw it back on. At this time, the master's partner pumps up the clutch pedal like a brake pedal. Enough 5-6 times, fixing, bleeding.
- This procedure is repeated until a light-colored liquid flows from the hose.
Important point! It is necessary to monitor the overall fluid level in the expansion tank, since it is undesirable to allow air to be sucked in. This will add a lot of problems and take a lot of time.
At the end of the procedure, the protective cap is closed and the hose is removed. Clutch fluid replacement is complete. We adhere to the interval previously developed by the manufacturer - 30,000 km or 2 years.
Air in the system
Another typical malfunction is air in the system. Such a discrepancy can lead to complete inoperability of the node. The clutch will not be fully depressed, and pedal operation will be accompanied by a corresponding crunching or vibration on the gearshift lever. Among the circumstances by which air gets into the system and specifically into the cylinders, one can highlight various destruction of hoses and natural wear of parts. Do not exclude water leakage in places where sections of the hydraulic drive are connected to each other. master cylinder repaired in this case ? The Gazelle is placed on a flat surface, the warped hoses are replaced and the system is pumped again.
Pumping fluid through the cylinder
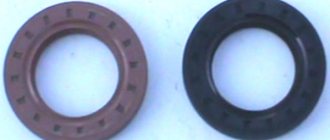
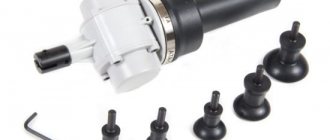
There is also one more malfunction - in this case, the cylinder can pump working fluid through itself. The cause of the defects is the cuff, which is most likely damaged. Perhaps there is wear due to natural wear of the piston. All these faults can be removed using a clutch master cylinder repair kit. In this case, the Gazelle can be quickly returned to working condition. The set includes all the elements that often fail. The process of replacing the cuff and other parts is not particularly difficult for drivers of these cars.
If the first signs of cylinder defects are observed, it is necessary to diagnose and service the clutch system. This will help avoid the need to replace the cylinder completely.
Dismantling and deflation
The first step is to remove and disassemble the cylinder. You can find it in the left rear corner under the hood of the car. Then, after the assembly is disassembled, all components are washed with brake fluid - do not use aggressive solvents for this. The cylinder is then inspected for scoring. Check the condition of the mirror and rod. If minor areas of corrosion or scuffing are noticeable, these defects can be removed with fine sandpaper. But such damage may indicate a large gap between the cylinder and the piston.
Next, the worn components that are provided in the repair kit are replaced. Before assembling the clutch master cylinder , the Gazelle must be put on the handbrake. Every part must be lubricated with brake fluid. Apply a little grease to the surface of the piston that will be in contact with the pusher. Next, the cylinder is assembled, installed in its place and pumped.
Replacing brake fluid in hydraulic brake and clutch drives
Home / Hyundai Tucson / Maintenance / Routine maintenance /
According to the manufacturer's recommendation, brake fluid should be replaced after 2 years of operation or 30 thousand kilometers (whichever comes first).
Useful advice Brake fluid is very hygroscopic (absorbs moisture from the air), which, in addition to causing corrosion of brake system parts, lowers the boiling point of the fluid itself, and this can lead to brake failure during frequent heavy braking. Therefore, we recommend replacing brake fluid every year in the spring.
You will need: keys “8”, “10”, brake fluid, rubber or transparent hose, transparent container.
Useful tips It is recommended to replace the brake fluid with an assistant, after first placing the car on an inspection ditch or overpass (there is no need to remove the wheels). Use brake fluids rated DOT-3 or DOT-4. The order of replacing fluid in the brake mechanisms is: - rear right; — front left; — rear left; - front right.
Warnings Do not reuse drained fluid: it is contaminated and full of air and moisture. Always add only new fluid to the system of the brand that was filled before. Brake fluid is hygroscopic (absorbs moisture from the surrounding air), so it should not be stored in open containers. Protect the environment! Do not dispose of used brake fluid into the soil or sewer system. You can find out about the location of waste fluid collection points in your area from your local authorities.
1. Remove the plug from the hydraulic reservoir of the brake system and clutch release.
2. Fill the reservoir with clean brake fluid to the bottom edge of the filler neck.
Warning Brake the car with the parking brake and install wheel chocks (“shoes”) under the rear wheels.
3. Clean the air release valves from dirt and remove the protective caps of the valves of the working cylinders of the brake mechanisms of the front and rear wheels.
4. Place a rubber hose onto the air release valve of the brake wheel cylinder of the right rear wheel and immerse the end of the hose in a clean transparent container.
5. An assistant must sharply press the brake pedal four to five times (with an interval of 1-2 seconds between presses), and then keep the pedal pressed. 6. Unscrew the air release valve 1/2-3/4 turn. Old (dirty) brake fluid will begin to flow out of the hose. At this time, the brake pedal should smoothly reach the stop. As soon as the fluid stops flowing, close the air release valve. 7. Repeat steps 4-6 until the fluid in the cylinder is completely replaced (clean fluid without air bubbles should flow out of the hose).
Note Always monitor the fluid level in the tank, not allowing it to drop to the “MIN” mark on the tank wall. If necessary, add new brake fluid to prevent air from entering the hydraulic drive. This ensures that the old fluid is gradually replaced by the new one without draining the hydraulic system.
8. In the same way, replace the brake fluid in the working cylinder of the brake mechanism of the left front wheel. 9. Then replace the brake fluid in the second circuit (first in the working cylinder of the brake mechanism of the left rear wheel, then the right front). 10. After replacing the brake fluid, be sure to put the protective caps on the air release valves. 11. Check the quality of the work done: press the brake pedal several times - the pedal travel and the force on it should be the same with each press. If not, go back to steps 4-9.
12. To replace the brake fluid in the hydraulic clutch release drive, remove the protective cap from the valve to remove air from the working cylinder.
13. Place a hose on the valve and lower its end into a container with a small amount of brake fluid. Have an assistant press the clutch pedal four to five times at 2 to 3 second intervals and then hold it down. Unscrew the valve 3/4 turn. Old (dirty) brake fluid will flow out of the hose into the container. 14. Close the valve and ask an assistant to release the clutch pedal. 15. Repeat operations 13 and 14 until the fluid in the clutch release hydraulic drive is completely replaced (clean fluid without air bubbles should flow out of the hose).
Warning While bleeding the hydraulic drive, periodically check the fluid level in the brake and clutch hydraulic drive reservoir. Do not allow the liquid level in it to drop below the “MIN” mark. Add fluid in a timely manner, otherwise air will get into the system and it will have to be pumped.
16. Close the valve and put on the protective cap.
17. Add brake fluid to the level between the “MIN” and “MAX” marks on the wall of the reservoir and replace the plug.
← Checking the free play (play) of the steering wheel
Checking and adjusting the free play of the brake pedal →
Replacing the clutch master cylinder
"Gazelle" requires this operation for the same reasons as in the previous case. These are leaks, natural wear, and improper operation of the clutch mechanism. As already noted, this cylinder is located on the left rear corner under the hood of the car.
Before the replacement itself is carried out, it is necessary to drain the brake fluid from the system. To do this, the hose is connected to a special fitting. The latter is located on the working cylinder. Next, disconnect the clutch pedal from the cylinder. To carry out this operation, remove the part of the dashboard located under the steering wheel. Then remove the retaining bracket, which can be found on the pedal, and pull out the pin on the cylinder pusher.
Once the fluid supply tube from the master cylinder is disconnected, you can begin to unscrew the two nuts that hold the clutch master cylinder itself. "Gazelle-3302" continues to stand on the handbrake. After the nuts are unscrewed, the cylinder can be removed and a new one installed in its place. The installation process is carried out in reverse order. After assembling the system, it is necessary to bleed the drive.
What is a clutch master cylinder?
Clutch master cylinder (MCC) is a hydraulic drive unit for engaging and disengaging the clutch of manually controlled transmissions (manual transmissions); a hydraulic cylinder that converts the force from the driver’s foot into the pressure of the working fluid in the drive circuit.
The hydraulic clutch is one of the main components of the hydraulic clutch drive. The main and working cylinders, connected by a metal pipeline, form a sealed hydraulic drive circuit, with the help of which the clutch is turned off and on. The main clutch is installed directly behind the clutch pedal and is connected to it by a rod (pusher), the working cylinder is mounted on the clutch housing (bell) and is connected by a rod (pusher) to the clutch release fork.
The master cylinder plays an important role in the operation of the transmission; if it breaks down, driving the vehicle becomes difficult or completely impossible. But to make a purchase of a new cylinder, you need to understand the design and features of this mechanism.
How to remove air?
After any repairs to the hydraulic part of the clutch, the system must be pumped. To do this, the liquid is poured into the tank literally to the brim, and the fitting must be unscrewed until it stops. Next, press the pedal several times. This is done to ensure that the brake fluid gets into all the pipes. Then the pedal is fixed. Next, tighten the fitting and again squeeze the pedal several times, and then fix it. Next, put a tube on the fitting. It is dipped into a bottle of liquid. The fitting is unscrewed to bleed air. All these steps must be repeated until there is no air left in the system.
If necessary, liquid should be added to the tank. It should be replaced in the clutch lines at least once every 2 years. Brake fluid is hygroscopic. This means that corrosion can form inside the system.
DSC_9405 (Copy)
Unscrew the bleeder fitting 1/2–3/4 turn.
Unscrew the bleeder fitting 1/2–3/4 turn.
In this case, liquid will flow out of the hose. As soon as the liquid stops flowing out of the hose, tighten the fitting, and only after that can the assistant release the pedal. We repeat this operation until new brake fluid (lighter than the old one) comes out of the fitting. We remove the hose, wipe the bleeder fitting dry and put a protective cap on it.
Pedal adjustment
After master cylinder has been repaired or replaced with a new one, the Gazelle requires adjustment of the pedal. It's a simple process. A ruler is required for this operation, but the first step is to carry out a diagnosis. If, when trying to start moving the car, the pedal falls down, various sounds are heard during the switching process, bumps and jerks are observed while driving, you need to start the engine, release the clutch slowly and try to move off smoothly. If the car is in no hurry to move, this indicates that the pedal is set incorrectly. Her stroke is greater than normal. Next, use a ruler to measure the distance from the floor to the pedal pad. It should be no more than 14-16 cm. If it is higher, then the pedal must be adjusted. To do this, you should find a bolt with a locknut under the hood. It is located where the cable ends. The nut is turned. In this case, the desired pedal travel is achieved. To increase the stroke, the nut must be tightened. If the stroke needs to be reduced, it is unscrewed. After adjustment, check the pedal again. Re-measure the distance with a ruler. The adjustment continues until the desired result is achieved.
How to make a replacement?
In two stages:
- Let's merge!
- It would be a good idea to wipe the tank free from accumulated dirt and dust.
- We unscrew the lid of the reservoir where you have the desired liquid (see technical documentation)
- Unscrew the cylinder fitting with a wrench
- We take a traditional set of tools that provide manual drainage of liquid
- We ask the assistant to progressively press the clutch pedal, we control the flow of liquid into the prepared container
- Let's fill it up!
- The assistant stops working with the clutch
- The fitting is screwed into its original position
- Filling with new fluid
- Checking the tightness of the lid
Work is done! Whether it’s long or short, to replace the fluid in the hydraulic clutch, you will need to visit the store, spend your personal time and the time of one of your friends or relatives. Can this be avoided?
Yes, if you use the Carprofi.net service, with which you can find an inexpensive car service nearby and make a profitable replacement without wasting your personal time!