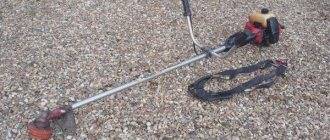
Of all the domestic motorcycles, it was the heavy Urals and Dniepers that motorcyclists fell in love with. They were mainly valued for their engine - a boxer, four-stroke, two-cylinder, with a large volume that gave the rider an indescribable sensation. Alas, the engines were very unique and demanding. In order to move carefree on your horse, you either had to be a good mechanic, to know all the nuances of the engine in order to set everything up properly, or you could approach the problem from the other side, getting rid of its source. In this article we decided to look at how to install one carburetor on a Ural motorcycle? You might also be interested in the article: Ural motorcycle tuning.
It's not a simple procedure, but it saves you hours of agony trying to synchronize two carburetors. To make it more clear how difficult this task is, the owners of Ural and Dnepr compare it with trying to synchronize two mopeds standing next to each other. In comparison, installing and servicing a single carburetor is a simple task, which has a number of other advantages, such as fuel economy, lighter throttle control and the ability to install a set of handles on one cable. But let's look at the whole procedure in order.
Choosing a carburetor for the Urals, Dnepr
Let’s answer the most common question in advance - no, none of the old carburetors are suitable for this job. You can explain for a very long time why, in general, this model is designed for one cylinder, but you will have to “feed” two, so let’s move on. The second question is “Which Solex or Moskvich carburetor should I choose?” The answer is none. We immediately dismiss all car carburetors for their unreliability and difficulty of maintenance. There are many articles that describe the conversion of the Urals to carbs from various domestic cars or foreign cars, but they all end with the owner constantly suffering from its incorrect operation, etc.
From the above, we conclude that we need a motorcycle carburetor capable of feeding the volume of our engine. For example, the Soviet K28G or from Japanese two-cylinder engines of similar volume.
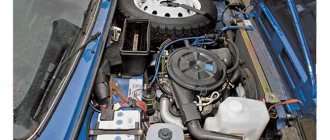
Creating the Intake Manifold
Having chosen which carburetor to install, we proceed to the next step - creating an intake. First, we remove everything unnecessary - old carbs, filter, freeing up the area. Now you need to make three mounting plates. To do this you need to use metal, no thinner than 5 mm. The plate will act as a tip that is fixed to the cylinder (similar to the plates on the exhaust elbows). On the cylinder side, it must retain the mounting points and have an internal diameter corresponding to the diameter of the inlet port. You can use the old plate on the carburetor side by cutting off part of the seat from the original part (if the design allows). Parts can be ordered from a turner or made from CNC equipment. The last resort is to do everything yourself, using a drill, a file and a lot of patience. Now we need to put everything out. The plates are screwed into their seats, and the carburetor is rigidly fixed in its future location.
Important! When aligning the carburetor, please note that it must be raised relative to the gearbox by at least a few centimeters.
The next stage is the selection of pipes and welding machine. It is best to use stainless steel pipes, perform rough “on-site” fasteners using manual electrode or semi-automatic welding, and finally weld the parts using argon or gas welding.
Such a high-quality finishing weld is needed to ensure that the inside of the manifold is in a perfectly smooth condition, otherwise swirls or irregularities may appear that prevent normal intake. If there is only rough welding, then it is worth welding the manifold in stages, polishing the welded joint each time. Note! Due to the peculiarities of the arrangement of the cylinders in a boxer engine, the manifold created in this way cannot be of equal length, so try to make the intake pipes as equal as possible. On the other hand, if you install the carburetor not symmetrically, relative to other parts, the problem can be avoided. Solving the problem with the air filter. As you already understood, the old air filter is no longer suitable for installation. Some people get sophisticated by installing one carburetor behind the filter, making an incredibly long intake. This option has a lot of disadvantages, but the most obvious is the inability of the system to adequately respond to gas and they do not work at low temperatures. The way out of this situation is a new filter. You can make it yourself; many people approach the issue creatively, placing the filter inside a flask, leather bag, first aid kit, etc. Such a new element looks quite original and can fit well into the overall style of the motorcycle. On the other hand, the market is simply overflowing with short filters of zero resistance, which will ideally fit in a new place.
Conversion of the Dnepr motorcycle to one K65D carburetor
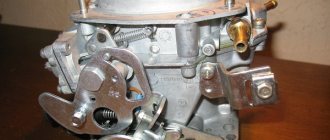
Hello Dear Like-minded People! So, I thought about installing one carburetor, instead of the old K301. Because it was very difficult to set up synchronization, the consumption was high, and in general they were outdated. I thought for a long time about which one to choose, there were many options - Solex, DAZ, K133, from a tractor launcher, etc. I read a post on this resource that you can install one K65D carburetor from Jupiter. Here was my topic about one K65D, logically it would have been better to install the K65I from the Planet, but it turned out the way it turned out. K65D (Pekar, Russia). Diameter of the mixing chamber, mm – 32; Diffuser diameter, mm – 30; Throughput, ml/min - GTZ - 260 - idle metering tubes - 50 - fuel corrector nozzle - 255 Ambient temperature range at which the engine starts and stable operation is ensured in all operating modes - from -20C to +50C.
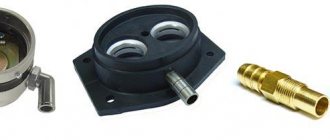
A stainless steel pipe with a diameter of 28mm was found, and 4 pipe angles with a diameter of 25-28mm were purchased, the diameter of the angles varied. The flanges were made of metal 5mm thick, there were two more metal options - 3-3.5mm, 10mm. 3mm - in my opinion, too thin, most likely they would begin to bend when tightened, and 10mm - this is too much, and it is more difficult to work with such material.
Here is the finished flange.
The most difficult thing was to make a structure with a flange that was attached to the carburetor, or rather to make a hole in the pipe, it took a long time. Since the drills did not have such a diameter, it turned out that it was decided to use a trick, namely, take a piston pin with a diameter of 30 mm, cut longitudinal lines on it with a grinder, it turned out something like a milling cutter. We didn’t drill the hole, but squeezed it out, the finger was red-hot.
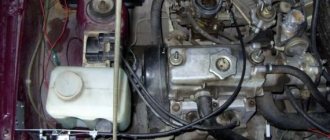
It was difficult to secure the manifold to the flanges in place. Fortunately, four pipeline bends were purchased; without them, it’s unlikely that anything would have worked; we would probably have had to bend the pipe. And so we put one knee, on the other it turned out, something like the English letter “S”. Thus, we made a less abrupt transition.
Of course, there was a lot of welding stuck on, the welder offered me to remove everything with a grinder, I refused. All the same, the collector needs to be covered with something and insulated. There is an idea to cover it with outdoor insulation for the wires. The whole rework took quite a long time; they started at 13:00 and were finished at 21:30. Because it was dark, the collector was poorly welded, leaving many small holes. I noticed this already at home, so I went to the welder again. The second time they boiled it well, checked it, put it in water and blew into the collector, everything was clear.
The first launch went surprisingly well. There is nothing, without changing the position of the needle in the carburetor in the middle. I installed it, replaced the air filter with a sock, pumped it up, grabbed the first kick, but stalled, and started on the second. I adjusted the idle and that's it. The precise operation of both boilers was a pleasant surprise. After unscrewing the throttle, a shot followed, it was the first and the last. This didn't happen anymore. The traction at the bottom is crazy, at first you can even climb the wall. The top was most likely cut off, acceleration was normal up to 70 km/h, then I don’t know. The collector cools down strongly, even in the heat of 30C, it is covered with dew. The consumption, it seems to me, is still high, the candles indicate this, they are too black. I lowered the needle to the very last mark, it didn’t seem to be as black as before. Maybe this is because I drive mostly at idle... This is the experience of converting it to one carburetor, I’m happy, I definitely won’t go back to two. I apologize for the photos because I took them on my phone! Thank you for your attention!
Settings
The last stage is starting the Ural engine and setting it up. Some imported carburetor models do not have an enricher, which must be taken into account when purchasing. Otherwise, the idea is simple: when the engine starts, we do a test drive, with maximum spin in low gears and try to reach speeds of more than 100 km/h. If the engine does not pull, perhaps a more efficient jet will solve the problem; you also need to work some magic with the idle speed setting.
Note! This entire system has one significant drawback - problems with operation at low temperatures. In cold weather, condensation forms in a long manifold, which inevitably leads to deterioration in engine performance.
You can try to isolate the inlet with rubber pads or other insulating materials. Plus, you shouldn’t do test runs and adjustments in the cold season.
Conclusion
Now you know how to install one carburetor on a Dnepr or Ural motorcycle. Before you start work, weigh the pros and cons, correctly assess your abilities, because if you don’t have a lot of money to entrust this work to workshops, you will have to use the skills of a welder, designer, mechanic and others. On the other hand, by correctly completing all the described points, you will lighten the burden of owning Soviet equipment and will be able to ride a motorcycle without any problems, even in everyday use.
The Ural is the most recognizable motorcycle with a boxer engine and a side-mounted trailer, which is known not only in the countries of the former USSR, but throughout the world. Today, these motorcycles are produced mainly for the foreign market with electronic fuel injection. But they used to have carburetors. This article will describe in detail the adjustment and tuning of various carburetors on a Ural motorcycle.
What do the shots affect?
Problems with the ignition system do not bode well. In such a situation, with prolonged engine operation, not only the aesthetic impression can deteriorate. A dirty carburetor or low-quality fuel will eventually disrupt cylinder compression, which in turn will lead to engine failure.
To understand why a Ural motorcycle shoots at the muffler, or any other bike, you should check the problem areas. Here are possible ones:
- not tightness of the pipes that can suck in air, or the exhaust tract;
- faulty spark plugs;
- dirty air filters or carburetor;
- difficulty in supplying fuel;
However, the problem may also be with the racers' rev limiter. The spark plugs do not charge continuously, causing most of the mixture to go straight into the exhaust system, where it hits the hot metal and ignites, creating a loud bang. A clear example of such a process is a motorcycle equipped for special show programs. On such bikes, some of the fuel mixture ignites directly in the exhaust pipe, which is why you can see a flame coming out of the muffler.
Under no circumstances should you install direct flow
if you experience popping noises. This will only increase the noise in the exhaust system. This happens due to an even greater depletion of the fuel-air mixture and a “gutted” muffler.
Ural motorcycle carburetor
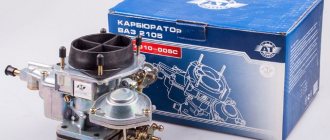
The most popular models of the Irbit Motor Plant that have been preserved in our country are IMZ M-67 (M-67-36 with 36 hp), IMZ 8.103-30 (8.103-10 – gearbox with reverse gear). We will focus on them, because... carburetors on other models are adjusted in a similar way.
All Ural motorcycles were equipped with variable vacuum float carburetors. At first these were K-301G(B) with one float; they were installed on models M-67 and M-67-36. The letter index indicates the diameter of the diffuser (28 and 32 mm) and the throughput of the GTZ.
On later models of the Urals, more advanced K-63U(T), K-65T and K-68U(T) began to be installed. These carburetors had a new float and mixing chamber design. The throttle valve remained flat (cylindrical on the K-68), but a manual starting enrichment appeared. This made it easier to start the engine in cold weather. Also, thanks to the new carburetors, fuel consumption on the motorcycle has significantly decreased.
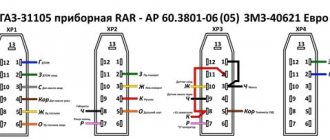
Motorcycle Ural IMZ M-67 with K-301 carburetors
Design and principle of operation
The design and operating principle of the above-mentioned carburetors are similar. The mixture from the fuel tank enters the float chamber through a hose. When the chamber is filled to the required level, the floats will float and the needle valve will close the fuel channel. From the float chamber, fuel is sucked through the GTZ into the diffuser (mixing chamber), where it is mixed with air in the required proportion and the finished mixture enters the engine cylinder.
Attention, the carburetors on a motorcycle are different on the left and right. To determine, just look at the markings on the case.
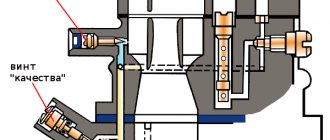
The throttle valve is responsible for narrowing or increasing the diameter of the diffuser, due to which the necessary vacuum is formed in the mixing chamber. When the throttle is closed, the vacuum is at its maximum and fuel is sucked in through the idle jet. And air enters the mixing chamber through a special emulsion channel (usually located next to the carburetor inlet pipe).
As the throttle valve rises further, the amount of air in the diffuser increases and the mixture becomes leaner. And here the main fuel jet with atomizer comes into play.
To ensure that the fuel is sucked into the diffuser in the required volume, a conical needle is provided in the mixing chamber. It rises along with the throttle valve, thereby changing the flow area between the nozzle and the needle (the fuel supply does not stop, despite the decrease in vacuum parameters when the throttle is raised).
To adjust the optimal mixture parameter, the carburetor has screws for the quantity and quality of fuel. You can also change the position of the needle in the lock by raising or lowering it (change the quality of the mixture). This is usually done when the season changes, when atmospheric air parameters change sharply.
To prevent engine detonation due to a sudden enrichment of the mixture (for example, when the carburetor is flooded), a drainage hole is made in the float chamber housing. If the fuel level in the chamber becomes too high, excess fuel is removed through this channel.
Adjusting the carburetor on a Ural motorcycle
To adjust the carburetor you will need: a flat screwdriver, a ruler (caliper). To set up high-quality alternating operation of the engine cylinders, you will need a vacuum synchronizer, an electronic tachometer, and 2 5 ml syringes. But you can do without all this.
First you need to adjust each carburetor individually. The algorithm is as follows (using the K-65T as an example):
- Check the fuel level in the float chamber. Unscrew the two screws and remove the camera cover. Turning the carburetor over, measure the distance from the middle of the float to the carburetor. It should be within 13 (+1.5/-1.5) mm. If the distance does not correspond to this limit, bend the float tongue in the desired direction. At the same time, at this stage you can check the cleanliness of the carburetor jets and channels (if there is contamination, blow them out with compressed air). We put everything back together and screw the carburetor to the engine cylinder flange. ATTENTION! Before further tuning, it is recommended to check the motorcycle's ignition system, fuel tap and air filter. The latter must be clean and have the necessary throughput. The default needle groove lock is in the very middle position.
- Next comes adjusting the idle mixture. Tighten the mixture quality screw (11) all the way and unscrew it 1 turn. Start the motorcycle and warm up the engine for 5-10 minutes. Since we adjust each carburetor separately, the spark plug cap of the second cylinder must be shorted to ground. We measure and use the mixture quantity screw (27) to set the distance between the throttle valve and the bottom of the mixing chamber to approximately 2 mm. Afterwards, we start the motorcycle on one cylinder. Using the quantity screw, we set the lowest engine speed at which the motorcycle does not stall. Next, use the mixture quality screw to look for the maximum engine speed. Sometimes these operations have to be repeated several times. It is necessary to find such a position of the mixture quality screw, depending on the quantity screw, at which there will be a “maximum” engine idle speed. We carry out a similar adjustment with the second carburetor with the spark plug insulator on the other cylinder closed.
- When the desired position of the screws has been found, you should also check the composition of the mixture in the carburetor while the engine is running. It must be optimal. To do this, while the engine is idling, sharply turn the throttle lever. The speed should increase smoothly without dips or jerks. To more accurately check the mixture, after adjusting and synchronizing the carburetors, you need to ride the motorcycle for 20 kilometers. The color of the spark plug insulator will tell you a lot.
After setting each carburetor separately, it is necessary to synchronize them together. Otherwise, when the engine is running, one of the cylinders will heat up more and fail faster.
The secret to proper timing is to get the same amount of vacuum on each carburetor. But since there are no completely identical cylinders, and each carburetor has its own unique position of quantity and quality screws (for optimal mixture composition), it is necessary, first of all, to adjust the synchronous lift of each throttle valve. To do this, according to the factory instructions, the motorcycle is placed on the center stand with the rear wheel hanging out.
Start the motorcycle on each cylinder one by one and engage 4th gear. It is necessary to achieve the same speedometer readings of 40-50 km/h with a load on each cylinder (turn on the high beams or apply the rear brake). Where the speed is less than required, use the quantity screw (27) on the corresponding cylinder carburetor to raise the throttle valve. It should be remembered that the cables stretch over time, so synchronization in the Urals must be checked every thousand kilometers.
Carburetor K65
The above method has some disadvantages, in particular, inaccurate adjustment. The speedometer has an error, and not everyone can determine the correct operation of the cylinders by ear. For more accurate synchronization, you will need special devices, which we mentioned above.
Can the K-63 carburetor be installed on Dnepr motorcycles of previous models?
The flange of the K-63T and K-63F carburetors, in comparison with the flange of the K-301 carburetor, is rotated 90° and located in the horizontal plane. Therefore, to install a new device on old motorcycles, you need to use a special spacer (Fig. 14). The named types of carburetors go on sale already with such a spacer; it is included in the package. When installing the K-63T carburetor instead of the K-301 on the Dnepr-11 and Dnepr-16, K-650, MT-9, MT-10 motorcycles. MT10-36 it is necessary to unscrew the studs from the head,
insert bolts 2 into the spacer sockets and screws 7 to attach it to the head. Then to the spacer with bolts 2
through gasket
3
.
Gasket 5
is used from an old carburetor. You may need to file down the ribs a little - you will find this out during installation. The K-750M-01 engine, which goes on sale with the new K-63F carburetor, is supplied with two sealing rubber couplings assembled with clamps. When installing this engine on the M-72, K-750M and Dnepr-12 motorcycles, you should locally shorten the inlet pipe of the right cylinder and replace the old couplings with new ones.
Please provide the parameters of the metering elements of the new K-63 type carburetors.
These parameters are summarized for convenience in table. 2.
Is it possible to operate the MMVZ-3.112 motorcycle on AI-93 gasoline?
It is possible, but first you should increase the compression ratio slightly and use a different spark plug. If you trim the cylinder head by 0.5...0.7 mm, you will get exactly what you need. The compression ratio will increase to 11.5...11.8. The candle should be used A23B. According to factory data, with such a simple reconstruction, the maximum engine power will increase by approximately 5%, and fuel consumption will become approximately 10% less.
Is it possible to operate the Izh-PS motorcycle on A-76 gasoline?
If you put a heat-resistant gasket made of annealed copper or soft aluminum with a thickness of about 2 mm under the cylinder head, you can also use A-76 gasoline. In this case, the spark plug must be used the same as on other motorcycles of this plant - A17B. The ignition timing should not be changed. It is clear that with such a modification the motorcycle will lose some power and throttle response.
A piston burned out on my Ural. What is the reason for this phenomenon and how to avoid its recurrence?
Burnout of a piston usually indicates that there are serious disturbances in the flow of the working process in a given cylinder and that these disturbances existed for a long time, but were not eliminated, although they certainly revealed themselves (overheating, “popping” in the carburetor) and with careful attention could be eliminated. It is most likely that the mixture in this cylinder was either lean due to incorrect adjustment of the main metering system of the carburetor, or this cylinder was working with constant overload due to the fact that the spool in its carburetor rose significantly ahead of the other. Perhaps the observed phenomenon was aggravated by setting the ignition too early or prolonged driving at maximum settings, as well as installing a spark plug that was too “hot” (with a low heat rating). The causes should be eliminated in order, starting with the simplest: checking and installing the ignition strictly according to the instructions, replacing the spark plug. Then adjust the carburetors to ensure synchronized operation. The adjustment procedure is described in sufficient detail in any instruction, and it is hardly worth repeating. We would like to draw your attention to just a few details. First, start by checking the fuel supply to the carburetors. With the tap open and the fuel lines disconnected, fuel should flow continuously and evenly from both fittings into the containers placed. If after 20...30 seconds the flow slows down, the stream becomes sluggish or intermittent, open the gas tank cap. If after this the gasoline flows more quickly, you need to clean the hole in the plug. If it doesn't flow better, the fuel valve is to blame or dirt has accumulated in the gas tank. Having ensured the fuel supply, check the fastening of the carburetors to the head flanges: air leaks can significantly deplete the mixture in one of the cylinders. When the surfaces are clean and level, and the gaskets are in good condition, a tight connection is ensured here with the most moderate tightening. Therefore, do not try to eliminate leaks by tightening the nuts, this will not help. Identify and eliminate the root cause. It should be borne in mind that the quality of the mixture at engine operating conditions when the throttle is raised by approximately 25% of its stroke is determined mainly by the adjustments of the idle system (the “quality” screw). Subsequently, when the throttle is raised from 1/4 to 3/4 stroke, the quality of the mixture is determined by the diameter of the main jet and the position of the spool needle; in the last quarter of the stroke - only by the performance of the main jet. The fuel level in the float chamber affects all modes, but is especially significant in the last quarter of the throttle stroke. If, when checking the carburetor, no obvious defects are found (clogged channels, filter, incorrect installation of parts - not fully screwed in jets, nozzle tube, torn gaskets, etc.), you need to check the serviceability of the shut-off valve and the fuel level.
One carburetor for a Ural motorcycle
Among the frequently encountered options for tuning a Ural motorcycle, it is worth noting the installation of one carburetor in the Ural, usually a car one. This is done primarily to reduce fuel consumption. After all, it is well known that boxer engines with original carburetors have a considerable appetite (6-9 liters per 100 km).
In addition, due to the design features of single-chamber float-type carburetors, Ural motorcycles have a noticeable dip during sharp acceleration from a standstill. For some this is unacceptable. Improving the dynamic characteristics of a motorcycle is another reason why such carburetors are installed.
To install one carburetor in the Urals, you need to make so-called “pants” - inlet pipes for each cylinder with a common flange for attaching the carburetor. Since car carburetors are located (longitudinally) in the center of the engine (where the air filter was), the pipes must have strictly the same length and a smooth surface inside, without burrs or steps.
If the carburetor is installed transversely, then the right (left) pipe must be made shorter so that the first channel of the diffuser is exactly in the middle. This way we will ensure equal supply of fuel to the cylinders. The air filter is installed above the carburetor or, if there is not enough space, to the side of it.
Another important point. The intake manifold does not have to be one piece. It must have at least one elastic connection. The motor has a certain thermal expansion. Since the motor is quite wide, this expansion is enough for the connections to the heads to break the tightness of the connection and begin to suck in air. The solution is tritely simple, an incision is made in any convenient place and connected with a rubber pipe.
So, the first car carburetor for the Ural motorcycle is the DAAZ 1111 (1113) from Oka. It is designed for a similar volume - 650 cubic cm. But before installation, it will be necessary to replace the standard jets in the first chamber with 90, and in the second with 92.5. The air channels remain the same.
The K-133 carburetor from Zaporozhets is installed in a similar way. Owners note a noticeable reduction in fuel consumption (3-5 liters per 100 km) compared to two carburetors. The downsides of this carburetor are its dated single-barrel design and workmanship. Today on the market there are more advanced 5-system carburetors with suction, accelerator pump, etc.
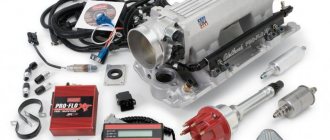
One of these is the DAAZ-2108–1107010 carburetor. It is initially configured for a 1.5 liter V8 engine. Before installation on a motorcycle, you will need to select the appropriate jets.
The filter for the carburetors described above is made independently. They make a platform for the filter element, and cover it with a decorative cover on top. They also make an adapter for a standard filter box, if there is enough space for it.
content .. 11 12 14 ..Carburetors of the Dnepr-12 motorcycle engine
The engine is powered by two K-302 carburetors (Fig. 9), identical in design, but not interchangeable (right and left), installed on the cylinder heads. Both carburetors have a common air cleaner.
During operation of the motorcycle, the operation of the engine at low idle speed, the synchronization and efficiency of the operation of the carburetors, as well as the operation of the carburetor control drive are checked and adjusted.
To protect the fuel system from contamination, a mesh filter and a sump 5 (Fig. 7) are installed in the gas tap, and a fuel mesh filter 9 is installed in the plug 6 (Fig. 9) of the carburetor filter.
It is recommended to remove accumulated dirt from the fuel tap sump every 5,000 km, wash fuel filters and float chambers, and blow out carburetor jets and channels.
If there is insufficient fuel supply, engine power sharply decreases, flashes appear in the carburetor, and the engine crankshaft speed does not correspond to the normal position of the throttle control handle.
In this case, first of all, you need to check whether the holes in the fuel tank plug that connect it to the atmosphere are not clogged. Then, after closing the gas tap, you need to unscrew the sump, clean and rinse it and the filter located in it. After assembling the sump, you should open the tap and blow air through it.
When disassembling carburetors, you need to unscrew plug 14, unscrew the main jet 10 and blow it with air. Unscrew the plug 6, remove and wash the fuel filter 9. Do not use steel wire to clean the nozzle, as this may cause a change in the cross-section of its hole, and consequently, disruption of the carburetor.
If the low speed nozzle becomes clogged, it must be unscrewed and blown out with air.
By rotating screw 18, you can change the flow area of the air channel and regulate the quality of the combustible mixture at low speeds: when screwing in the screw, the mixture becomes richer, and when unscrewing, it becomes leaner. An adjusting needle 22 is connected to the throttle body and passes into the internal channel of the main jet nozzle.
Fuel is supplied to the atomizer through the annular gap between the wall of the atomizer channel and the needle. The needle at the lower end has a conical shape, due to which, when it rises, the annular gap increases, the amount of gasoline supplied to the atomizer increases and the mixture becomes richer.
The adjusting needle is connected to the throttle body by lock 23. The needle has six annular grooves. By moving the lock to one of the needle grooves, you can achieve six different carburetor adjustment positions. The lower the needle is, the poorer the mixture, and the higher it is, the richer it is.
Rice. 9. Carburetor: 1 — throttle thrust screw; 2 - quencher; 3 — float chamber cover; 4 — float needle; 5 — float; 6 — filter plug; 7, 12, 13 — gasket; 8 — filter spring; 9 — fuel filter; 10 - main jet; 11, 14 — plug; 15 — low speed jet; 16 — air filter housing; 17 — air filter mesh; 18 — screw for adjusting the quality of the mixture at low speeds; 19 — sawing hole of the low speed jet; 20 - sprayer; 21 — nozzles; 22 — adjusting needle; 23 — wash the throttle needles; 24 — throttle body; 25 — throttle spacer spring; 26 — carburetor body; 27 — throttle travel limiter; 28 — carburetor cover; 29 — spring; 30 — stop lock nut; 31 - fitting; 32 — throttle cheek; 33— low speed jet air channel; 34 — air channel of the sprayer; 35 — fuel supply channel to the spray hole; 36 - main fuel channel
content .. 11 12 14 ..
Imported carburetors for the Ural motorcycle
Imported carburetors with constant vacuum have proven themselves well on Ural motorcycles. In particular, Japanese Mikuni and Keihin with diffuser diameters of 32 mm. But since they are intended mainly for 400 cc cylinders, they can be installed in the Urals.
Just to start, you need to select the right jets, otherwise the carburetors will become lean.
To attach to the engine cylinders, adapters will need to be made by a turner. It should be remembered that such carburetors are mounted strictly on an elastic suspension!
Also, oppositionists like to “make” slide (float) carburetors with an accelerator pump on their engines, which eliminates the same failure that occurs on all St. Petersburg carburetors when the throttle is opened sharply. Usually these are Italian Dellorto PHF 30(34) and Chinese Keihin PZ 30.
In the photo: Italian carburetor for a Ural motorcycle
For installation, you will need to select jets, make adapters for attaching to the engine cylinders, and also buy and modify special cables (each cable has a splitter for the throttle valve and accelerator pump). The video below shows all the nuances of installing Chinese carburetors on a boxer engine:
Adjusting the main carburetor systems in the Urals
Adjustment of carburetors on a Ural motorcycle is carried out after checking and adjusting the gaps between the spark plug electrodes, breaker contacts, valve stems, and the ends of the rocker arms. Each of the two carburetors is separately adjustable. It is necessary to begin adjusting the carburetor in the Urals after measuring the gap between the tip of the cable sheath and the fitting, which should be 2-3 mm.
Rice. 3a. The main elements of the carburetor: 1 - main air path: 2 - throttle valve; 3 - subsidizing haze; 4 — air nozzle; 5 - sprayer; 6 — air channel; 7 - well; 8 — main fuel jet; 9 — float chamber (central location).
Rice. 3b. Fuel corrector: 1 — air inlet channel: 2 — spool; 3 — spool needle; 4 — fuel jet: 5 — sprayer; 6 — output emulsion channel; 7 — spool return spring; 8 — corrector control cable.
If the gap does not correspond to the specified size, the union locknut is loosened. Turn to the right or left to set the required gap. After this, the fitting is re-locked with a lock nut and the carburetor of the Ural motorcycle is adjusted. By turning off the warm engine at a minimum engine speed without load, the basic settings are made. The idle system is adjusted for each of the two mechanisms separately. The Ural carburetor is adjusted with the second cylinder turned off.
Idle adjustment
By rotating screw 28, the crankshaft speed is set to the minimum stable engine speed. Screw 29 is slowly unscrewed gradually until the motor begins to malfunction. It also gradually, slowly twists until a calm, stable speed is achieved. Once again, use screw 28 to reduce the opening angle of the throttle valve until the minimum speed is reached.
At the same time, screw 29 adjusts the saturation of the mixture. Such operations are repeated until the minimum stable engine crankshaft speed is obtained. The carburetor of the Ural motorcycle is adjusted in the same way for the second cylinder. The test is carried out by sharply opening and closing the throttle. In this case, you must sharply turn the throttle towards yourself and release it to its original position.
Operating modes
Modes of medium loads are characterized by the position of the needle relative to the throttle. Adjustment is carried out by choosing its most optimal position. The settings must be repeated when seasonal conditions change (winter-summer), during the running-in of new vehicles, in order to increase engine power. In this case, the dosing needle 25 moves along the thread relative to the bar 6. The locknut 5 is loosened.
When screwed into the bar, the needle rises in relation to the nozzle hole. The mixture becomes richer. When unscrewing, the mixture becomes leaner. One revolution of the needle moves 0.5 mm. The quality of the adjustment is checked by sharply turning the throttle knob. The loud pops that the carburetor makes on a Ural motorcycle indicate that the mixture needs to be enriched. To do this, the needle rises.
When operating motorcycles, owners often wonder which carburetors are best to install on a Ural motorcycle. Now Chinese carburetors are widespread in the Urals. There are some good examples among them. Foreign-made Solex and Weber models performed well in operation. However, their prices are higher than domestic ones.
What carburetors should I put on the Ural IMZ motorcycle? In my opinion, a Russian-made K63 carburetor would be good for the Urals. This is a trouble-free mechanism, the professional adjustment of which allows it to last for several decades. Every 5 thousand km it is recommended to clean it, blow it out, and rinse it.
The jets must be washed with acetone. The parts are wiped with rags or soft vinyl. The throttle should be installed after servicing with the cutout facing the air filter. Regular maintenance will ensure long-term trouble-free operation of the K63 model.
Conversion of the Urals to one carburetor.. | Topic author: Aria
Which carburetor is better to install from Aki or from Zaparozhets. And how to do it correctly.
Sergey (Bushra) Better from OKI, but for me and Zhoperovsky 133 is not bad, consumption with a sidecar at 70-85 km/h is 5.5-6.5 liters per 100 km.
Alexander (Omkara) How can I redo this? write in PM
Vlad (Berhanu) I have a car and it drives fine
Andrey (Adelrik) PM me how to do this
Rustam (Shepherd) How much does this carburetor cost? from Oka
Dima (Carle) Write to me in a personal message how to install one carb in the Urals :)
Sergey (Bushra) If it’s not a secret, what is the beauty of one carb? Is your appetite decreasing or what? What about power?
Sergey (Bushra) What’s good with one carburetor! There is no need to synchronize, it’s easier to set up, and the consumption is less! I also thought about this topic, but I didn’t bother, bought a synchronizer and it’s fine! I recommend!
Ivan (Ahavat) What is a synchronizer?
Alexander (Omkara) Yes, really, what is a synchronizer?
Nikas (Justika) and the connection between the cylinder and the carburetor, connected by a hose, the principle is spitting,
Nikas (Justika) well, personally, I made no difference
Nikolay (Aislin) installed one carburetor from the “starter” of the MTZ tractor, fuel consumption became less, it began to work more synchronously, but the power dropped. I put two “native” ones back.
Nikita (Adelgonda) write what needs to be done to plug in a carb from Oka
Nikolay (Aislin) forget about this matter. it’s like sticking a Lada engine into a Kamaz
Yura (Jethro) PM me how to convert a Ural to one carb
Nikita (Adelgonda) and me if possible please.
Nikolay (Aislin) buy yourself a “Minsk” and don’t fuck your brain
Vasya (Arcadie) write in a personal message about how to install a carburetor from an Oka and what needs to be redone. how much will it cost (carburetor)
SOVIET OPPOSITION MOTORCYCLES on Odnoklassniki | Topic author: Evgeniy
Which carburetors are better to put in the Ural K-68 or K-301?
Vladimir (Achava) Of course K 301. Old ones that have been proven over the years - RELIABLE. And at 68, I can’t say good things about them. I had these in the Urals, a “baker”, it works terribly above average speeds, it eats a lot. All in all a bad option. But if you put K 301, then buy them from a grandfather you know.
YURIY (Carmiya) I’ve had 301 for three years now and I’m not complaining.
Andrey (Iseline) I was of the same opinion
Vadim (Natana) Yes, K 301 is good for everyone until the float cracks and sinks. Here there will be a slightly different opinion. I also thought they were eternal. Ah, no. With K-63, 65 it is much easier in this regard. There were articles about the K-68 in Moto, it’s not worth publishing without modifications.
YURIY (Carmiya) yes, this also happens, but in this case I always carry a couple with me. About 68, what improvements?
With (Assunta) on a quad they cost 68 on a trike 301 to 301 consumption is less by 68 a little more, in principle I’m happy with both of them, they need to be adjusted normally and everything will be great
))) Vovka 54 RUS (((I had a motor in the Urals without any modifications, it worked perfectly, I admit only the K-68, nothing else. The K-65 crap comes a little closer, it starts to eat and you sit there wondering what to do with them, k- 301 is also bullshit, the flap consisting of two halves is also annoying
YURY (Carmiya) I’ll have to try to put 68 on the second Urals, but that will be in the summer.
Dmitry (Pernelle) I noticed only the plus of the K-68 is more economical than the K-65T. Minus the failures. The K-65T is good for speed. K-301 was installed on 6-volt Urals M-62, M-63, M-66. The K-38 was also praised for its economy on the Irbit M-61.
))) Vovka 54 RUS (((I didn’t have any failures in the Urals
YURY (Carmiya) thanks for the advice, we’ll try it. I was given it in the Urals 4 years ago,
))) Vovka 54 RUS (((I’ve been in the Urals since I was 7 years old
Andrey (Iseline) In general, opinions differ, but for now I’ll stick to K-301 K-65, I’m not even considering new ones
Andrey (Iseline) K-68 needs to be improved, right?
With (Assunta) put any if the new ones will still eat up as much as it needs. I have a K65.. only the damper wears out, you take the repair kit and change the whole zoor for a couple of K68s you can run into scorched ones.
Anton (Leonora) more than one Urals will not work on these corbs without failures
))) Vovka 54 RUS (((You don’t need to tell me, I had them and there were no failures.
Anton (Leonora) more than one 4-stroke internal combustion engine will not work without failures with variable resistance carburetors in the diffuser. This is a fact. It has been verified a long time ago
))) Vovka 54 RUS (((Who checked? when checked? I won’t bullshit I didn’t have any failures in the Urals
Everyone has Anton (Leonora). That’s why such corbs are no longer installed on any internal combustion engine except for some 2-stroke engines