Replacing injectors
The difficulty in identifying problems in the operation of injectors is that the fuel system is quite branched and it is necessary to diagnose the functionality of all its parts. For example, a malfunction such as a decrease in engine power can have two reasons - failure of the injectors or exhaustion of the pump's life.
Clogged injectors can result in sudden jerking of the engine while driving or unstable idle speed. In addition, an increase in fuel consumption can be considered a sign of injector failure.
You can check the functionality of each injector even without removing them. Simply start the engine and remove the wires from the connector of each injector one by one. If immediately after removal the engine starts to twitch or stalls, then the injector is fine. If the stability of the engine does not change with removal of the wire, then the injector needs to be thoroughly cleaned or even replaced.
Choosing garage technicians: a simple and safe way
Using a milling cutter, grind the saddle all the way through one edge. The seat will weaken, lose tension and jump out of the seating hole on its own, without even having to sharpen it through, reaching the seating plane, when a little less than 0.5 mm of tension remains, the tension is no longer enough to hold on. By opening the ring, the saddle will no longer be able to resist.
A drill cutter is sold in any hardware store and costs no more than a drill, which is why this method is so affordable.
Now that the saddle is out, we need to think about what we are going to put in there.
Valve seat blank
For all popular engines, valve seat blanks are offered, both standard sizes and repair ones, with an increased outer diameter. For rare engines, blanks must be ordered or made to order.
Such blanks are quite cheap; if you don’t find one for a certain motor, you can choose the size from the available items. But don’t forget that companies that produce engine parts (Kolbenschmidt), in particular valves, also produce seats of the same sizes, so ask in stores in your city. After installation, the seat will need to be processed - chamfered for the valve.
How to replace old injectors with new ones (in detail)
All four injectors are removed and installed identically, so we will consider replacing only one injector. The dismantling of the injectors was described in detail above, so we move on to the next stage - replacement.
- First of all, we check the condition of the sealing rings of the fuel atomizer housing.
- Likewise, check the O-ring of the injector spray component. To do this, pry up both rings with a screwdriver and inspect them for wear.
- When it comes to fuel injectors, there is no need to change the O-rings when replacing the injectors if they are in good condition. But if you are going to reuse them, lubricate them with engine oil before installation.
- When the nozzle is removed and the rings are replaced (or the old ones are left), you can begin installing new devices. The procedure is performed in reverse order.
- Then we insert the sprayer into the hole located on the fuel rail and secure it with a clamp.
- We return the block with the wires to its place, after which we install the fuel rail in place.
How to replace injectors on a VAZ 2108-VAZ 21099?
Note! All four injectors are removed and installed identically, so for clarity, we will show the removal of only one injector!
1) At the very beginning of the operation, remove the fuel rail from your vehicle. (How to remove the rail, see the article: “Replacing the fuel rail”)
2) When the ramp is removed, place it on a flat surface and then disconnect the wire block from the injector you need.
Note! In order to disconnect the wiring block, squeeze the spring clip that secures it and only then disconnect it!
3) Now, using a screwdriver, move the metal clamp that secures the fuel injector in the direction of the ramp.
Note! There is no need to completely remove the clamp from the ramp, just moving it to the side is enough!
4) Next, grab the nozzle with your hand and shake it, as a result of which you remove it from the ramp.
5) Next, check the condition of the sealing ring of the injector body and the sealing ring of the spray part of the fuel injector, for this:
• Taking a screwdriver in your hands, use it to pry off both o-rings and check their condition.
Note! If the rings are in good condition, then in this case they can not be thrown away, but left as a spare and later used on a new injector. Before installing old rings, be sure to lubricate them with engine oil!
Installation: Installation of new injectors occurs in the reverse order, that is:
1) First, check the condition of the injector O-rings.
Note! The condition of the rings is checked only if you are going to install a used injector on your car!
2) Next, the fuel injector is inserted into the hole in the ramp, and after installation it is fixed with a clamp.
3) And finally, a block of wires is connected to the fuel injector, and after connection, the fuel rail is installed in its place.
Additional video materials: Just below you will find a video in which the replacement of fuel injectors will be carried out in detail. And the most important thing is that the replacement will be carried out quickly, that is, without removing the throttle assembly, in general, watch the video:
Source vaz-russia.com
It is not uncommon to remove injectors on a fuel-injected VAZ 2109 car. You can contact a car service center, where they will do everything for your money, or do the work yourself, gaining invaluable experience and saving an impressive part of your own budget. The choice is yours.
Appearance of devices
Methods for cleaning VAZ 2109 injectors
It should be noted that replacing nozzles is not always the only and justified way to restore the functionality of the atomizer. You can try cleaning the injector, especially since it is not difficult, and you can save quite a lot.
There are two most common methods for cleaning dirty injectors, each of which has its own advantages and disadvantages. Which one to choose is up to the car enthusiast.
method one
To work you will need:
• Injector cleaner. • Spray cleaner for carburetor. • New O-ring.
The operating algorithm is as follows:
We remove all the injectors (even if only one is clogged, it won’t hurt to clean everything).
Place the nozzle in a container with injector product and leave it there for a while.
At this time, use carburetor cleaner to wash the idle air control.
We clean the carbon deposits around the injector nozzles manually - its consistency resembles resin. You will have to tinker with carbon deposits. This is called external injector cleaning.
As for internal cleaning, you will need a power source with a voltage of 3 to 12 Volts (a car battery will do), as well as a foot pump with a built-in pressure gauge.
Remove the nozzle from the end of the pump hose, pour a little injection cleaner inside the hose, and place the hose on the nozzle. After this, pump up the pressure to 6 atmospheres, focusing on the pump pressure gauge. After this, a voltage of three volts must be applied to the injector. If the electromagnet does not work (the injector does not click), you need to increase the voltage.
Voltage should be applied to the injector in spurts for a short time, periodically pumping up the pressure. Blow all the injectors in the same way.
method two
To work you will need:
• Spey for carburetors. • Pump with pressure gauge. • Sealing ring.
• Instead of injector cleaner, we use a spray.
• We repeat in turn all the manipulations that were described in method No. 1, using carburetor cleaner.
• Be sure to clean the outside of the nozzle to remove carbon deposits.
• Apply the spray to a clean rag and thoroughly wipe all the nozzles on the outside.
• Gradually, under the influence of the spray, the carbon deposits will soften and it will be easy to clean off. You can carefully use a toothpick or flathead screwdriver.
• Before installing the nozzle in place, be sure to lubricate the sealing rings with a solution of laundry soap.
Both the first and second methods take no more than 3 hours in time, and in terms of money they cost tens of times less than the same service at a service station. After cleaning the injectors, check their operation - if there is no result, the injectors will have to be replaced.
What injectors are installed on VAZ 2114/2115 cars
Almost all types of injectors that the VAZ 2114/2115 are equipped with at the factory can be considered interchangeable. Depending on the year of manufacture, injectors manufactured by Bosch and Siemens of different markings were installed on the car. Bosch injectors:
- Model 0280 158 022. The product is compatible only with a 16-valve engine with a volume of 1.6 liters.
The nozzle is black and is designed to operate at an optimal pressure of 3.8 atmospheres.
- Model 0280 158 017. An injector with this marking is installed on 8-valve engines with a volume of 1.6 liters. The body is also black.
- Modification 0280 158 996 is considered obsolete, since injectors with this marking were installed on cars until 2006. The model was intended for 8-valve power units.
Standard equipment for VAZ 2114/2115 injection engines Siemens injectors:
- VAZ20734 is made in an orange case. The model can be installed on a VAZ 2114/2115 of any year of manufacture, but the modification is paired with an 8-valve engine.
- Model VAZ20735 is intended for a 16-valve engine. In terms of its characteristics, it is practically no different from the previous model. The nozzle has a blue marking.
Depending on the marking, it can be used on different types of engines.
How to replace the fuel rail on a VAZ 2108-VAZ 21099?
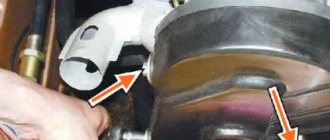
Removal: 1) Before starting the operation, you will need to do two things so that the ramp can be removed without unnecessary inconvenience and problems, namely, remove the minus terminal from the battery; this does not affect convenience in any way; you will simply protect the wiring from a short circuit if water suddenly gets into it (For information on how to remove the terminal, read the article: “Replacing the battery on a car”, study the first point in this article), after you have removed the terminal, proceed further, namely, for the convenience of removing the ramp, remove the air intake hose from the car engine (This hose indicated in the photo below with a red arrow), to remove it, loosen the two tightening screws with a screwdriver (indicated by blue arrows) and then remove it from the car, but the crankcase ventilation hose will not be completely removed, so also use a screwdriver to loosen the tightening screw of the crankcase ventilation hose ( Indicated by a green arrow) and then disconnect the hose from the air pipe and completely remove the pipe itself.
2) Now disconnect by hand the vacuum hose (Indicated by a red arrow) from the fuel pressure regulator (see photo below, this regulator is located on the ramp itself) and after disconnecting, release the pressure in the fuel system, for more details on how to do this, read the article called which: “Bleeding the fuel pressure on the VAZ.”
3) Then disconnect the fuel pipes from each other (There are only two pairs of them, see photo 1 in which only one pair of pipes is shown), to do this, use a wrench to unscrew them by the nuts and disconnect them from each other and do the same with the other pair of pipes, from the pipes Most likely, a little gasoline will spill out so that it does not get on the engine (You never know, if gasoline gets on something very hot, the car may even catch fire, so follow the fire safety rules) put a thick cloth under the place where the gasoline will flow, and then disconnect the block wires with a connector (see photo 2), and unscrew the screw that secures the pressure plate and then remove the plate (see photos 3 and 4).
4) Let's go further, now unscrew the two bolts that have hex heads and which secure the ramp itself to the car engine, one of the ramp mounting bolts is indicated by an arrow just below for clarity (This is the right bolt if you look in the direction of the car).
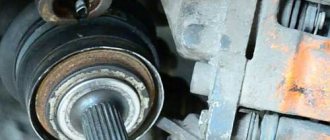
5) When all the tubes are disconnected and the ramp mounting bolts are unscrewed, proceed to removing it from the car, first grab it with your hand and pull it back and along until all the injectors come out of the holes (For clarity, one of the holes is marked with a red arrow in photo 1 shown) in which they are located (Remove the ramp carefully and precisely lengthwise; you don’t need to pull it to the top with all your might right away, since you will simply break off the injectors and go to the auto store for new ones), as soon as you see that all the injectors have come out of the hole then just carefully pull the ramp out onto the street and thereby remove it as shown in photo 2 (Pull it out to the left side of the car if you look at it as you drive, you just can’t pull it to the right, there’s not enough space).
Installation: The new ramp is installed in its place in the reverse order of removal, but before installation, be sure to, regardless of the condition of the o-rings, replace them with new ones and before installation, lubricate them with engine oil, there are not very many of these o-rings, namely, one at a time each injector and one more is located on both fuel pipes (For clarity, see how these rings look in the photo below; on the injectors and on the fuel pipes they are located absolutely identically and you will immediately find them).
Note! By the way, if you have a torque wrench, use it to tighten the fuel pipe nuts and fuel rail mounting bolts; the tightening torque for these bolts should be 9–13 N.m, and the tightening torque for the pipe nuts should be 20–34 N.m!
- Location
- When replacement is required
- Removal and replacement
- Cleaning
It is not uncommon to remove injectors on a fuel-injected VAZ 2109 car. You can contact a car service center, where they will do everything for your money, or do the work yourself, gaining invaluable experience and saving an impressive part of your own budget. The choice is yours.
Appearance of devices
Cleaning
There are two methods for cleaning fuel sprayers, each of which has its own aspects. Choose for yourself which one you not only like or is more affordable, taking into account the available funds.
Welcome! Do you want to learn how to clean fuel injectors on fuel-injected cars of the Samara family? If you are interested in this, then continue reading the article further, in it you will find instructions for properly cleaning the injectors.
Summary:
When should you clean your injectors? Each person cleans their injectors differently, because as a rule, there are no exact numbers that would indicate how often fuel injectors should be cleaned. But there are small signs by which you can determine that the injectors are not working correctly, the signs are as follows:
- Basically, if the injector is heavily contaminated, the car’s engine may become difficult to start.
- It may begin to exhibit unstable operation, this will be especially noticeable at idle.
- The engine may also stall at idle.
- And in some cases, its speed may increase while operating at the same idle speed.
- And finally, due to improper operation of the fuel injectors, when driving the car may experience jerks, various kinds of failures, and fuel consumption usually increases.
What things are needed to clean injectors? 1) Firstly, you will need a charger for your phone, but not one that you use every day, but one that you don’t need, provided that it works.
Note! In such cases, old phone chargers are best suited: Nokia, Samsung, in some cases Siemens and others!
2) You will also need a special can for cleaning the carburetor, which must be filled with cleaning liquid.
Note! As a rule, a small stick is included with the can; it is indicated by an arrow in the top photo; be sure to try to get it because in some cases it simply gets lost. But if you fail to find this wand, then use any analogue of it!
3) You will also need a short length, one thick and one thin hose.
Read more: Tuning for Mitsubishi Pajero 4
Note! A thick hose must be selected according to the size of the spray part of the nozzle so that it can be easily installed on it, as shown in the photo below. And the thin hose must be selected in such a way that it can fit inside the thick one and at the same time does not interfere with the passage of the thin stick that comes from the spray head of the carburetor cleaning cylinder. (For more information on how to assemble a thick hose together with a thin one, see below in the same article, under the heading: “Preparation”, point “3”)
4) And to all this, you will also need two clamps, one of which will hold the hose on the fuel injector.
When replacement is required
There are several signs that indicate you need to at least remove and check the condition of the fuel injectors. Next, a decision is made to clean or replace the elements.
Pay attention to the behavior of your car and specifically the engine. They will tell you if there is something wrong with the injectors
This may manifest itself as follows:
- The engine produces less power, the same acceleration efficiency is not felt;
- If the engine performs poorly or lacks power, fuel consumption still increases;
- Poor starting is not a rare sign of injector failure;
- If the engine does not hold idle speed well, the injectors may well be the cause;
- The amount of toxic components in exhaust gases increases;
- At idle the speed increases.
How to Clean Injectors on a VAZ 21099 Injector
How to remove and clean the injectors on a VAZ 2109 (injector)?
It is often necessary to remove injectors on a VAZ 2109 from an injection machine. Of course, contact the car service where our client stayed to do it for your money, or take up the craft, gaining invaluable experience and saving an impressive part of your own budget. Make a choice for yourself.
Appearance of devices
Residence
You can't start annotating to remove attachments without first talking about the location of the object you want.
VAZ 2109 car injectors are installed on fuel. They are all 4. This is justified by the fact that any injector sprays fuel onto one very large cylinder. Since nine have four cylinders, we conclude that the number of nozzles is logical.
When Changes Are Needed
There are several signs that indicate the need to remove and check the condition of the fuel injectors. Then a decision is made to clean or replace parts.
Look at the behavior of your car and the engine itself. They will tell you if there is something wrong with the attachments. This can be done as follows:
- The engine produces the least power, the previous acceleration efficiency is not felt;
- In case of poor engine performance or lack of energy, fuel consumption increases in any case;
- Bad start. not a rare sign of nozzle failure;
- If the engine won't idle, sprayers are usually needed;
- The amount of toxic components increases in exhaust gases;
- The idle speed increases.
Delete and change
Now we will directly tell you how to properly remove and replace old injectors that have lost their suitability for new units.
The process for removing all 4 injectors is the same, so there will be no difference in the process.
Perhaps the more problematic step in changing the injector cleaning process is removing the fuel rail. Therefore, we will separately explain how to remove such a node.
Fuel rail
Fuel rail. This is the rod where the injectors are needed. It is secured with a pair of bolts on the intake pipe. To the left of the ramp is the fuel pressure control fitting. To remove it you need to:
Real injector cleaning!
Do you want to know in detail what to remove?
fuel
injection
nozzles VAZ
2108-
VAZ 21099
? Our client remains.
Cleaning nozzles VAZ 2108 21099 2109
cleaning injector
2108
21099 2109 ! The installation is not cleaned Vase injector
2108
21099
2109! In this case, the video is me.
- Disconnect the negative terminal from the battery. No short circuits are required;
- Turn off fuel pressure;
- Remove the air filter and disconnect the intake hose, then remove the vacuum regulator hose;
- Disconnect the power cable from the idle speed sensor. To do this, the lock of the plastic lining is simply squeezed out;
- Disconnect the block from the wires coming from the injectors;
- Disconnect the drains and hoses from the fuel pipes;
- Remove the pair of mounting bolts that secure the fuel rail to the intake pipe;
- The fuel pipes are held in place by a special holder that requires the removal of one mounting screw;
- Remove the fuel rail by pressing it along the axis of the fuel injector. This will leave their seating position on the intake pipe;
- Reverse assembly.
Removing a ramp
Please note that under the fuel rail bolts there are washers that must be replaced during reassembly, as it is called, exchange for similar new ones.
- Start by removing the fuel rail from your vehicle.
- The ramp is then laid on a flat surface, after which the mounting block is detached from the curved attachment. To remove it, you need to compress the spring retaining bracket and then detach the unit.
- Using a screwdriver, slide the iron lock towards the fuel rail. Used to repair fuel injector. Maybe they're lifting the block completely on something. It is not necessary. Just push it slightly to the side.
- Take the nozzle in your hand and spread it slightly. Therefore, she should get off the fuel rail without any hassle.
- Be sure to check the current condition of the seals on the fuel injector body.
- The injector injector O-ring is checked in the same way. To do this, remove both rings using a screwdriver and see if they are worn.
- If there is a nozzle port, the seals should not be replaced when replacing the sprayers themselves if they are in good working order. Only if you intend to reuse them, be sure to lubricate the rings before installation. Motor, obviously.
- When the nozzle is removed and the rings are replaced (the old ones remain the same), of course, begin installing the new devices. The procedure is performed in reverse order.
- Insert the nozzle into the fuel hole and secure it with the latch.
- Rotate the electrical wiring block into place, install the fuel rail in its place.
Disconnect the wire block
Rarely, when changing injectors, this is the only and optimal way to restore the performance of fuel injectors. Try cleaning them. It's not a complicated business, but the savings are impressive. .
cleaning
Help spray
Source
Repair of injectors VAZ 2114/2115
Repairing injectors involves carrying out a number of works at once:
- cleaning;
- purging;
- replacement of rubber seals.
After the products have been removed from the fuel rail, you need to take a good look at each of the four nozzles. If there are visible signs of leakage on the body, repair will not be practical. You will have to immediately replace the nozzle with a new one. The differences in flushing and cleaning procedures for 8-valve and 16-valve engines are not significant. Therefore, you can be guided by the same scheme.
Video: the easiest way
If the body is clean and there are no deformations or cracks on it, then repair work is allowed. To do this, you will need to remove the seal from the body and the sprayer. It is recommended to leave these parts in acetone or solvent for 1.5–2 hours. While the parts are being washed, you can use a vacuum cleaner to clean the fuel rail. Next, you need to carefully clean the place where the injectors fit into the ramp using a toothpick or a needle.
After this, you can start purging the nozzle from the inside. You will need a roll of electrical tape, an aerosol can for cleaning carburetors and a syringe. An aerosol cleaning liquid is supplied through a thin syringe into the nozzle cavity. It is better to wrap the joint between the syringe and the tube of the canister for sealing with electrical tape. It is recommended to repeat washing the nozzle from the inside three times. Afterwards the product must dry. As soon as the body itself, as well as the seal and sprayer dry after washing, you can assemble the nozzle and install it on the ramp.
A cheap product will perfectly remove dirt and deposits from the nozzle
Before installation, each nozzle is tested for resistance. The tester readings should be in the range of 11–15 ohms.
There is also a simple way to clean the injectors, without dismantling the fuel rail. However, it is only appropriate in cases where the injectors have not yet exhausted their entire service life (120–150 thousand kilometers). The use of cleaning additives in gasoline is allowed. In this case, all elements of the fuel system will be cleaned, but its closed nature does not allow removing dirt and sediment from low-quality gasoline.
The liquid is poured into the gas tank and, together with fuel, cleans all elements of the system
Replacing rubber rings and seals on injectors
Usually, when washing or repairing injectors, car enthusiasts immediately change all rubber elements. This is due to high wear rates. The cost of rings and seals is very low, but after replacement you can immediately observe the stability of the motor.
Rings and seals can be removed with one movement of the hand. However, installing new ones will require care, as it is easy to damage the rubber. The plastic element is first lubricated with gasoline, and then pulled in place of the old seal.
Spare parts for VAZ injectors can be purchased at a minimal price
Almost every driver can clean or replace the injectors on VAZ 2114/2115 cars on their own. Difficulties can arise only in the process of unscrewing the fuel rail or reconnecting the wires to the injector contacts. However, if each stage of work is carefully carried out, even a beginner can independently maintain this element of the fuel system.
How to remove and check injectors on a VAZ 2114 with your own hands
Content:
The “fourteenth” model of the domestic automaker represented by AvtoVAZ is equipped with injection power units. The motors have fairly good reliability indicators, but problems are rarely avoided. This is influenced by many factors.
If the Check Engine light comes on on the dashboard, and other symptoms of engine trouble are observed, it is likely that the injectors are clogged. In practice, cleaning injectors on a VAZ 2114 with your own hands is done quite often. It is not necessary to be an expert in the field of auto repair to understand the nuances of this event.
It is the issue of cleaning this fuel cell that our material today is devoted to.
Symptoms of a problem
Fuel rail
There are several key symptoms that indicate the presence of such a problem:
- There are misfires at idle;
- Fuel consumption increases sharply;
- There is instability in engine operation;
- The car accelerates more slowly than usual when the gas pedal is fully pressed.
It is very important to identify such a problem, since the injectors supply fuel to the system. Without fuel, engine operation is impossible. It is not always worth replacing them immediately, since they often need to be cleaned.
What you need to know about injectors
The quality of the fuel used has a huge impact on the safety and efficiency of the injectors on your VAZ 2114. Alas, the quality of domestic fuel leaves much to be desired. If you regularly fill your car with low-quality gasoline, the injectors will not last more than 120 thousand kilometers.
Unscrew the fuel pipe
The optimal replacement frequency is about 80-90 thousand kilometers.
As for the cost, original injectors for the VAZ 2114 cost from 500 rubles apiece. Foreign analogues are more expensive, sometimes several times. But the price is largely justified by reliability and longer service life. Therefore, if possible, buy high-quality imported devices.
How to extend the life of injectors
There are essentially two main ways to ensure that the fuel cells installed in your vehicle last as long as possible.
- Use of additives. Special additives for increasing fuel quality and cleaning the system can be found in any automotive chemical store. They are poured into the gas tank. The additive costs quite little, so everyone can afford to buy it. But when starting to use additives, you should do this regularly, otherwise they will not be effective. Some people believe that additives only spoil the condition of the injectors. This statement may be true if low-grade or counterfeit chemicals are used. Good products, although they do not completely clean devices, can significantly extend their service life.
- The second method is periodic flushing. Experts recommend performing the operation approximately once every 40 thousand kilometers traveled by your car. Some people do the cleaning themselves, while others turn to auto repair shops for help. For reference, we note that the cost of cleaning injectors at a service station will be from 1,500 rubles.
Checking the operation of injectors
Before replacing injectors on an 8-valve VAZ 2114 or cleaning them, you should check the functionality of the devices.
Do-it-yourself washing
There are two proven methods for this. With their help, you will learn how to check an element for functionality.
| Method | Your actions |
| Checking on a cold power unit with the engine running | Touch each nozzle with your hands. If it is working properly, the device will vibrate or pulsate. The method is bad because it does not provide complete information |
| Idle check | Add revs and let the car run for a while. Then loosen the cap nuts one at a time. They hold the injectors. At the same time, the speed should drop. If the speed does not decrease, one of the injectors is not working. |
Cleaning injectors with the help of workshops is quite an expensive proposition. In addition, it is quite possible to do the work yourself.
Removing injectors
Clip
To clean the devices, they must first be removed from the vehicle. Let's figure out how to remove injectors on a VAZ 2114:
- Turn off the engine and let it cool for a while. This is necessary for your own safety;
- Disconnect the negative terminal from your car's battery;
- Remove the protective casing;
- Remove the air filter;
- The high pressure pipeline should be unscrewed from the nozzle and pump. It must be removed from the support bracket;
- You now need to unscrew the nozzle with a spanner wrench. Do this together with the puck;
- Be sure to disconnect the electrical connector and slide the lock located along the ramp;
- Manipulate all 4 injectors in the same way, which will allow you to eventually remove them;
- If the device is completely out of order, you will have to replace the injectors on the 8-valve VAZ 2114. If everything is fine with them, just clean them.
Cleaning
Handy cleaning agent
The procedure is not complicated, but try to do everything carefully and step by step.
- Visually examine the condition of the item. If there are traces or signs of leakage, it is better to immediately replace the elements, since cleaning will definitely not have a long-term effect.
- If the injector can be saved by stripping, remove the O-rings located on the body and nozzle.
- Place them in acetone for a while. As an analogue, you can use regular gasoline. But do not forget that these are highly flammable mixtures, so there should not be any sources of even the slightest spark nearby.
- Be sure to keep a fire extinguisher near you. Let you be the most careful and consistent person, accidents have never been canceled.
- Keeping the injectors in acetone or gasoline will allow you to better clean all accumulated contaminants.
- While the units are soaking, pay attention to the valve cover and ramp. It is advisable to clean them, as they act as sources of contamination.
- The ramp is blown out with a conventional vacuum cleaner.
- Now we take out the nozzles and start working directly with them.
- Coke often forms on the nozzles, resembling resin in appearance and consistency. Be sure to get rid of these deposits.
- The surface around the nozzle is cleaned with gentle movements of a pin or needle.
- At this point, external cleaning can be considered complete.
- Now the most difficult process is the internal “cleaning” of the elements. For this procedure, arm yourself with a tube, a syringe and a can of a substance intended for cleaning carburetors. It doesn’t matter that you have an injection car produced by our glorious automobile company AvtoVAZ. It is not difficult to purchase such a product, and it is cheap.
- The product must be applied under pressure using a tube, simulating an injection. For each injector, perform several such manipulations. This will allow them to cleanse themselves and break through from within. As a result, the devices will be able to spray fuel liquid more evenly than before cleaning.
- Be sure to give them some time to dry.
- You should also replace the old O-rings with new ones. It is strongly not recommended to use the old ones, even if you clean them. Replace the seals every time you clean the injectors.
- To delay the next cleaning as much as possible, and also to ensure long-term and efficient operation of the cleaned injectors, it is recommended to replace the mesh on the fuel pump, as well as the fuel filter.
The most important recommendation, which should be followed in any case, before and after self-cleaning, is a little different.
To save your car, get rid of many problems and malfunctions, and also allow the elements of the fuel system to do their job effectively, refuel with high-quality fuel. VAZ 2114 drivers motivate the use of cheap gas stations by the need to save money. But if this is not stopped, clogged injectors will be only a small part of the problems your car will face due to poor fuel. And all the money saved on gasoline, plus the same amount, will be spent on repairs. Here is the price of cheap gas stations.
No Comments Yet! You can be first to comment this post! Close Window
Loading, Please Wait!
This may take a second or two.
luxvaz.ru
Removal and replacement
Now we’ll talk specifically about how to properly remove and replace old injectors that have lost their usefulness with new units.
The process of dismantling each of the 4 injectors is identical, so there will be no difference in the process.
Perhaps the most problematic step in replacing or cleaning injectors is dismantling the fuel rail. Therefore, we will separately tell you how this knot is removed.
Fuel rail
The fuel rail is the bar on which the injectors are mounted. It is secured with a pair of bolts on the intake pipe. To the left of the ramp there is a fuel pressure control fitting. To remove it you need:
- Disconnect the negative terminal from the battery. Nobody needs short circuits;
- Relieve pressure in the fuel line;
- Remove the air filter and disconnect the intake pipe hose, then remove the vacuum hose of the pressure regulator;
- Disconnect the power supply wire from the idle speed sensor. To do this, simply press out the pad retainer, made of plastic;
- Disconnect the block with the wires coming from the injectors;
- Disconnect the drain and supply hoses from the fuel pipes;
- Unscrew the pair of mounting bolts that secure the fuel rail to the intake pipe;
- The fuel pipes are held in place by a special holder, which requires unscrewing one mounting screw to remove;
- Remove the fuel rail by sliding it along the axis of the fuel nozzles. This way they will come out of their seat on the intake pipe;
- Assembly is performed in reverse order.
Ramp dismantling
Please note that under the fuel rail mounting bolts there are washers that must be returned to their place during reassembly or replaced with similar new ones.
- First, remove the fuel rail from your vehicle.
- Next, the ramp is laid on a flat surface, after which the wiring block is disconnected from the damaged injector. To remove it, you need to compress the spring mounting bracket and then disconnect the block.
- Using a screwdriver, slide the metal retainer toward the fuel rail. It serves to fix the fuel nozzle. For some reason, many people remove the lock completely. There is no need for this. Just move it a little to the side.
- Take the nozzle in your hand and rock it slightly to the sides. So it should come out of the fuel rail without any problems.
- At the same time, be sure to check the current condition of the sealing rings of the fuel atomizer body.
- The sealing ring of the nozzle spray element is checked in the same way. To do this, you need to pry both rings with a screwdriver and see if they are worn out.
- In the case of fuel injectors, there is no need to change the O-rings when replacing the injectors themselves if they are in good condition. Only if you are going to reuse them, be sure to lubricate the rings with oil before installation. Motorized, of course.
- When the nozzle is removed and the rings are replaced (or the old ones are left), you can begin installing new devices. The procedure is performed in reverse order.
- Insert the nozzle into the hole on the fuel rail and secure it with the clamp.
- Return the block with the wires to its place, and install the fuel rail in its rightful place.
Disconnect the wiring block
Replacing injectors is not always the only and rational way to restore the performance of fuel atomizers. Try cleaning them. This is not a difficult matter, but the savings are impressive.
Cleaning the Injector VAZ 2108 21099 2109
Cleaning the VAZ Injector
2108
21099 2109 ! Without de-installation cleaning of the Injector VAZ
2108
21099
2109! In this case, the video is me.
- Disconnect the negative terminal from the battery. Nobody needs short circuits;
- Relieve the pressure in the fuel line;
- Remove the air filter and disconnect the intake pipe hose, then remove the vacuum hose of the pressure regulator;
- Disconnect the power supply wire from the idle speed sensor. For this purpose, the pad retainer, made of plastic, is simply pressed out;
- Disconnect the block with the wires coming from the injectors;
- Disconnect the drain and supply hoses from the fuel pipes;
- Unscrew the pair of mounting bolts that secure the fuel rail to the intake pipe;
- The fuel pipes are held in place by a special holder, which requires unscrewing one mounting screw to remove;
- Remove the fuel rail by sliding it along the axis of the fuel nozzles. This way they will come out from their own landing place on the intake pipe;
- Assembly is carried out in reverse order.
Read more: Procedure for pulling cylinder head bolts
Please note that washers are located under the fuel rail mounting bolts, which must be returned to their place during reassembly, or replaced with similar new ones.
- To start things off, remove the fuel rail from your vehicle.
- Next, the ramp is laid on a flat surface, then the wire block is disconnected from the warped nozzle. To remove it, you need to compress the spring mounting bracket and then disconnect the block.
- Using a screwdriver, slide the iron clamp towards the fuel rail. It serves to fix the fuel nozzle. Probably for some reason they remove the lock completely. There is no need for this matter. Just move it slightly to the side.
- Take the nozzle in your hand and rock it slightly to the sides. So it should come out of the fuel rail without unnecessary problems.
- At the same time, be sure to check the current condition of the sealing rings of the fuel atomizer body.
- The sealing ring of the nozzle spray element is checked in the same way. To do this, you need to pry both rings with a screwdriver and see if they are worn out.
- If the passage has fuel injectors, there is no need to change the O-rings when changing the nozzles themselves, if they are in good condition. Only if you are going to reuse them, be sure to lubricate the rings with oil before installation. Motor, obviously.
- When the nozzle is removed and the rings are changed (the old ones are left otherwise), of course, begin installing new devices. The procedure is performed in reverse order.
- Insert the spray nozzle into the hole on the fuel rail and secure it with the clamp.
- Return the block with wires to the area, install the fuel rail in its proper place on your own.
Disconnect the wiring block
It is rare that changing injectors is the only and optimal method of restoring the performance of fuel atomizers. Try to clean them. This is not a difficult task, but the savings are impressive. .
Installing a new saddle
The valve seat must be installed correctly with nitrogen; all other methods are not as reliable. In normal condition at room temperature, the diameter of the seat is greater than the diameter of the hole in the head, so after installation some interference is obtained. To fit the saddle, it must be reduced in size, this is what nitrogen is needed for.
Liquid nitrogen retains a very low temperature. While cooling in nitrogen, the valve contracts in diameter, and when cooled it can freely fit into the mounting hole of the head. At the same time, to enlarge the mounting hole in the head, the head can be heated, then the hole will expand and the gap will increase. If you heat the head, then you don’t need to cool the saddle so much, it will be enough to just put it in the freezer and the temperature difference will be enough.
It is impossible to install the saddle without preliminary heat treatment; the required tension will not be achieved and the saddle will fall out during operation.
When installing, you need to hammer the saddle so that it falls into place, you don’t need to hit it hard, light blows are enough.
How to remove
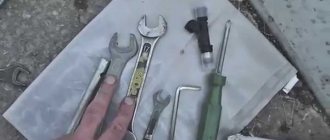
The procedure for dismantling and installing injectors is not particularly difficult, but it does take a lot of time. You need to prepare a set of tools in advance:
- 2 open-end wrenches for 17;
- crosshead screwdriver;
- screwdriver with a flat thin blade;
- hex key 5.
None To relieve fuel pressure, you must turn off the fuel pump. It is located in VAZ 2114/2115 cars in the fuel tank. The easiest way to get to the pump is through the hatch located under the rear seat cushion. For this:
- The seat needs to be reclined.
- Find a small hatch under the rug.
- Unscrew the screws securing the hatch.
- Remove the cover and remove the contact block from the fuel pump housing.
Then you need to start the engine. The engine will run on the amount of fuel that remains in the system, since the pump will not build up pressure after removing the block. You must wait until the engine has completely used up the remaining gasoline and stalls.
- Open the hood of the car and remove the wire from the negative terminal on the battery.
- For ease of dismantling, it is recommended to remove the air filter box. It will prevent free access to the engine.
- After that, use your finger to snap off the plastic retainer on the engine and disconnect the connector from the throttle valve.
- The connector from the idle air control regulator is removed in the same way.
- Next, you need to disconnect the connector block from the wiring harness of the injectors themselves.
- The injectors can only be removed together with the fuel rail. Therefore, you need to unscrew the bolts securing the ramp to the body.
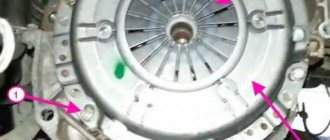
- After which it will be possible to move the ramp to the side so that each of the nozzles moves slightly out of the mounting socket. The wires are removed from the injectors, otherwise it will be impossible to pull out the ramp.
- The ramp is pulled out and placed in a clean place. Now you can easily remove all the injectors - they are pressed out using a plastic clamp.
Disconnecting the injectors is possible only after dismantling the ramp itself. Accordingly, new products are inserted in place of the old ones. And then the installation work is carried out in the reverse order.
Work order
1
. It is necessary to remove the pipe from the air filter. Remove the terminals from the battery.
2
.
We take some kind of container for draining gasoline. 3
. We take a screwdriver and a container, approach the car, unscrew the cap from the valve on the fuel rail (TR), prying the valve nipple with a screwdriver, release the pressure (gasoline will flow from the FR), then screw the cap back on.
4
. Next, we take the keys for 24 and 21 or 22 (so for a square TR, for a round one there are most likely two keys for 24, I don’t know for sure) and try to unscrew the tube that goes to the TR under the throttle pipe on the driver’s side and try to pull it out of the ramp.
5
.
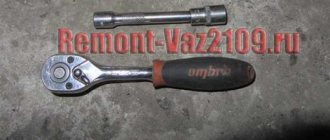
Then he unscrews the fuel pressure regulator (FPR) with a ratchet or just a 6-point 5-pointer, we also try to pull it out of the TP, to do this we carefully pull up so as not to tear the white hose that goes from the RTD to the receiver. 6
. We disconnect the chip, impulses pass through it to the injectors.
7
. We unscrew the fuel rail (TR) itself with a ratchet or just a 6-point 5-pointer.
We pull it towards the receiver, then when the injectors come out, we turn the TR injectors up and carefully pull it out towards the right wing, everything came out and went back in without any problems!
8
. We remove the wiring from the injectors, here you need a screwdriver, press your finger on the spring (U-shaped piece of iron).
We try to push it upward with a screwdriver (towards the wires coming out of the injector).
Next, we move the spring forward, one end should come out, the other will remain in place, pull the chip up, i.e. remove from the nozzle.
9
. Now you need to remove the clamps from the injectors; to do this, use a screwdriver to pry them off on both sides.
Then we try to pull them out with our hands or a screwdriver (whichever is more convenient) and pull them to the side.
Then we pull the injector up, if there are rings left in the ramp, as I had, then we take them out with a screwdriver, they come out easily, don’t forget about the ring on the RTD, it’s better to change it in advance, I didn’t buy rings on the RTD, I left the old one. 10
. Everything was removed.
This is interesting: Increased fuel consumption on the VAZ-2114 - gasoline consumption standards
How to clean the injectors from dirt on a VAZ 2108-VAZ 21099?
Preparation: 1) First, prepare the surface on which you will clean the injectors.
Note! In order to prevent the ingress of small particles of dirt and dust, it is best to clean the injectors on a clean surface, for example, laying down a clean rag!
2) Now take the phone charger in your hands, connect two wires to its terminal and wrap the whole thing with electrical tape.
3) Next, pick up two hoses, one of which is thin and the other thick. And then press the thin hose inside the thick one, and into the hole of the thin hose insert a small stick that comes from the spray head of the carburetor cleaning cylinder.
Note! Place a clamp on top of all the hoses so that all the hoses are tightly attached to each other!
4) Then connect the resulting hose structure to the fuel injector.
Note! After the nozzle is connected to the hose structure, tighten this place with a clamp so that the nozzle does not fly out when spraying. Also pay attention to how the nozzle is installed in the hose; carefully ensure that the spray part of the nozzle comes out!
5) And to complete the operation, connect the carburetor cleaning fluid to the spray head and as a result you should get the following thing:
Signs of malfunction of VAZ 2109 fuel injectors
If poor, low-quality fuel is used or the injector supply system is contaminated, they may fail. In this case, the fuel does not spray out of the injectors, but simply begins to drip or flow. The formation of the air-fuel mixture is disrupted, and as a result, the engine operates intermittently at different speeds. Power and throttle response drop significantly, the car moves jerkily, dips and jerking appear in the engine.
If the injector valve needle is stuck in the open position, ignition may occur after the engine is stopped, so-called detonation, as fuel continues to flow. The electrical part of the injector may also break. This may happen due to a broken wiring or short circuit. In this case, the injector cannot be repaired and must be replaced. A dirty nozzle can be washed. A special stand is used for this. After washing, the functionality of the nozzle is restored for some time.
Fuel rail device for VAZ 2109
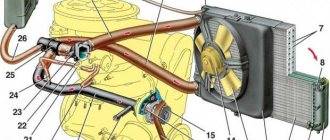
The fuel rail, or, as it is also called, the injector ramp, is one of the main elements of the fuel supply system in the VAZ 2109 injection engine. The main purpose of the fuel rail is to attach the injectors and supply fuel to them. In the injection engine of the VAZ 2109 car, the ramp is located on the intake manifold. The ramp is secured with two hex bolts at “5”.
The ramp on the Nine engine is a rack that is empty inside. A fuel supply hose from the tank is attached to the rail at one end. At the other end there is a fitting for monitoring the fuel pressure in the fuel system. In addition, all four injectors and a fuel pressure regulator are attached to the ramp. The injectors are secured with locking spring clips through a rubber sealing ring.
The operating principle of the ramp is as follows: the gas pump pumps fuel from the tank to the ramp (pressure 2.8 - 3.2 atmospheres). The pressure inside the ramp is regulated by a pressure regulator, which is attached to the ramp (excess fuel is discharged back into the gas tank through the return line). At the command received from the controller, fuel is injected from the ramp through the injectors into the engine cylinders.
The most common malfunctions of the ramp include mechanical damage and depressurization of connections (at the attachment points of the injectors, fuel pipe, pressure control fitting). All faults can be easily identified by visual inspection of the ramp. This could be fuel leaks, deformation, dents, or other damage.
Pressure regulator - device and principle of operation
The fuel pumped into the ramp enters the cavity of the regulator and affects its membrane. If the pressure exceeds 2.8 - 3.2 atm, the fuel, acting on the diaphragm, compresses the return spring and the shut-off valve begins to open. Excess gasoline is dumped into the return fuel line and flows into the tank.
The return hose, connected at the other end to the receiver, is needed to collect the vacuum, which drops as the engine speed increases. The effect of vacuum is prevented by the spring pressing the shut-off valve to the seat.
Thus, the maximum vacuum at idle slightly opens the valve and excess gasoline flows into the tank. As engine speed increases, the valve closes because the reduced vacuum force cannot prevent this.