Burnout of the gasket under the exhaust manifold is a rather unpleasant and common malfunction on the VAZ 2109.
A product that has become unusable will allow exhaust gases from a running engine to pass under the hood, and the characteristic chattering sound when the engine is under load also does not greatly contribute to a comfortable ride. Replacing the manifold gasket on a VAZ 2109 will help avoid such problems.
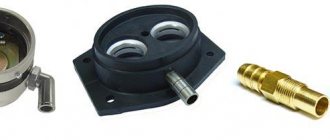
The collector gasket is made from a specially compressed asbestos mixture reinforced with steel thread; it can be purchased at any spare parts store. The price of the product, depending on the manufacturer, varies from 50 to 200 rubles. For a VAZ 2109, replacing the intake manifold gasket at a car service center will cost approximately 1,500 rubles and more, not counting the cost of the gasket itself.
Preliminary work
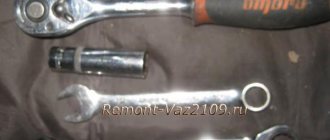
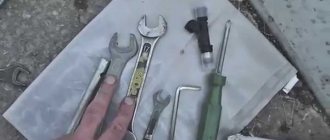
Replacing the VAZ 2109 intake manifold gasket with your own hands is not very difficult and does not require specific knowledge or expensive tools - the required set of keys is usually present in the trunk of every car enthusiast.
But before replacing, you should try to tighten the fastening of the intake unit - if the gasket is not burned out, it is the loose fastening that may cause exhaust gases to get under the hood. If tightening the fastening does not help, it means that the gasket is completely burned out and needs to be replaced. Replacing the VAZ 2109 manifold gasket will require preliminary work to dismantle the air filter, remove the carburetor and the manifold itself. All of the above work is carried out exclusively on a cold engine.
Removing the air filter with housing
On the injection engine of a VAZ 2109 car, to remove the air filter, it is enough to unscrew the four self-tapping screws securing the cover of the filter element housing - for this, use a 10mm wrench or a ratchet. There will be a filter element under the cover. If the cover is difficult to lift, you can disconnect the mass air flow sensor from the plug.
On a carbureted engine, there are three latches under the hood that can be easily opened. There is a screw in the middle of the metal cover, which can also be unscrewed by hand, after which the cover is removed. Under the cover there is a filter element that must be carefully removed. Subsequently, during reassembly, the filter element can be replaced - if the time has come or if the filter element is very dirty.
Removing the carburetor
After the air filter has been removed, you can begin to remove the carburetor. To remove the carburetor on a VAZ 2109, you will need the following tools:
- two screwdrivers - flat and Phillips;
- 13 open-end wrench;
- head at 8;
- ratchet.
Instructions for dismantling the carburetor will be as follows:
- The coolant supply hose to the carburetor starter is disconnected from the fitting by unscrewing the fastening clamps. The coolant itself is drained into a previously prepared container.
- The exhaust pipe coming from the exhaust manifold and from the cylinder block bracket is disconnected.
- Then the throttle cable bracket is disconnected. To do this, first remove one end of the spring from the throttle control rod, and then remove the entire spring, then loosen the nut on the bracket and remove the cable from its engagement.
- The EPHH screw sensor is disconnected from the power plug.
- Two hoses and a vacuum tube are disconnected from the carburetor heating unit.
- The crankcase ventilation hose is removed.
- Unscrew the 4 nuts securing the carburetor to the intake manifold.
- The carburetor is removed carefully and without jerking - by lifting it from the studs.
The work of removing the carburetor is completed. The presented photos and videos will help you clearly follow the process of removing the carburetor.
Removing the intake manifold
After the work of removing the air filter and dismantling the carburetor is completed, you can begin to remove the intake unit. To do this you will need the following set of tools:
- open-end wrench 13;
- head 13 - regular and deep;
- ratchet and crank;
- ratchet with 10mm head.
Replacing the gasket
After the preparatory work is completed - the air filter, carburetor and intake and exhaust manifold are dismantled, you can begin the main work, for which all previous steps were done - directly replacing the gasket itself.
The work order will look like this:
- We remove the old gasket - this can be difficult, since, most likely, it is tightly burned to the cylinder head - in this case, you need to use a thin screwdriver or knife. To make the work easier, you can use special aerosol solvents in cans, sold in auto parts stores. It is also necessary to carefully remove carbon deposits from the mating surface of the block - you can use sandpaper for this.
- The new product is installed on the exhaust manifold, then all work is done in the reverse order. Replacing the intake manifold gasket on a VAZ 2109 is carried out in a similar way.
Replacement of the exhaust manifold gasket on the VAZ 2109 has been completed. The exhaust pipe of the muffler is secured with brass nuts, preferably new ones. And don't forget to fill in the coolant that was drained when dismantling the carburetor!
Article: 2101-1008082
Order code: 041112
- Buy with this product
- show more
Thread diameter - M8 L (length) - 38 Strength class - 8.8 Note: d=25
Information used: JSC "AVTONORMAL"
- Passenger cars / VAZ / VAZ-21212 drawing
- » href=»/catalog/vaz-3/legkovye_avtomobili-30/vaz_2121-13/truba_vpusknaya_i_vypusknoiy_kollektor-55/#part58671″>Stud M8x16x38Engine / Intake pipe and exhaust manifold
- » href=»/catalog/vaz-3/legkovye_avtomobili-30/vaz_2121-13/truba_vpusknaya_i_vypusknoiy_kollektor-56/#part58705″>Stud M8x16x38Engine / Intake pipe and exhaust manifold
- Passenger cars / VAZ / VAZ-21231 drawing
- » href=»/catalog/vaz-3/legkovye_avtomobili-30/vaz_2123-315/truba_vpusknaya-88/#part977346″>Stud M8x16x38Engine / Intake pipe
- Passenger cars / VAZ / VAZ-21142 drawings
- » href=»/catalog/vaz-3/legkovye_avtomobili-30/vaz_2114-647/truba_vpusknaya_i_vypusknoiy_kollektor-41/#part1669639″>Stud M8x16x38Engine / Intake pipe and exhaust manifold
- » href=»/catalog/vaz-3/legkovye_avtomobili-30/vaz_2114-647/kollektor_vypusknoiy-44/#part1669678″>Stud M8x16x38Engine / Exhaust manifold
- Passenger cars / VAZ / VAZ-212133 drawings
- » href=»/catalog/vaz-3/legkovye_avtomobili-30/vaz_21213-731/truba_vpusknaya_i_vypusknoiy_kollektor-99/#part2009868″>Stud M8x16x38Engine / Intake pipe and exhaust manifold
- » href=»/catalog/vaz-3/legkovye_avtomobili-30/vaz_21213-731/truba_vpusknaya_i_vypusknoiy_kollektor-101/#part2009903″>Stud M8x16x38Engine / Intake pipe and exhaust manifold
- » href=»/catalog/vaz-3/legkovye_avtomobili-30/vaz_21213-731/truba_vpusknaya_i_vypusknoiy_kollektor-100/#part2009889″>Stud M8x16x38Engine / Intake pipe and exhaust manifold
- Passenger cars / AZLK / Moskvich-21411 drawing
- » href=»/catalog/azlk-9/legkovye_avtomobili-30/moskvich_2141-53/vpusknaya_truba_i_vypusknoiy_kollektor-65/#part148755″>Gas pipeline mounting studEngine mod. 2106 / Intake pipe and exhaust manifold
- Passenger cars / IZH / IZH 2126 with VAZ1 engine drawing
- » href=»/catalog/ij-7/legkovye_avtomobili-30/ij_2126_s_dvigatelem_vaz-307/truba_vpusknaya_i_vypusknoiy_kollektor-15/#part945973″>HairpinEngine / Intake pipe and exhaust manifold
- Passenger cars / IZH / IZH 27171 drawing
- » href=»/catalog/ij-7/legkovye_avtomobili-30/ij_2717-607/truba_vpusknaya_i_vypusknoiy_kollektor-48/#part1693938″>Stud VAZ-2106 engine / Intake pipe and exhaust manifold
- Passenger cars / VAZ / Lada Granta 21901 drawing
- » href=»/catalog/vaz-3/legkovye_avtomobili-30/lada_granta_2190-1236/truba_premnaya_s_neiytralizatorom-92/#part2981204″>Stud Exhaust gas system / Continuous pipe with converter
- Passenger cars / VAZ / Lada Kalina 2192, 21941 drawing
- » href=»/catalog/vaz-3/legkovye_avtomobili-30/lada_kalina_2192__2194-1646/truba_priemnaya_s_neiytralizatorom-51/#part3652859″>Stud Exhaust system / Reception pipe with converter
- Passenger cars / VAZ / Lada Priora 2170 FL1 drawing
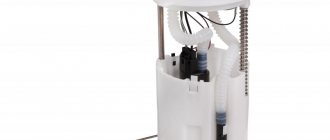
Removing and installing the fuel manifold and injectors
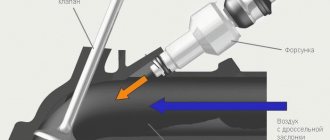
The Multiport Fuel Injection (MFI) system is a device controlled by the ECM. It measures the fraction of fuel under pressure in each cylinder.
The ECM provides control pulses to the fuel injector solenoid.
Fuel enters the top of the injector through the ball or valve needle and a recess in the guide plate at the injector outlet.
The guide plate has 6 holes that control the fuel flow, which creates a conical spray of fuel towards the intake valve. The atomized fuel evaporates before entering the combustion chamber.
Conclusion Attention: the fuel system is under pressure. To reduce the risk of personal injury or fire, the fuel system must be relieved of pressure before disconnecting fuel lines.
1. Release fuel pressure.
2. Disconnect the “-” battery cable.
3. Remove the fuel injector harness connectors.
4. Remove the exhaust gas recirculation valve.
5. Remove the supply line.
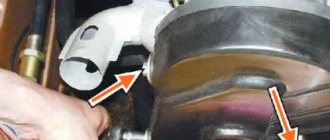
6. Remove the fuel manifold mounting bolts.
Before removal, the fuel manifold should be spray cleaned according to the included instructions.
How to remove the manifold on a VAZ 2109
Removing manifolds on a VAZ
.
replacing manifold gaskets. installation of collectors on a VAZ 2109
. 2108 21099.
Do not submerge the manifold
into the liquid cleaning solution. Be careful when removing the manifold to avoid damaging the injector connectors and spray heads.
Do not allow contaminants to enter open pipelines and passages.
Fittings should be capped and plugs should be blocked with plugs during maintenance.
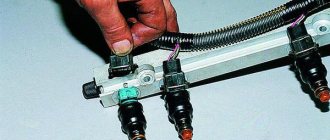
7. Remove the fuel manifold with the injectors installed on it.
8. Remove the fuel injector mounting clamps.
9. Remove the fuel injectors by pushing them down.
10. Remove the injector O-rings.
Installation Caution: Injectors are marked for flow rate. When ordering a fuel injector, be sure to order the part with the same number on it as the old injector.
1. Install new O-rings on the fuel injectors, after lubricating them with engine oil.
2. Install the fuel injectors onto the fuel manifold sockets with the injector terminals facing outward.
3. Install the injector retaining clamps on the injectors and the edge of the fuel manifold
.
4. Make sure the yoke is installed parallel to the fuel injector harness connector.
5. Install the fuel collector assembly onto the cylinder head and tighten the fuel manifold mounting bolts to a torque of 25 Nm.
7. Connect the supply hose.
8. Connect the fuel injector harness connectors. Rotate each of the fuel injectors to avoid stretching the wiring harness.
9. Install the exhaust gas recirculation valve, if installed on the vehicle.
10. Connect the “-” battery cable.
11. Check the tightness of the fuel manifold and fuel injectors.
Burnout of the gasket under the exhaust manifold is a rather unpleasant and common malfunction on the VAZ 2109.
A product that has become unusable will allow exhaust gases from a running engine to pass under the hood, and the characteristic chattering sound when the engine is under load also does not greatly contribute to a comfortable ride. Replacing the manifold gasket on a VAZ 2109 will help avoid such problems.
The collector gasket is made from a specially compressed asbestos mixture reinforced with steel thread; it can be purchased at any spare parts store. The price of the product, depending on the manufacturer, varies from 50 to 200 rubles. For a VAZ 2109, replacing the intake manifold gasket at a car service center will cost approximately 1,500 rubles and more, not counting the cost of the gasket itself.