How to remove the instrument panel on a VAZ 2107
Removing the instrument panel (or dashboard) is required for many purposes: changing light bulbs, the panel itself, and control devices. You need to remove the panel in order to tune it, and some unscrupulous “specialists” get to the meter this way and “twist” the mileage. Regardless of whether it is a carburetor VAZ 2107 or an injector, the removal diagram is the same.
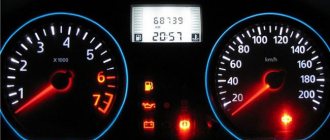
Below is the instrument cluster for the VAZ 2107 injector:
The difference in the combination is insignificant: if you have an injector, then an engine management system malfunction indicator is added:
The symbol lights up when ignited, and goes out after a stable start. Constantly lights up or flashes if the injector is faulty or the engine is not working properly.
Let's look at the sequence of actions to remove the panel.
- Remember: almost all work on servicing electrical circuits in a VAZ 2107 car, and in any other car, begins with “de-energizing the mass,” or opening the negative part of the circuit, which serves as the body. To do this, you need to remove the negative terminal from the battery.
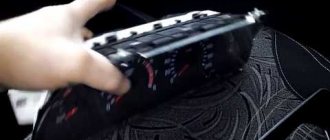
- Using a straight-blade screwdriver, carefully remove the three caps from the interior heater control levers. Any scheme for the removal order.
- To the right of the levers you can see a plug with a heating symbol. Use the same screwdriver to pry it off. Removing the plug is easy. Under it there is a screw - a self-tapping screw that secures the right side of the dashboard. We unscrew it.
- To the right of the alarm button there is a recessed handle that “resets” the daily mileage. You need to unscrew and pull out the nut along with the washer, and push the handle itself inside the panel.
- Carefully pull the right side of the panel towards you, next to the heater levers.
- Now you need to disconnect the speedometer drive cable. We put on cotton gloves so as not to stain our hands with oil, and unscrew the nut on the cable. It has a grooved rim and is shown with an arrow.
- Remove the vacuum supply hose from the economizer fitting. For VAZ 2107 it is located on the left side of the dashboard. Sometimes it resists, so you can gently apply force.
- Important point! Before disconnecting different colored pads, remember the markings and joint locations, or write down where they are connected. Only after this can the connectors be opened. If the connection diagram is broken during assembly, you will have to disassemble everything again.
- The final stage: we remove the shield. The operation is completed.
When installing the shield, all steps are performed in reverse order. Before installing the panel, do not forget to connect all contacts, place the negative terminal on the battery and turn on the ignition. Because if you forget to connect something, you will need to completely remove the panel again.
Once you have removed the panel, you can do its tuning. For example, change the appearance of the dials. To do this, first carefully remove the arrows, while trying not to bend them or the pins. The movement is only “pulling” perpendicular to the plane of the dial (do not forget to mark the place where the hand “lies” in the zero position before removing it).
The next step is to glue on the new dial; for good quality of the sticker, the surface needs to be degreased and the sticker carefully rolled. You can also tune the dashboard lighting by setting the LEDs to 12 V, current 350 mA. The main thing when soldering is not to forget to put a resistor in the series circuit to protect against overload. LEDs can be installed instead of standard lamps, and a rheostat can be included in the circuit.
The photo shows a decent tuning of the VAZ 2107 dashboard in day and night lighting options.
Source: 7vaz.ru
Removal and repair of the instrument panel of a VAZ-2107 car
On the dashboard there is a panel with a combination of instruments, which combines in one housing:
– speedometer (with total and daily mileage counters);
– coolant temperature and fuel level indicators with fuel reserve indicator;
– a block of indicators (battery charge, high beam, turn indicators, side lights, parking brake, insufficient oil pressure and closing the carburetor air damper).
An additional signaling unit (heated rear window and emergency brake system) is installed in the radio panel insert.
The connection diagram for the instrument panel is shown in Figure 1.
The connection diagram in the instrument panel is shown in Figure 2.
Instructions for dismantling the tidy on a VAZ 2107
The most important part of the interior is located in the front part - this is the instrument panel or tidy. It contains different types of indicators that inform the driver about the health of the car, and also provide other important information, such as driving speed or crankshaft speed. Sometimes it becomes necessary to dismantle this part, and therefore drivers wonder how to remove the instrument panel on a VAZ 2107 on their own, which you can learn from the material.
The most common reasons for dismantling
There are a lot of reasons for removing the tidy on a VAZ 2107, and some of them can be called banal, but nothing can be done. The most common reason when you need to remove the instrument panel is a burnt-out backlight bulb. Replacing light bulbs in the dashboard of a VAZ 2107 is carried out only when dismantling the device, and this procedure is simply impossible to perform otherwise.
The dashboard on the VAZ 2107 must also be removed for a number of the following reasons:
- Malfunction of pointer indicators.
- Failure of the instrument lighting, as well as lack of functionality of the arrow indicators.
- Replacing the device with a new one, for example, if a digital panel is installed instead of the factory instrument panel.
- Tuning or upgrading the device.
As practice shows, most often the need to dismantle the dashboard arises precisely because the backlight bulb burns out. If the device is dismantled for this reason, it is recommended to immediately replace conventional light bulbs with LED ones.
Required Tools
Before starting work, you will need to prepare the necessary tools so that you do not have to be distracted during the process. Despite the fact that the work of removing the device in question is quite labor-intensive, to implement it you will need a small set of tools, including:
- Phillips and slotted screwdriver.
- Electrical tape to indicate chips that are disconnected from the device.
- Work gloves for unscrewing the speedometer cable.
Panel or torpedo?
Which torpedo is suitable for the VAZ 2107? The issue is complex, but completely solvable. Just to begin with, you should determine how radical the alterations will need to be made. Such tuning can be done in two ways:
- Replacing the dashboard;
- Replacement of the entire torpedo.
The first option will allow you to get by with little expense and replace the panel with another one that suits you more. You just have to adjust the socket a little in size. It is somewhat more difficult to install a new panel. At the same time, it must be suitable in size and provide the ability to connect all vehicle systems. The final choice depends on your ultimate goals and capabilities.
Gazelle dashboard
When replacing the instrument panel on a VAZ-2107, the equally popular Gazelle often becomes the donor. Despite the fact that the manufacturer of these two machines is the same, the work will be more complex. The Gazelle panel has large dimensions and also has a completely different configuration, shape and size. You will also have to tinker with the electrical wiring: you will need a number of adapters, as well as knowledge from the field of electrical engineering.
In such work, you will have to use a jigsaw and a soldering station to resolder the adapters. This is a rather painstaking procedure that should be approached with special care.
Read, it may come in handy: We protect from rust and repair the thresholds of the VAZ 2107
Tuning VAZ 2107 with a torpedo from BMW e-34
Also, this appearance has no attractiveness. Therefore, many drivers replace dashboards. The issue is complex, but completely solvable. Just to begin with, you should determine how radical the alterations will need to be made. Such tuning can be done in two ways: Replacing the dashboard; Replacement of the entire torpedo.
The first option will allow you to get by with little expense and replace the panel with another one that suits you more. You just have to adjust the socket a little in size. Feeling upset, I turned on the TV. A few minutes later an idea came. Light bulbs may also not work. And I didn’t check the devices at the time of purchase. 4 light bulbs did not work, I cleaned three, and pulled out one penny from the original instrument panel. It would have cost a little money if there had been a bug in the circuitry of my adapter - it would have been a break of about two months until I recovered my strength.
So the process was completed completely unexpectedly. It was Saturday outside, I got up in the morning and, as always on Saturdays, went to the car market.
How to remove the dashboard on a VAZ 2107
AvtoVAZ mastered production of the 2107 model back in the days of the Soviet Union - in 1982. For almost 40 years, this car rolled off the factory assembly line. Unlike later cars, the “Classic” or simply “Seven” has one distinctive feature: the absence of electronics allows you to repair and even remove the dashboard using ordinary screwdrivers. Therefore, almost every car enthusiast with minimal knowledge of mechanics and electrical systems can independently remove devices from a VAZ 2107.
Directions for tuning the VAZ 2107 dashboard
The choice of method for modifying the dashboard depends on the financial capabilities and skills of the car owner.
- Purchase ready-made tuning parts and install them instead of the original ones. This is not the most original or cheapest, but it is a simple way to transform the appearance of the “tidy” and the entire interior. There are no problems with installing the purchased parts: you only need a screwdriver to work, and the connectors are made in such a way that it is almost impossible to make a mistake when connecting devices. You can also go to a specialized tuning studio.
- Purchase additional instruments (on-board computer, econometer, thermometer, proximity sensors and others) and organically fit them into the classic or tuned design of the “Seven” instrument panel.
- You can independently tune the VAZ 2107 tidy by installing backlighting, replacing the scale and arrows on the instruments. You can make a new instrument scale and arrows yourself or buy ready-made products. This move opens up wide opportunities for giving the car individuality, but requires certain skills and time.
Possible reasons for dismantling the shield
In what cases is it necessary to remove the dashboard of a VAZ 2107 car? There may be several reasons for this:
- panel tuning;
- replacing burnt out light bulbs;
- repair of individual devices that have failed.
VAZ 2107 is a legendary car, which hundreds of thousands of car enthusiasts have repaired independently.
Expansion of functionality
The VAZ-2107 is equipped with a minimum of instruments, and therefore installing new ones will significantly increase the information content of the panel. Most often they add:
- light and temperature sensors;
- fuel consumption indicator per kilometer;
- ECU;
- TV, etc.
Additional holes are cut for them. It is also necessary to install wiring and make changes to the design of the machine (in particular, to provide it with missing sensors).
The “Seven” has a fairly simple and modest interior design by modern standards. Therefore, car owners transform the interior of the car on their own, making its appearance individual and bright. Tuning the instrument panel of a VAZ 2107 is one of the primary ways to improve the simple and discreet appearance of the car’s dashboard.
Why is special attention paid to “tidying” a VAZ when tuning? It is the dashboard that draws the attention of the driver and passengers during the trip. Therefore, tuning the interior should start with refining the “tidy”.
Removing the panel
You can repair a VAZ 2107 with just a few screwdrivers in your arsenal. In particular, to remove the panel you only have to unscrew one Phillips screw.
Photo gallery: what tools should be on hand
How to properly remove the instrument panel
To quickly dismantle the shield, you need to follow the algorithm below:
- Pry up and remove the plate located to the right of the stove. It shows the corresponding icon.
Using a screwdriver, remove the plate to the right of the stove
Using a Phillips screwdriver, unscrew the screw hidden under the plate.
The lower heater control knob has already been removed
The right edge of the panel is tilted to the right and towards itself
To remove the panel, disconnect the contacts from the heater switch button
The gray thick hose is pulled to the side and the wing nut on it is unscrewed
Unscrew the nut from the daily mileage reset handle
According to the experience of auto mechanics, there is no particular need to mark the plugs; it is almost impossible to plug them back in incorrectly.
The first white plug is removed, the second, located a little deeper, is also removed
The white econometer wire is located a little further from the opposite edge of the panel
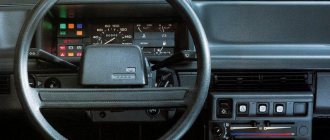
Seven dashboard design
In terms of science intensity and level of professionalism, there can be no special complaints about the person performing this operation. If the owner knows how to disassemble an electric kettle and what is the best way to do it, then how to remove the instrument panel on a VAZ 2107 will certainly not raise any questions. Difficulties will appear only the first time, when before this you have not had to disassemble the Zhiguli front panel and pick out the tidy from it.
Absolutely all modifications 2107 and 2105 have a similar algorithm for dismantling the tidy, which we will announce today to help desperate owners who decide to spend a day off replacing a light bulb. First you need to be patient, this is the most important thing, and then have a good set of screwdrivers of different lengths and thicknesses. We will use them as assembly blades and manipulators where it is physically impossible to reach with our hands.
Progress:
After everything you need has been prepared, you can begin tuning the VAZ-2105 panel.
Preparing the pattern
Before starting work, in order to do everything correctly and not miss the mark with the dimensions, you need to make several patterns. To do this, you will have to disassemble the console a little so that the VAZ-2105 tuning is of high quality. The dashboard can be removed quite simply, so there should be no problems with removal.
Then measure all sides and, using the values obtained, try to redraw the pattern onto a dense material, for example, cardboard. Try to make a pattern with a margin; it is better to cut off excess than to get a deficiency.
Then attach the pattern to the material and trace with a gel pen or marker. Cut out and mark the stitching areas. Since the dashboard is not a homogeneous part of the interior, the component parts of the material will still have to be sewn together. When all the elements for covering the dashboard are ready, sew and proceed directly to the reupholstery.
Working on a torpedo
You should begin work by processing the dashboard. It must be washed well with soapy water and degreased with at least a solvent.
The next step is to sand the surface with coarse sandpaper. After this, you need to cover the surface with plastic putty. When everything is finished, degrease it again and you can apply glue.
Start gluing the material from the visor of the VAZ dashboard. We coat this piece of the dashboard well and also apply glue to the material well, glue it and smooth it, while heating it with a hairdryer. But be careful, as leatherette is a very delicate material and can easily melt.
Do the same with the remaining components of the dashboard. Usually it takes about half an hour to consolidate the result. Try to avoid air bubbles, smooth them out carefully, otherwise the leatherette will stretch and not completely stick to the surface.
After you have covered the entire surface, it may be difficult to install the VAZ-2105 instrument panel back, since the plastic covered with the material has become thicker and is difficult to snap into place. If you have any difficulties with installation, trim the material a little and grind the plastic around the edges.
Features of shield 2107
The peculiarity of the seven dashboard is that it has its own special way of attaching to the dashboard. On the six, you can remove the panel quite simply - just disconnect the wiring harness chips from the terminals on the shield and unfasten the latches. In the five, the scheme for dismantling the tidy is similar to the seven, but there, too, everything is somewhat simpler due to the changed shape of the front panel and fairly good access to the mounting screws.
The VAZ 2107 dashboard received a completely different architecture and acquired new functions that were not available on the same 2105. For example, now before the driver’s eyes there was an economizer dial, which approximately showed the optimal driving mode for saving fuel, although few people pay attention to it. A much more useful thing was the ammeter, which disappeared in the top five. Due to the compaction of the architecture and the large number of devices and lamps, the design of the main printed circuit board changed - now the lamps were connected not by wires, but by socket contacts directly to the board.
When to remove the tidy
Repairing the dashboard can be useful in the case when any of the control lamps simply burns out, and this is extremely undesirable, since the car no longer has any means of monitoring such systems as, for example, the state of the injection engine control unit (naturally, in the latest 2107 models years with an injector). The Check Engine lamp appeared only in sevens with these motors, and if it burns out or loses contact with the circuit board due to vibration or moisture, then one can only guess at the reasons for the unstable operation of the engine.
Well, the instruments themselves, the tachometer, speedometer and sensor status indicators in the systems, rarely fail, if ever. By the way, you should pay attention to the tidy at the moment when the ignition key is turned and all the lamps flash in test mode, so to speak. It is this moment that will make it clear that the control lamp of a particular system does not work and explanatory measures need to be carried out with it.
How to remove the tidy on the seven
The algorithm for dismantling the 2107 instrument panel is simple and here are the steps you need to perform in order, with patience:
- The stove control knobs - the antifreeze supply lever to the heating system and the ventilation system control lever - will interfere. They should snap off using a screwdriver of a suitable diameter.
- Resetting the odometer readings. This button is located to the right, where the emergency light button is installed. A nut is screwed onto the top of the button body. You need to unscrew it and push the button itself into the panel.
- Now we find the thinnest slotted screwdriver and remove the plug on the right, under which the fastening screw is hidden, we unscrew it too.
- The panel on the right is free, you can apply it to yourself, but it’s too early to rejoice. All that remains is to remove the speedometer cable, the econometer vacuum tube and unclip the wiring harnesses.
- Now, with an effort of will and sleight of hand, you need to unscrew the cable nut. It's not hard to do, it's hard to get there. It might be faster if you try on the right.
- The econometer hose is also easy to remove. But you need to be able to get to it. Let's take it off too.
- We disconnect the pads from the harnesses by touch and remember where each one was, although you need to have a special talent to mix them up.
Remove the instrument panel and change the light bulbs
The control devices stopped working or they began to “confuse” the readings, the control lamps and lights do not light up - in this case the panel will have to be removed.
Preparing for work
Before starting work, you need to buy replacement light bulbs. You can choose standard ones with or without sockets, as well as LED ones. If it is necessary to replace the incandescent lighting elements responsible for the backlight, then you will need light bulbs of the AMN 12-3-1 (T3W) type. These are ordinary filament bulbs that are installed in the dashboard of VAZs from the factory. If it is necessary to replace indicator lights, then type A 12-1.2 elements are used. Are you choosing LED?
You don't need a lot of tools:
- flat screwdriver;
- Phillips screwdriver;
- pliers.
If you are going to disassemble the panel and repair it, you will additionally need:
- multimeter or probe;
- soldering iron from 40 Watt;
- solder and rosin;
- side cutters;
- small screwdrivers.
Removing the panel from the car
Using a slotted screwdriver, remove the plastic plug on which the heating sign is depicted. This plug is on the right, and under it there is a Phillips screw that needs to be unscrewed. (There are 2 screws under the plug, but only one needs to be unscrewed - the top one, which secures the right side of the dashboard).
Next to the hazard warning button, there is an odometer reset button, which is secured with a plastic nut. The nut must be unscrewed and removed with the washer located behind it. The button is recessed inside the panel.
The right side of the tidy is weakened at this stage, and it remains to perform several additional manipulations in order to completely dismantle the device. To do this, pull out the right side of the device, thereby freeing access to its rear part. Here you need to disconnect all the chips and wires to perform dismantling.
Initially, the power chips for the stove button are disconnected. Be sure to remember the location of the wires. It is recommended to take photos so as not to be confused when assembly is carried out. Next you need to disconnect the speedometer cable. It is secured with a special nut, which can be unscrewed by hand.
All chips connected to the dashboard are disconnected. It is almost impossible to confuse their locations, since they have different fastenings and differ in size.
The supply hose is removed from the economizer fitting. This cable is located on the left side of the device. After all the chips, cables and wires are disconnected from the device, you can dismantle it.
Determining what doesn't work
If the backlight of the VAZ 2107 dashboard does not light up, this may be due to the following factors:
Faulty incandescent lamps
This rarely happens, however, due to the fact that from the factory the lighting of the panel is realized through the use of incandescent lamps, their burnout periodically occurs. The problem can be fixed by replacing the lighting elements, or better yet, installing LEDs. To make a replacement, you will need to dismantle the instrument panel. This is not difficult to do, but it will take a lot of time to disassemble the shield. The panel contains lighting elements, which must be replaced in order to restore the functionality of the VAZ 2107 instrument panel lighting. Before replacing, you should first check the serviceability of each lamp. The design of the shield uses 4 main lighting elements, which are responsible for lighting, as well as additional ones that act as an indication. If you had to disassemble the panel, it is recommended to immediately change them to LED ones.
Brightness control
The malfunction may be hidden in the part that is responsible for adjusting the backlight intensity. Although this part fails extremely rarely, its malfunction cannot be ruled out, especially if it has been established that the incandescent lamps are in good working order and do not need to be replaced. The light brightness control is located directly on the right side of the steering wheel near the headlight range control. If diagnostics have shown that this particular part is the reason that the backlight does not light, then it should be replaced.
Circuit breakers
The search for the reason why there is no instrument lighting on the seven should begin directly with the fuses. These elements protect the circuit from voltage surges, and as soon as a large current flows in the circuit or a short circuit occurs, the fuse link blows. If such a malfunction occurs, replace the fuse and check the power circuit.
Absence or poor contact at the point where the chip connects to the power wire
The reason for the lack of contact may be that the chip is not tightly pressed to the terminal block of the instrument panel. Poor contact occurs when contacts become oxidized. You can fix such breakdowns yourself by cleaning the contacts from oxides.
In addition to the main faults, there are additional ones, for example, damage to the power cable. If you have a multimeter in your arsenal, then identifying such a malfunction will not be difficult. Even if you don’t have a multimeter, it’s not at all necessary to contact a car service to fix the problem; you can use a probe with a light bulb.
Installation of LED lighting for VAZ 2107 devices
Tuning the dashboard of the VAZ 2107 with changing the backlight will create a unique style for the interior of the “Seven” at night. Installing LED lighting is not difficult; it does not require special skills or equipment.
LEDs can be installed behind the instrument dial, in places where standard lamps are installed, or placed around the perimeter of the instruments.
Installing LEDs in place of the standard backlight provides better illumination of the instrument scale, therefore it is more preferable. When connecting LEDs, pay attention to the polarity, otherwise the backlight will not work.
It is also worth replacing the standard backlighting of switches and control buttons with LEDs of the same color as on the instrument lighting. This will create a single, harmonious dashboard style.