Replacing engine mounts for VAZ 2101-2107
I came across such a problem as replacing engine mounts on a VAZ 2107 or they are also called mounts. The reason for this was vibration in the car body. This problem can also arise on other vases of the classic model 2101 or 2105 or 2106, it makes no difference since replacing the pillows will be exactly the same and you can do it yourself.
What can cause complete wear of engine mounts and why are they needed? But it will lead to the engine falling onto the subframe, and that will be a problem. Well, not everyone will like vibration discomfort when driving or running the engine in place, since working airbags should dampen vibrations, which is what they are designed for.
Brief summary
In order to sleep well, we place a pillow under our heads. Also, in order to avoid noise and vibration, the designers have developed sophisticated motor mounts. If at least one of them collapses, the salon immediately turns into something like a echoing iron barrel.
If the engine comes into hard contact with the body as a result of wear on the cushion, you need to reduce the speed to minimum and carefully move to the repair site. Damaged pillows will naturally have to be replaced.
And in order not to think about pillows for a longer time, you just need to change your attitude towards the car. Careful driving over uneven surfaces, smooth starting and gradual acceleration should become a habit. A calm driving style will extend the life of the supports and the car as a whole.
- How to replace engine mounts on a VAZ
- How to replace an airbag
- How to change the wing on a VAZ
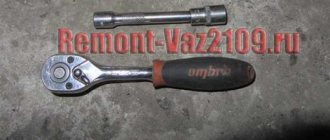
- Two jacks, an open-end wrench for 17, a spanner for 17, a socket wrench for 17, a ratchet with an extension and cardan, wrenches for 8 and 10.
Remove the terminal from the battery as there may be a risk of short circuit.
It is advisable to install a wooden block between the jack and the engine so as not to bend the pallet.
Engine repair
The following tools will be needed for this job:
- a puller that allows you to easily remove the piston pin;
- adjustable support under the bottom, supporting at least 1 ton;
- crankshaft ratchet key;
- wide flat probe 0.15 mm;
- a pressure gauge capable of measuring pressure in the fuel rail;
- metal ruler;
- vice;
- compression gauge, etc.
How to remove the engine
The engine is removed for repair or replacement. There is nothing particularly complicated in the procedure if you have a special winch. In this case, it will be possible to dismantle the engine entirely, however, this is more difficult than removing it without the cylinder head.
The sequence of actions looks like this.
- It is recommended to remove the car hood to ensure easy access.
- Drain all refrigerant.
- Remove the air filter, disconnect the choke cable, remove the accelerator lever, the carburetor gas hose - in a word, all the attachments that can present an obstacle to work.
- Unscrew the muffler and remove the hose from the heater.
- Remove the distributor.
- Pull out the starter.
- Remove the radiator.
- Remove the fuel hose from the pump.
Now you can move on to direct work with the engine.
- Unscrew the nuts from the cushions.
- Separate the gearbox from the engine.
- Pull the engine off the cushions and place a strong rope under them.
It would be more effective to insert a metal pipe under the rope. Place the ends of the rope on the hydraulic equipment to lift the engine. Turn over and pull out the motor.
The engine removal crane makes it easy to pull out the power plant
Replacing crankshaft bearings
The engine is removed, you can continue.
- Unscrew the 14 bolts securing the pan to the cylinder head.
- Remove the oil pump.
- Unscrew the nuts securing the connecting rods and remove the covers.
- Push the pistons out of the cylinders.
- Remove the crankshaft main bearing cap bolts.
- Remove the crankshaft.
To be able to remove and replace the liners, you should remove the half rings of the thrust bearing from the grooves of the fifth main bearing bed. After disassembling the crankshaft, you can remove the old bearings and replace them. New items must match the desired category.
The inserts can only be replaced. They are not subject to repair, as they are made to exact dimensions. Over time, parts wear out and new ones have to be installed. Essentially, the bearings are plain bearings for the connecting rods that act on the crankshaft.
Replacing piston rings
In many cases, this procedure is required due to the fault of the car owner himself, who fills in something unknown instead of high-quality oil. In addition, the frequency of lubricant renewal is of great importance. The first symptom indicating failure of the rings is a sharp increase in fuel consumption.
Replacement on a removed but not yet disassembled engine.
- The crankshaft is rotated so that the required piston is in the desired position - bottom dead center.
- The connecting rod cover is removed, all pistons are pushed upward by the cylinders.
- Carbon deposits are removed from the pistons.
- Old rings are replaced with new ones.
It is imperative to first install the oil scraper ring, and finally tighten both elements with a special mandrel.
Oil pump repair
The oil pump on the VAZ 2107 is the most important element of the lubrication system, allowing it to supply lubricant under pressure. Repairing an element requires the presence of tools such as flat probes measuring 0.15–0.25 mm, a ruler and a vice.
Algorithm for carrying out restoration work with an oil pump.
- Dismantle the pump and install it in a vice.
- Unscrew the bolts securing the intake pipe to the body.
- Disconnect the pipe from the body, doing this carefully. The main thing is not to lose the pressure reducing valve washer.
- Remove the spring and pressure relief valve.
- Remove the cover.
- Then remove the gears.
Each removed part must be inspected for cracks and deformations. If they are detected, the element must be replaced. At the end, be sure to rinse all parts with kerosene and dry with compressed air. After that, put everything back together.
The VAZ 2107 engine is a complex device only in appearance. In fact, if you follow the instructions and carefully, you can safely disassemble and reassemble it.
VAZ 2105 | Removing and installing left and right engine mounts
Removal
Remove the air filter assembly with the air flow meter.
Unscrew the mounting nuts 2 on the right and left engine mounts.
Insert the adapter 10-222A/16 into the traverse 10-222A with the high side of the guide for the lead screw facing up, as shown in Figure 2.39.
After this, insert the adapters 10-222A/19 into the traverse 10-222A on the right and left. Install the 10-222A crossbar onto the side members.
| Rice. 2.40 . Installing the engine on a traverse |
Hook the engine with two earrings 10-222A/12 to adapters 10-222A/16 and slightly tighten it (Fig. 2.40).
Then unscrew the mounting bolts 1 from the left and right engine mount/subframe.
If necessary, take advantage of the free space between the cylinder head and the front wall.
Now carefully lift the engine using crane 10-222A/16.
To remove the engine mounts, it is necessary to additionally unscrew the fastening of the right or left engine mount from the cylinder block, since the engine cannot yet be raised high enough.
| Rice. 2.41 . Installation diagram of sealing flanges: 1 – bolt; 2 – torsional vibration damper; 3 – bolt; 4 – oil seal; 5 – sealing flange; 6 – cylinder block; 7 – sealing flange; 8 – oil seal; 9 – dual-mass flywheel; 10 – bolt; 11 – bolt |
Installation
Installation is performed in reverse order.
When installing, ensure that the engine mount pin is seated correctly in the support.
First, tighten all mounting bolts by hand, then tighten them to the specified torque.
Tightening torque of fastening bolt 1: 60 Nm.
Tightening torque for mounting bolt 2: 75 Nm.
Tightening torque of the oil filter housing/engine mount mounting bolts on the left cylinder block: 23 Nm.
Tightening torque of the engine mount mounting bolts on the right cylinder block: 40 Nm.
automn.ru
Replacing the front springs of a VAZ 2107
Replacing the front suspension springs is done after removing the shock absorbers and undocking the anti-roll bar (the latter prevents the arms from moving freely). Also, to replace the spring, loosen the nuts securing the lower arm axle.
To lower the lower arm as much as possible and release the spring, it is necessary to press the lower ball joint pin out of the steering knuckle.
Before installation, the new spring must be compressed and secured with special ties.
Assembly of the unit is carried out in reverse order. The clamps can be removed from the spring only after the ball pin is secured in the steering knuckle.
You can read more detailed information on replacing springs here
Repairing the VAZ 2107 suspension is not particularly difficult and does not require special knowledge or special qualifications. The only question is whether there are special tools (pullers and ties) and an inspection hole in the garage.
Here is a video of the complete disassembly and correct sequence of the front suspension
Replacement
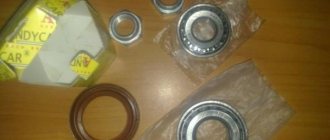
Replacing airbags on a VAZ 2107 is a fairly simple procedure. Before starting work you need to prepare:
- a set of new pillows;
- 17mm socket wrench with cardan for front airbags;
- 13mm socket wrench for rear support;
- In addition, you will need a hydraulic jack;
- board approximately 20cm wide. The length of the board must exceed the width of the inspection hole or overpass opening by at least 20 cm on each side. You will also need a piece of board measuring 20x20 cm, 3 cm thick.
Work order
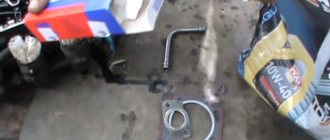
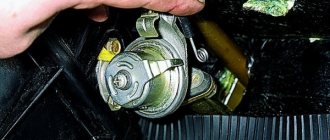
- The car is driven onto a pit or overpass and secured securely. The mudguard is removed from the left or right side. Now access to the corresponding (let's say left) pillow is open. Using a 17mm wrench, unscrew the nut of the upper fastening of the left front engine mount. There is a special hole in the front beam (also called the cross member). Through it, using a 17mm wrench, unscrew the lower nut securing the pillow.
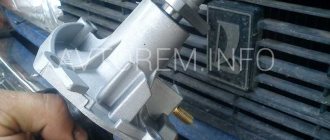
- We place a board under the engine crankcase in such a way that it covers the inspection hole or the opening of the overpass. We install a jack on this board and carefully lift the engine through a 20x20cm wooden spacer. Lifting must be carried out until the engine mount is freed. We take out the old pillow.
- We install a previously prepared new pillow in the vacant space. It is recommended to insert the lower nut into the key and attach it to the stud. Tighten the bottom nut and proceed to install the top nut. Finally tighten both nuts.
- We change the second front support (in this case the right one) in a similar way.
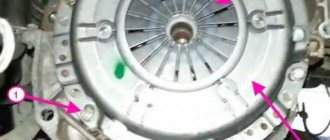
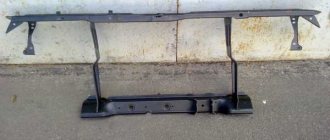
- To replace the rear cushion, first remove the transmission cross member.
- Using a 13mm socket wrench, unscrew the nuts securing the rear support to the gearbox cover. Now remove the cross member along with the rear cushion.
- Installing the rear airbag is performed in reverse order.
Read more: Contract for the right to drive a car
Front suspension device for VAZ 2107
The “Seven” is equipped with an independent suspension, consisting of an upper and lower control arm, a spring and a shock absorber on each side. The lower arms are connected to each other through the anti-roll bar.
The axles of the lower arms are rigidly attached to the cross member (beam), which is attached to the front side members of the body. The role of the axes of the upper arms is performed by the fastening bolts with which the arms are screwed to the mudguard posts.
The mobility of the levers is ensured by rubber-metal hinges - silent blocks.
The wheel hub is bolted to the steering knuckle, which is held at the ends of the arms by ball joints (upper and lower). This ensures that the wheels rotate around a vertical axis.
The front suspension springs, which smooth out bumps when driving over uneven sections of the road, are located between the lower arms and the mudguard. That the springs did not move while driving, their edges were inserted into the support cups.
Shock absorbers that absorb vibration energy are attached by the body to the lower arm, and their rods are screwed to the mudguards through rubber cushions.
The anti-roll bar is connected to the arms and side members through rubber bushings to prevent direct metal-to-metal contact and absorb shock loads.
VAZ 2105 | Checking the condition and replacing rubber cushions of engine mounts
Checking the condition and replacing rubber cushions of engine mounts
Engine mounts rarely require attention, but if the rubber mount material becomes damaged or shows signs of aging, they must be replaced immediately, otherwise increased vibration may cause failure, wear, or damage to vehicle transmission line components.
Checking status
During the test, the engine should be lifted slightly to remove its weight from the supports.
| Replacement automn.ru |
Replacing silent blocks VAZ 2107
Repairing the front suspension of a VAZ 2107 often requires replacing the silent blocks. To perform this operation, you must remove the upper arm. The silent blocks of the lower arm can be changed without removing the arm from the car.
The silent blocks are pressed out of the lever and pressed into it using a special puller. To remove the upper arm, it is necessary to press out the support pin.
The silent blocks of the lower arms can be replaced by unscrewing the nuts on the arm axis. It is worth removing the lower arms only to replace them with new ones. But such an operation is usually required only when eliminating the consequences of an accident.
Stages of work
It is impossible to remove the box without a hole or overpass. After the car is in the pit, disconnect the battery and apply the parking brake. Now you can start working, and it goes through the following stages:
- The lever needs to be pulled out.
- Remove the cover with the seal.
- Afterwards the cover and mat are removed.
- We remove the hose through which warm air enters, and then the exhaust pipe of the exhaust system.
- Move the starter forward.
- Drain all the oil into a previously prepared container.
- Disconnect the cardan coupling and muffler.
- Remove the clutch cylinder.
- We remove the cardan transmission, first getting rid of the fuses.
- Unscrew all the remaining bolts and remove the gearbox.
At this stage, we have completely removed the box, and now we can carry out repair procedures on it or completely replace it with a new one.
The process itself cannot be called simple, and a novice car enthusiast will definitely not be able to cope with it without a detailed training video. Therefore, turn to the Internet for help before you start any work. Watch videos from professionals who clearly show each stage of the work.
Recommendations
Comments 16
Is there less vibration?
Too soft, I later installed from the Niva, there is a record in the log, with them there is more vibration at idle, but at high speeds (relatively high) there is less vibration, when slipping it is several times less, when you turn your heels on a slippery road the engine does not hang out, no these vibrations of the whole body as with standard pillows
Right. I also try to replace it right away so as not to accumulate damage.
You take a long extension 1/4 inch, a long head less than 17 so that the engraver does not fall into it, insert the extension into the head, put the washer and engraver on the extension, the end of the extension where the square rests on the pillow bolt and with the head you put this whole pie on the pillow bolt . The washer flies off on its own, but together with the engraver it stays on the thread. To do everything in a few attempts, no more than 10 minutes, sometimes it works the first time))) and sometimes it takes half an hour)))
It turned out to be easier if you remove the protection and boot, you can climb up from the top with your fingers and hold the washers) and with the other hand use the head with the nut and that’s it)
If you climb from above there is not enough space... The washer and the engraver do not fall together)))
Hello. Attach a magnet from the speaker to the beam, it will hold the washer. In general, they wrote that the threads on the new pillows should be shortened by a couple of turns so that they become hemorrhoid-free, less jacking is required. Just tighten the nut before doing this; when you cut it off, you twist it and it drives the threads through. Soon it will probably be necessary too, the pillows are already eight years old.
There was nothing at hand except the keys. Change these supports once every hundred years)
I read somewhere here that the fields will be stronger
Too hard, there is more vibration on the body, my neighbor has them on 6, he regrets that he installed them
in my opinion these are universal pillows, it says on the box even for 4x4 cars and classics 2101-2107
This is the back side of the box, the correct side is where it is marked with a marker
Ahh, I just didn’t pay attention to the marker, I also just bought pillows after the May ones, I’ll gather my strength and change them)
fast, good when there is a hole
Well, yes, a lift is even better. It’s good that there is a familiar owner of a service station, when you can go there freely, but you can’t take pictures there, you need to quickly so as not to interfere
If you experience vibrations in the engine, the first thing you should do is check the mounting of the engine mounts on the car. Today we will tell you in detail about replacing engine mounts on a VAZ 2107 with your own hands.
How to remove the front engine mount of a VAZ 2107
1. Place the car on an inspection hole or overpass.
2. Remove the mudguards.
3. Using a 17 mm socket wrench with a universal joint, unscrew the nut of the upper mounting of the mount on the left side of the engine.
4. Using the same tool, use the same tool to unscrew the nut of the lower mounting of the engine mount through the hole in the cross member.
5. Raise the VAZ 2107 engine with a jack and remove the cushion.
Installation of front engine mounts of VAZ 2107
1. Installation of the support is carried out in reverse order.
2. Before installing the engine mount, place the nut in the socket wrench and tighten it onto the stud.
Similarly, we replace the pillow on the right side of the car engine. To prevent the exhaust pipe from heating the engine mount, a heat shield is installed between the cross member and the right mount.
The rear engine mount of the VAZ 2107 is attached to the rear cover and cross member of the gearbox.
How to remove the rear engine mount
1. Remove the gearbox cross member from the studs of the VAZ 2107 body.
2. Using a 13 mm socket wrench, unscrew the two nuts securing the rear engine mount to the rear gearbox cover.
3. Remove the gearbox cross member assembled with the rear engine mount from the rear cover studs.
4. Using a 13 mm socket wrench, unscrew the two nuts securing the rear engine mount of the VAZ 2107, holding the bolts from turning with a wrench of the same size.
5. Remove the rear engine mount of the VAZ 2107. A spacer sleeve is installed between the eyes of the rear engine mount.
Installation of the rear engine mount of the VAZ 2107 is performed in the reverse order. Let me remind you that the previous article was about replacing the front suspension shock absorber on a VAZ 2107 with your own hands.
Replacing supports: operating procedure
Here are instructions on how to change the mounts on a VAZ engine yourself.
Front
- We drive the seven into the pit and put chocks under the wheels to securely fix the car. Remove the mudguard from the desired side. This will allow access to the front airbag.
- Now you need to unscrew the nut of the upper support fastening. A 17mm socket wrench will come in handy.
- The lower support nut is located in a special hole in the front beam and is unscrewed with the same 17mm wrench.
- Now you need to remove the old pillow to replace it. But this is hampered by the engine, which clamps the support with its weight. To lift the engine, we will need a jack. We place a board under the crankcase so as to block the inspection hole. The edges of the board should protrude from the edge of the pit by at least 20 centimeters on both sides. The board must be thick and strong enough to support the weight of the motor. A jack is installed on it and the engine is raised through a spacer made of a 20 by 20 centimeter board. The motor will not rise much until it stops. But this will be enough to remove the old pillow.
- We install a new support and tighten the nuts. To attach the lower nut to the stud, it must be inserted into the wrench.
Replacing engine mounts on a VAZ-2104-2107
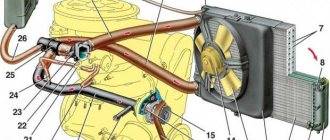
They prevent the transmission of vibration from a running engine to the car body. In addition, the cushions protect the body from possible engine movements in the engine compartment during sudden acceleration and braking of the car.
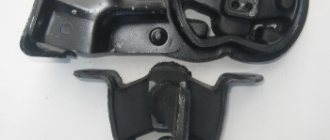
The VAZ2107 uses two side airbags and one rear airbag, which supports the gearbox. The front airbags are located symmetrically on both sides of the engine.
The rear cushion is located under the gearbox. It consists of two steel plates, between which a layer of special rubber is mounted using vulcanization. The type of pillow is different for 4- and 5-speed transmission options.
Price issue
Engine mounts are made by several manufacturers. The most popular products of the BRT company among our compatriots. Provided that this is a truly original product and not a fake, which abounds on the market.
The cost of the front engine mount from BRT ranges from 500 to 600 rubles. The rear cushion is slightly more expensive, approximately 700 ÷ 800 rubles. . You can find pillows much cheaper in the car park. But, most likely, it will be a fake, from which, in addition to harm, there will be no result.
The original cushion uses a special class of rubber SKI-3 of the first group and of high quality. This rubber is made from natural rubber. Special glue and high quality steel are also used to make the side plates. This pad is designed for use in temperatures ranging from .45°C to 70°C.
Small tricks
In various instructions on the Internet, the process of replacing pillows is described very simply and unpretentiously. There is a feeling that this work will take no more than an hour, and even a person without experience can cope with it.
But in practice you usually have to tinker. Difficulties arise due to poor access to nuts and tight space for maneuvering with spare parts. As a result, work can drag on for the whole day and be quite nerve-wracking.
Read more: EGR for Freelander 2 diesel
To avoid this, we recommend that you carefully watch the video at the end of this article.
Here we list a few tips that will make your work easier.
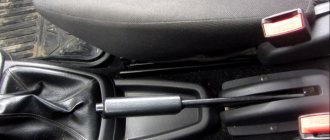
- The jack is placed under the clutch bell. A spacer in the form of a 20x20cm board is used.
- There is no need to lift the engine too much. The exhaust pipe will rest against the steering rod, which will lead to the body lifting along with the engine. Of course, you can remove the steering rod or exhaust pipe, which will allow the engine to rise a little higher until the clutch bell stops in the floor tunnel.
- The left cushion is very easy to remove. Therefore, most lessons are based on the example of this particular support. You will have to tinker a little longer with the right support.
- To remove the left support, just use a pry bar or simply push the engine away from you. The pillow is pressed against the beam and pulled towards itself.
- Before installing a new cushion, check the tightness of all nuts on it and tighten them if necessary.
- Clean the installation site from dirt and rust accumulated over the years.
- When installing, first place the bottom pin in the slot on the beam. Then we press on the engine and insert the upper pin into the cushion bracket. Since the engine is raised slightly, the part fits perfectly into place. So there is no need to cut off the pin to fit it in there.
- Things are a little more complicated with the right pillow. The fact is that access to the upper fastening nut is difficult. But this can be solved. A long 17mm socket and a ratchet will help. With this simple device you can unscrew the nut from under the car. But it will be quite difficult to do this from above. This is due to the fact that the pillow is located at an angle to the block.
- In order for the new cushion to fit into the bracket, you must first get the lower pin into the hole on the beam, then lift the engine in the area of the generator and put the upper pin in place.
- Don't forget to put a heat shield on the right pillow. Otherwise, it will not live long due to overheating from the exhaust.
- When installing the rear cushion in the traverse, do not confuse where the back is and where the front of the cushion is. Otherwise, you will have to take it out and screw it on again.
- To fasten the traverse to the body, you need to lift the box using a jack. This will allow you to press the traverse to the bottom and successfully tighten the nuts. This will avoid the need to lift the box on its hump and tighten the nuts, bent halfway.