Methods for tuning Priora door cards
All methods of adding originality to the appearance of doors can be divided into three groups:
- replacing door cards with tuned ones;
- coloring of door cards;
- door card trim.
The first method does not raise any special questions or difficulties. The only problem is to find tuned door cards that suit your taste.
Painting door cards is the easiest and cheapest way of tuning. Its disadvantages:
- only the color changes, not the texture of the material;
- Even high-quality paint can peel off over time, requiring the door panels to be repainted.
Covering Priora door cards with fabric or leatherette is the most complex method, which allows you to achieve the best appearance of the interior. Regardless of the tuning method, it is necessary to dismantle the door cards
How to properly remove the door trim on a Lada Priora with your own hands
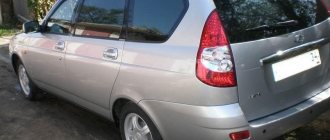
The VAZ-2170 or Lada Priora first appeared on the market in 2007. Since then, it has enjoyed deserved popularity among many car enthusiasts. And there are reasons for this: Priora combines the low cost of a domestic car and good build quality, comparable to some foreign cars. At the same time, the car has a fairly economical engine, and its repair and maintenance will not break the bank. And some simple jobs, such as removing the rear or front door trim, can be done with your own hands.
How to remove the front and rear door trim on a Lada Priora
Removing the door trim on a VAZ-2170 is quite simple, even if you have not done this before. The whole process can be divided into several stages:
- removing screws and fasteners;
- removing door trims;
- detaching the casing from the clips and pistons.
If you do not want to contact a car service, then you can easily carry out this process yourself.
Why may it be necessary to dismantle the covering?
There are various situations in which it is necessary to remove door trim. For example, without this it is impossible to install noise insulation or insulate a door. In addition, if the window regulators or door handles need repair, you also cannot do without removing the trim.
Well, in the end, there may always be a desire to replace the casing with a newer one, with an original color scheme or unique materials.
Replacing door trim can significantly change the appearance of the interior
Required Tools
You don't need a lot of tools to remove the trim. All you need is:
- straight slot screwdriver;
- Phillips screwdriver;
- new clips and pistons (if you accidentally break the previous ones).
Be careful when purchasing new trim clips and clips. The appearance of the fasteners for the Lada Priora is very similar to similar parts for the Lada Kalina. However, the latter are 1.5 mm longer. Such a small difference may prevent the trim from being firmly secured in place.
Sheathing fastener diagram
The fasteners on the rear and front doors of the VAZ-2170 are located in different ways, so the procedure for dismantling the trim will be slightly different. In order to easily remove all the decorative elements of the door, you need to study the principles of their fastenings.
Front door fasteners
Before removing the door trim, you need to understand what parts it consists of. To do this, take a look at the diagram.
the front doors of the Lada Priora consist of several elements
- Front door trim trim.
- Front door trim.
- Front door trim.
- The screw is self-tapping.
- Front door trim insert.
- Front door trim pocket.
Pay attention to where the trim fasteners are located.
location of the fasteners that hold the door trim
Eight clips that hold the trim in place are located at the top of the door, as well as on both sides. They hold tightly enough so that nothing dangles while the car is moving. However, removing the trim is fairly easy once you have removed all the other screws and trim.
Rear door fasteners
The structure of the rear door of the car is slightly, but different, from the front.
rear doors of Lada Priora consist of several elements
- Front door trim trim.
- Front door trim.
- Front door trim pocket.
- The screw is self-tapping.
- Upholstery trim.
The rear door trim is also held in place with clips. Several more lower ones were added to the side and top pistons.
location of the trim fasteners on the rear doors of the Lada Priora car
Thus, the design of the car involves 18 clips on each side, to which the door trim is attached.
Stages of removing the casing
Before removing the trim from the clips, you must remove all bolts, clamps and fasteners that are located in different parts of the door. It is most convenient to do this in a certain order.
Before you begin removing the door trim, disconnect the negative cable from the battery.
From the front door
To remove the door trim on a Lada Priora, you need to get rid of all the fasteners. To do this, follow the following procedure.
- Unscrew the button responsible for locking the door and remove it.
- Unscrew the screw on the inside door handle.
- Remove the handle by carefully moving it away with a flat-head screwdriver.
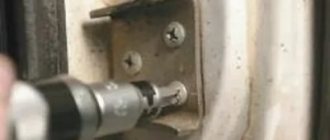
- Find the two screws in the special pocket that secure the power window control module. They can be hidden under a rubber mat.
- Unscrew both screws and remove the ESP module. Now you need to disconnect the connector with wires from it.
- Locate the three screws at the bottom of the door that secure the trim to the door. Turn them inside out.
- This way you got rid of all the screws and fasteners. Now you need to take a flat-head screwdriver and carefully pry off the casing at the bottom.
- Unsnap all eight clips, which are indicated in the diagram, starting from the bottom of the door. Be careful at this stage: broken fasteners are quite difficult to repair.
- Carefully remove the trim. If done correctly, you should encounter almost no resistance.
Location of the main screws that prevent the removal of the casing
removing the door lock button screws in the pocket under the mat three screws securing the trim Your car door will look like this as a result.
after you remove the trim, your door will look like this
Due to their small size, screws and clips are often lost. To make the reassembly process easier for yourself, before starting work, prepare a container where you will put all the small parts.
To install the trim in place, place it against the door. Make sure the fasteners are in place. Insert and tighten the lock button. Thanks to this, you can pre-fasten the door components. Make sure the handle fits into its hole. Now you can snap all the clips into place and screw the screws back in.
Video: how to properly remove the trim from a Lada Priora car with your own hands
From the back door
The procedure for removing the trim from the rear door of a Lada Priora is not much different from what was given in the instructions for the front door. The exception is when working with window lifters: here they have a slightly different mechanism.
- Unscrew the door lock button and remove it.
- Using the same screwdriver, carefully press out the window lifter handle lock.
- Pull out the handle itself and its lock.
- Remove the screw holding the inner door handle trim.
- Remove the trim using a flathead screwdriver.
- Remove the two screws located in the small pen pocket under the rubber mat, and then remove the pen.
- Starting at the bottom of the door, remove the trim from the clips. The operating principle is the same as for the front door.
The rear door is assembled in the reverse order.
Be careful when working with wiring, especially those for window regulators. It is quite thin, so it can tear easily.
As you can see, the process of dismantling both the front and rear door trim of the Lada Priora is not particularly complicated and does not require many tools. A set of two screwdrivers will be sufficient. To avoid damaging the door, follow the main rule: not only unscrew the screws, but also remove the parts attached by them. All additional elements, such as door handles or window lifters, will greatly interfere with the process of removing the trim. If you strictly follow all the instructions, you can easily disassemble and reassemble the door trim without resorting to the help of specialists from car services.
- Author: Natalya K.
vazweb.ru
Dismantling and installation of Priora door trim
To remove door cards you need:
- flat screwdriver;
- crosshead screwdriver;
- door card clips.
The procedure for removing the casing is as follows:
- Unscrew the bolts securing the door handle;
- Unscrew the bolts securing the power window control module (on the front doors);
- remove the power window control module and the mirror adjustment system (on the front doors);
- disconnect the wires going to the controls (on the front doors);
- remove the door handle;
- unscrew the three screws securing the casing;
- remove the door lock control button;
- remove the door card by unclipping the fastening clips.
Important: during the dismantling process, the plastic fastening clips often break. Therefore, you need to prepare new fastening clips needed for subsequent installation of door cards.
Installation is in the reverse order.
Step-by-step instructions for removing the rear door trim
Roughly speaking, the principle of operation is absolutely the same as with the front door. The only significant difference is that the rear door does not have a lift-lowering mechanism.
- Using a flat-head screwdriver, you should unfasten and push aside the mounting handle that raises the window of your car.
- Unfasten the handle mechanism and its lock from the shaft using a screwdriver.
- Remove the screw that secures the door handle trim, located inside the trim, and move it to the side.
- Use a flathead screwdriver to pry up the trim and remove it.
- Ready!
Painting the door trim of “Priora”
To complete the work you will need:
- White Spirit;
- primer for plastic surfaces;
- auto enamel;
- car varnish
If you don't have a spray bottle, primer, enamel and varnish must be taken in an aerosol container.
Painting the Priora door trim is done as follows:
- clean and wash the surface of the casing;
- degrease the front surface of the cards with white spirit;
- apply 1-2 layers of primer;
- apply 2-3 layers of paint;
- cover the surface with matte varnish.
Removing Priora door trims
| We decided to do the sound insulation ourselves or simply repair something inside the door (ESD, door handle, etc.), then we will need to remove the door trim . |
| LADA Kalina door trims are secured using bolts and special plastic holders (clips). There is a possibility that the clips will break when removing the upholstery (especially in the cold season), so it is recommended to buy new clips in advance. |
To remove the door trim you will need a straight and Phillips screwdriver. Before starting work, disconnect the negative cable from the battery.
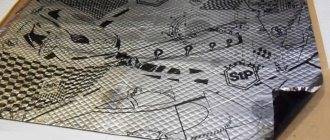
Priora door panel trim
To cover door cards with leatherette you will need:
- 4 meters of furniture leatherette;
- glue “Moment” or equivalent (0.5 liters per door);
- brush;
- "Super glue";
- stationery knife;
- construction hair dryer;
- fabric gloves;
- White Spirit;
- antenna cable with a diameter of 5 mm.
The covering of Priora door cards is done one by one, one by one. Produced as follows:
- remove door cards;
- clean and wash the surface of the casing;
- cut a piece of leatherette in accordance with the size of the casing (so that they overlap 15 cm over the edges of the casing);
- degrease the sheathing surface with white spirit;
- Using a brush, coat the surface of the door card with glue;
- wait until the glue begins to dry;
- Using a brush, lubricate the underside of the leatherette blank with glue;
Important: the glue on the upholstery and leatherette must be applied in a thick layer!
- wait 10 minutes;
- place the workpiece on the casing in the area of concave areas;
- press the leatherette onto the trim;
- using a hair dryer turned on at low power, warm up the leatherette in the area of the concave areas;
- With a hand wearing a fabric glove, carefully press down and smooth the heated areas of the leatherette;
- move to the convex places of the covering, also heating and smoothing the leatherette;
- last of all, glue the leatherette to the inside of the door card;
- cut pieces of the antenna cable so that it fits in size to the junction of the plastic sheathing elements with leatherette;
- Glue the cable with “Superglue”, hiding the joints.
After completing one door card, you can move on to the next one.
After the glue has dried, all that remains is to install the door cards in place.
Door cards covered with leatherette have an excellent appearance and good performance characteristics.
Reinforced "Hedgehog" pistons for interior door trims of VAZ 2108-21099, 2110-2112, 2113-2115
Reinforced upholstery clamps Raymond for Lada Priora, Kalina 2, Granta, datsun
Original interior driver's door handle Lada Priora
Door stops with 3 locking positions for VAZ 2110-2112, Lada Priora
Original front door interior mirror trims for Lada Priora
Door limit switch for VAZ 2108-21099, 2110-2112, 2113-2115, Lada Priora, Kalina
Ultra fabric for upholstery of door upholstery 1x1.5m
“Hedgehog” fasteners for trunk lid trim (5 pieces) for Lada Kalina, Kalina 2, Priora, VAZ 2108-2115
Original inner rear door trim “Corners” for Lada Priora sedan, hatchback
Set of brackets for fastening the front door handle of Lada Priora
Original interior passenger door handle for Lada Priora
Eco-leather “Rhombus” for reupholstering door upholstery, 4 pieces 66x24cm
Removing Priora door trims
| We decided to do the sound insulation ourselves or simply repair something inside the door (ESD, door handle, etc.), then we will need to remove the door trim . |
| LADA Kalina door trims are secured using bolts and special plastic holders (clips). There is a possibility that the clips will break when removing the upholstery (especially in the cold season), so it is recommended to buy new clips in advance. |
To remove the door trim you will need a straight and Phillips screwdriver. Before starting work, disconnect the negative cable from the battery.
Installing door trim
Installing the upholstery on the doors of the Lada Priora is carried out in the reverse order. The upholstery is applied to the door, pressing firmly on the places where the hedgehog fasteners are located, the upholstery is pressed onto the fasteners with characteristic clicks. Then tighten the bottom screws. A door opening hook with its own lining is installed. The locking button is screwed in. The control unit is inserted.
Of course, the Lada Priora door trims are in no way inferior in quality, design, and functionality to the door trims of foreign cars. Thus, they create an atmosphere of European comfort in the Lada Priora cabin.
How to remove the rear door trim on a Lada Priora - Do-it-yourself vase repair
If you need to fix any problems with the rear door, you will need to remove the trim. You can do this yourself, read more below.
We remove the rear door trim on the Lada Priora:
The Priora door trim is held on by pistons and screws.
Unscrew the two TORX screws in the door handle, under the rubber mat.
Using a figured screwdriver, unscrew the self-tapping screw inside the niche of the door handle.
Unscrew the door lock latch.
Now the trim is held in place only by plastic clips around the perimeter of the door.
We pull the casing towards us, gradually snapping off all the pistons starting from the bottom. Then we lift the trim up a little and disengage it from the glass opening.
We completely remove the door trim.
I hope you were able to remove the door trim. I advise you to pay attention to the small styling: do-it-yourself rear lights in red film.
vazgarage.ru