Types of mixers for 2nd generation gas equipment for carburetor and injector
Last updated - October 12, 2020 at 12:28 pm
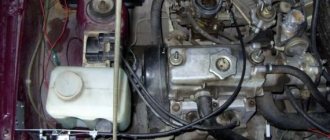
Gas equipment of the 1st, 2nd, and 3rd generations on injection and carburetor cars operates on the principle of ejection. Gas is supplied to form the air-fuel mixture in such a system through an LPG mixer or an insert is installed.
In this article we will talk about methods of supplying gas fuel to the engine, which one is better to choose and how to install it.
Faucet types
Based on their design, 2nd generation LPG mixers for injectors are divided into two types:
- streaming
- ring with holes or slotted (external/internal)
Since injection engines are equipped with additional sensors at the intake, and the second generation of the gas system has a tendency to backfire, mixers come with built-in anti-pop to protect the intake tract.
Basic circuits for the carburetor:
- mixer on the housing lid
- spacer in front of throttle block
- inserts into the area of large diffusers
The operating principle is the same for all methods of gas supply. Due to engine operation, a decrease in pressure (vacuum) occurs in the intake system, while masses of air carry gas fuel with them. The more the internal combustion engine sucks in air, the more gas enters the combustion chambers.
The design of the mixer is made in the form of a diffuser, which facilitates mixing of fuel with air.
Which one to choose for the injector
The main disadvantage of installing an external slot mixer on an injection machine is that you often have to shorten the suction manifold pipe. Also, if a “cracker” mixer is installed, due to explosions, the valve bends in the opposite direction, which makes it difficult for air to pass through.
There are cases of valve tearing off (a common problem with firecrackers with curtains attached to rivets). After which the remains of the rivets and the curtain fly under the intake valve, causing damage to the CPG.
The solution to the problem is to install a flow mixer and separate installation of an anti-cotton valve in the plastic air filter housing. This design is less useful for protecting electronics because the blast wave will pass through the MAF/MAP sensors. Inserting a safety valve into the manifold (made of plastic) will work more efficiently.
Installing an in-line mixer will also require breaking the integrity of the pipe. This mixer is placed inside the corrugation with a hole cut for the fitting.
In terms of performance, all devices are designed for a specific car brand.
Which is better for the carburetor
Due to the lack of electronics, the carburetor circuit does not require such protection.
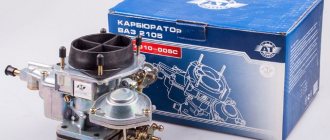
To supply gas to the carburetor, with minimal modification, a universal “turtle” mixer, also known as a burner, is placed on the cover of its body (suitable for Solex).
The advantage of “turtles” is quick installation. You just need to make a hole in the air filter housing for the gas supply fitting. The downside of the burner is that it significantly blocks the air flow and chokes the engine.
To modify the mixer, holes are drilled in its cover opposite the air jet of the main dosing system or washers are placed to lift the cover.
A diffusion-type mixer, when installed on the carburetor body, does not require any modifications at all. Its disadvantage is that it blocks the channels for equalizing the atmospheric pressure of the float chamber (not on all models).
If installed correctly, a spacer under the carburetor can work well, but there may be a number of significant disadvantages:
- idle problems
- no suction
- there will be no possibility of cold start (in summer)
- if over-tightened, the carburetor body is deformed
- the distance between the axes of the starting device and the damper increases, which leads to their inconsistent operation
- not significant, but disrupts heat exchange
- Removal and disassembly of the carburetor is required
- the required vacuum is not provided
- adjustment becomes more difficult. When only the first chamber is open, air flows from the second chamber (the mixture becomes leaner)
In addition, the quality of the products suffers greatly. A couple has to glue the halves of the mixer. File off the protruding screws and cut out new gaskets that partially cover the windows.
Inserting an LPG into a carburetor is the most balanced solution between economy and engine power. Screwdrivers have proven themselves both on old foreign cars and in the entire line of the VAZ family. When installed correctly, they work ideally with Solex, Weber, OZONE, K-151, etc. carburetors. Advantages of the inserts:
- stable behavior of the car on petrol/gas
- even XX
- customizable
- trouble-free starting on gas with suction
- no loss of dynamics
- possible reduction in gas consumption (10-15%) compared to the spacer
Carburetor problems when the engine is running on gas
Most often, owners of cars with a high level of gasoline consumption switch them to gas. Let us give as an example the option of switching a Gazelle gasoline carburetor engine to bottled gas.
In this case, problems await every driver of this equipment. The most basic of them is long and hard work, which sometimes leads to charging the battery when starting in the cold season. When installed on cars with balloon equipment, spacers are usually placed between part of the throttle valves and its main body.
When the distance between the 2 parts of the carburetor increases due to the installation of a thick gasket, the operation of the starting system on a cold engine is disrupted. It works uncertainly, as drivers say, “it doesn’t grab hold,” so the foot constantly presses the gas pedal, while the hands are busy with the ignition key and the choke handle.
When running on gas in the summer, a loose choke does not affect the starting of the car, but starting a cold engine in winter is done only on gasoline. With constant vibration, the car's threaded connections loosen, and the screws securing the carburetor flap axles loosen.
However, any motorist can easily get rid of this problem. To do this, it is necessary to make some changes - we weld an additional bar to the air damper rod. This change allows us to compensate for the difference in the distance of the classic (original) gasket between the parts of the carburetor and the installed gas spacer.
When choosing LPG, owners of carburetor cars face a number of problems. Such problems include options for introducing gas supply to the carburetor. Today there are several connection options. Let's look at them.
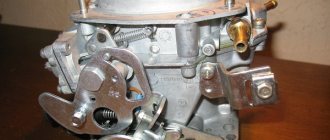
Separate mixer by chambers and spacer
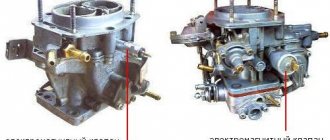
Mixer for carburetor DAAZ OZONE
This set will completely satisfy the inexperienced driver. The mixer-spacer will allow you to connect the LPG without changing the design of the carburetor. All you need to do is remove the internal textolite gasket and install the mixer. This option is available for all carburetors of the “classic” VAZ family. Also, the dispenser shown in the figure above will allow you to achieve the desired dynamic properties and savings. This is probably the easiest installation method for carburetor cars.
Mixer for carburetor and mechanical dispenser
Mechanical dispenser without separate adjustment
This combination is the easiest to install. You don't even need to remove the carburetor during installation. Simply unscrew the nuts that secure the air filter housing, remove the metal pressure plate, install the mixer and screw everything back with nuts. The only thing you need to do is cut a hole for the hose in the air filter housing. In this example, adjustment is easiest.
But the method is not without drawbacks. The first of them is the loss of dynamics on both gas and gasoline. This happens due to a decrease in the flow area of the air supply. And the composition of the mixture cannot be adjusted perfectly. In any case, the mixture will be either “poor” or “rich”. But the plus is the ease of installation. This method is suitable for any carburetors.
Insertion of fittings directly into the carburetor and separate adjustment
It can be said that this is the most complex and at the same time the most correct option for connecting LPG. This method is quite complicated, since it requires knowledge about the structure of the carburetor and very straight hands. If in doubt, it is better to contact a turner or a service station. But the biggest advantage is that you can almost perfectly adjust the LPG if you use a regulator with separate supply to the chambers. This installation option is suitable for owners of cars with a SOLEX carburetor. The downside is that we are drilling the carburetor, and returning it to its previous condition will be very problematic.
How to install HBO on a Solex carburetor through inserts with your own hands
When connecting gas to a Solex DAAZ carburetor you will need:
- drill with metal drill Ø 9mm
- tap M10*1
- nozzles (2 pieces)
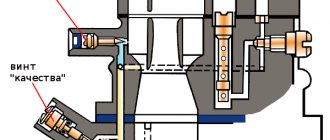
The main thing when drilling is to maintain distances so as not to touch important channels, rods, adjusting screws, and take into account the proximity to the installation holes. In this case, you need to place the screws where there is the fastest air flow and the thickest walls for threading (large diffuser).
It is necessary to mark the drilling locations at the same level - 35.5 mm from the sole (so that there is no pressure difference). Drill holes and then cut threads in the direction of the flow.
To install the mortises, you must first shorten them and cut them at an angle of 45° (to the threaded part). The fittings should be screwed in with a minimum protrusion, with the cut down. They should not block the small diffuser . The tightening force must be sufficient to withstand vibration.
It is advisable to use a one-piece thread locker during installation, but this is not necessary, since the screw thread is conical.
In the same way, it is possible to install inserts on the Ozone carburetor.
You may be interested in an article about adjusting 2nd generation HBO.
Video on how to properly make inserts in Solex:
Carburetor gasket: types and materials for making it yourself
Numerous gaskets and washers can be rubber or cardboard; paronite is also used for this purpose, which is used in places where the operating temperature of the unit does not allow the operation of rubber or paper parts. In addition, to ensure sealing of components operating in particularly harsh conditions, a textolite gasket is used.
A device that uses all types of the listed materials is the carburetor, and despite the fact that this part is no longer used to prepare the working mixture in modern cars, a garage mechanic may need information on how to change or make a gasket for this part.
Types of gaskets used in the carburetor
The following types of gaskets are used in the carburetor:
- Gasket between carburetor and intake manifold. In most engine models, this part is made of paronite. This part is installed directly on the collector plane;
- Thermal insulation gasket. This part is also installed under the carburetor. The thermal insulation gasket is usually made of textolite, so it copes with its function perfectly;
- Lower carburetor gasket. This part is installed between the heat-insulating gasket and the carburetor flange. The lower carburetor gasket is made of metal-textolite material. This gasket perfectly prevents the formation of leaky areas in the lower part of the carburetor mount;
- Upper gasket. This part is installed between the carburetor and the air filter pipe. It is made of dense rubber, therefore it provides a tight connection, preventing the leakage of untreated air;
- Carburetor cover gasket. It is made of thick cardboard and serves to reliably seal the two halves of a Solex carburetor. The Solex carburetor gasket most often causes carburetor malfunction, but this problem can be easily solved if the old gasket is replaced with a new one.
Replacing the cardboard spacer
Installing a cardboard gasket will not take much time, but when carrying out this operation, care and caution are required so as not to damage the fragile internal parts of the carburetor, as well as to eliminate the possibility of dust and dirt getting inside the float chamber.
Carburetor gasket sets can be purchased at an auto parts store or ordered online. In the latter case, you definitely won’t have to stand in line.
For Solex carburetors you can find cardboard gaskets sold separately. In this case, the cost of repairs will be almost invisible to the budget.
After the carburetor is removed, the five bolts that secure the cover are unscrewed. The cover is then removed and the float is removed, which is held in place by a pin.
The pin should be carefully knocked out of the hole using a thin nail and a hammer.
When the pin is removed, the float is disconnected from the needle and completely removed. The old gasket can now be easily removed from the top cover of the carburetor, and a new cardboard piece installed in its place.
Then we assemble the carburetor and install it in the reverse order of removal.
Tightening the carburetor bolts that hold the top cover must be done evenly and crosswise to prevent misalignment and the possible leakage of air into the carburetor mixing chamber in this case.
How to make a gasket yourself
You can make the carburetor gasket yourself. This need arises when it was not possible to find an original spare part. To make the gasket you will need the following tools and materials:
- Thick cardboard;
- Nail scissors;
- Fountain pen refill.
To make the gasket, you can use any thick cardboard. The thickness of the material should be about 0.8 mm. If the thickness is greater, then such cardboard can also be used to make a gasket, but in this case it will be necessary to additionally adjust the position of the carburetor float.
To make the gasket, you will need to remove the carburetor from the engine. Then the lid and float are removed in the manner described above.
The old gasket is removed and the surface of the carburetor cover is cleaned of traces of gasoline.
Then the ballpoint pen is cut with scissors and a thin layer of ink is applied to the surface of the carburetor cap.
The next stage of gasket manufacturing must be performed as carefully as possible. The cardboard must be leaned against the carburetor cover and lightly pressed against the surface of the part, but in such a way that the sheet does not move at this moment. Then the cardboard is sharply separated from the surface of the part with the ink applied.
After this procedure, an exact imprint of the horizontal plane of the lid will be displayed on the cardboard sheet. Using nail scissors, cut out the gasket for the carburetor using this imprint.
Holes for the cover bolts can be made using a spent cartridge case of a suitable diameter. For this purpose, the gasket blank is placed on a wooden board, and the hollow side of the sleeve is applied to the designated places under the holes, and precise blows are applied with a hammer from the side of the capsule socket.
The manufactured gasket is installed in the usual way, but if the thickness of the cardboard used to make the gasket differed significantly from the original one, then it is necessary to adjust the position of the float in the chamber, as well as adjust the operation of the carburetor in idle mode.
Blitz tips and tricks
- The efficiency of the engine and its dynamic performance depend on how the carburetor gaskets are installed, so if problems arise in the operation of this device, you must immediately begin replacing the gasket;
- It is possible to make yourself not only a product from cardboard, but if you need a homemade textolite gasket, then it is made from a sheet of textolite of suitable thickness. In this case, the material is processed using special scissors;
- If necessary, the rubber gasket for the pipe can be made of dense rubber of suitable thickness. Holes for bolts in the rubber gasket are made using a drill and twist drills, but the gasket must be securely fixed between two wooden boards;
- Before purchasing a gasket in a store, you need to disassemble the carburetor and see what the part costs;
- Thermal insulating gasket can be installed in the amount of 2 pieces, when a suitable thickness of the part cannot be found, or the textolite for self-production is not suitable for this parameter. Thermal insulation, in this case, is not compromised, and the unit can be used under normal load conditions.
Replacing the carburetor gasket or making it from cardboard will not be difficult, but you should be very careful about the selection of material, as well as the accuracy of manufacturing this part. After replacing the product, the carburetor is installed on the engine and the engine is test run, as a result of which it will be clear how correctly all repair operations were performed.
If you have any questions, leave them in the comments below the article. We or our visitors will be happy to answer them
swapmotor.ru
Inset options
In the situation with 2nd generation HBO, the insertion of HBO into the carburetor may vary, and depends primarily on the model of the car. For each specific case, experts consider the most optimal option:
- A simple way is to install a spacer mixer with a divider between the chambers. It is not intended to be inserted into the carburetor body. No need to drill anything. In this way, gas is often inserted into the ozone carburetor. It is necessary to remove the textolite gasket and install the gas mixer. This manipulation can be done with classic types of carburetors. The gas mixer is equipped with a power register. Has two outputs with autonomous adjustments. The register performs a useful function for fine-tuning the gas supply. You can effectively adjust the dynamic characteristics and save gas fuel. This option is very popular due to its simple installation.
- Another simple way is using a faucet, which car owners nicknamed the turtle because of its appearance. There is no need to remove the carburetor during installation. Unscrew the fastening nuts on the air filter, remove the pressure plate and install the turtle. Then all that remains is to put back the unscrewed nuts. The only modification is that you need to drill out the entrance for the gas line in the filter housing. The adjustment is carried out by a dispenser, which has an inlet and an outlet, as well as an adjusting bolt. You must be prepared for some loss of car dynamics when running not only on propane, but also on standard fuel. This factor is inevitable due to the narrowing of the air flow passage. It is possible to expand it by placing washers under the bolts. It will be more difficult to adjust the gas-air mixture using this method. It turns out to be “poor” or oversaturated. The advantage is simple installation. Suitable for all types, including ozone, daaz or weber.
- It is possible to insert into the LPG carburetor with separate adjustment. This is the way to install 2nd generation HBO on a Solex carburetor. The path is more complicated, but according to most experts, it is the most correct when it comes to connecting gas equipment. Such an insert is entrusted to installers or turners who are well acquainted with the principle of operation of the fuel system and have golden hands. You can “squeeze” the gas supply setting to the maximum from the obsolete HBO 2. In this case, a regulator is used with an autonomous fuel supply to the cameras.
The insertion method is considered the most difficult, but also the most profitable. However, inserting an LPG into a Solex carburetor is possible if the car owner is sure that he will not remove the gas, otherwise he will have to plug the insertion fittings.
Replacing the cardboard spacer
Installing a cardboard gasket will not take much time, but when carrying out this operation, care and caution are required so as not to damage the fragile internal parts of the carburetor, as well as to eliminate the possibility of dust and dirt getting inside the float chamber.
Carburetor gasket sets can be purchased at an auto parts store or ordered online. In the latter case, you definitely won’t have to stand in line.
For Solex carburetors you can find cardboard gaskets sold separately. In this case, the cost of repairs will be almost invisible to the budget.
After the carburetor is removed, the five bolts that secure the cover are unscrewed. The cover is then removed and the float is removed, which is held in place by a pin.
The pin should be carefully knocked out of the hole using a thin nail and a hammer.
When the pin is removed, the float is disconnected from the needle and completely removed. The old gasket can now be easily removed from the top cover of the carburetor, and a new cardboard piece installed in its place.
Then we assemble the carburetor and install it in the reverse order of removal.
Tightening the carburetor bolts that hold the top cover must be done evenly and crosswise to prevent misalignment and the possible leakage of air into the carburetor mixing chamber in this case.
Insert or spacer, what to choose?
Inserting gas fittings into a Solex carburetor is more beneficial from the point of view of saving fuel consumption and maintaining the dynamics of the internal combustion engine. The spacer has the disadvantage of blocking the air flow. However, there are types of construction in which it is impossible to physically make an insert or, conversely, install a spacer. For Solex it is definitely better to choose the way of introducing fittings.
If you need to maintain dynamics and maintain moderate fuel consumption, you can consider the option of a spacer mixer with a chamber separator, or use the insert option. If simple installation is important and you absolutely cannot tamper with the fuel system, the turtle is ideal.
Solex carburetor
There is the possibility of inserting a gas fitting into the carburetor for installing LPG, which has a separate adjustment. The second generation gas equipment is installed on Solex. This option is much more complicated. However, according to professionals, it is the best for installing gas equipment.
To adjust the fuel supply, there is a special regulator that provides autonomous gas supply to the chambers. The method of inserting gas into a Solex carburetor is considered the most complex, but very profitable. This option can be used under one condition. The owner of the car will never remove gas equipment. Otherwise, it will be necessary to plug the embedded fitting.
Advantages and disadvantages
Let's summarize. There are certain advantages that come with installing a spacer mixer with a chamber separator:
- there is no need to make holes in the carb;
- you can fine-tune the gas supply dosage;
- engine dynamics are maintained;
- installation is not difficult.
The main disadvantage of this method:
- Suitable only for components of engine power supply systems of the “classic” series.
The advantages of the turtle mixer are obvious:
- very simple installation;
- Only the air filter housing needs to be drilled;
- Suitable for all types of carburetors.
Disadvantages of choosing a turtle for installing gas equipment that cannot be avoided:
- it is difficult to adjust the gas-air mixture;
- The engine dynamics are significantly reduced.
The most advanced method, but also the most difficult, is insertion. It has its clear advantages:
- significant fuel savings compared to the other two options;
- does not affect the dynamic characteristics of the engine;
- Can be installed on a Solex carburetor.
This method has one drawback, but it is significant:
- After modification, the carburetor cannot be returned to its previous state.
All three methods are available for HBO 1st, 2nd and 3rd generations. Definitely, the final choice is up to the masters of a certified center for installing gas equipment.
Replacing the cardboard spacer
Installing a cardboard gasket will not take much time, but when carrying out this operation, care and caution are required so as not to damage the fragile internal parts of the carburetor, as well as to eliminate the possibility of dust and dirt getting inside the float chamber.
Carburetor gasket sets can be purchased at an auto parts store or ordered online. In the latter case, you definitely won’t have to stand in line.
For Solex carburetors you can find cardboard gaskets sold separately. In this case, the cost of repairs will be almost invisible to the budget.
After the carburetor is removed, the five bolts that secure the cover are unscrewed. The cover is then removed and the float is removed, which is held in place by a pin.
The pin should be carefully knocked out of the hole using a thin nail and a hammer.
When the pin is removed, the float is disconnected from the needle and completely removed. The old gasket can now be easily removed from the top cover of the carburetor, and a new cardboard piece installed in its place.
Then we assemble the carburetor and install it in the reverse order of removal.
Tightening the carburetor bolts that hold the top cover must be done evenly and crosswise to prevent misalignment and the possible leakage of air into the carburetor mixing chamber in this case.
HBO for carburetors of different types of installation
1. Mikhail (18 years of experience) “ Installing an LPG on a Solex carburetor is only possible using an insert. There is a mixer that is installed on top of the carburetor, but it is better, of course, to insert a fitting. The fitting is located directly above the damper, thanks to which the gearbox instantly reacts to changes in vacuum, improving the dynamics of the stroke.”
2. Alexey (more than 10 years of experience) “The insertion of gas fittings is certainly better. The preparation of the mixture in the 2nd generation HBO for the carburetor occurs in the intake manifold, and not above the throttles. When inserting, good suction performance is maintained. The fittings are cut in so that they protrude a few mm into the diffuser; you should not screw it in to its center. The insertion is made separately into each chamber.”
3. Oleg (11 years of experience) “When installing LPG on an OZONE carburetor, it is easier to make a spacer between the carburetor and the manifold than to make an insert. From my own experience: on Solex it is better to install a lower mixer, on OZONE it is better to install a lower mixer. When installing a spacer, there is a risk that the carburetor may fail, but even when cutting in, the threads are cut off over time.”
4. Andrey (15 years of experience) “You should understand that the spacer may be between the air supply and the carburetor (not recommended), or it may be the correct one - between the carburetor and the suction manifold. If you can’t find a spacer of the second type, it’s better to use an insert for LPG on a carburetor engine . In one or two chambers - it is decided individually. For example, on nines with a spacer the engine runs worse than with a tie-in, but on sixes it’s the other way around.”
Several advantages of installing a spacer on a gasoline engine
The first and main thing is to prevent deformation when the engine body is very hot and to prevent the carburetor from overheating and disrupting the operation of the device. Models from brands such as Solex and Ozone are most susceptible to such “diseases”.
Here are some more benefits of installing a thick gasket when installing on a gasoline carburetor engine:
- If there is no spacer between the carburetor sole and the cylinder head body, the temperature is transferred to the device, strong heating occurs, so on a hot engine you will have to turn the starter for a long time before the engine grabs gasoline and starts. This occurs due to the acceleration of the evaporation of gasoline vapors; in addition, the specific density of the delivered fuel increases due to the high temperature and saturation of the combustion chamber with vapors;
- Having tightly tightened the nuts on the device to ensure a reliable connection and the impossibility of gasoline leaks, at the first heating the sole warms up and the deformation process begins. With subsequent inevitable heating, the deformation increases. Having removed the carburetor for repair, we get a deformed sole. This will cause the engine to run on three cylinders on a cold engine, and subsequently the engine will constantly fire. There will be air leakage along the lower flange and the intake manifold. Such a malfunction will require correction of the deformed sole; if the damage is severe, the sole or the carburetor itself will need to be replaced. Straightening the flange, and in case of severe deformation, milling - these works may involve a fuel supply system that is not equipped with a platform for the combustion chamber. None of even the most trendy sealants can help here;
- With many methods advertised on the Internet, a textolite sole under the carburetor, in the opinion of many car enthusiasts, should be installed on every car. However, you should be wary of fakes. You can often see a textolite spacer with an additional layer of unknown material on display. After a short period of time, it dries out or decomposes even worse, the performance and power of the engine drops due to a malfunction.
Advice from professionals
When installing a spacer on a gasoline carburetor, calmly install an industrial (standard thickness) gasket with two holes. When the engine is running on gas, it is better to install a spacer that is a little thinner and with one wide groove for the carburetor of the classic Zhiguli type “Ozone”, but for the Solex carburetor a gasket with two separate holes is better suited. This is done to prevent the sealing gasket from closing the channels and holes on the device body on the heel part.
Installing a thick gasket between the carburetor and the engine body increases the fuel flow through the accelerator pump. During this operation, a stream of gasoline hits a certain place between the fuel valve and the housing wall. This operation increases the dosage while reducing the amount of fuel consumed and reduces the combustion time.
If the system is faulty, the stream of oxygen-enriched fuel does not flow correctly, and drops form on the chamber wall. This reduces the quality of the carburetor and causes interruptions in engine operation. When installing a spacer with smaller holes for the chambers, a kind of step is formed, fuel will not be supplied in full, and the car will stall and freeze when revving up. If you cannot find the original gasket, it is better to purchase a spacer with large holes (of course, within reasonable limits).
If the studs are out of order, or the length of the relatives is not enough, there is no point in panic. Buy long studs of the required diameter and thread pitch, screw a nut onto one of the ends. We mark the length of fasteners we need and cut them with an angle grinder. Try to cut straight, but if your hand shakes, it's okay. Grind to a smooth edge and twist the nut. We have a hairpin of the length we need.
As for installing a spacer under the sole when installing gas equipment on an engine, there is still no clear answer to the question of why this part is needed. Car enthusiasts argue about this on forums, and dubious devices based on thick gaskets are also entering the spare parts market, which also does not add to the popularity of this method of improving equipment performance.