Camshaft sensor VAZ 2110 and its replacement
Camshaft sensor
Most mechanics and motorists agree on one opinion. The VAZ 2110 camshaft sensor is a part without which the car, or rather its engine, will never start. Since the camshaft position sensor on the VAZ 2110 is very important, it is necessary to concentrate a lot of attention on it.
Kinds
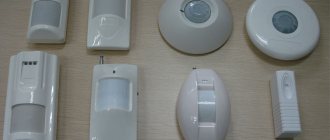
Depending on the engine modification, the VAZ 2110 camshaft sensor has two types of design:
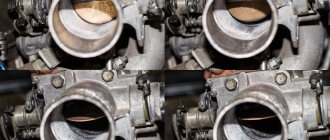
- Slotted. The sensitive element is U-shaped, and the moving element (mark) of the setting disk passes between its halves.
- Tortsevoy. It has the shape of a cylinder, at the end of which there is a sensitive element for reading the proximity of the mark.
For each type of DPRV, the corresponding type of camshaft pulley is used. For a slotted DPRV, a pulley with teeth and one air gap along the entire circumference is used. When the gap passes, the sensor transmits a corresponding signal. For an end-mounted DPRV, a pulley with one mark or one tooth at the end of the pulley is used. The DPRV reacts when it passes a protruding pulley element.
DPRV on VAZ 2110 8 valves or 16 valves have no functional or design differences.
Why is it needed and checking the sensor
VAZ 2110 camshaft sensor
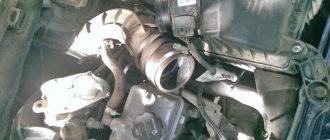
This electromagnetic sensor is used in the car to carry out most operations, which is sent by the on-board control system. Its readings are very important, since without this data it will be impossible to synchronize the ignition system and injector operation. It is this small device that allows you to distribute the time between supplying the fuel mixture to the engine cylinders. Its location is very simple. It is located on a bracket near the generator drive pulley. Sometimes, problems with this device can be mild. All you need to do is take a few simple steps and you don’t have to worry about replacing the device. Frequent problems with constant use of a car may include:
- When using a car, dirt gets onto the sensor from the timing belt. It forms on the belt as a result of oil leakage from the engine cover. The consequences of such an accumulation of dirt can be problematic starting of the car, poor acceleration, low speed (rarely exceeds 3,500 revolutions).
Note: at such moments the emergency button stops lighting. The first few days may be accompanied by an error generated by the on-board computer, after which it displays a message indicating a faulty camshaft sensor. This situation is very interesting, since if the sensor is faulty, the car cannot be started. If the sensor breaks while driving, the car continues to move. Once the engine is stopped and turned off, it will be impossible to restore the vehicle's operation. If the engine continues to run, this means that the sensor is working and the problem of failure lies elsewhere.
- The vehicle continues to function normally. The ride doesn't stop. The on-board computer may provide information about problems with the camshaft sensor. To solve this problem, you need to slightly move the connection wires. Strong vibration of the car while driving can cause one of the contacts to disconnect. Also, you should clean the terminal from possible rust formation or check all wiring from the sensor to the on-board computer (panel).
- The car stops functioning completely. The engine stalls, and attempts to start it again are unsuccessful. To resolve this problem, you need to check the wiring. Sometimes, the sensor may accidentally come into contact with a hot exhaust manifold. If this situation occurs frequently, the sensor may burn out.
To be more confident in the serviceability of the sensor, it is necessary to carry out a full check of it. A car stops starting for many reasons. The reason will not necessarily be hidden in the breakdown of this mechanism. If you are not sure that the sensor is faulty, you need to check some systems:
- The camshaft sensor must be removed.
- Using an ohmmeter (multimeter), the resistance on the winding of the device is measured.
- In the case when the device readings go beyond 550 Ohms to 750 Ohms, we can confidently say that the sensor is broken and requires replacement.
VAZ 2110 camshaft sensor malfunction
If the sensor breaks down, it must be repaired. To replace the sensor, you must purchase a new device. Its cost will not be too high and in most cases, its price is insignificant compared to other car parts.
Replacing the camshaft sensor
Replacing the sensor if it malfunctions
When the camshaft sensor is certain to be damaged, it is necessary to remove it. To carry out this work, you must use an ohmmeter. Also, it would not hurt to familiarize yourself with the basic safety rules when working on a car’s engine control system. After familiarizing yourself with the rules and preparing the necessary equipment and tools, you need to perform the following actions:
- The car is prepared for work to replace equipment: washed, cleaned and installed in a fixed position.
- The decorative trim on the car engine is removed.
- The latch is released.
- The wire terminal that connects the mechanism itself to the machine wiring is disconnected.
- The negative probe of the ohmmeter must be mounted on the car body.
- The car ignition is turned on.
- An ohmmeter takes the necessary measurements. You should bring the free probe of the device to the wire block.
Note: the voltage that will be shown on the ohmmeter should not show a result of less than 12 V. If it is less or completely absent, the battery is discharged. Also, the reason may be a malfunction of the power circuit or the ECU.
- Using a socket wrench with a stroke of 10 millimeters, unscrew the two connecting bolts of the sensor with the bracket.
- The sensor can be removed from the vehicle without much effort.
Note: The final test for sensor failure can be carried out in the following way. A working mechanism is taken and connected in place of the previous equipment. If the sensor works, new equipment is installed, otherwise it is necessary to look for failure in other places.
To install the camshaft sensor, perform the same operations as those used when dismantling the equipment, but in reverse order. As mentioned above, the cost of a new sensor is negligible. It can be found in any specialty store or at service stations. If there are complications with performing the replacement work yourself, it is best to leave the work to specialists. The corresponding video and photo instructions will be a great help for independent work. This way, you can carry out the entire replacement yourself without errors. The price for this type of service in car services is high, which is for cars with an engine of 8 valves or 16 valves.
Camshaft sensor
Purpose
The components of the camshaft are elliptical cams, each of which acts on its own personal valve, that is, the task assigned to the camshaft is to control the exhaust and intake valves . Although it is driven by a belt drive from the crankshaft, its speed is half the speed of the crankshaft.
Unfortunately, it is impossible to determine which phase of engine operation is currently in operation only by the position of the crankshaft (the compression stroke with the accompanying ignition of the fuel mixture or the moment of exhaust gas emission), then the camshaft position sensor helps the electronic control unit determine the desired phase gas distribution mechanism. The photo below shows how the camshaft acts on the valve: The camshaft cam (1), rotating, acts on the valve (4) through the pusher (2) and the spring (3), the valve seat (6) opens and the exhaust gas moves through the channel (5). gases/fuel mixture from/to the chambers/combustion chamber (7).
Operation of the gas distribution mechanism
Principle of operation
In the domestic automotive industry, sensors that help the engine control system determine the desired phase of the gas distribution mechanism began to be used in contactless ignition systems of carburetor “eights”. It was installed in a distributor, and its operation was also based on the so-called Hall effect. This sensor removes and transmits to the commutator the signal received from a metal shutter that has one slot, which is attached directly to the crankshaft gear (1).
The relative position of the metal disk and the phase sensor
That is, the curtain itself (2) is constantly located between the magnet and the sensor (3) that reads its signals, thereby preventing it from reading the magnetic lines. The slot (4) serves to generate and supply an impulse from the sensor to the electronic control unit (switch). The presented design is designed in such a way that the phase sensor informs the commutator with a pulse precisely at the moment when the compression stroke occurs in the first cylinder . Pulse parameters: slot opposite - the voltage is almost zero, slot to the side - the voltage is almost equal to the voltage in the on-board circuit.
Sensor differences
The above-described design is called slotted and is used in the control system of a 16-valve engine on a VAZ 2112/2110. On a VAZ 2115, replacing the camshaft sensor is somewhat different, since VAZ engines of the 2111 and 21214 series are equipped with end-type phase sensors. It also works on the principle of the Hall effect, only its design does not use a slot, but a special setting mark. In this case, the pulse passes when the tag approaches the phase sensor. Since the distance between them is much smaller than between the sensor and the camshaft itself, when approaching, the magnetic field of the sensor changes, which contributes to the formation of a synchronizing pulse. On engines of the 2111 series, this mark is located on the camshaft itself, and on the 21214 series - on its drive pulley.
Attention! The pulse formation on the 21214 series engine occurs at the top dead center of the fourth cylinder, which falls on the compression stroke.
Symptoms of a problem
Most often, malfunctions in the camshaft timing sensor occur due to simple contamination of the contacting surfaces and a break in the power circuit, in which case:
- The “CHECK” indicator light is on;
- The engine starts only after prolonged rotation by the starter (about ten revolutions);
- Power drops slightly with a simultaneous increase in fuel consumption (problematic to determine);
- Deterioration in dynamics, dips appear during acceleration.
These failures won’t be able to cause anything catastrophic to the engine, but it’s still advisable not to delay repairs, since the cost is low.
When is it necessary to change the engine camshaft sensor on a VAZ 2110?
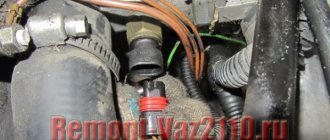
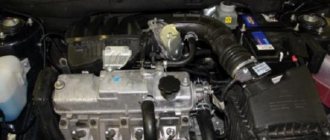
The engine camshaft sensor on the VAZ 2110 is located on the right side of the engine, not far from the cylinder head. If this unit fails, further operation of the engine is impossible, but often the sensor simply begins to act up, which leads to:
- Increased fuel consumption;
- Reduced engine power and thrust;
- Increased vibration and noise under the hood;
- Increasing the average operating temperature of the motor;
- Problem starting the power unit.
The presence of several reasons at once indicates a problematic condition of the sensor itself. You can check the serviceability of the engine camshaft control indicator using a multimeter - just measure the current resistance on the external winding of the unit. Alternatively, the verification procedure can also be carried out using a megger.
According to factory standards, the resistance should be between 550 and 750 Ohms. If the resistance is lower or higher than the value, then the sensor should be considered faulty and a new part should be urgently purchased. Remember, neglecting the timely replacement of the camshaft position sensor seriously shortens the service life of the engine and adjacent systems - it is quite possible that a major overhaul may be required in the near future.
Signs of a faulty phase sensor on a VAZ 2114
Checking the phase sensor of a VAZ 2114 with an 8-valve engine is possible using a multimeter. Signs of a malfunction may vary from person to person. Most often, failure of the DPRV is manifested by the following symptoms:
- Difficulty starting the engine, regardless of its temperature. This is due to the formation of an incorrect composition of the air-fuel mixture.
- Incorrect operation of the power unit at idle. Car owners note the lack of stability in the operation of the power unit at idle. This symptom is explained by the fact that the electronic control unit, due to the lack of data from the DPRV, cannot correctly select the ignition timing.
- Slow response to pressing the accelerator pedal. Reduced dynamic performance of the vehicle. The symptoms are due to the fact that the electronic control unit has selected the wrong air-fuel mixture. The symptom is especially noticeable when shifting to a higher gear.
- Fuel consumption increases significantly. Incorrect operation of the gas distribution mechanism and the lack of information supplied to the control unit make it impossible to correctly select the air-fuel mixture. Supplying a large amount of gasoline leads to excessive consumption.
- Spontaneous stopping of the power unit at idle speed. This is especially common when the engine is not warmed up. This indicates that the ECU has selected the air-fuel mixture too lean.
- There is a dip when you press the gas pedal sharply. The ignition timing is incorrectly adjusted.
The vehicle owner can independently determine the failure of the DPRV based on the above signs. If symptoms appear, replace the part with a known working part. In some cases, it may be necessary to additionally check the functionality of the wiring.
Replacing the camshaft sensor on a VAZ 2110 with your own hands: it’s simple!
To replace or dismantle the control device, you will need no more than 15 minutes of free time, as well as a set of wrenches. The procedure is carried out according to an intuitive scenario, therefore it does not require specialized skills and, if necessary, can be performed even in the field. To replace the camshaft sensor on the “ten” you need to:
- Secure the vehicle on a level surface and then remove the battery. If the battery is not removed, then memory dumps of the old unit will remain in the engine ECU, which can cause problematic operation of the power unit during the first time after repair. Resetting the memory of the engine control unit significantly shortens the time required for engine self-diagnosis;
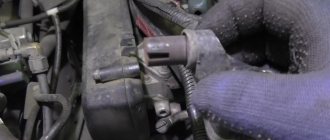
- Next, remove the engine protective cover and find the sensor itself. As a rule, the part is located on the right side of the engine, near the 4th cylinder. On the sensor itself, you need to unscrew all the fasteners and also disconnect the wiring;
- Now it would be a good idea to carry out a number of maintenance activities, namely, clean the wiring contacts from the presence of oxidation sites and remove old sealant residues. If necessary, it is also necessary to replace the power wiring leading to the sensor - often the reason for the sensor’s inoperability lies in problem cables;
- Next, we go through the old sensor or immediately install a new one, having previously coated the mounting location with a new layer of sealant. Then we connect all the wiring and install the battery, after which we test the system.
To diagnose, you need to start the car with the key and wait until the power unit reaches operating temperature. If the engine starts successfully and you can adjust the idle speed yourself, then the procedure for replacing the camshaft position sensor can be considered successful.
Purpose of the DPRV
Such a device is based on the electromagnetic principle of operation and is used to carry out commands from the vehicle control and testing complex. The importance of the device parameters lies in the fact that without them there is no way to synchronize the car’s ignition system and the correct operation of the engine injectors, i.e. set the desired concentration of the air-droplet mixture supplied to the engine cylinders. Finding this sensor is easy. It is located on the high tide near the generator drive pulley.
During operation of the VAZ 2110 camshaft sensor, the price of which is acceptable for Russian motorists, the following problems may arise:
- During operation of the vehicle, dust and mud deposits remain on the product, falling onto it from the timing belt. This is facilitated by oil leakage from the over-valve cover of the power unit. These deposits on the camshaft sensor can lead to difficulties when starting the vehicle, low-power acceleration, low engine speeds that cannot be gained when the tachometer “gives” no more than 3.5 thousand rpm. In this case, the emergency device goes off, the on-board electronic device displays an error for some time, and then classifies it as a malfunction of the camshaft sensor, which in itself is nonsense, because With such a defect, starting the engine is absolutely impossible. If the product fails while driving, the car functions, but after stopping and turning off the engine, it is not possible to start it. If the engine continues to function, the camshaft sensor is working properly, so the defect should be looked for elsewhere.
- The vehicle is moving normally. The electronic device of the car begins to signal about product defects; to stop the receipt of erroneous signals from the detector, you should check the fastening of the wiring in the power compartment. Vibration friction during vehicle movement can cause the absence or weakening of one of the contacts. Additionally, you should sand the battery terminal from suspected oxidation and test the wire connections from the product to the on-board electronic device (front panel).
- The car does not start, attempts to revive the vehicle's engine do not lead to success. To solve this problem, you need to test the electrical wiring and its attachment to the contacts. Check the contact of the sensor with the collector, otherwise the product may fail.
Checking the camshaft sensor "tens"
To eliminate a malfunction of the VAZ 2110 camshaft sensor, a complete diagnosis of the product is required, because starting a vehicle depends on many reasons. It is not a fact that the defect in this product is associated with the problem of starting the car engine.
Then you will have to test a number of other vehicle systems:
- we dismantle the camshaft sensor;
- we measure the resistance value on the external winding of the product using a megger or multimeter;
- If the measurement values are below 550 Ohms and above 750 Ohms, then you can be sure that the sensor is defective.
Replacing the camshaft sensor
Once you are confident that the product has failed, you will need to replace the “ten” camshaft sensor, which must be done correctly, in compliance with all safety rules. For these purposes, it is additionally necessary to use a megohmmeter or multimeter.
For this purpose, the following set of works is carried out:
- The vehicle is being prepared for repair operations and its position must be fixed.
- The car is freed from the protective casing in the power compartment.
- The locking device is brought into the released state.
- The wiring of the product is dismantled.
- We attach the negative contact of the multimeter to the body of the vehicle.
- By turning on the ignition, we energize the low voltage system of the car.
- We make the necessary measurements using a measuring device. We connect the positive contact of the multimeter to the wire block. The voltage parameters on the megohmmeter scale should not be lower than 12 V. If the potential difference is still lower than 12 V or is absent altogether, then the battery requires full charging or there is a defect in the electrical circuit. You also need to check the on-board computer.
- We remove the fasteners of the product with fastening using a “10” wrench.
- Remove the camshaft sensor. The final check for a malfunction of the camshaft sensor is carried out in this way: using an element that is in good condition, we connect it in place of the defective product. During normal operation of the device, the breakdown has been eliminated; in this case, you should look for the fault in another place.
- The reverse operation for installing the DPKV must be carried out according to the “countdown” principle.
Signs of malfunction of the VAZ-2112 phase sensor 16 valves
The phase sensor is used to determine the camshaft position angle. Moreover, this does not happen all the time, but only during a certain period of time. This information is quite important, as it allows you to make the vehicle operate efficiently and smoothly. To be specific, directly to the camshaft itself. This takes into account how the cylinder is placed in the engine. This ensures that fuel is supplied to the appropriate compartment, after which it is ignited.
How does it work
This mechanism works quite simply. At the same time, his role in the whole process is very large. Therefore, it is necessary to monitor the serviceability of the sensor. It forms a pulse that is sent to the electronic unit. As a result, the motor is controlled. At the same time, the amount of gasoline supplied and the opening and closing of the exhaust valves are strictly controlled.
The phase sensor allows you to set the motor operating cycles as accurately as possible. Clearly determines what kind of impulse has been formed and how well it meets the requirements. Install this device next to the cylinder head. The latter is located on the engine where the air filter is located.
Checking the camshaft sensor
Checking the camshaft sensor (DPRV) allows you not only to verify its functionality, but also to make sure that in engines with phased (sequential) injection, fuel is supplied in exactly the required sequence. Another name for the device is a phase sensor (it is often used by owners of domestic VAZs). The test can be performed using a multimeter in voltmeter mode and/or an oscilloscope. Checking the camshaft position sensor is simple in nature, and even a novice car enthusiast can handle it.
What is a camshaft sensor
Before moving on to the question of checking the camshaft position sensor, you need to find out what kind of device it is, what it is needed for and on what principle it works. This will help clarify the details of the audit in the future.
A camshaft sensor is a device that records the angular position of a specified shaft at a specific point in time. The information obtained with its help is transmitted to the electronic engine control unit (ECU), and on its basis this control element issues commands for fuel injection and ignition of the air-fuel mixture in each cylinder at a specific point in time.
The operation of the camshaft position sensor is based on the Hall effect. So, directly on the camshaft there is a metal tooth, which, when the shaft rotates, changes the magnetic field in a nearby sensor. This tooth is called rapper. The sensor detects a change in the magnetic field, which is converted into a low voltage electrical signal. This signal is sent to the electronic control unit.
In fact, the camshaft position sensor only registers one position, corresponding to the position of the piston of the first cylinder at top dead center. Next, phased fuel injection is performed in the firing sequence of the cylinders. Typically this is a 1-3-4-2 system.
If the camshaft sensor fails (the electronic control unit receives incorrect information from it or does not receive it at all), then it is programmed to switch to emergency mode. It involves the use of pairwise-parallel (group) fuel supply to the engine. This leads to two negative consequences:
- A slight loss of engine power, especially when driving in critical modes (acceleration, driving under load).
- Increase in fuel consumption by approximately 10...20% (depending on engine power, its design features, as well as operating conditions).
As for diesel engines, camshaft position sensors are designed similarly, but there is one difference. It lies in the fact that the sensor records the position of not only the first cylinder, but all of them. This is done due to the fact that the drive disk has a separate tooth for each cylinder.
Thus, if a sensor fails, it makes sense to diagnose it as quickly as possible and, if necessary, replace it.
Purpose of the phase sensor
The device is needed to determine the operating cycles of the electric motor. The camshaft cams cause the movement of the shut-off and control valve mechanism, and the DPRV detects the opening of a specific valve. Such a control system is integral, including a sensitive element and a signal transformation mechanism. The work consists of the device recording the cylindrical phases of intake and exhaust.
For carburetor power units it is not necessary, since the spark arrives at the moment of compression and after exhaust gases are released. The crankshaft sensor serves this purpose.
The device is located in the upper part of the block head near the air-cleaning filter. The features of its work are based on the Hall effect. A DPRV, consisting of a magnet and a semiconductor, detects voltage changes under the influence of an electromagnetic field. With a constant magnetic field, the sensor is indifferent. To change the parameters, a metal element must enter the magnetic zone. In a car, such an element is the teeth on the camshaft in the area controlled by the DPRV.
In order for a car to operate smoothly, it requires periodic diagnostics of systems and mechanisms. If faults are identified when diagnosing the phase sensor, it will need to be checked. A voltmeter is required for surface analysis.
The first step will be to measure the voltage in the electrical circuit. For this purpose, without turning off the ignition and disconnecting the connectors, you should check the voltage level at the contacts to the DPRV. If it is not there, then the whole problem consists of faulty wires or insufficient contact when closing due to banal oxidation or opening of contacts. As a result of checking the chain, as a rule, it is necessary to strip the contacts and connect the wiring to the electrical terminals and contacts.
If there is voltage, you need to connect a voltmeter to the device and the negative contact of its power supply; as a result, when turning the camshaft, the voltmeter will show a voltage change in the range of 0...5 Volts. If there are no changes, you will need to buy a new “tens” phase sensor to replace the old one.
Signs of DPRV failure
There are several typical signs that indicate that the camshaft position sensor has failed. It is immediately necessary to clarify that the symptoms listed below may indicate completely different malfunctions. Therefore, it makes sense to perform additional diagnostics. So, signs of a DPRV breakdown:
- Problems with starting the engine, under any conditions - “cold”, “hot” and in other modes. This usually results in having to crank the starter longer.
- Unstable engine operation, “floating” operating and idle engine speeds.
- “Dips” in the movement of the car; when you press the accelerator pedal, it does not respond immediately, the dynamic characteristics of the car are lost (it accelerates poorly, does not pull, especially when loaded and when moving uphill).
- When the accelerator pedal is released, the engine stalls.
- Increased fuel consumption (by 10...20%).
- The Check Engine warning light on the instrument panel activates. It is necessary to perform additional diagnostics using an electronic scanner (for example, an ELM 327 device or its equivalent). In this case, typical errors regarding the operation of the sensor are numbers P0340, P0342, P0343.
In fact, the camshaft position sensor is a fairly simple and reliable device, so it rarely fails. More often, its wiring is damaged - the wires fray, the insulation on them is damaged, the so-called “chip”, the place where the sensor is connected to the car circuit, fails.
However, for cars that run on gasoline, the problems described above are not so clearly expressed. But a failed camshaft position sensor will cause many problems for owners of cars equipped with gas equipment, in particular the fourth generation. The malfunctions and problems described above can appear on such machines “in all their glory.” Therefore, owners of cars equipped with HBO are strongly recommended to diagnose and replace the sensor as quickly as possible if it is suspected of being faulty.
Phase sensor VAZ 2112
The phase sensor (PPV) is one of the most critical elements that ensures optimal operation of the internal combustion engine. Its main purpose is to analyze the angular position of the camshaft in a certain time period. The information received from it is needed for the operation of the ignition and fuel injection mechanisms. Having this data, the car ensures coordinated operation of the camshaft, taking into account the placement of the cylinders in the engine, which allows the supply of gasoline to a specific cylinder and ignition of the fuel-air mixture.
Symptoms of a problem
If you have the following symptoms, then the phase sensor (df) is most likely faulty.
When starting the engine, the starter spins for 3-4 seconds, then the engine starts and the check engine lights up. In this case, during startup, the computer waits for readings from the phase sensor, does not wait and switches to engine operating mode relying on the ignition system (according to DPKV).
Increased gasoline consumption. (Also read: Reasons for high fuel consumption on VAZ)
Self-diagnosis mode failures.
Reduced engine dynamics. (the reason may also be the mass air flow sensor and low engine compression)
Relay and fuse box at the link.
Replacement
On these engines, the sensor is located at the end, in the rear cover of the timing belt. Replacing the camshaft sensor on a VAZ 2110, VAZ 2112 is not at all complicated: use a “ten” key to unscrew the two bolts and remove it from the cover.
How to check
1. Set the voltage at voltmeter V1 on the power supply unit “E” to 13.5±0.5V, the voltage at contact “B” of the sensor must be at least 0.9.
2. Bring a steel plate made of soft magnetic material to the end of the sensor, as shown in the figure, placing it in the slot of the housing. The sensor should operate, which is determined by the change in voltage at contact “B” of the sensor. When the sensor is triggered, the voltage at contact “B” should be no more than 0.4V.
3. Remove the steel plate, and the voltage at contact “B” of the sensor should change to a value of at least 0.9
Location of the DPRV on the engine
To check the camshaft position sensor, you need to know where it is located. As a rule, on eight-valve engines the DPRV is usually mounted at the end of the cylinder head. On sixteen-valve engines it is also mounted on the cylinder head, usually in close proximity to the first cylinder.
As for popular domestic VAZ cars, their owners call such units phase sensors. Their location in these motors is similar. So, on eight-valve engines, the sensor is located on the left side of the cylinder head (when viewed in the direction of travel of the car). On sixteen-valve engines - on the right front part of the engine. In the latter case, the sensor is not directly visible visually; its location can only be assessed by the signal and power wires suitable for it. The VAZ 2114 phase sensor is fixed in close proximity to the air filter, near the cylinder head.
Design
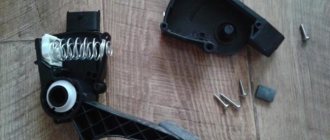
On the VAZ 2110, the camshaft position sensor is made in the form of a cylinder and has an end-mounted operating principle. Its structural elements are:
- plastic case;
- semiconductor wafer;
- secondary converter;
- magnet;
- current-carrying elements.
The DPRV connector has three contacts:
- constant power supply;
- transmission of the read signal to the control unit;
- weight.
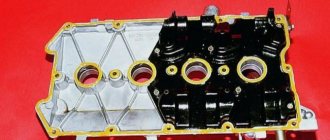
Engines on which two camshafts are installed, and the gas distribution mechanism consists of sixteen valves, also have one camshaft position sensor of the same design.
Methods for checking the camshaft sensor
Before testing the sensor using a multimeter or other electronic tools, you must check its mechanical integrity. In particular, it is installed in a housing with an O-ring, ensuring its secure fastening. We need to check its condition. It would also be useful to check the integrity of the sensor body, whether there are cracks or other damage on it. It is advisable to check the drive disk to see if the teeth are damaged or if there are metal shavings on the sensor body or nearby.
On the Internet you can find information that supposedly the DPRV can be determined to work by simply checking its magnetic properties. In particular, bring a small metal part to its end (the working sensitive part), which should “stick” to the sensor. In fact, this is not the case , and a non-working DPRV may or may not have magnetic properties. Accordingly, verification must be performed using other methods.
There are two main ways to test the camshaft position sensor - using an electronic multimeter and using an oscilloscope. The first method is simpler and faster, but the second is more accurate and provides more diagnostic information.
Checking the camshaft sensor with a multimeter
To check the DPRV, dismantling is necessary. This is not difficult to do; you just need to disconnect the contact group of wires from it and unscrew the fastening bolt. You will also need a small metal object (ferrous metal so that it is magnetic) to test.
Connection diagram for checking phase sensor 21110-3706040
Connection diagram for checking phase sensor 21120-3706040
The algorithm for checking the sensor with a multimeter is as follows:
- Take a multimeter and switch it to the DC voltage measurement mode in the range up to 20 V (depending on the specific multimeter model).
- Disconnect the “chip” from the sensor by unclipping the latch.
- Remove the sensor from its mounting location.
- On the “chip” of the sensor 21110-3706040 of a VAZ car (and on many others), contact “A” corresponds to ground, contact “C” is the positive wire, comes from the control relay, contact “B” is the signal wire (middle). For sensor chip 21120-3706040, contact “A” corresponds to ground, contact “B” is the positive wire from the control relay, contact “C” is the signal wire.
- Check the presence of power on the chips. To do this, you need to turn on the ignition on the car (but do not start the engine) and do this with a multimeter. If there is no power to the chips, then you need to look for the reason. This could be faulty wiring (insulation damage, broken wires), failure of the control relay, or a glitch in the electronic control system (ECU).
- Next, you need to connect the sensors for testing according to the diagrams shown in the figure.
- Apply a voltage of 13.5±0.5V to the sensor (although less is allowed, for example, 12...12.5 Volts from the battery).
- If, when power is applied to the sensor, the voltmeter detects a lack of voltage on the sensor, then this indicates either a breakdown of the sensor itself, the test can be completed and you can prepare to replace the sensor with a new one.
- Measure the voltage between the positive and signal contacts. It must be equal to at least 90% of the supply voltage (that is, if the supply voltage is 12 Volts, then the voltage at the signal contact must be at least 10.8 Volts).
- Bring a metal object prepared in advance to the end of the sensor (its signal part). Re-measure the voltage at the signal contact. It should be no more than 0.4 Volts. Remove the plate - the voltage value should be restored to 90.100% of the supply. If there are any deviations during the verification process, it means that the sensor has failed and must be replaced.
Checking the DPRV using an oscilloscope
An electronic oscilloscope helps to understand how the camshaft position sensor works and whether it produces pulses at all. Usually they use a so-called electronic oscilloscope, that is, simply a simulator program installed on a laptop or other similar device. You need to connect to the camshaft sensor and take an oscillogram from it. Ideally, there should be a smooth comb diagram with one drop-out peak that corresponds to the rapper passing through the sensor. If the oscillogram has a different shape, additional verification is needed.
When diagnosing the camshaft sensor of Nissan cars (in particular, Nissan Almera) with an oscilloscope, the shape of the oscillogram will be different. It will not be smooth, but in the form of 3 impulses, then a space, then 4 impulses - a space, 2 impulses - a space and one impulse - a space. For engines from this automaker, this feature is the norm.
How to check the phase sensor on a VAZ-2112 16 valves: malfunctions
All 16-valve engines on the 2112 hatchbacks were equipped with the same sensor that reads the camshaft angle. We are talking about the intake camshaft, and the sensor is attached near the pulley of this shaft. It is called a phase sensor. The operating principle is based on the Hall effect, that is, voltage must be supplied to the sensor. On a VAZ-2112 car, you can check the phase sensor only after dismantling. You will also need to check whether the supply voltage is supplied. If necessary, replace it - you need a part with article number 2112-3706040.
The following video shows how the sensor is checked using the express method (not recommended).
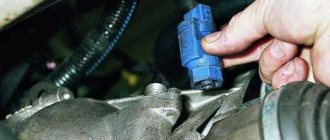
Removing the sensor in three steps
To remove the phase sensor, first turn off the ignition. The sensor connector is easily disconnected - it is held in place by a plastic tab.
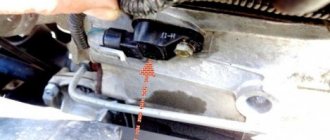
Sensor location and mounting
When the connector is disconnected, use a 10mm socket wrench to unscrew the two bolts holding the sensor in place (see photo). Then the sensor housing is removed from under the casing, pressing it against the cylinder head.
During installation, the tightening force of the fasteners should be 8-10 N*m.
Here we show how the sensor is removed on the 21120 (16v 1.5) engine. For the VAZ-21124 engine, all steps will be the same. If you look at the car connector, you can see three terminals. Their purpose is explained in the drawing.
This is the sensor housing, not the vehicle terminal block
There is a desire to measure the voltage between the two terminals on the right. If you don't turn on the ignition, you'll be fine.
With the ignition on, connect the negative probe to the negative terminal of the battery. Measure the voltage separately on the right and middle contacts - you should get “0” and “+12”.
Homemade test stand
Below is a diagram that, once assembled, can be tested. It appears that the sensor could have been left on the engine. But not only the electrical part is important, but also the ability to remove and bring up the steel plate.
Test stand
So, taking an E battery (12 Volts) and two voltmeters, we assemble the circuit. Next we run the test:
- On the “free sensor”, the voltmeter V1 will show a voltage of 0.4 V (or less);
- If you install a plate from a transformer in the slot, the voltage will change to 10.8-11.5 V.
Plate dimensions: 20x80x0.5mm or larger. If at “step 1” the voltage was higher than specified, the sensor is faulty. At “step 2”, on the contrary, the value should exceed V2*0.89.
We did not come up with the stand layout, but took it from the information letter. On different VAZ-2112 engines, the phase sensor is checked differently (see photo).
Screenshot of the VAZ “65-2003-I” document
For those who don't understand everything
The rectangle shown in the diagram is a resistor. Resistance is 680 Ohms, power is any. The power source can be not only a battery, but also a 12-volt adapter.
Element E can be an LATR with a rectifier. Then, firstly, try not to exceed the voltage, and secondly, connect the ground (pin 1) to the “ground” tap of the LATR.
Articles
Instead of the numbers 2112-3706040, the article number 21120-3706040 is found. Both designations are correct. You can also find an article with the numbers -00, -01, -02... This is how the manufacturer is designated: 01 and 03 - “SOATE”, 00 - “Autoelectronics”, etc.
Parts with article number 2112-3706040-04
Recently, flexible lead sensors have been launched. The length of the wires is 15 cm. So far there is nothing like this in retail. But the article numbers remained the same - 2112-3706040-XX.
Symptoms of a faulty phase sensor
When the phase sensor is faulty, the following can be observed:
- The CHECK lamp turns on;
- The BC, if present, displays error “P0340” (0343, 0346);
- The starter turns for 1-2 seconds longer than usual;
- When you press the gas, acceleration does not begin immediately: 1 or 2 jerks, then acceleration.
By the way, a working sensor can be turned off by the ECU. This happens when the timing belt is incorrectly worn or damaged. Draw conclusions.
Video with a lecture on Hall sensors
carfrance.ru
Replacing the RV position sensor
If during the inspection it turns out that the camshaft position sensor itself has failed, then it must be replaced. As a rule, these units are non-repairable, since their body is sealed and cannot be disassembled. The sensor is inexpensive, and the replacement procedure is simple, and even a novice car enthusiast can handle it.
The sensor replacement algorithm is as follows:
- With the engine not running, disconnect the negative terminal from the battery.
- Disconnect the “chip” from the camshaft position sensor (as when checking).
- Depending on the vehicle model, it is necessary to remove parts that prevent access to the sensor. For example, on modern cars like the Lada Vesta, it is necessary to remove the bracket for auxiliary units.
- Using a wrench, unscrew one or two mounting bolts, depending on the type of fastening. The size of the wrench can be different, usually for VAZs it is a 10 mm wrench.
- After dismantling the mount, you must similarly remove the sensor from its seat.
- Installing a new sensor is performed in reverse order.
- Connect the negative terminal to the battery.
When purchasing a new camshaft position sensor, you need to pay attention to the condition of its O-ring. It is usually sold separately. When changing the sensor, it is advisable to also change the O-ring, since over time it wears out and loses its elasticity. You can use an old ring only in case of emergency, when it is not possible to buy a new one.
Replacing the camshaft timing sensor
Examination
I think you will agree that replacing the camshaft sensor on a VAZ 2110, 2112, or on a VAZ 2115 should begin with checking it , which can be done with your own hands. To do this, we arm ourselves with a multimeter, turn it on in voltmeter mode and, with the ignition on, measure the input voltage, which should be at least twelve volts. On 8-valve engines of the 2112(-4) and 21114 series, the wire block is simply disconnected from the sensor...
...on a 16-valve multimeter, the “minus” of the multimeter is attached to the “ground” of the car.
If the voltage is less than this value or is absent altogether, this indicates that the battery is discharged, the electronic control unit is faulty, or there is a break in the power circuit.
Replacing the phase sensor on engines of the 2112 and 21124 series
On these engines, the sensor is located at the end, in the rear cover of the timing belt. Replacing the camshaft sensor on a VAZ 2110, VAZ 2112 is not at all complicated: use a “ten” key to unscrew the two bolts and remove it from the cover.
Replacing the camshaft sensor on a VAZ 2112
Replacing the phase sensor on engines of the 2111 and 21114 series
On engines of this series, the phase sensor is located in the camshaft cover, at the rear. Replacing the camshaft sensor on a VAZ 2115 is carried out in the following order:
- With the ignition off, disconnect the wire block by first squeezing the plastic lock on its body;
- Use a ten key to unscrew the bolt;
- We remove the sensor.
Replacing the DF with a VAZ 2115
Advice! Do not forget to check the condition of the sealing ring; if it is defective, it should be replaced with a new one.
Camshaft position sensor VAZ 2115 with sealing ring
Attention! After you have replaced the sensor and have not reset the errors in the electronic control unit, the engine will begin to operate normally only after the second start. In this case, the “CHECK” fault signal will disappear on its own.
As you can see, in our case, the most difficult part of the repair was identifying the cause of the malfunction. I hope that this instruction fully describes the diagnostic and repair process, and does not require any additional videos or photographs.