Removal and installation of the VAZ-2109 windshield
To remove a damaged windshield, remove the windshield wiper arms, tuck the edges of the seal at the top of the body opening flange and, pressing on the upper corners of the glass, push it out.
In this case, an assistant must support the glass from the outside. Remove the seal from the glass.
When filling the seal, use a blunt slotted screwdriver, being careful not to damage the seal.
Glass removal diagram
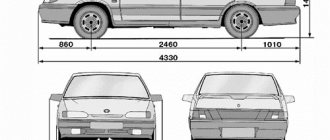
Glass opening sizes
Before installing new glass, you need to attach it to the glass opening without a seal and look at the gaps.
There must be a gap of 3 - 4 mm between the glass and the opening, otherwise the glass will not fit as expected.
If there is no gap, then the glass may be defective or the opening may be deformed.
The deformation of the glass opening is removed by exhaust hood using jacks, observing the dimensions of the openings.
Install the windshield as follows:
– wash the grooves of seal 1 with water and blow with compressed air;
– put the seal on the glass;
If the seal has become hard, you can immerse it in gasoline for a few minutes. After this it will become elastic.
– lubricate the groove of the seal with which it is installed on the body flange with glycerin or soapy water;
– insert cord 1 into the groove using a screwdriver;
– install the glass in the body opening and then, by pulling the ends of cord 1 from the seal inside the body, ensure that the glass with seal 2 sits in place. In this case, an assistant should press lightly on the glass from the outside.
Installation of glass begins from the bottom from the middle. In the upper part, the seal is tucked behind the upper headliner and adjusted using a slotted screwdriver.
If the glass is not installed, check the dimensions of the body opening using glass without a seal. Correct deviations in the dimensions of the opening by straightening.
Replace the glass of the rear window and side frames in the same way as replacing the windshield.
When installing a new windshield, you must first glue the rear view mirror mounting plate.
To ensure reliable gluing, it is recommended to carry out work at a car service station.
Use a blade or sharpened knife to clean the glass where the plate is glued.
The plate should be located along the axis of the car, its bottom should be at a distance of 105 mm from the top edge of the glass.
Degrease the gluing area with ethyl or isopropyl alcohol.
Apply activator LT-736 to the glass in the place of gluing with a brush, and apply 1-2 drops of LT-317 glue to the surface of the plate and press the plate to the glass for 1-1.5 minutes.
24 hours after gluing, put the rear view mirror in place.
When monitoring the adhesion strength, the plate should not come off under a load of 300 N (30.6 kgf) applied perpendicular to the glass surface for 15 s.
How to replace a rear window in practice?
#1
It happens when you need to change the rear window of a car yourself. But how to do this, how to replace the rear window of a car. The first thing you need to do is purchase glass that matches the make of your car. Next you need to remove the damaged old glass, this must be done carefully, trying not to break it completely. To remove the glass, you need to remove the seal along the entire glass edge and then carefully remove it. Then “prime” the edges of the glass and apply new glass with special glue.
#2
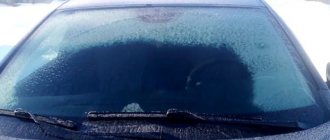
It is clear that for safe driving, it is especially important to have clean, uncontaminated windows. In order to know how to clean car glass, you need to understand a few simple recommendations. If the glass is not very dirty, then you can do without various chemicals, but simply arm yourself with a damp cloth. If the glass is thoroughly dirty, then numerous detergents will come to the rescue, such as: “Auto Cleaner”, “Nithinol”, “Secunda-75”. To clear frost from glass, you can use the Auto Defroster.
#3
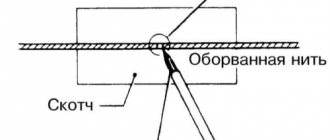
Another common problem is scratches on the glass. It makes no difference where: on the windshield of a car, on a mirror or window glass, or on an expensive mobile phone. The question arises how to remove a scratch on glass. For this you will need GOI paste, which is used for military purposes for rubbing glass, and any fabric. Then the paste must be heated and applied to the scratch and rubbed in a circular motion from beginning to end of the crack. This is how you can polish a crack or scratch.
#4
In addition to the fact that glass needs to be cared for and polished, it can also be tinted. As you know, tinting a car is not very cheap, so this operation can be done without specialists, by yourself. Then, how to tint car windows correctly? To do this, you need to purchase a tint film (it must meet GOST) and treat all the car windows with soapy water and seal the contour of each window with tape (so that dust does not get under the film). Next, the film itself is applied; you must remember to squeeze out the air from under the film; this can be done using, for example, a bank card.
#5
Everyone knows that glass is a fairly fragile, breakable material and working with it requires great care and a minimum of effort. How to cut glass? Interesting question. To solve this problem, you need to purchase a glass cutter and, of course, have glass. Next, use a marker to outline the outline of the glass that needs to be cut. After this, you need to start cutting very carefully without much effort. The better the glass cutter, the faster and better the glass cutting will be.
The process and subtleties of replacing a VAZ 2109 windshield
Typically, replacing a VAZ 2109 windshield does not involve any secondary use of this transparent shield. If improved airflow helps prevent thermal cracking, then the risk of catching a road stone is inevitable, whether you have double glass with a polymer layer or single-layer tempered stalinite. It also happens that, for one reason or another, it is necessary to replace the rear window of a VAZ 2109.
How to properly remove the rear window of a VAZ 2109
You will need to replace the rear window after an accident, tinting or unexpected damage to the installed element.
Installing the rear window of a VAZ 2109
Before installing new glass, you must remove the old one. For this:
- The screwdriver is inserted into the seal that holds the glass. You need to deepen the tool by about five millimeters.
Tip: There is no need to insert the screwdriver deeper, otherwise the hole will be too deep.
- The seal is pushed out.
- First, a small piece is pulled out.
Tip: Do not pull on this piece and try to pull out the entire seal; due to the fragility of the product, it can be torn.
- The screwdriver is carefully moved a few centimeters, as shown in the photo.
The screwdriver is inserted into the seal
- Another small piece comes off from the seal.
- This continues until the seal is completely removed.
- Removing the rear window of a VAZ 2109.
Tip: It is often not possible to keep old glass intact, but this does not matter. The main thing is to keep the body intact, otherwise it will need to be repaired.
Preparing the rear window for installation
The instructions indicate that before installing a new rear window, you must first do the following:
- Wipe the edges thoroughly with degreaser to facilitate installation of the seal. The cleaner the glass, the better the seal will fit.
Tip: If the old seal can be removed carefully, it can be reused. But this is difficult to do. Therefore, it is advisable to use a new seal.
- Put on the seal. Spread it first in the corners and then press it onto the sides of the glass.
- Install the lock, which is a small wedge resembling the letter P. It is inserted so that the device is located in the center of the seal, but runs along the entire perimeter of the inserted element.
Before installation, the wedge must be stretched slightly. Otherwise, it may not be enough. Usually it stretches up to 20 cm. The wedge is mounted as follows:
- The long part is inserted first, then the short one. This needs to be done around the entire perimeter of the rear window. If part of the lock is left over, it needs to be cut off so that it does not interfere with subsequent actions.
Removing the seal
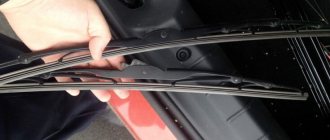
Before installing a new one, the old windshield of the VAZ 2109 must be carefully dismantled. To do the replacement yourself, you will need a slotted screwdriver with a slot width of 10–12 mm. If you plan to reuse the seal, make sure the screwdriver is relatively dull so as not to injure its blade. Before replacing the windshield, it is recommended to remove the windshield wipers. Even bent, they create interference.
Start dismantling the windshield on a VAZ 2109 from inside the cabin, from the middle of the top edge. In profile, the seal resembles the letter “H”. Between the lower halves of the legs of this letter is the edge of the windshield, and between the upper halves of the legs is the edge of the frame, smoothly turning into the roof of the body. You must carefully press the upper leg of the letter “H” closest to you and push it out of the body. Both legs of the upper part of the seal profile will be on the outside of the frame, and you will see the exposed metal of the edge of this frame.
After pushing out the first section of the seal, expand the area step by step. The most difficult step is the first, then the seal goes out almost without resistance. With a little luck, you can push the edge of the seal out without damage. Expand the removal area gradually in both directions from the center until the upper corners of the windshield are free.
If you are replacing the side glass of a VAZ 2109 located behind the rear door, start from the middle of the long side.
Rear window replacement
You can replace the rear window of a VAZ 2109, as mentioned above, yourself. Before installing new glass, you must remove the old one.
Removal
To do this, you should:
- Take a screwdriver and stick it into the seal on which the glass is attached. It should be inserted approximately 5 mm.
- Push the seal out. First you need to pull out a small piece. The downside is that you cannot pull out the entire seal by pulling it. It's just quite fragile, so it breaks quickly.
- Carefully move the screwdriver a few cm. Tear off another piece of the seal.
- Step by step you can get rid of everything.
- After the seal has been removed to the upper side corner, you can begin to remove the glass itself.
Replacing glass on a VAZ 2109
Don't try too hard when removing the glass. Usually it cannot be kept completely intact.
It certainly cannot be reused. The main thing is not to damage the body of the vases, otherwise additional repairs will be required.
Before you begin installing new glass, you must do the following:
- Wipe the edges with degreaser to make it easier to install the seal. That is, the cleaner the glass, the better the seal will fit.
- Put on the seal. First, it is distributed in the corners, and then pressed against the sides of the glass.
- After this, you should install a lock, which is a small wedge that looks like the letter P. It needs to be inserted so that it is in the center of the seal, but runs along the entire perimeter.
- The wedge is installed as follows: first you need to insert the long part, then the short one. This needs to be done around the entire perimeter of the glass. If a small part of the lock remains intact (that is, it is redundant), then it must be cut off, otherwise it will interfere with subsequent actions.
Installation
Replacing glass on a VAZ 2109
Installing the rear window may be necessary when replacing it, or when tinting it. Although usually, tinted glass is new, since, as stated earlier, it is almost impossible to remove the rear window without damaging it. In order for the installation to be completed successfully, you should find a rope that is long enough to completely surround the sides of the rear window.
- Determine where approximately the middle of the rope is. Insert this part into the upper side of the seal.
- The seal has two grooves. You need to find the one that is closer to the top of the glass.
- Use a screwdriver to insert the rope into the groove until it stops. You need to insert the rope to the middle of the glass area. We need to stop there. One end of the rope should hang freely on one side. In this case, the second one must be stuck into the seal.
- On the opposite side, you should also insert the rope until it intersects with the end of the previous rope.
- When they intersect, the end of one must be placed on the end of the other.
- The free ends of the rope should be pulled into the cabin.
- Only after this can glass be placed in the opening. It is advisable to have someone help, as it is quite heavy and can be accidentally dropped. The bottom of the opening should fit into the outer groove.
Replacing glass on a VAZ 2109
- You need to press lightly on the glass. At the same time, it should press even better into the seal. In addition, this way it will sit in its place much better.
- The rope should be pulled towards you from both sides (as if you need to tie a knot).
- Stretch half the rope to the bottom corners of the glass.
- After this, smoothly seat the glass.
- To make it easier to pass the left corners, you need to “twist” the rope clockwise, and the right corners – vice versa.
- While pulling the rope, you need to carefully seat the glass in the opening. There is no need to hit the glass, as it is still sitting very precariously, so it may fall out.
- When the rope has completely come out, you should carefully check the interior. After all, the seal could come out slightly. To fix this, you should drive it into the opening using a flathead screwdriver.
- At the end, you should shrink the glass all the way. To do this easily, you need to place your hand on the top edge, lightly hitting it with your second hand. The same should be done with the rest of the glass area.
Usually the glass shrinks to its maximum after 3-4 days of driving. This is facilitated by the constant vibrations that the car undergoes while driving. If you want to save time, you can take the car to a car dealership, where the price for this work will be rather high. However, you can carry out repair work yourself and at home.
You can also learn about windshield replacement on our website.
Don't buy cheap copies. Products with a suspiciously low price are either made of low-quality materials or are sold as disassembled parts. An inexpensive consumable will require replacement after just six months of use.
It is advisable to find an original spare part. It will definitely fit the car, and the quality will be higher than that of its analogue.
Inspect the part carefully. The surface must be smooth, without scratches, even and transparent. The reflection must be clear and clear. If it is cloudy, do not rush to shell out money.
Check markings, manufacturer and type. Information must be clearly written. Blurred markings are one of the main signs of a fake.
Economy segment
Xyg (China) - the best Chinese parts on the market. Pass ultraviolet rays. The material is not of the best quality: poor visibility, the image is distorted. Weak structure. This consumable will have to be changed twice a year. Overall, the price is reasonable.
Borovskoye KMK (Bor, Nizhny Novgorod region). The spare part is made of soft material, chips and scratches quickly appear. Doesn't take punches well. Cheap, but short-lived.
Premium segment
Pilkington (UK). European quality. Resistant to scratches, chips do not appear the first time. Will last a long time.
Borovskoye AGC-glass (the plant was purchased by the Japanese Company AGC-Glass). Decent choice. Japanese quality, quite high price. The company provides energy-saving, multi-layer shock-resistant and colored lacquer-coated glass.
Contact a car service. Fast, simple, but expensive. On one's own. If you have experience in repair work of this kind, time, patience, and an assistant, then dismantling is possible in your own garage.
How to remove
The work begins with the fact that we remove all unnecessary things. Side trims, wipers - this interferes with dismantling. Now we remove the old glass: starting from the top corner, squeeze it out along with the rubber. It is advisable to have someone help. If you pry the seal with a flat screwdriver from the inside, it will be easier to remove the headband.
Clean the grooves. The replacement now needs to be replaced with a seal. If the rubber is cracked, it is also advisable to replace it.
Replacing the windshield frame requires more effort, but this operation can be done at home.
We measure the frame. Its width is 680 mm in the center and 1378 mm diagonally. Further actions:
- We weld the fasteners on the sides.
- We make an amplifier, weld it to the frame from the outside.
- We clean the frame and the cavity for the wipers.
- We prime it twice.
- Apply adhesive sealant.
- We evenly coat the frame and cavity with paint and weld it.
The seal needs to be replaced as it wears out. If it has shrunk in places and lost elasticity, then it is advisable to install a new one in the near future. To replace the front window seal of a VAZ 2114 you will need:
- a set of flat screwdrivers;
- stationery knife;
- putty knife;
- solvent for nitro paint;
- adhesive sealant.
To make installation easier, apply lubricant to the rubber seal and soap solution to the lower groove. You need to put a thin, strong rope inside the seal. Place the new seal on the glass. We pull the ends of the cord in the center of the bottom of the material. It is advisable to soak the cord with detergent.
Of course, it's not often that a car's rear window cracks. But still, many car enthusiasts are worried about such a breakdown. After all, sometimes they have only one option left - replacing the rear window. We list the situations in which it is necessary to replace the rear window:
- consequences of a traffic accident;
- a stone flying from under the wheels of a speeding oncoming car created a very large crack on the highway;
- reinstallation of a standard window with a similar one from another modification of the car;
- Body repairs are being carried out, while the glass element interferes with the work.
Next, we will consider several cases of replacing a defective rear window, applicable to both domestic and imported cars.
Let us first note that with this repair there are certain difficulties associated with the rubber seal or the adhesive seam.
Removing old glass
Further actions depend on whether you have two vacuum glass holders. Glass holders are a pair of vacuum suction cups and a handle between them. Of course, it’s not worth buying this device, since you only need to remove the glass once. But if you borrowed holders, then it’s time to use them and ask your friends for help. Get out of the cabin, install holders on the sides of the windshield in parallel with a friend, “suck” to its surface and, at the same time as an assistant, pull the holders up and out. The rear window of a VAZ 2109 is removed in the same way.
Installation
Installation of the rear door glass is performed in the reverse order, following the previously marked mark on the cable.
To remove the glass, remove the edging of the seal and, pressing on the lower corners of the glass of the VAZ 2105, push it out. In this case, an assistant must support the glass from the outside.
The operations for installing the rear window of a VAZ 2107 are the same as for the windshield.
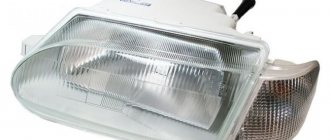
The windshield of the VAZ 2107 is installed at an angle of almost 90°, so during operation it is subject to impacts from all kinds of stones, grains of sand, and thorns. This is a common cause of chips and cracks that interfere with visibility and affect the safety of driving on public roads.
Preparing the installation kit
Before installation, a number of preliminary works need to be done.
To install glass with a seal into the frame, you will need 4.5 meters of durable nylon cord. The length is determined by the size of the windshield. You need to add 50–70 cm to the perimeter of the frame. The size of the rear window and the size of the side glass are taken into account in the same way. The cord should have a slippery surface and a diameter of 4 mm.
It should be placed in the outer groove of the seal, starting from the middle of the cord and from the center of the top of the frame groove. The cord should be laid symmetrically to the right and left from the center of the upper groove, down along the left and right edges of the element and along the lower edge of the part from the edges to the center. In the middle of the lower groove, the mounting cord should overlap, one end over the other.
The cord should have free ends that should not be tucked into the groove; they are needed during installation.
Inserting new glass
We start by applying a rubber seal to the new glass. Then we put another rubber band in its place, which is called a lock. It is done brilliantly so that drivers know. Why is the lock applied before the glass is installed, and not after? Because it’s faster and, as practice shows, more convenient. After installing the lock, the most important thing begins - installing the rear window in its place. To do this, we need a cord about two meters long (in general, it’s better to prepare a cord, a screwdriver and a friend to help you ahead of time).
We insert the cord into the groove of the seal, but not the entire length, but only onto the top and sides of the groove. The remaining ends of the cord should be approximately the same length. Then we take the glass and insert it into the lower groove, as if rubbing it in, so that the seal lies evenly in place. Then, calling a friend for help, we begin to press on the glass, while simultaneously pulling the cord out of the groove. At the same time, the cord pushes the sealing rubber aside and allows the glass to gradually take its place.
This operation should be done slowly, pulling the cord alternately from the right and then from the left. When the cord is pulled out completely, the glass with rubber bands will completely fit into its grooves. And this will mean that everything worked out for you.
Windshield installation
It is better to install the prepared installation kit into the car body together with an assistant and do it in the following order.
- Attach the kit with the seal to the outside of the frame. Pass the free ends of the mounting cord into the vehicle interior.
- Start installation from the middle of the bottom contour of the frame. While your assistant holds the kit pressed against the frame with its bottom edge, you begin to carefully pull the mounting cord into the interior.
- The cord carries along the inner leg of the letter “H”. Due to deformation, it goes over the side of the frame and, as the cord is pulled out, it takes its normal position on the interior side. In this case, the outer leg remains outside, and the side of the frame, as expected, is placed between them.
- Carry out the installation symmetrically, with small movements, alternately pulling out one or the other end of the mounting cord. The assistant should constantly push the installed glass into place with light blows of his palm.
Finally remove the last section of the mounting cord from the middle portion of the top edge of the outer seal groove. Upon completion of installation, it is very useful to knock on the glass on both sides, pressing your fingers on the seal from the outside and inside at different points of the contour.
Start the engine, drive with sharp turns on a not very smooth road. Minor deformation and vibration will help the glass shrink properly in the frame. Installation stresses will disappear, the fit will automatically adjust, and the sealant will harden in a few days.
Replace your windshield wipers and enjoy the stunning views of the world around you through your new windshield.
Design and dimensions
Consumables that do not match in size are one of the reasons for rapid breakdown. To prevent troubles, take the choice of a new part more seriously.
Head-on
The dimensions of the windshield of the VAZ 2115 are 1400×662 mm. The dimensions of the windshield on the VAZ 2114 and 2113 have the same dimensions, which makes it easier to find a new spare part.
It is multi-component: two glass layers and a film between them, the so-called triplex. This structure prevents fragments from scattering when damaged.
Rear
Cracks or chips on parts are rare. The size of the rear window of the VAZ 2114 is 1210x656 mm.
The parameters need to be known if the driver wants to tint the car.
Lateral
The front left side glass is 858 mm wide and 528 mm long. Consult with a salesperson at your auto store before purchasing.
Required Tools
First you need to select a new canvas. Craftsmen recommend choosing double glass with a polymer layer or single-layer tempered stalinite. Required equipment and related materials:
- nylon cord - about 5 meters;
- rubber hammer;
- slotted screwdriver;
- sealant;
- anti-corrosion agent and primer.
Preparation involves choosing a comfortable room for work; you also need to select equipment, purchase new glass and dismantle the old fragment.
You can put the old seal on the glass or purchase a new element to make the job easier.
Replacement principle
When replacing the windshield on a VAZ 2109 car, it is necessary to take into account its dimensions. When purchasing, it is important to compare the auto glass article number with the data indicated on the factory element. The size of the frontal fragment is standard, as on all VAZ models. Rules and nuances of replacement:
- The rubber seal should fit tightly in all corners, and the structure itself should fit into the side, top and bottom sides of the frame.
- Installation of glass requires the installation of an internal lock. The locking mechanism is an important element during installation; it is shaped like a wedge. It needs to be installed in the center, but the wires should be routed around the entire perimeter.
- Careful removal of the structure is required first. It is important not to damage the frame.
- If the size is slightly off, it can be easily corrected with a rubber mallet.
- Anti-corrosion treatment of the element and frame is also necessary. It is recommended to use a rust modifier and primer. After drying, sealant is applied to the frame, then sealing material is installed. The external and internal grooves of the frame are lubricated.
The length of the nylon cord is equal to the size of the car glass. It is better to purchase this material with a diameter of at least 4 mm. The quality of the cord is checked by touch; it must have a slippery surface. The nylon fits into the grooves of the seal.
Removing the seal
Removal of the sealing element will be required when replacing the windshield frame or the most transparent part. Removal is carried out from the passenger compartment, strictly according to the instructions:
- The windshield wipers are removed.
- Use a slotted screwdriver with a width of 10–12 mm to pry off the seal. The tool should be used carefully so as not to damage the rubberized material if you plan to use it in the future. You should start from the middle of the top edge. By pressing the top part with a screwdriver, the glass can be easily removed.
- When part of the sealing fragment is removed, the auto glass will already be movable. It is necessary to expand the area between the metal and the seal.
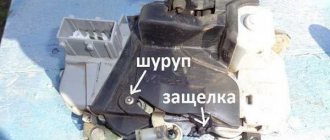
Disassembling the front door
1) First, we need to remove the main handle with which the door closes. We press out the decorative trim with a screwdriver, but be careful not to damage it. Next, unscrew the bolts, there are two of them, and remove the handle.
2) Then we remove the decorative trim of the unlocking handle, you know that kind of black plastic, we also pick it up with a screwdriver and pull it out, there are two latches there, be careful.
3) Then you need to remove the lower shelf, in which the window lift buttons are installed, there are two or three bolts there. The shelf comes out together with the power window cable, disconnect them and remove them.
4) Next, as a rule, comes the speaker, it is fastened with 2 - 4 bolts, to be honest, I have seen only one. We unscrew, there are cross-shaped bolts from the factory. Let's remove it.
5) In the upper part, unscrew the locking “latch”; it simply unscrews like a bolt.
6) Everything is removed, now we need to detach the upholstery itself, this is a little more complicated. You can pull the corners, or you can pick it up with a screwdriver and pull it towards you - the main thing is not to break it, we carefully try to separate it. If some rivets are broken (and this will be 100%), don’t worry, we bought new ones
At this point the “analysis” is completed, as you can see, there is nothing complicated and it is also considered that the front part is complex. Let's watch the video.
Everything is much easier at the back.
How to remove and install rear window
Removing the rear window is similar to the front fragment, only removing the rubber seal should begin not from the middle, but from the edges in the upper part. After the tape is pulled out along the top layer, the auto glass is removed in or out. The rear window is installed on a VAZ model 2109 using a rope or cord. Algorithm of actions:
- The rope is inserted into the frame to the middle, into the groove, which will be closer to the outer glass part.
- On the other side, a similar operation is carried out. The rope cords must cross. Drowning into the groove until it stops.
- The auto glass is placed in the opening. The structure is slightly pressed: not inward, but downward.
The finish is the removal of the rope. It should not be pulled vertically, but horizontally. The seal is being installed. It should first be wetted so that it becomes soft. After drying, the material will harden and fix the edges of the glass.
Replacing rear windows on a Passat
The replacement procedure requires tools and can be done independently, although it is more convenient to do the work together.
For repair you will need:
- the auto glass itself;
- vacuum holder for ease of manipulation (when working with an assistant, you can do without a “suction cup”);
- adhesive sealant, for example, Teroson PU8590;
- primer;
- activator – a means for pre-treatment of body surfaces;
- molding, if not included with glass;
- second glue for fixing the molding;
- solvent of old sealant;
- Tool for cleaning the old sealing layer and removing glazing residues (if the glass is broken): drill with a thin drill, stack, flat screwdriver, pliers, string, scrapers and chisels.
Rear window of the Passat B5
Be sure to wear protective gloves and goggles when working.
How to remove an entire rear window on a Passat
The official documentation for the car describes the replacement process simply:
- Disconnect the heating wires.
- Remove the seal trim (and the visor, if any).
- Press the glass outwards by pressing on the lower corners, while an assistant should support the element to be removed from the outside.
You can display the part yourself, but it is better to perform the operation together.
How to remove the rear window of a Passat B5 if it is additionally taped:
- Make a hole in the glass.
- Pass a string through it.
- Carefully saw through the adhesive layer around the perimeter.
- Extrude the part.
Removing the Passat B3 glass follows a similar method.
How to remove a broken rear window on a Passat
To remove a broken element you need:
- Carefully remove all possible fragments.
- Remove the seal.
- Clean the opening from any remaining sealing compound.
Additional tools you may also need are a copper string and a sharp knife to remove sealant and splinters.
Rear window installation
The instructions from VW advise simply repeating the removal operation in reverse order. In practice, more actions are required, everything happens as follows:
- On your own or with an assistant, squeeze out the old Passat B5 glass as described above.
- Clean the landing opening with sealant remover.
- If there is damaged factory molding with sealant on the glass, they should be removed.
- Next, a new molding is put on, its ends are fixed with an elastic band or instant glue to prevent it from spreading during installation.
- New sealant is applied to the opening.
- The glass fits tightly into the opening.
If there is an additional brake light, it is attached to the old place with the same sealant.
How to remove the rear door glass of a Passat B5
Sometimes it is necessary to replace not only the rear window, but also the glazing on one of the rear passenger doors. You can also do the replacement yourself. Additional tools you will need are a Phillips screwdriver and a Torx 20 wrench.
Let's look at how to remove the rear door glass of the Passat B5. To remove the lowered side element on a Volkswagen car, you should:
- Remove the inner door trim.
- Lower the glass all the way down.
- If the car has a power window, turn it off and move the wiring harness away.
- Peel off the film on the door frame.
- Press out the plastic round insert holding the glass with a suitable object (for example, a screwdriver or another of the same diameter) and remove it for further use. The insert consists of two bushings nested inside each other.
- Remove the lower horizontal trim of the window from the inside.
- Remove the rubber seal around the perimeter.
- Unscrew three screws (one on the outside, two on the inside) and remove the side vertical trim.
- Remove the outer horizontal trim.
- Pull the glass up.
To remove the rear fixed glass of the Passat B6, B5, you should:
- Remove the deflector (if present) and door trim.
- Remove the protective film from the inside of the car door.
- Unscrew the two screws securing the glass guide.
- Remove the lower window seals (inside and outside).
- Remove the rear and top seals.
- Lower the rear guide into the door.
After this, you can move forward and remove the fixed window from the door.
Rear Door Glass Installation
The installation process is performed in the reverse order of removal. For a fixed element there are some points to consider:
- to make the VW Passat glass fit easier on the seals, they can be moistened with soapy water for better slipping;
- It is recommended to replace the plastic film damaged during disassembly.
At the final stage, the door trim is assembled. On the Internet you can find many videos with assembly and disassembly instructions.
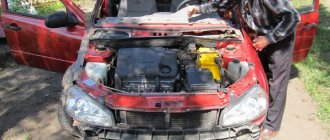
Removing the windshield of a VAZ 2109: how to do it right
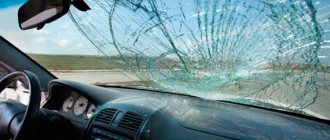
General view of the front part of the VAZ 2109 car
It is known that you can drive a car without a windshield. At the same time, its technical ability to move on roads is not impaired. But both the driver and his passengers will experience maximum discomfort inside the cabin. Dust, wind, all precipitation will enter the cabin. In addition, the temperature inside the car and outside will be the same, which is especially unpleasant in winter. The article suggests getting acquainted with the question of how to install a windshield on a VAZ 2109 in order to protect the interior from all weather and external physical factors, with your own hands.
How to Remove the Rear Window of a VAZ 2109 Video
Replacing the rear window on a VAZ-2109
back
Car window. a real assistant to the person driving a car. It is through him that you can see everything that is happening and correctly assess the situation. But glass. very fragile material, and falling into a stone or other heavy object may crack or crumble into many small objects. As a temporary solution, you can cover the hole with thick film. But this, of course, is not an option. The rear window still needs to be replaced in the future.
Many motorists put off this work later, fearing serious costs. Really everything you need. is to find money to buy new glass and glue. The rest of the work can be done by hand within 1-2 hours.
Replace the rear window on a VAZ-2109
Before you start, go to a store or market and get a new rear window for your car. It is important that it clearly fits your model (particular attention should be paid to heating and its design features).
Then prepare the necessary tools. You need to work. new glass (this is logical), special glue (the best option is a two-component composition), a new rubber strip (the old one should be thrown away), a string for cutting glass, special suction cups (needed to hold and lift the glass). In addition, you will need duct tape, a knife, sandpaper and solvent.
Works well in a well-lit room with reasonable maneuverability. If the weather is good, you can stay right next to the garage. Rear window replacement partner assistant highly desirable. Regardless of such work, it is extremely difficult to manage.
Therefore, after the preparatory activities, you can immediately get to work. There are three steps here:
- Remove the old glass. This work is performed in the following sequence:
- Take a flathead screwdriver and press it against the rear window seal somewhere around 4-5 mm. Act without fanaticism. there is no need to insert the screwdriver deeper (this will only complicate the task);
- Gradually move the screwdriver around the perimeter. Walk about 4-5 centimeters and stop;
- tear off a piece of sealant;
- Gradually, step by step, go all the way to the press, stretching it into small pieces;
Types of automobile glass
Automotive glass for modern VAZ 2109 cars is manufactured using high technology. They differ from simple glasses in their high strength and design features, which allow all road users to be protected from injury during an emergency. There are two types of technologies for making windshields:
- Triplex. This technology is most often used for the manufacture of rear, windshield, side windows and hatches. Translated from Latin, triplex means “triple”, and the design involves the production of multilayer glass: more than two layers of silicate or organic glass. At the time of manufacture, they are glued together with a special film and then pressed at a certain temperature. When broken, the broken parts of the glass remain on the film rather than breaking into shards with sharp edges.
- Stalinite. The technology of its manufacture is that the glass is tempered: first it is heated to a certain temperature, and then it is cooled evenly and gradually in the air flow. When glass breaks, it breaks into a large number of fragments with blunted edges; in the event of an accident, they cause minimal harm to the driver and passengers. On modern cars they are used less often, but the temptation of installation elements is the lower price.
Tip: When buying glass, you need to carefully consider its markings. It is applied by chemical etching, located at the bottom right corner, and has a black color, as shown in the photo.
VAZ 2109 windshield markings
How to remove the windshield of a VAZ 2109
Replacing a windshield is mainly necessary after an accident or unexpected damage to the old one.
Installing a windshield on VAX 2109
- 1 – rubber seal.
- 2 – windshield.
- 3 – window opening flange.
Before removing the windshield on a VAZ 2109 you need to:
- At the top of the windshield, insert a screwdriver into the seal five millimeters.
- Push out the seal so that part of it can be pulled out.
- Move the screwdriver to the side five centimeters.
- Thus, consistently get rid of the sealant.
Advice: Operations should be done gradually, without jerking, and make sure that the glass does not fall out.
After removing the seal to the upper side corner, the glass can be removed. This is done in two ways:
- By squeezing out from the inside. To do this, gently press on the upper corners of the glass, which is then squeezed out.
- Pull the glass towards you. At the same time, you need to pull it up slightly.
Removing the windshield
After this, the rubber seal is removed, and the installation groove of the window opening is cleaned of dirt around the entire perimeter. Even professionals practically cannot keep glass intact, but old glass is usually not removed to preserve it.
Advice: It is better not to throw away damaged old glass, but to use it to cover the car when painting the body.
How to remove a windshield
Related Articles
Windshield replacement
23.06.2014
Windshield Renault Logan - Renault Logan
23.06.2014
Stripe on the windshield
23.06.2014
Informative!
Mechanic
Ask a Question
How to remove a windshield Most of us have encountered broken glass, and when after removal we scatter a lot of fragments, which is a big problem for a car interior. To avoid additional difficulties in cleaning the interior from glass residues, which are very difficult to remove, even with a vacuum cleaner, you need to know how to remove a car windshield.
If you are faced with the situation of how to remove a windshield, where the car glass is cracked to pieces, or is jammed by the outside of the car, remaining intact and you need to carefully remove it, then the following recommendations are just for you:
- To properly remove the glass and then install another, you need to take one copper wire. Make sure that this wire is braided; in a guitar it is called 3, 4 or 5. This is the size. The braid is necessary for a better silicone cutting process. Glass, and in particular on foreign cars, rests on silicone, which is why you need to take an awl and carefully make a hole in a convenient corner part of the glass seat. Then we will run a copper string into that place, and clarify that two people need to work on this process, that is, when removing or installing glass, at least two pairs of hands are needed.
- On the first side, pull the string toward you and pull it out in the required direction for cutting out the silicone, where the windshield is glued. We perform the same action on the other side of the glass. As a result, the person who does this must be inside the car. Then, when you have gone through the entire perimeter of the windshield seat in this way and cut out the silicone, small steps of silicone will remain at the cutting site. There is no need to delete them. This silicone residue will be a good helper for you, in strong adhesion to the other glass that you are going to install.
- Then, since you do not know the instructions for the technique of controlling the string, you can be sure that this process is performed quite simply, keep the string lightly wrapped around the mitten. When someone tells you that you don’t need to worry about how to remove the windshield and it’s easier to trust the professionals, then be sure that you will perform this action no worse than others, and perhaps even better.
How to remove a windshield This is actually the entire process of removing a windshield. Put the theoretical narrative of this article into practice as it was done by common people who have no practical experience in the field.
And in the end, we can add that this method is simply excellent when for the first time you had to face a similar problematic situation of removing glass and you did not know where to start. When, from your own experience, and with simple tips from specialists, you will learn how to remove the windshield, and you will be able to calmly and easily dismantle the windshield of your car. And the installation process is even simpler, since for this purpose you will need silicone glue in a spreading gun, and rinse the surface of the glass edges and the edges of the body, the windshield is easily glued within twenty-four hours, and your car will be transformed before your eyes.
Informative!
Mechanic
Ask a Question
Share link:
- Click to share on Twitter (Opens in new window)
- Click here to share content on Facebook. (Opens in a new window)
Similar
Replacing the windshield on VAZ 2108, VAZ 2109, VAZ 21099
Welcome! Most people who periodically use their car have their windshield deformed from time to time, most often this happens from a stone hitting it, a bird flying past, or an accident. The windshield of a car plays a very important role; it creates additional rigidity for the car body, which has a very positive effect in the event of a collision.
Note! It is not recommended to leave a car without the glass removed for a very long time, because if the windshield is missing for a long time, the car body may become distorted; of course, you won’t see anything by eye, but this will make itself felt when installing a new glass!
Summary:
What other glasses can be replaced using these instructions? Using this article, you can replace other fixed windows on a Samara family car in exactly the same way, since their replacement is carried out in the same way; fixed windows include:
- Front windshield.
- Rear trunk window.
- As well as small rear side fixed windows.
Removing old glass
You should start replacing the rear window in VAZ cars with the grooves of the seals. To do this, you will need a flat blade screwdriver to pry the seal lock from the inside of the glass. After which we simply pull it out.
Then, using a screwdriver, move the frame seal as far as possible from the outside of the glass. After which, we do the same on the inside of the frame. Having freed the glass, we begin the extrusion process. Why do we call for help from a friend smoking on the sidelines and ask him to hold the glass from the outside. We ourselves squeeze out (push carefully, but with force) the rear window from the inside.
You may not be able to free the glass from the frame the first time. There is no need to despair and freak out, but it is worth going through the seals with a screwdriver again. Then try again to squeeze out the glass. It will still resist, but eventually it will pop out. Having briefly rejoiced at this circumstance, we proceed to installing new glass.