Features of the mirror heater device
To repair the heating element, you can use one of the commercially available special kits that contain silver. Any modern car is equipped with all kinds of heating systems. Standard devices that no car can do without include a cabin heater and rear window heating.
Break. It also often happens that conductive threads burn out or break, as a result of which the current does not flow beyond the break point.
Lada (“Lada”) is a brand of cars produced by AvtoVAZ JSC. Previously, it was used only for export cars, and for the domestic market, cars were produced under the Zhiguli brand. In 2004, the management of AvtoVAZ announced the transition to the Latin alphabet for the official spelling of the names of all cars produced by the plant: Lada - instead of "VAZ" and "Lada".
Instrument cluster, pin “21”. Electrical package controller, contact “9” of block X2. Electromechanical power steering control unit, contact “1” of block X2. Reversing light switch. Reversing lamps.
Measure the voltage on all strips one by one with a voltmeter, connecting one terminal of the body voltage and the other in series to the conductive strips.
Go see a good electrician and let him try soldering, just be careful, don’t heat the glass too much... If it works, the contact should be reliably held, because... It can get very hot, after all, 20 A before. costs.
Before replacing a blown fuse, find out the cause of its blown and eliminate it. When troubleshooting, it is recommended to look at the circuits that are protected by this fuse.
If you don't have a multimeter, use an alternative method. If the housing is transparent, check the integrity of the filament with light (its damage is easy to see). For fuses with an opaque casing, this option will not work.
How to restore heated rear window
When a damaged area of the heater filaments is found, it is worth thinking about how to restore the heating in full. Of course, you can restore it simply by replacing the glass, but this is a rather expensive operation, while there are several ways that allow you to eliminate the defect on your own, without too much effort. Before work, it is necessary to prepare the place where a break is detected and the heating filaments will be restored. To do this, the conductive path in the right place must be carefully cleaned of varnish and degreased with alcohol. A characteristic metallic sheen should be visible on the prepared area.
Track restoration can be done in the following ways:
- Using special conductive paste. It is applied to cold glass. When performing work, do not turn on the heating. The path, prepared as described above, at the site of damage should be limited on both sides with adhesive tape. The paste is then applied to the area that is not working. It hardens, as a rule, within 24 hours; you can check and use the heating after this day has passed.
- Using metal filings. This method allows you to restore functionality when there is no paste. For this, pre-prepared small iron filings are used. During the work process you will need transparent glue and a magnet. It must be secured over the area where the damage is detected, and then iron filings must be applied to this place. The magnetic field will force them to line up along the section of the track that is not working. Having leveled the sawdust and ensured electrical contact with the damaged area, they are covered with a layer of glue. You can check whether the repairs have been successfully completed and whether the heating is working in one and a half to two hours.
- Using shavings and paint, in this case shavings of non-ferrous metals are used. It is mixed with paint in such a way that a mass similar to plasticine is obtained. Using tape, a kind of stencil is formed around the damaged area. The heating is turned on, and the prepared mixture is applied to the desired area, and a characteristic hissing may occur at the point of contact, but after a while it disappears. This mixture hardens in twenty to thirty minutes; you can check and use the restored system after an hour.
This is interesting: Maintenance schedule for Nissan Qashqai: list of works
There are some other methods that allow you to restore a non-working heating system, but those described are the simplest and most accessible.
Unfortunately, such methods are unlikely to be applicable to windshield restoration. It uses thinner conductive tracks and the repair area will appear quite rough, impairing the driver's visibility. For a car, heated rear window is not a luxury, but can significantly improve driving safety. And if it does not work, then with the help of fairly simple techniques you can restore its functionality.
Repair materials
To fix problems with the rear window defroster, you will need:
- paste or glue capable of passing current (special ones, sold in automotive supply stores);
- or copper-brass powder and paint;
- or zinc chloride, material for joining workpieces POS-18, soldering iron;
- as well as a repair kit for heating filaments (if the gap is very large, several centimeters).
Conductive varnish, paste, paint
Special pastes, varnishes, and paints are characterized by excellent adhesion to glass. In addition, the composition includes crushed palladium, gold and silver, due to which the conductive properties are increased. Restoration of heating filaments using such means occurs quickly and efficiently. As a result of the repair, a long-term effect is achieved.
This repair composition is a two-component product, so before use, its two parts should be thoroughly mixed in a separate container. You need to use the varnish according to the standard scheme, applying it with a cotton swab or brush. In this case, the layer thickness should not exceed 2 mm. The product hardens in about 30 minutes, and after a day you need to carefully remove the remaining substance.
Design of heated rear window of Lada Priora car
But the lack of heated rear window and side mirrors can become a serious problem, since in this case there is already a negative impact on traffic safety.
But there are often cases when it is simply not possible to replace one relay and fuse. In this case, you have to replace the entire mounting block. Most of the vehicle's electrical circuits are protected by fuses installed in the mounting block. The mounting block is located in the instrument panel on the lower left side and is closed with a lid.
The information is relevant for the Priora 2170 2013-2018 model year, 2172/2171 2013-2015 model year.
How to find the location of a broken glass heating filament
Now let's talk about how to check where the rear window heating thread has broken. To do this, you will need a voltmeter or ohmmeter of your choice. Do the following:
- Inspect the rear window - sometimes the break is visible to the naked eye: the thread is interrupted and resumes after a few millimeters.
- Turn on the heating and see where the water drops have not dried. Take a magnifying glass and look at this area more closely.
- Let the heating function remain active. One metal rod of the voltmeter needs to be connected to the positive heating terminal, and the second should be drawn along the thread from the side of the clamp with the “-” sign. Keep an eye on the indicators: the break will be where 0 volts is displayed.
- Take an ohmmeter and attach one probe to the common wire (the negative of the battery is connected to it), and carefully lean the other one against the center of each thread in turn. The break is where the resistance jumps to 4-6 ohms.
This is interesting: Broken timing belt and possible consequences - causes, symptoms, repair
The rear window heating does not work, we look for and fix the problem
The reason for inaction is inability and ignorance of the causes of the malfunction, as well as the principles of repairing heated mirrors. What to do if the device does not work? What tool might be needed?
It turns out that if we do not have enough generator power, the heating will stupidly turn off. There seems to be heating, but we can’t turn it on. I decided that this scheme did not suit me. So I came to the conclusion that the heating power should be adjusted in steps, and not just on. or off It took some time to think through the heating algorithm itself.
Having decided on the installation location of the fuse, it must be removed and checked for suitability. If it is burnt out, it needs to be replaced with a new one, as this could be the main reason why the rear window defroster is not working. A typical malfunction can also occur due to a breakdown of the system relay.
At BOSCH the quality is okay, but the price tag is already 6500 RUR. In short, replacing a generator due to heating is not our method. So I came to the idea that some kind of smart heating power control circuit was needed. At first I wanted to do it like the first Priors with heating. There was a tricky switch that turned on one half of the glass for 5 minutes, and then the other half of the glass for 5 minutes.
Having decided on the installation location of the fuse, it must be removed and checked for suitability. If it is burnt out, it needs to be replaced with a new one, as this could be the main reason why the rear window defroster is not working. A typical malfunction can also occur due to a breakdown of the system relay.
The design of any heater is very simple, and on all cars they are built according to the same principle. If we consider only the rear window, its heating system includes:
- Conductive threads and busbars applied to a transparent surface (from the inside);
- Heater power cables (powered from the on-board network);
- Protective elements (relay, fuse);
- Controls (power key with signal diode installed on the front panel).
DIY rear window heating repair 2
We will talk about a car function that is necessary in any season - a heated rear window. If some people think that rear window heating is not needed in summer, it means they haven’t driven in rainy weather.
the humidity rises in the cabin and outside . Consequently, visibility is reduced. Therefore, it is necessary to repair the system responsible for heating the rear window of the car.
The cause of the malfunction can be various factors: unprofessional actions of service workers in the process of tinting windows, children pampering in the seat.
How to find the break point? Can't be determined visually. Any motorist is able to find the place where the threads break. Basic Rules:
1 Initially inspect the mechanism. If the rear window is fogged up, turn on the heating. In the area where the threads break, the glass will immediately begin to fog up, but the rest of the surface will not have characteristic stripes.
2 You can use a voltmeter . Turn on the ignition, start the rear window heating mode. We connect the voltmeter probe to the ground of the car, wrap the other end in foil, and move it to the center of the heating filament. The voltage level must be maintained within 5V. There is a break where the indicator falls.
3 Using a voltmeter, connect one probe to the “positive” heating terminal. We move the end of the second along the heating thread, where the negative terminal is. Repair of the glass heating will be required where the voltage drops.
4 Use an ohmmeter . It is needed for diagnostics; you will need an analog device. Turn on the ohmmeter, mega or kilo mode. We connect the equipment probes to different terminals of this system. Using ordinary cotton wool, which is soaked in distilled water, we carefully move it along the existing heating thread. The reaction of the ohmmeter needle will indicate an open circuit.
Do-it-yourself repair of rear window heating threads
[ads2]
Now regarding work. There are many techniques and materials for performing this operation. Initially, we will consider the possibility of using an industrial repair kit. It must be remembered that the connection points of the threads (wires) are always cleaned and degreased before carrying out the activities.
1 Repair set of glass heating threads allows you to restore up to 10 cm of the damaged area. The set contains stencils (templates) and a container with compound. Having specified the location of the thread break, the heating should be turned off. Remove the protective film from the stencil and apply the thread to the broken area. Using a brush, apply the compound in place. The procedure is repeated two to three times after drying. It is necessary to remove the template from the glass, but do not turn off the heated rear window during the day.
2 Apply conductive paste . The product is applied to the area of the break. It is advisable to grab the area where the paste is applied 20 millimeters from the ends of the broken thread. It is necessary to dry the paste for 24 hours.
3 There are also traditional methods for repairing heated glass. The only difference is in the material used. Apply paint and shavings. The chips are formed with a file from a copper-brass bar. Red paint will be more effective. You need to mix the shavings with paint in a 50:50 ratio until it forms a dough. We create a stencil from ordinary electrical tape. We turn on the heating and apply this mixture using a stencil. If you recognize “contact” during the reaction at the repair site, you will get a slight hiss.
4 Sometimes glue with chips is used. The result is a conductive mass, but glue is used instead of paint. In a large area of broken conductive thread, you can use a small wire (core).
5 Continue soldering the break point. Here you need a flux - zinc chloride. If a significant area of the thread is damaged, a wire core (copper or silver) is used.
Where to buy heated rear window?
I looked online to see if I could buy a heated rear window instead of having to repair it. There was little information: mainly either proposals for the manufacture of independent heating elements, or a couple of Ukrainian sites with finished products. In general, the easiest way is to put up with fogging or buy new glass - if you don’t want to repair it. As an option, I heard you can install computer fans on the sides, blowing on the glass))).
Interesting read:
Driver glasses
Preferential loan for a car
Attention rust!
How to drive through a puddle
How to insulate an engine for the winter, methods and solutions.
How to save fuel?
Tags: heating, windshield, roof rails, purchase, sale, price
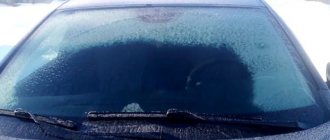
In just a few minutes, heating the rear window melts ice and light snow, and also dries the condensation that accumulates on the glass in wet weather.
In the autumn-spring period, this condensation causes “fogging” (a water film is formed, which greatly limits visibility), and in winter it turns into ice and frost, through which it is generally impossible to see what is happening behind.
If the problem is not solved, create a topic on the forum, the problem has nothing to do with relays and fuses.
As it turned out, only the two lower threads worked for me and therefore it seemed that the heating was not working at all because these threads practically do not warm anything in winter.
Basic glass faults on Priora
To prevent the battery from being discharged by a heating element left on when the engine is not running, the heating can only be turned on when the ignition is on. Heated rear window is useful not only in winter, when you can’t see anything on the glass due to ice and snow, but also in summer, when it rains and the glass fogs up. The malfunction of this option causes a number of inconveniences and makes the train less safe, because visibility is significantly reduced.
Most electrical circuits are protected by fuses. Powerful consumers (rear window heating element, heater fan, engine cooling fan, sound signal and others) are connected via a relay.
Oleg, relay K4 drags all the extra consumers through itself. So that when leaving the car, do not leave on something that is not visible. It often melts and the wiring in the mounting block burns out.
Individual threads of the heating element do not heat up Lada Priora
And heating in a car is not the only energy consumer. You can, of course, stupidly turn on the heating and not pay attention to the fact that the voltage has dropped significantly. But sooner or later all this will end with at least a burnt diode bridge. In the worst case, the generator stator winding burns out. As an option, you can install a more powerful generator: this is either KZATE 115A or BOSCH 110A.
Recirculation switch (on indicator). Relay for switching on low beam and dimensions (automatic lighting control system). Heater electric fan relay. Automatic lighting control switch. Windshield wiper and external lighting control unit (pin 3, 11). Automation system controller climate control (contact 1).
Guys, I have a problem: neither the rear heated glass nor the heated mirrors work, Relay K7 has a working fuse, the button is new.
Often, a breakdown of this vehicle device is discovered with the onset of cold weather, just at the wrong time.
Signs of breakdown
You can understand that there are problems with heating by the following signs:
- The glass begins to sweat when the warning light does not work. The first thing you need to do is check what voltage and serviceability of the fuses
- The glass does not heat up when the control lamp is on. The reason may be due to lack of voltage
- Condensation appears in some places; this may be due to a broken thread. Can be restored through repairs, special varnishes
- Defrosting does not occur even though the system is working properly. This can happen if the glass is heavily iced and there is not enough voltage; you need to clean the ice yourself.
There can be many reasons for the breakdown, ranging from the switch to the wiring itself, which can only be repaired by disassembling the entire dashboard.
If the reason is a broken thread, you can try to restore it. There are many different ways to solve this problem, which look like this:
- To eliminate a break, up to one millimeter, you need to prepare a special adhesive composition, for example (Kontaktol, Elekont), a syringe, or a glass cleaner. Special glue is applied to the area where there is a break, and insulating tape is tightly applied on both sides.
- You can use soft soldering or resort to the option of galvanic application of the material. But this procedure is labor-intensive and difficult to carry out in garage conditions.
- If the width of the gap exceeds two millimeters, you need to use a tinned copper core with a cross-section of 0.2 millimeters. It is better to perform soldering with POS-61 solder, but do not tinning the thread.
This is interesting: How to change rear beam silent blocks with your own hands
Technological process of repair step by step
From this diagram we only need to understand that the rear window heating is turned on via relay K2 when the control voltage +12V arrives at pin 85 of this relay (red-green).
Instrument cluster (contact “21″). Electrical package controller (contact X2-9). Electromechanical control unit power steering (contact X2-1). Reversing light switch. Reversing lamps.
In the event of a car breakdown related to electrical equipment, the fuses and relays are first checked. If a fuse is blown, you must first determine the cause of its blown before replacing it. Instrument cluster (contact “20″). Interior lighting. Brake light bulbs. Front door threshold lamp (right).
Fuses and relays, where to look for them?
This automobile addition serves to remove icing and perspiration from its surface in winter. When the rear window heating does not work, visibility is significantly reduced. The driver is unable to correctly assess the situation on the road behind his car.
Most modern cars are equipped with a rear glass heating system. This automobile addition serves to remove icing and perspiration from its surface in winter. When the rear window heating does not work, visibility is significantly reduced. The driver is unable to correctly assess the situation on the road behind his car.
The voltage must be measured in at least two places at the same distance from the axis of symmetry to eliminate the possibility of missing a damaged area.
If all fuses, relays and the heating element power circuit are good, check the condition of the conductive strips.
Rear window heating diagram for VAZ 2110, 2111 and 2112
Mounting block, high speed windshield wiper relay. Switch for cleaners and washers, contact “53a”. Wiper and washer switch, contact “53ah”. Heated rear window switch. Mounting block, rear window heating relay (winding). Windshield wiper motor. Rear window wiper motor (2171,2172).
The working element of the rear window heater is a horizontal grid of conductive threads glued to the inner surface of the glass. And it will decrease until the voltage settles at 13V (not lower). Each decrease in power level by 1% increases the heating operating time by 5 seconds, taking into account the time it has already worked. This is necessary to ensure that the glass is guaranteed to thaw even when the heating is operating at lower power.
Do-it-yourself rear window heating repair
Nowadays, absolutely every car is equipped with a rear window heater. Visually, it looks like thin threads, which is why motorists call them “heater threads.” This tool is designed to effectively remove frost from the glass surface, thereby preventing the formation of an ice crust on it. If the heater is faulty, visibility will be significantly affected. Frost can completely cover the surface of the glass, which creates an emergency situation. Therefore, this mechanism must always be in working order. Well, if you need to repair the heated rear window, then this article is for you.
First we need to determine the place where these threads were damaged. This can be done using a voltmeter. When the heater is on, the voltage on both wires should be 11 volts.
Now you need to prepare the necessary tools. In order to efficiently repair the heated rear window of a car, we will need sulfuric acid, a piece of copper tube with a diameter of 7-8 millimeters, copper sulfate and a strip of fabric measuring 30x0.5 millimeters.
We wrap the end of the tube with a strip of fabric. You only need to wrap half of its width to get a kind of tassel. Now we put the threads on the fabric so that the latter does not unwind. At the next stage, repair of the rear window heating terminal is accompanied by the production of electrolyte. To do this, take a glass, fill half of its volume with water, then pour in a few teaspoons of copper sulfate. Stir the resulting mixture thoroughly and add a solution of concentrated sulfuric acid (about ½ teaspoon per 100 milliliters).
Now we connect the terminals to ground; The “+” of the battery is connected to the handset. Dip the positive electrode into the solution and treat the area where the threads break. The voltage that will pass through the current transfers the copper ion, causing the filaments to heat up. If the scale of the breakdown is small, then within 5 minutes the repair of the heated rear window will be completed and the device will be fully operational. If this does not happen, then the threads are seriously damaged. In this case, we take a soldering iron in our hands and use it to treat the areas with the applied solution. At this stage we need to solder a jumper from a thin wire. Also, do not forget that a solution with sulfuric acid is very dangerous for the fabric on clothing, so take precautions.
If you are not confident in your abilities, you can try to repair the heated rear window in another, faster and easier way. For this we need a Done Deal repair kit. It is specially designed for such work. The glue will form a conductive layer on the surface of the glass, which has the same electrical resistance as the threads themselves.
Whatever repair method you use, in both cases the rear window defroster will be repaired. The only difference is the time and cost of the work.