Features of choosing and installing podiums for speakers on Priora
High-quality sound in a car is ensured by installing and connecting several speakers to the media system. The larger the tweeter, the louder the sound will be.
And the more speakers, the more voluminous the sound from the radio in the cabin. This is why many owners decide to install podiums on the front doors of the Priora to increase the playback volume. The speakers can be placed either at the top or at the bottom of the door.
New podiums on the Priora in the front doors: differences and features of the products
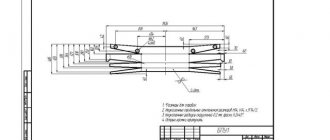
Before choosing a podium for Priora tweeters, the buyer needs to determine their appropriate size. This applies not only to the purchased speakers, but also to the free space left for a comfortable stay in the cabin. It is unacceptable to install an element that is too bulky, since it will not allow either the driver or the passenger to sit properly in the cabin.
In addition, the podiums should be conveniently attached to the side pads. The newly acquired elements must lie exactly on the surface of the door, without blocking the pocket. And special podiums for Priora, installed in the upper part of the sidewall near the pillar, will allow you to add new notes to the sound. And also achieve surround sound transmission.
Modern podiums
Acoustic podiums yourself
Sound organization is a set of measures that includes not only sound insulation or installation of a subwoofer, but also installation in the front doors of the podiums. You don’t have to buy them, although you can find almost any option in stores today. You can make podiums with your own hands if you know the basic nuances of the operation presented in our instructions below. Modern acoustic podiums are not too different from those that came before. Although, this is at first glance, but if you take a closer look, you will see the following:
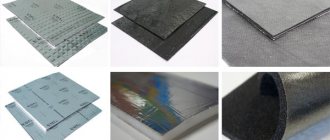
- Modern podiums are made of high-quality material, which significantly increases their service life. If earlier they were made of plastic, which soon became covered with cracks and delaminated, today podiums are made of more durable material;
Modern acoustic podium
- Acoustically, modern podiums have an excellent and comfortable matte surface that does not leave dirty marks. High-quality plastic or plywood, from which modern podiums are made, is quite difficult to accidentally damage;
- The current podiums are made in such a way that they provide the opportunity to conveniently lay hidden electrical wiring to the speakers;
- Modern podiums are distinguished by a slightly modified configuration, which allows the installation of not one, but several speakers that reproduce different frequencies.
Acoustic podiums for yourself
Making acoustic podiums on Priora with your own hands
Organizing sound in a car is a set of measures, for example, sound insulation, installation of 16cm. speakers and subwoofer, as well as the production of podiums, because The standard dimensions of Priora speakers are only 13cm. Do you know how to make door podiums yourself?
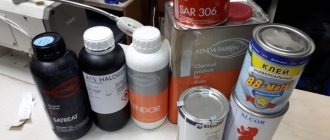
Required . plywood, polyurethane foam, epoxy with fiberglass, putty with fiberglass, finishing putty, sandpaper (fine and coarse grit).
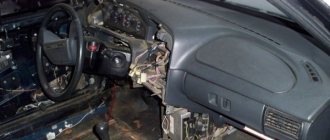
How to make podiums on Priora? The process begins with the manufacture of spacer rings for pre-purchased speakers; we use plywood as the material. Then we screw the resulting rings to the door trims (see removing door trims). At this stage, it should be taken into account that the podiums on the Priora should not be installed too close to the passenger’s feet, otherwise it will not be possible to open the glove compartment when the door is closed.
The further process of making podiums at Priora.
- Polyurethane foam was used to fill the volume. The approximate drying time is a day.
- Give a forum to the podiums in the Priora doors, cutting off excess foam with a knife. It is important that the foam is completely dry, otherwise there will be a defect.
- We reinforce the front podiums with epoxy and fiberglass. After the resin has completely cured, fiberglass putty should be applied. After drying, sand it with coarse sandpaper.
- Finally level the surface of future door podiums using finishing putty.
After the putty has dried, we sand the podiums for the speakers with fine sandpaper (this process is long and dusty). It is impossible for the parts to have irregularities, because as a result they will be very noticeable. If unevenness remains, then the puttying process must be repeated until the podiums are perfectly smooth. To give the door trims their final look, they should be painted (see painting plastic) or reupholstered with elastic leather (see reupholstering door trims).
Lada Priora sedan in Kvarts › Logbook › Podiums in the door of the Priora (Part one)
For DTX-203 dragsters
The rings were made by a specialist with a larger outer diameter so that during installation the plywood would not burst or break, in short, to make it easier to work with. I won’t really explain how to cut, everything is simple, we mark and cut)
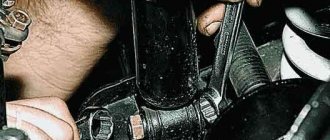
Today I removed the door trims and, in fact, the installation began, using tools: - jigsaw
-screwdrivers -small screws (they are also seeds)
-mounting tape (which, by the way, I didn’t have enough at all, tomorrow I’ll buy a couple more meters, it goes away quickly)
First, we completely disassemble the casings, unscrew everything we can so as not to scratch/tear/break anything unnecessary. To do this, turn the casing with the back side facing you and twist all the screws that can be unscrewed
Back covering
Next, we apply the podium, look, twist as we like, mark, cut
I started from the corner of the door, then I tried on a podium for food and a podium for the second Hanibal 7 along it
The first podium can be secured to the trim with short screws, but not tightly around the perimeter, but so that it stands parallel to the plane of the door (I wanted to, you can also turn it slightly upward, but this is not for everyone), but in no case so that the podium Don't look down, the sound will be worse later.
To attach the podium, without the possibility of attaching it directly to the sheathing, you will need mounting tape, I won’t describe it, we mark it, cut it, screw it on
Mounting the podium for the horn
The tape is also needed for edging the round podiums under the ganibals, so that later the speaker grids are flush with the door trim. I only had enough of this tape for one podium, once I buy some tape I’ll finish it!
I decided to turn the food up a little, you can see it in the photo above, and here’s the finished version:
Contents of the article: 1. Installation of front speakers 16 cm in diameter 2. Installation of 16 speakers in Priora without cutting
Installation of front speakers 16 cm in diameter
Finally I got a radio. Cheap radio cassette player SoundMAX SM-CCR3037.
I bought Mystery speakers.
As a friend recommended, I took 16, their sound should be better. But the question is how to install it in the door, because the size is standard for 13 speakers.
Now I decided to install it without the help of others.
Below is a photo report of the process of installing the front speakers.
To remove the trim you will need: a screwdriver and an asterisk wrench. Thanks to AvtoVAZ I will have to take a set of asterisk keys. There are probably many more such pitfalls.
Looking ahead, the plastic, as well as the clips on the Priora doors, are good, a comparison with the former two-piece.
There is a standard place for speakers for 13. There is audio preparation - it’s true that two wires for the speakers are brought out.
This piece of paper was already included with the speakers, all I had to do was draw a circle in a comfortable place.
For the future, you shouldn’t move the hole as in this picture. The last clip on the trim will touch the speaker. I made a hole on the second door without moving it higher to the side. It was awkward to strengthen, but the sheathing sat perfectly.
For good fastening of the speaker to the door
, took 9mm as a substrate. plywood
So as not to touch the fastening of the clip on the casing, I ground down the edge of the speaker.
Speaker on spacer
Speaker on plywood spacer
There was no suitable material for sound insulation, but there was one at hand - foil insulation.
It’s not a masterful thing to say, I agree. But isolon is better than nothing at all.
Everything is ready, you can put on the trim.
Installation of 16 columns in Priora without cutting
The process itself is not easy, I chose the music painstakingly, but not cheaply, I think this option will suit many.
Diary Lada Priora 2. Entry 44. 16 cm speakers in the front doors.
Subscribe to the channel Dismantling BC https://www.youtube.com/
To watch online, click on the video ⤵
CAR SOUND IN PRIOR BY DESHMAN Read more
Installing tweeters in the front pillars. Acoustic carpet. More details
Stands for tweeters, horns. Priora, VAZ Read more
Installation of 16 cm speakers in the front doors of Lada Priora without podiums Read more
No extra channel for horns! How to connect HF speakers from a GU or in parallel, see Read more
What happens if you connect the tweeter directly? More details
Installing a gong (buzzer) from BMW in a Priora Read more
Car service: “Installation of high-frequency speakers - tweeters - tweeters on the side pillars” More details
Where you can and cannot install tweeters (HF, tweeters) | Car Audio School Read more
Diary of Lada Priora 2. Entry 44. 16 cm speakers in the front doors. More details
Should I put tweeters or a horn? More details
The process of making door cards. Coverings for a loud front on the Lada Priora from [Avtostyle] More details
Audio system for 20,000 rubles - connection and configuration Read more
Large review of horn tweeters (tweeters) Read more
Does the car radio need an amplifier? We test acoustics with and without amplification. More details
How to Install HF tweeter (tweeters) in MAZDA3 test and review. More details
SB: We remove the wheezing of the speakers and set up the radio with our own hands Read more
Assembling a loud audio system in a car. Part 2.2. Installation of acoustics. More details
Car tricks for CAR SOUND!! More details