Device design
The design of the windshield washer on the VAZ 2101 consists of a gearmotor powered by an incoming current that drives the washers, a switch, a switch, a relay for switching on the intermittent mode, an additional relay, etc.
Glass cleaner device
The node consists of:
- Windshield wiper trapezoids: with its help, the motor transmits movement. It wears out quickly, so sometimes repairs to the trapezoid are necessary.
- An electric motor drives the wipers of the VAZ 2110. If the motor burns out, the entire unit will fail.
- The windshield wiper pump pumps cleaning fluid. If the electric pump breaks down, then, despite the operation of the wipers, the windshield will not be cleaned.
- The purpose of the tank is obvious - window cleaning liquid is poured into it.
For high-quality operation of the windshield wiper, the shape, material, size and design of the wipers are important.
Thanks to the electric motor, the wipers on the VAZ 2110 can operate in three modes:
- Intermittent. The switch lever is in positions II and III.
- Constant - with a low speed of movement of the brushes. The switch lever is in position IV.
- Constant - with fast movement of the wipers. In this case, the shift lever is in position V.
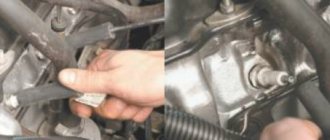
What is a windshield wiper trapezoid and what is it for?
The trapezoids are around here somewhere!
The wiper trapezium is a special unit that converts the engine impulse into forward movements of the windshield wipers.
Simply put, it is she who is responsible for their movement along the windshield or rear window of the car. Since weather conditions are often unpredictable, and the windshield must provide complete visibility, failure of this part must be quickly identified and repaired.
Principle of operation
Most often, plastic bushings wear out in trapezoids.
This is interesting: All the details about the windshield washer: what to do if it doesn’t work
Although, at first glance, it seems that the movement of the brushes occurs directly, in fact, a trapezoid, which is an electromechanical unit, is responsible for it. It works on the following principle:
- The windshield wiper motor uses the finger, which drives the trapezoid itself.
- Due to the connection of the gearbox and shafts, oscillatory movements occur, causing the brushes to move along the glass, cleaning it.
It often happens that the trapezoid fails. This happens especially often after or during the winter season. Some inexperienced VAZ-2110 owners turn on the “brushes” without bothering to clear the snow from the glass. Often the wipers freeze to the glass, and an attempt to move them ends in breakage. To prevent this from happening, you should always check the brushes before turning them on in winter for freezing.
Possible causes of wiper malfunction
The causes of windshield wiper malfunction can be either mechanical or electrical. We start troubleshooting first with the fuse, and then we disassemble the rest.
Mechanical problems may include the following symptoms:
- When the windshield wiper is turned on, you can hear the wiper motor running, but the blades do not move. This may primarily be caused by a loose or loose nut that secures the crank to the gearbox axle.
- If the brushes do not work synchronously, the reason may be the driver - its fastening nut has become loose.
Windshield wiper diagram for VAZ 2110
Electrical faults have the following symptoms:
- The brushes do not occupy an extreme position, they stop anywhere and move slowly. The cause may be the ring switch. In this case, you need to bend the contacts. If this does not help, you need to replace the wiper motor assembly, as it is sold with a gearbox.
- The intermittent mode is turned on, and the brushes work continuously, then the problem is in the relay, it needs to be replaced. If the replacement does not help, then it is likely that the contacts on the limit switch have oxidized or burnt.
- If, when you turn on the windshield wiper, the windshield wipers and armature do not work, then the blades may have frozen. Another reason could be a burnt anchor.
- The electric motor does not work, but the fuses are good. In this case, it is necessary to check the contacts that the wiper drive has, as well as the motor. It is possible that the VAZ windshield wiper blades are stuck or the armature is burnt out.
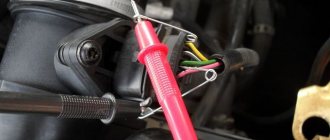
Checking the operation of the windshield washer
Photo report on the removal and installation of the windshield wiper trapezoid on a VAZ 2110-2112
When all the preparatory steps are done, everything will look something like this. The arrows at the top show the attachment points of the two nuts:
You need to unscrew them, of course.
After this, we disconnect the clamp securing the expansion tank and, lifting it up a little, move it to the side to gain access to the third trapezoid mounting nut.
After this, the nut can be unscrewed; it is located at the very bottom:
After you have dealt with this, you can carefully turn the trapezoid and remove it from the left side, slightly bending the metal frame below the windshield to the side (the force required is very small - there is no point in talking about any real bending!)
And lift it almost all the way to take it out:
All that remains is to disconnect the power plug:
And now you can finally remove the entire structure of the trapezoid and the wiper motor from the bore. If you need to disconnect and replace one motor, then in principle there will be no difficulties with this - just unscrew it and replace it.
Installation of all removed parts occurs in the reverse order. It is worth mentioning the prices of these spare parts. The cost of a trapezoid assembly with an engine for a VAZ 2110 is about 2000-3000 rubles from the manufacturer AvtoVAZ. Chinese analogues cost about 2000 rubles.
Windshield wiper repair
To repair the unit you will need the following materials and tools:
- set of sockets and keys;
- screwdrivers;
- WD-40 liquid;
- old rags;
- trapezoid repair kit in case of need for replacement or windshield wiper repair kit for VAZ 2110;
- other parts requiring replacement.
To repair the windshield wiper, you need to disassemble it:
- First you need to remove the instrument panel.
- Next, you should find the VAZ 2110 wiper relay, which is screwed to the body. If it doesn't work, it needs to be replaced.
- It is advisable to remove the frill so that it does not interfere with disassembling the unit.
- Now you need to check the fuse that is responsible for the operation of the VAZ 2110 wiper drive.
The next step is to disassemble the steering column to check the switch. If it has significant damage, it needs to be replaced (the author of the video is “In Sandro’s Garage”).
- Next, you need to dismantle the motor and check it. If replacement is necessary, replace the windshield wiper motor and gear motor assembly.
- If the windshield washer reservoir or pump is damaged, it must be replaced.
- Be sure to check the size and condition of the brushes: they must meet the standards specified in the manual. Their length is important as they must cover the entire surface of the windshield.
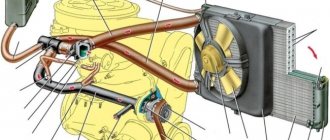
Device and possible malfunctions
To understand the operation of the wipers, you will need an electrical diagram, which is present in the VAZ 2110 operation and maintenance manual. You also need to know what the unit consists of:
- The trapezoid is the main part through which the motor transmits movement; the trapezoid most often wears out, and as a result, repairs are needed.
- Electric motor - due to this unit, the wipers move; the motor can burn out, which will cause the failure of the entire unit.
- Pump - this element is needed to pump cleaning fluid into the wipers. If the pump breaks, then you can forget about keeping the front window clean, although the wipers will still run across the window.
- Tank - everything is obvious here, it stores window cleaning fluid.
- Windshield wiper – mounted on a trapezoid, performs a cleaning function. First of all, you need to pay attention to the size of the windshield wiper.
Do-it-yourself modification and replacement of wipers
Which wipers are better is up to the car owner to decide. Those installed on the VAZ 2110, as well as on the UAZ, do their job well from the factory, but it can be modified with washers from other companies that are of higher quality. Many people are attracted to frameless brushes - this is a good option. They are compact in size and equipped with a special leash mechanism. True, they do not look very attractive on the VAZ 2110, since the fastener to the standard washer arm turns out to be massive. Therefore they need improvement.
Frameless car washers
To perform a replacement or modification, you must perform the following steps:
- First you need to disconnect the negative terminal on the battery.
- Then you need to tilt the mount towards you and remove the brush.
- If there is a decorative trim, it must be removed.
- By unscrewing the bolt, you can remove the old brush.
- Before replacing parts, be sure to check the dimensions of the new washer with the old one. It is advisable that the new one does not exceed the size of the old one by more than 2 cm.
- Installation of the new kit is carried out in the reverse order.
After upgrading, you should check the functionality of the unit: whether the brushes creak, how they work when switching modes. At high speeds of the windshield wiper motor, the wipers should work quickly, at low speeds - slowly. In addition, they must support intermittent operation.
Self-replacement of the windshield wiper trapezoid on a VAZ 2110
A hot topic for owners of the corresponding model is replacing the windshield wiper trapezoid on a VAZ 2110. Experienced motorists know: this part is subject to rapid wear
. more precisely, not the part itself, but some of its components. In particular, the bushings are made of plastic. Whether the design is to blame for this, or some other defects, they wear out much faster than other mechanisms.
Meanwhile, the performance of windshield wipers is a guarantee of safety in bad weather.
Replacing the windshield wiper trapezoid on a VAZ 2110 is a necessary measure that has to be taken to maintain the wipers in working condition. At the initial stage, this problem manifests itself in a weakening of pressure - in other words, the windshield wipers cannot cope with flows of water or heavy snowfall. Returning to the original position is difficult; you can actually feel the strain with which the wipers move across the glass.
The presence of such symptoms indicates wear and tear on the trapezoid mechanisms.
windshield wiper
Attempts to repair the part, especially in a makeshift setting, are impractical: the mechanism is too thin, and the plastic bushings cannot be replaced. The only way out is to replace the trapezoid.
The replacement process is simple, but it involves manipulations that require increased attention and accuracy - there is a danger of damage to neighboring components and mechanisms.
We de-energize the car by removing the “negative” terminal. We remove the special wind cover (the so-called “jabot”) and the expansion tank. The latter must be removed at an angle - there is a possibility that some of the coolant will spill out, so it is useful to first drain some of it into a previously prepared container.
Then you need to turn off the gearmotor. To do this, remove the corresponding connector
Carefully pull out the trapezoid (depending on the year of manufacture, it can be attached to two or four studs) and carefully remove it from the air supply box. That's it, job done
Installation of a new trapezoid is carried out in the reverse order.
Before purchasing a part, you need to find out which trapezoid is needed: there are “old” and “new” samples, indistinguishable in appearance. However, there are quite serious internal differences, which makes it impossible to install the “wrong” trapezoid.
However, our mechanics found an interesting way: a small modification (removing “extra” fastening studs on both sides of the body) solves the problem.
Moreover, experts advise installing a trapeze from Priora on a VAZ 2110 - in this case, a rework is also needed, but some cost savings are achieved (spare parts from Priora are cheaper). The modification consists of replacing the wiper arms ( on the VAZ 2110 they are slightly smaller
).
In addition, the connectors for connecting the electric motor are different. Here you need at least minimal knowledge in electronics, because you will have to install new wiring, reliably insulating it.
Note
. that such experiments require a fair amount of technical skill, which most car enthusiasts do not possess. In addition, in this case, the correct operation of the windshield wipers is not guaranteed (there is a danger that the blades will not ensure complete cleaning of the windshield, in addition, there may be problems with returning to their original position).
Conclusion: in order not to acquire a bunch of problems along with a dubious item, we install the original part, without chasing penny savings.
As you can see, replacing the windshield wiper trapezoid on a VAZ 2110 is a very simple task, accessible even to an amateur
Once again, we draw the attention of novice car enthusiasts that all actions must be carried out with the utmost care - especially those related to extraction
- Why don't the wipers work on the VAZ 2110? Several popular causes and methods of repair
- Replacing the handbrake cable on a VAZ 2107. No service stations. Do it yourself
- Replacing the fuel filter on a Kia Spectra yourself
- How to change the rubber on a wiper? Simple and fast ways
It’s unpleasant when problems with the windshield wiper appear at the most opportune moment, for example, the wipers refuse to work, their movements are difficult, or the blades scratch the car’s windshield. You may have to change the purifier trapezoid assembly, but which one should you install to replace the old one?
We are modifying the windshield wiper relay (VAZ 2110)
The disadvantage of the VAZ2110, according to the owners themselves, is the insufficiently convenient operation of the windshield wiper blades. In particular, the presence of 3 speeds in the operation of the wipers, as well as the process of washing the glass, the work of the brushes begins on dry glass.
To solve this problem, you can use the services of an online store or purchase an alternative windshield wiper relay yourself on the auto market (about 144 rubles). Installing the purchased relay takes no more than one minute.
Advantages:
– the ability to independently set the frequency between the frequency of wiper sweeps; – the first stroke after washing the glass begins with a pause; – the number of strokes after the washer is reduced (3 instead of 4);
There is also a way to independently modify the wiper relay:
Regulating the number of brush strokes on the car. The manufacturer initially provided 4 strokes of the brushes after washing the glass, but after the second stroke is completed, there is practically no water left on the glass. As a result of this, the brushes begin to operate on completely dry glass, and even with an unpleasant sound. But if you use the proposed technique, you can achieve a 2-fold reduction in the number of strokes (2 instead of 4).
First, we consider and compare the wiper relay of the existing (old) model
Then we remove the factory resistance diode and install a 40-70 kOhm resistor. Adjusting the pause between the frequency of wiper sweeps.
What needs to be done for this?
The 2.7 kOhm resistor, located on the second leg of the chip, has an output directly to the “J” pin of the relay itself.
To get an initial delay of 1 second at the output, you should solder in the old resistor, and then solder in the purchased 600 Ohm resistor. If this is not done, the relay will not work.
Next action: from this output a striped yellow-green wire passes through the block of the Shch4-10 mounting block to contact “J” of the steering column switch.
To successfully adjust the pause between the frequency of sweeps of the wipers, it is necessary to install a 22-47 kOhm variable resistor in the section of this wire.
When setting 22 kOhm, the pause duration is 2-5 seconds, and at 47 kOhm - 2-38 seconds. There is also another option: a 47 kOhm variable resistor can be installed in the steering block housing near the steering column switch. To perform this action, you need to pull out the wire on the switch block itself, which is located in contact “J” and connect it through a single block to the alternator. Then connect another wire coming from the alternator to this place and put on the tip.
As for purchased relays with pause adjustment (for example, “Deck”), there are some nuances here (in particular, constantly use the switch lever to adjust). There is an opinion among car enthusiasts that a homemade device is significantly superior to a purchased one.
Adjusting the speed of the brushes on the steering column lever.
First you need to purchase a 47 kOhm variable resistor.
This option of connecting the contact to “J” in the gap does not cause any particular difficulties. To do this, you need to solder wires (length 25 cm) with male and female terminals to the terminals of the resistor itself. It is recommended to remove contact “J” from the switch block and connect it to the male terminal from the resistor, and insert the female terminal from the resistor directly into the block. Then install a variable resistor (SP4-1 at 22 kOhm) at the end of the handle.
The second method is to display the variable on the steering column lever.
Conclusion: thanks to the improvement of the wiper relay, the perception of rainy weather does not become so gloomy. Another pleasant advantage: settings for the wipers have been added, which has a beneficial effect on the quality of cleaning the windshield during rain. As a result of such positive changes, you can think about increasing the cleaning area of the windshield, as well as increasing the level of windshield washing.
Popular cars
I think all owners of products from the indestructible AvtoVAZ know how windshield wipers work; when washing, the wipers make 4 strokes, in 1-2 of them they wipe away the liquid and dirt, the rest are done almost on dry glass, which is not necessary, and is also accompanied by lovely sounds creaking or jumping on the glass (no one has canceled the force of friction). The same thing happens in intermittent operation, when the glass does not have time to get wet, and the wipers walk on almost dry glass. On normal cars, intermittent mode adjustment has been invented, but why are we worse? Moreover, this is done in 10 minutes. Perhaps some people already know the solution, others don’t. Let me make a reservation right away: the trick won’t work with classics and old chisels. In general, allow me to present a windshield wiper relay diagram.
We are interested in two resistors that hang on the 2nd and 4th legs of the chip (3 kOhm and 130 kOhm in the diagram). Increasing the value of the first will give a longer pause between strokes in intermittent mode, decreasing the value of the second will result in fewer strokes after washing. Let's start with the second one, I wanted to get 2 strokes after washing, I bought a 60 kOhm resistor (although the multimeter now stubbornly shows me 61, strange), we take the relay, bend the latches with a knife, remove the body and see this same adapter, in the photo already with one leg at large.
We unsolder it, in its place a new one, which is 60 kOhm, everything can be checked.
Part two, adjusting the pause in intermittent mode. As written above, if you increase the resistor value, the pause will also increase. This means you need to connect a variable resistor (with a linear characteristic) in series with it, something like this:
There are two ways: either leave everything in the relay as is, then the adjustment will be from the standard pause, or resolder the relay to a lower value, then the adjustment will be from a shorter pause. I didn’t touch anything else in the relay; a minimum pause of about 3-4 seconds suited me quite well. Where to install the variable resistor is up to the owner; I, like many, chose the steering column. It is easy to remove, the connection point is close, and it is quite accessible for hands on the go.
The connection is also as easy as two fingers, the plastic of the steering column has already been removed, we take out the steering column wiper switch, we see the block connected to it, we look for the yellow-green wire in it, we have a snack, we plug our connector into the gap (in any convenient way, the block is probably optimal, not on twists), we collect all this stuff and enjoy the fact that we did it all ourselves.
All that remains is to find some kind of handle for it; for example, the heater handle from 2108/9 suited me.
Replacing windshield wipers on a VAZ 2110 on your own
Windshield wiper VAZ 2110, its repair and replacement
You can easily evaluate the performance of your wipers using a small test. You need to take a glass of water and pour it on the windshield, then turn on the wipers. If, after one or two passes of the windshield wiper blades, streaks or streaks are noticeable on the glass, the windshield wiper blades must be urgently replaced. Replacing windshield wipers on a VAZ 2110 is a necessary process. If this is neglected, in heavy rain there will be poor visibility, which in frequent cases becomes the cause of accidents. In this article we will look at how to replace the windshield wiper of a VAZ 2110 with your own hands.
The process of replacing the windshield wiper motor on a VAZ 2110
The procedure for performing work to replace the motor with an imported analogue (from a Volkswagen):
1. It is necessary to disconnect the negative terminal from the battery.2. Dismantling the windshield wiper (unscrew the arm nut and remove it).3. We unscrew the three bolts of the gearbox and remove it from the bracket (after marking the position of the brushes on the windshield with a wax pencil).4. It is necessary to disconnect the electrical connector of the motor (loosen the mounting bolts and remove the motor assembly with rods).5. We take it out from the space under the fairing.6. We disconnect the motor from the assembly rods (it is necessary to loosen the 3 mounting screws).7. To connect a new motor, you will have to redo the connection chip itself (there is nothing complicated, and it costs a penny).8. On the VAZ 2110 trapezoids, the hole for the gear motor shaft is slightly larger than the required diameter, so the lever will have to be replaced. It is necessary to supply a new sample, it fits perfectly. An important point when installing a new gearmotor on a trapezoid is that you do not need to place an engraver under the bolts. Otherwise, the “crank” will catch the bolts.9. When replacing the windshield wiper motor of a VAZ 2110, it is advisable to use new wires to avoid accidental short circuits. As a last resort, if you use twists, be sure to properly insulate all connections from moisture.
Assembly is carried out in the reverse order. After assembly, a test drive of the innovation is required. The result is obvious; replacing the windshield wiper motor on the VAZ 2110 speeded up the work of the wipers significantly, even on dry glass.
Read 1908
once
These necessary wipers
Replacing a windshield wiper on a VAZ 2110
In the winter months, non-working wipers are not as dangerous as, for example, in the fall. The driver has to make forced stops every 5-10 kilometers to independently clean the icy windshield wiper blades (see Windshield wiper repair - how to do it correctly), which causes a lot of inconvenience. Either way, replacing old wipers is a vital necessity.
Replacing wipers
Replacing the windshield wiper motor of a VAZ 2110
First you need to look at the old brushes. You can try to get them out of the levers. Often, special springs are installed that make it possible to bend these levers. Next, you need to determine how the brush is attached to the lever (screws, needles or clamps can be used).
Note! In some situations, the lever and brushes are designed as a single structure.
A ruler or, for example, tape measure measures the length of these brushes. Required replacement tools:
- round nose pliers;
- screwdrivers included in the set;
- paper napkins and a small towel.
Necessary materials to complete the work:
- a set of new brushes;
- special liquid for glass.
The required materials can be purchased in stores specializing in the sale of spare auto parts.
Note! It is not recommended to skimp on new brushes. Cheap products are more difficult to install and do not last long.
If the car was produced earlier, it is almost impossible to find brushes for it. The only thing that can be done is to change only the rubber part attached to a thin metal base.
Note! It is imperative to acquire a high-quality glass liquid. We take into account the fact that many fakes are now being produced. This especially applies to methanol-based liquids. Not everyone knows that methanol is considered a poison; at significant concentrations, vision sharply deteriorates, which subsequently leads to complete or partial blindness.
It is recommended to replace brushes in the following sequence:
- for normal access to the windshield wiper, the car must be parked;
- windshield wipers must be secured in a position that provides unobstructed access to each blade;
- in some certain brands of cars, the windshield wipers are recessed flush, so you need to read the instructions for replacing them specifically for the VAZ 2110;
- You need to spread an unnecessary blanket on the hood of the car, as well as around the windshield wipers. Such measures will prevent glass from breaking and damage to the coating on the hood;
- The old windshield wiper design is removed from the mount.
Note! For machines produced earlier, the brush mount will not be removed from the levers, so actions are limited only to replacing the rubber strip.
- At the end of the rubber brush there is a locking device that can be easily opened with round-nose pliers. The functioning of the locking device is checked several times. You need to compare the rubber brush fixed to the machine with the new brush, they should match. It is removed from the mount and lever. A new brush is inserted, and it must pass through all the points, just like the old design;
- On recent cars, T-shaped mounts for windshield wipers are installed; to remove them, you need to use a small flat-head screwdriver. The purchased unit is installed by pressing the lever itself, as a result a click should be heard;
- Another type of fastening involves the use of screws. In such a situation, the unit with the brush will be secured using one or two screws. The screws are unscrewed with a screwdriver, and the new design is screwed onto the lever. The fastening screws must be tightened tightly, and small washers can be used;
- The new L-shaped design of the fastening levers is noteworthy. This unit is equipped with a rounded latch that has a swivel joint. To install new brushes, no tools are needed; just press the special latch, pull the brush slightly towards you and remove it from the lever. To fix the new structure, you need to press on the latch until it is installed in its place; you should hear a click.
When the manipulations with the first brush are completed, it’s time to start the second, the sequence of actions is the same.
Note! We should not forget about the existence of rear windshield wipers.
It often becomes necessary, especially on modern modifications of the VAZ 2110, to replace the motor. It is he who is responsible for the normal operation of the windshield wipers.
Replacing the windshield wiper motor on a VAZ 2110
Replacing the windshield wiper motor of a VAZ 2110 can also be done with your own hands. In addition, it may be necessary to replace the windshield wiper mechanism of the VAZ 2110 or replace the wiper arms of the VAZ 2110. Sometimes, simply replacing the windshield wiper drive on the VAZ 2110 leads to normal operation of the blades . A detailed video, of which there is a lot on the Internet, will tell you how to do everything without errors. It is also useful to use photo materials and pictures during the work process, especially if everything is done with your own hands. The detailed instructions for replacing windshield wipers presented above are an opportunity to save a lot of money, because the price for services of this kind in services is high, and the result is not always pleasing to the car owner. You can also find out on our website how to replace washer nozzles.
Trapezium wipers - replacement for VAZ 2110
The trapezium of the wipers transmits the force from the engine to the windshield wiper arms. The best quality of windshield cleaning will be only if all elements of the wipers are in working order. If the trapezoid hinges are clogged with dirt or the lubricant has dried out, the motor energy will not be enough for proper cleaning. Therefore, owners of cars of the tenth family are forced to repair the trapezoid once every 5–10 years in order to avoid deterioration in the performance of the wipers.
Replacing the trapezium wipers of a VAZ 2110
I don’t think anyone will argue with that for safe driving. a good overview is needed. To do this, it is necessary that the mechanism driving the brushes works, the trapezoid of the wipers is in good working order, but the brushes themselves must be in good condition and appropriate for the time of year.
Bad weather reminds us to regularly replace our windshield wiper blades. Some manufacturers of these extremely important parts recommend changing brushes once a year. The fact is that under the influence of the environment, rubber inserts gradually dry out and lose their elasticity. Hard rubber works like a scraper, leaving streaks and streaks on the glass. Run your finger along the blade of the eraser; if it is worn out and dull, you need to replace the brushes. Don't skimp on small things and replace dry or worn wipers before the onset of slushy weather.
Replenish the washer fluid supply in the washer barrel in a timely manner. To avoid poisoning from toxic pores, buy only proven glass cleaning liquid.
What affects the condition of the trapezius
The wiper motor and trapezoid are located directly under the glass, so some of the water or washer fluid falls on them. In addition to water, dust, dirt and various small debris get there. All this leads to a change in the properties of the lubricant and deterioration in the performance of the trapezoid. When the lubricant loses its properties, the plastic bushings of the hinges begin to wear out, resulting in backlash and increasing resistance during operation.
How to remove the windshield wiper trapezoid
To remove the trapezoid you will need:
- key to 10;
- thin flat screwdriver;
- crosshead screwdriver.
First of all, you need to remove the wipers. To do this, you need to remove the plastic pads and unscrew the nuts with which they are attached to the trapezoid studs. Then unscrew the screws and side fastenings of the protective casing (jabot) and remove it. If the fasteners do not come out, treat with WD-40. Before removing the casing, make sure to remove all screws, bolts and nuts. If the cover does not come off, look for a fastener that you did not remove. Lifting the frill, disconnect the washer fluid supply tube from the tee, and then move the casing to the side.
Remove the belt that supports the radiator tank and move the tank to the side. Then pull out the partition (sound insulation), which is located behind the tank. Don't forget to remove the washer fluid supply tube from it. Disconnect the electric motor power connectors. After this, unscrew the bolts securing the trapezoid and electric motor. To remove the trapezoid, you must either struggle for a long time, coming up with various options, or place a thin flat-head screwdriver under the far end (relative to the motor) of the lower rod of the trapezoid and pull out the entire structure as if on a slide. You can also turn the left edge of the trapezoid clockwise and pull it out, then remove the engine.
Trapezoid repair
During repairs, it is necessary to clean all elements of the trapezoid from dirt and inspect the studs. If wear is detected on their ribs, the trapezoid will have to be replaced. Repairing a trapezoid involves replacing the plastic caps. To do this you will need a repair kit and boiling water. First, disassemble the trapezoid using a pry bar or a heavy-duty flathead screwdriver as leverage. After this, cut off the old plastic caps. If you can’t cut it, use side cutters and bite off the caps piece by piece until you can pull them out of the trapezoid rods. You can also hold the ends of the trapezoid in boiling water, 2 to 3 minutes is enough, then push the caps out of their seats.
Three types of trapezoids were installed on cars of the “tenth” family - VAZ 2110, 2111 and 2112, which differed in minor details. Therefore, there is a possibility that either the trapezoid rods or the caps will have to be adjusted. Remove the cap and inspect it. If there is a fixing protrusion on top of it, check the recess for it on the rod seat. If there is no notch, you will have to either cut off the protrusion on the cap (does not affect the performance and reliability of the trapezoid) or saw through it in the draft. If there is no protrusion on the cap, no adjustment will be necessary.
Clean the rod and seat, then lower the cap into boiling water for 10 - 15 seconds. After this, it will soften and easily fall into place. Do not install a cold cap as this will destroy it. After the cap has cooled completely (20 minutes), the rod is ready for assembly. Before assembly, lubricate the bushings with graphite grease.
Check the serviceability of the electric motor. To do this, disconnect it from the trapezoid (you need to unscrew the fastening nut) and connect it to the car battery. When working, it should make a low buzzing sound. If you don't know how to connect the motor to the battery, then connect it to the power connector. Turn on various operating modes of the electric motor for 10 - 15 minutes. After that, feel it. If the motor gets hot, it needs to be replaced. An electrical technician can try to repair this device, but regular drivers and car enthusiasts need to replace it.
Putting the trapeze in place
Usually, installing the trapezoid into place does not cause difficulties. Insert it and secure with bolts. Do not overtighten the motor mounting bolt; the motor may need to be turned slightly to get the trapezoid to operate smoothly. After making sure that the trapezoid is working properly, tighten the electric motor mounting bolt, install and secure the sound insulation, frill (do not forget to connect the washer tube), and the expansion tank. Insert the plastic plugs and install them in place, install the arms with brushes and check the operation of the wipers in all modes.