Cars admin26.02.2020
The wheel bearing of the “seven” gradually wears out and can cause problems: accelerated wear of rubber, brake discs and pads. If you do not change the VAZ 2107 wheel bearing in time, it may jam, which will lead to loss of control. Therefore, it is necessary to monitor the condition of the bearings, adjust and change them in a timely manner.
Adjusting the wheel bearing on a VAZ 2107
You can correctly tighten the front wheel bearing of a VAZ 2107 as follows:
If play and noise cannot be eliminated in this way, the bearing must be replaced.
The replacement procedure is quite simple. To replace the VAZ 2107 wheel bearing, you will need:
The work is carried out on a lift or after raising the front wheel with a jack.
- lift the car on a lift or “hang” the wheel using a jack;
- Unscrew the wheel mounting bolts;
- remove the wheel;
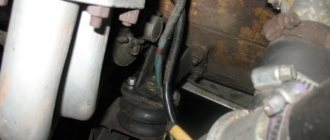
- unscrew the caliper mounting bolts;
Tips for replacing a wheel bearing
Timely elimination of play is a guarantee of long bearing service.
Welcome, friends, to the DIY car repair website. While driving your car, noise occurs in the front part of the suspension, a hum, sometimes even a whistle, this indicates that the VAZ 2107 wheel bearing most likely needs to be replaced.
In the front hub of the VAZ 2107 there is a pair of roller bearings, one internal, and the other, of course, external.
How to check a wheel bearing
- Jack up the car so that the wheel rotates freely.
- We place the stand under the threshold of the car.
- When the wheel rocks in different planes, a knocking noise occurs; it could be a bearing, a ball joint, or possibly a steering linkage, so let’s check further.
- We turn the wheel by hand; when noise appears, it will immediately become clear to you that the bearing needs to be replaced.
In the same way as described above, we check the other side of your vehicle, since most likely the hub bearings have worn out there too.
Replacing silent blocks on a VAZ 2107 - Do-it-yourself car repair
As the machine is used, components and parts gradually wear out and need to be repaired or replaced. This is especially true for suspension parts that are subject to daily stress when driving over potholes and potholes. Some types of work require special equipment, so they should be performed at specialized service stations. But replacing the VAZ 2107 silent blocks can be done independently in “garage” conditions.
Silent blocks VAZ 2107
Levers, torque rods and shock absorbers of the car are attached through movable joints. Rubber-metal bushings, or “silent blocks” (“Silent” - English silence), dampen shocks and vibrations that appear when driving on uneven roads and ensure the mobility of the connection without backlash.
Over time, the rubber wears out and dries out, causing play and, accordingly, knocking in the suspension. In this case, the silent blocks of the VAZ 2107 must be changed immediately, since play in the suspension and steering impairs controllability and directional stability.
When the silent blocks wear out, the alignment angles of the front wheels are disrupted (the so-called “wheel alignment”), which increases the rate of tire wear.
Checking the condition of VAZ 2107 silent blocks
The declared resource of silent blocks is designed for a mileage of 100 thousand kilometers, but in reality, taking into account the condition of the road surface, it is less. Therefore, VAZ 2107 silent blocks require periodic condition checks.
To check the condition of the silent blocks, the machine must be installed on an overpass or inspection hole. You should start with a visual inspection. The rubber of the hinge should not delaminate or have cracks. There should also be no backlash. If problems are observed with silent blocks on only one side of the machine, they must be changed simultaneously on both sides.
Tools required to replace silent blocks on a VAZ 2107
In addition to standard keys for 13 and 22, you will need:
- silent block remover VAZ 2107;
- steering wheel end remover;
- device for pressing out silent blocks;
- jack;
- wheel wrench;
- mount;
- chisel;
- hammer.
Without any of these tools, work will be very difficult or simply impossible.
It is also necessary to prepare new rubber-metal (preferably polyurethane-metal) silent blocks to replace worn ones.
Replacing silent blocks VAZ 2107
The procedure for replacing silent blocks on a VAZ 2107 does not differ from similar work on any representative of the VAZ “classic”. To facilitate access to connections, work should be performed in an inspection pit. The silent blocks are changed sequentially: first on one side, then on the other side. The procedure is as follows:
- loosen the front wheel bolts;
- lift the car with a jack;
- unscrew the wheel mounting bolts and remove it;
Important: to ensure safety, it is necessary to install additional support under the body (bricks, logs) and lower the jack slightly so that the car stands on it and the support. The supports are installed in the sill area, not far from the wheel arch.
- Use a wrench to unscrew the nut securing the steering tip;
- using a puller, press out the steering tip;
- unscrew the nut securing the upper ball joint (support);
- press the ball joint out of the steering knuckle;
- unscrew the nut from the axis of the upper arm and remove the support washers;
- pull out the axle and remove the upper arm;
- clamp the upper arm in a vice;
- using a VAZ 2107 silent block remover , press the rubber-metal hinges out of the lever;
- press new silent blocks into the lever;
- install the upper arm and support washers on the axle;
- tighten the upper arm nut.
After this, it is necessary to replace and tighten the steering tip and ball joint.
Replacing silent blocks on the lower arm is done in the same way:
- remove the wheel;
- unscrew and press the lower ball joint out of the steering knuckle;
- unscrew the nuts securing the lower arm;
- remove the support washers;
- remove the lower arm;
- clamp the lower lever in a yew;
- press out the silent blocks using a VAZ 2107 silent block puller;
- press in new silent blocks;
- install the lever in place and assemble the remaining suspension parts.
The nuts of the upper and lower arm must be finally tightened after the car is removed from the jack and placed on the wheels. It’s even better to drive 100-200 meters by car. In this case, the parts will take the correct position in the seats.
THIS IS INTERESTING: Mazda 3 engine repair
Tip: replacing the silent blocks of a VAZ 2107 can be done without removing the upper and lower arms from the car. To replace it, it is enough to dismantle the lever axes. But such work requires skills and special equipment.
Tips for replacing silent blocks
- To remove silent blocks, ball joints and steering ends, you must use pullers. If you knock out parts with a hammer, you can damage the threads on them. Also, due to impacts, cracks may appear on the welded joints of the levers.
- Before installing the hinges, it is necessary to clean the old bolts and pins from rust and dirt, and then lubricate them with machine oil.
- Polyurethane silent blocks have a much longer service life than rubber ones. Considering that the cost of silent blocks is low, and the work of replacing them is quite labor-intensive, it is preferable to use polyurethane-metal silent blocks.
- If the old silent block cannot be pressed out, it should be cut with a hacksaw.
- Replacing silent blocks is a responsible and quite complicated job. A loose nut may cause an accident. Therefore, if you do not have sufficient experience in plumbing, it is better to entrust the replacement of silent blocks to professionals at a service station.
- Replacing the silent blocks of the VAZ 2107 violates the alignment angles of the front wheels. To adjust the wheel alignment angles, special equipment is required, without which the work cannot be done efficiently. Therefore, after replacing the silent blocks, you must definitely go to a service station, where specialists will adjust the wheel alignment.
Source: https://avto-voshod.ru/ekspluatatsiya/menyaem-sajlentbloki-na-vaz-2107.html
Instructions for replacing the VAZ 2107 wheel bearing
Replacing the front wheel bearings, as recommended by the manufacturer, should only be done in pairs.
We jack up the car, be sure to place some kind of stand under the body to avoid an accident, unscrew and remove the wheel.
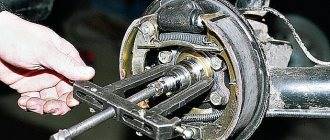
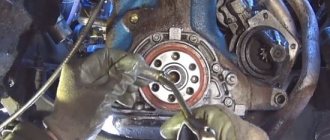
Next, you need to remove the caliper; to do this, you need to unpin the two bolts on which it is attached and unscrew them. To prevent the caliper from dangling and getting in the way, tie it to the lever.
Then you need to remove the cap that covers the hub nut. We unscrew the nut (on the left side there is a left-hand thread, on the right side there is a right-hand thread), remove the lock washer and pull out the outer bearing.
Pull the hub towards you and remove it from the axle along with the brake disc. Using a twelve key, unscrew the two guide bolts and remove the brake disc from the hub.
Attention! The brake disc is removed from the hub to make it easier to replace the bearings, but this is not necessary.
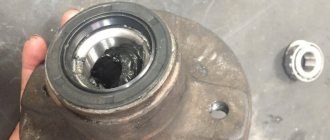
Next, using a screwdriver or other tool, pry up the oil seal and pick it out, take out the split spacer ring, if you have one, and the internal bearing.
Now you need to select old and unusable lubricant from the inside of the hub and wash everything thoroughly.
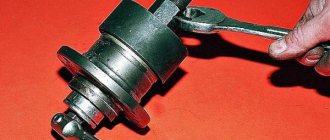
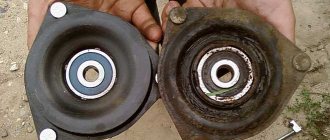
After which it is necessary to knock out the old bearing races; this can be done using a regular drift, a large screwdriver, a tube of the appropriate diameter or other tool.
Assembly of the front hub of a VAZ 2107 car
Now that the old clips have been knocked out, you need to rinse the inside of the hub and you can start pressing in the new clips.
You can press in the clips either in a vice or hammer them in using a special mandrel or a piece of pipe of the appropriate diameter; this is not at all difficult.
Then we fill the hub with new grease, lubricate the inner bearing and insert it, then install the split spacer ring and press in the new oil seal.
Next, we fasten the brake disc and install the hub on the steering knuckle axle, insert a new outer bearing, lock washer, tighten the nut, install the caliper and wheel. In general, we do everything in reverse order.
If there are no special tools, we tighten the bearing as follows: tighten the nut until it stops (pull within reasonable limits) and release it 2/3 of a turn and rotate the wheel. We check the backlash (thermal gap).
Bearing Failure Determination
Some recommendations will help you make sure that you need to replace the wheel bearing on your VAZ-2107:
- The easiest way to determine the need to replace the hub unit is to grab the front wheel and wiggle it in different planes. If you feel the presence of play, then it’s time for a more detailed diagnosis and most likely replacing the bearings.
- The front wheels of the car should be hung on a jack, while being sure to take precautions: pull the handbrake, install shoes and additional stands under the car. Grasp the top and bottom of the front wheel with your hands and then make movements. It is important to wobble the wheel, and not the car as a whole. Thus, you can accurately determine whether the product in question needs to be replaced.
- Another way to determine the need for replacement is to listen for humming, knocking, and grinding noises in the wheel as it rotates.
Having decided that you really need to replace the VAZ-2107 wheel bearing, you need to purchase new products and begin the replacement workflow.
Replacement features
The front hub of the VAZ-2107 car has a pair of roller bearings, one of which is called internal, and the second external. The manufacturer recommends replacing these products in pairs, on both front wheels of the car. We will find out further what the replacement of the parts in question is.
Initially, it is necessary to tear off the nuts securing the front wheel of the VAZ-2107 car. After this, we install the jack and jack up the front of the car. At the same time, do not forget to install shoes under the wheels, as well as a special safety stop to prevent the jack from falling.
The VAZ 2107 wheel bearing wears out over time, which leads to faster wear of tires, brake pads and discs. If measures are not taken to replace the bearing in a timely manner, the part may jam, resulting in loss of vehicle control. This indicates the need to monitor the condition of the mechanism, periodically adjust and replace it.
Symptoms of a problem
The wheel bearing must always be in good condition. If the part becomes unusable, this can lead to an accident, since the malfunction is accompanied by large wheel play. As a result, the disc may be sheared off the wheel bolts. If such a situation occurs at high speed, a serious accident cannot be avoided. This indicates that the hub bearing needs periodic inspection, and if play is detected, it needs to be adjusted or replaced.
The main manifestations of a part malfunction are:
- Dry crunch. When a bearing breaks, a metallic crunching sound occurs while driving. It appears as a result of uneven rolling of the rollers due to damage to the separator. It is difficult to confuse this sound with any other.
- Vibration. If the element in question has severe wear, vibration appears, which is transmitted to both the body and the steering wheel. It indicates severe wear of the bearing cage, which can lead to seizure.
- The car pulls to the side. The problem is somewhat reminiscent of the case with incorrect wheel alignment adjustment, since the faulty element does not work correctly due to its parts being wedged.
Definition of failure
To determine the condition of the wheel bearing, you need to perform a few simple steps:
- Hang the front wheel on the desired side using a jack, not forgetting to put the car on the handbrake and install stops under the rear wheels.
- Place a support under the lower suspension arm and remove the car from the jack.
- Take the wheel with both hands (top and bottom) and perform movements from yourself to yourself, and no play or knocking should be felt.
- Spin the wheel. If the bearing has become unusable, a grinding noise, hum or other extraneous noise may appear.
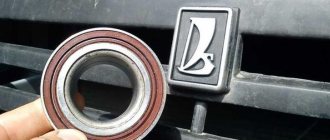
Purpose of the VAZ 2107 wheel bearing
The VAZ 2107 wheel bearing is a part through which the wheel is attached to the steering knuckle, and the wheel itself rotates. In a car, this element is constantly affected by temperature changes, the environment, impacts from uneven road surfaces, jerks of the brakes and steering. If the bearing is in good condition, the wheel should rotate without any play, with noise and minimal friction allowed.
The part in question has a fairly large resource. However, there are many factors that sharply reduce its service life. These include:
- Poor quality of roads is one of the reasons for the rapid failure of wheel bearings. This is explained by the fact that the element is located in the center of the wheel and absorbs strong loads during an impact when hitting bumps. For some time, the bearing withstands such impacts, but gradually collapses.
- Exposure to an aggressive environment. In summer, moisture and road dust get inside the hub, and in winter, chemical reagents penetrate.
- Overheat. Wheel rotation is constantly associated with friction and increased temperature. With constant heating and cooling, which is especially typical in winter, the service life of bearings is reduced.
Where is the wheel bearing installed?
Based on the name, you can already understand that the part is located near the hub. On the VAZ 2107, the element is installed in its internal cavity and changes, as a rule, when it fails, as evidenced by characteristic signs.
What bearings to put
When a wheel bearing requires replacement, the question immediately arises of which part to install. Many people advise using original components. However, today the quality of parts leaves much to be desired and the issue of choice remains quite relevant.
Table: type, installation location, and size of bearings
| Installation location | Bearing type | Size, mm | Quantity |
| Front wheel hub (outer support) | Roller, conical, single row | 19,5*45,3*15,5 | 2 |
| Front wheel hub (inner support) | Roller, conical, single row | 26*57,2*17,5 | 2 |
| Rear axle shaft | Ball, radial, single row | 30*72*19 | 2 |
Manufacturer's choice
When choosing a manufacturer of a wheel bearing for a VAZ “Seven”, we can recommend SKF , SNR, FAG, NTN, Koyo, INA, NSK. The companies listed have many locations around the world. These products are of high quality and meet the most stringent requirements.
Among the domestic manufacturers that supply bearings for cars of the Togliatti plant, we can highlight:
- CJSC "LADA Image" - manufactures and sells original Lada wheel bearings through secondary markets;
- Saratov plant - produces parts under the SPZ brand;
- Volzhsky Plant - uses the Volzhsky Standard brand;
- Vologda plant - sells products under the VBF brand;
- Samara plant SPZ-9.
Replacing the front wheel bearing
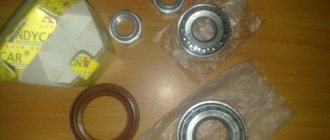
Work on replacing a wheel bearing begins with the preparation of tools and materials. You will need:
- set of socket wrenches;
- screwdriver;
- chisel;
- hammer;
- pliers;
- extension for knocking out the bearing race;
- new bearing, seal and lubricant;
- rags;
- kerosene.
How to remove
To dismantle the part, lift the front wheel using a jack. In a service station, work is carried out on a lift. When replacing a bearing, the following sequence of actions must be performed:
- Unscrew the fasteners and remove the wheel.
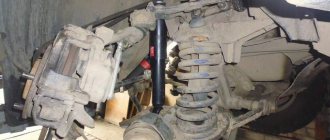
- Unscrew the fastening and dismantle the caliper.
To avoid damage to the brake hose after removing the caliper, the latter is carefully suspended and secured with wire.
How to put
After dismantling the wheel bearings and cleaning the hub itself, you can begin installing new parts. The work is performed in the following order:
- Press in the races of both bearings.
Video: how to replace the front wheel bearings of a VAZ 2107
What to lubricate
Litol-24 is used to lubricate wheel bearing separators. It is also used to apply a new oil seal to the working edge during installation.
Bearing nut tightening torque
The need to tighten the hub nut arises after replacing the bearings or during their adjustment. The nut is tightened using a torque wrench to a torque of 9.6 Nm, while the hub is turned several times to install the bearings in place. Then loosen the nut and tighten it again, but with a torque of 6.8 Nm, after which it is locked in this position.
Do-it-yourself wheel bearing adjustment
The content of the article:
Unlike owners of cars of many foreign brands, owners of VAZ “classics” know how to adjust wheel hub bearings. Currently, the prevailing opinion among designers and automotive engineers is that non-adjustable and non-separable front wheel bearings are safer. We can only partially agree with this. The new bearing is replaced along with the hub into which it is pressed at the factory.
Whether we like it or not, wear and tear is inevitable. After some time, play appears and there is only one way out - to buy an expensive bearing with a hub. The domestic auto industry is on the side of our car enthusiasts.
It is much easier to replace only the bearings, which allow you to periodically adjust the hub play. Firstly, it is several times cheaper. Secondly, the operating life of the node increases. Thirdly, the adjustment can be made by the driver himself in a garage.
Why is it possible to adjust the wheel bearings on some cars?
Adjusting the rear wheel bearings
Considering that the design of the classic VAZ series is borrowed from foreign cars, there are foreign cars in which the play of the front wheel bearings can be adjusted. This possibility is provided by the special design of the front wheel hub, which rotates on the axle shaft on two tapered (cone) bearings.
A distinctive feature of conical ones is that it is possible to establish play between the hub and the axle shaft by pressing the outer and inner races of the bearings against each other. In the hub, in the direction of the cones, the bearings are directed towards each other. If you gradually tighten the hub nut on the axle shaft, this will lead to stronger pressing of the rollers between the cages. At some point the wheel will stop rotating altogether.
Thus, using just one nut, you can regulate the force with which the clips press the rollers. During operation, even heavy-duty metal alloys of bearings wear out, which leads to the appearance of excessive. This puts the life and health of both the driver and passengers and other road users at risk. All that needs to be done to fix this problem is to tighten and secure the hub nut. As soon as the nut, when tightened to maximum, no longer affects the amount of play, it is necessary to change the bearings.
Adjusting wheel bearings - step-by-step instructions
Replacing the hub bearing
Before embarking on the regulatory process, certain preparatory steps must be taken. For such an important event, you really need a minimum of tools:
- jack;
- hammer;
- screwdriver;
- beard;
- wrenches for wheel bolts at “12”, “27”;
- torque wrench.
Whenever adjusting the bearing play, be sure to change the hub nuts. The nut is fixed on the axle shaft in the required position by riveting the collar of the nut into the groove on the axle shaft. If the collar is bent and bent again, then there is a high probability that the nut will return to its previous position.
With everything you need at hand, you can begin adjusting the wheel bearings.
Wheel bearing adjustment technology:
- the car is fixed on a level surface with a parking brake or other available means;
- using a jack, the front wheel is raised and then removed along with the decorative caps;
- carefully, using a hammer, screwdriver or other spacer, press out the protective cap of the hub;
- the wheel is installed on the hub and tightened with at least two opposite bolts;
- the amount of play and the possibility of tightening are checked for what: with one hand you should hold the wheel at the top and make sharp rocking movements to the sides in the direction of the wheel axis, and with the other hand you need to press the washer located between the nut and the bearing race. If the axial clearance is more than 0.02 - 0.08 mm, adjustment should be taken;
- using a hammer and a pointed metal object (bit, core), it is necessary to unlock the bent sections of the hub nut collar;
- the nut is unscrewed and removed, a new one is screwed on instead (on the right trunnion there is a nut with a left-hand thread, on the left trunnion - with a right-hand thread);
- after tightening the nut with a force of 19.6 Nm, it is necessary to turn the hub several times in different directions so that the bearing rollers take their place;
- the nut is loosened and re-tightened, but with a force of 6.8 Nm. For reference: 10 Nm = 1.02 kg/cm2;
- the nut is turned at an angle of approximately 25 degrees;
- the collar of the nut is jammed into the grooves on the axle shaft of the steering knuckle axle;
- The hub is assembled and the wheel is installed.
Expert advice when making adjustments
Adjusting the wheel hub bearings is a very important and responsible matter, because the safety of people depends on how correctly everything is done. In addition to strictly following all the rules, you need to know and take into account such aspects as:
- the degree of tightening of the hub nut;
- condition of bearing lubrication.
Some drivers mistakenly believe that tightening the nut will extend the mileage. After the nut is fixed, the wheel must rotate absolutely freely and the established minimum technological play must be present. As it moves, all parts of the bearing heat up and expand. If you overdo it and tighten the nut too much, this can even lead to jamming or destruction of the bearing.
The bearings in the hub must be generously lubricated. During operation, the lubricant is subject to destructive effects: friction, overheating, and the appearance of abrasive metal impurities. If it's time to adjust the bearing play, you shouldn't save money on buying new lubricant. As a rule, Litol-24 is universal for wheel bearings. Lubrication is one of the important conditions for increasing bearing life.
Replacing the axle bearing
The axle shaft is an integral part of the rear axle of the VAZ 2107. The axle shaft itself practically does not break, but the bearing by which it is attached to the axle housing sometimes fails. Its purpose is to rotate the axle shaft smoothly and evenly while the car is moving. Signs of bearing failure are the same as those of the hub elements. If problems occur, it is necessary to dismantle the axle shaft and replace the faulty part.
Bearing removal
Before starting work, you need to prepare the following list of tools:
- set of socket wrenches with a crank;
- hammer;
- flat screwdriver;
- chisel;
- grinder;
- new axle bearing with retaining ring.
To replace, follow these steps:
- Raise the rear wheel using a jack, then remove it, not forgetting to install stops under the front wheels.
- Remove the brake drum.
To dismantle the drum, you need to carefully strike its inside through a wooden block.
Installing a new part
After removing the bearing, you can immediately begin reassembly:
- Clean the axle shaft from dirt and wipe it with a rag.
- Press the new bearing onto the axle shaft, and then install the retaining ring. To install the latter, it is advisable to heat it up with a blowtorch, which will ensure easier installation and reliable retention after cooling.
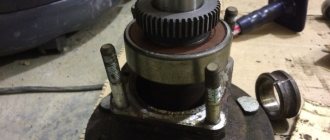
Replacing the bearing of the input shaft of the VAZ 2107 gearbox
The easiest way to replace a worn element is on the removed box. On the VAZ 2107 it is possible to remove the bearing from the input shaft directly from the gearbox in the car, but this procedure is very labor-intensive and time-consuming.
To work, you need to prepare the usual tools for any driver:
- screwdriver with a powerful flat blade;
- hammer;
- puller if necessary.
How to remove the old one
With the gearbox already removed from the car, you need to remove the bell (casing) and retaining rings. There is no need to completely disassemble the box:
- Use a screwdriver to pry up the special groove in the input shaft bearing. (it looks like a ring).
- Pull the shaft towards you, using the bearing as a support for pressure.
- Carefully pull out the bearing, periodically hitting it with a hammer.
- After each hammer blow, it is recommended to rotate the shaft a little to avoid dents or distortion of the bearing.
- As a result, after these actions, the bearing can be easily removed from its support.
Removal should be carried out very carefully, as the shaft may be damaged.
How to install a new one
Next, you will need to install a functional one in place of the old bearing. For this:
- Press the new bearing onto the shaft using a hammer.
- Use a hammer only on the inner ring of the bearing, otherwise it may become deformed.
- When pressing, it is necessary to pull the input shaft slightly forward so that the bearing fits in more easily.
Video: replacing the input shaft bearing on a VAZ classic
To summarize all of the above, we can say that the owner of a VAZ 2107 can carry out all the necessary work on the gearbox and input shaft himself. However, if you have doubts about your skills, it is better to turn to auto repair specialists. We also note that the VAZ 2107 gearbox rarely requires any intervention and usually serves for many years without a hint of a problem.