Diagnostics and decoding of codes on the Lada Granta
One of the differences between the Lada Granta and other domestic vehicle models is the on-board computer that these cars are equipped with. It allows you not only to optimize the engine operation process, but also to identify Lada Granta error codes. It is with its help that you can quickly identify any malfunctions in the operation of the bookmaker.
But how to diagnose the on-board computer “State X1” of the Lada Grant for errors? And how can you decipher the codes after that? You can learn more about these and other issues in this article.
Diagnostics
To decipher the error codes that appear, it is necessary to diagnose the vehicle. The machine can be checked in several ways. We will talk about them further.
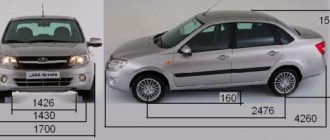
Car Lada Granta sedan
To check using a scanner, you need to connect the on-board computer “State X1” to the tester or laptop using a diagnostic cable. The scanner or laptop must be equipped with software designed specifically for diagnostics. In our article we will look at an example with the KWP_D program.
In addition to this utility, you will also need to find a specialized OBD-II adapter. It is necessary in order to transfer information from the bookmaker to the laptop via USB output. The diagnostic connector is located next to the gearbox selector, under the cover. You need to connect a scanner to it.
The Check lamp indicates possible breakdowns of the battery
When the program is installed, when you connect, you will see that a COM output with a specific number has appeared in the system. This number will need to be reassigned to any of the four - 1-4. When this is done, the laptop needs to be connected to the bk, then start the ignition and turn on the software.
As you know, any car engine has its own characteristics that determine its operation. If these characteristics differ from the standard ones, it means that something is wrong with the engine.
The first point to pay attention to is the DTC characteristic. If malfunctions are detected in the BC system, then open the “Error codes” tab and find the number along with the decoding.
Please note: everything will be fine with your Lada Granta if the measured characteristics do not differ from the standard ones by more than 20%.
1. Remove the plastic protective cover next to the gear selector and you will see the connector. 2. Connect the scanner for testing and run the utility. 3. Go to the “Parameters” tab and check the standard characteristics.
Checking a car without a scanner is not a difficult task at all. The disadvantage of such diagnostics is that it does not always allow you to identify all errors in the operation of the car:
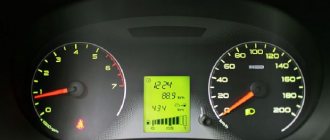
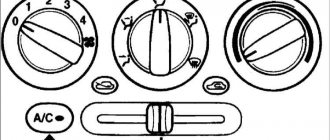
- On the instrument panel, press the button that resets the daily mileage. At the same time, turn the key and turn on the ignition, but do not start the engine. In this case, the instrument panel test mode starts, which will help determine whether all panel elements are functioning properly.
- Then press the button on the windshield wiper lever. Thus, the firmware version of the bookmaker “State X1” will first appear on the screen, and then you will see combinations of possible faults, if any.
Well, now it’s time to tell you about decoding fault combinations.
Diagnostic connector for connection to the on-board computer
As stated above, if the measured characteristics do not differ from the standard ones by more than 20%, then everything is in order with the car. What are the standard parameters?
| Parameter | Meaning |
| UACC | Shows battery voltage. To understand whether there is an error in this case, it is necessary to activate all devices that consume the most voltage. Allowable voltage is from 13.9 to 14.5V. If it is less, then it is necessary to check individual circuits of the network. |
| THR | Throttle position parameter. As a rule, if it is faulty, the driver will know about it without diagnostics, since the car will move jerkily and the engine power will constantly drop. Press the gas pedal without starting the engine, but turning on the ignition. The TPS readings should gradually increase to 90% (or slightly less). If everything is so, then the sensor is working; if not, it needs to be replaced. |
| FREQ | Crank pulley rotation speed parameter. The rotation speed is up to 840 rpm. If this sensor fails, the operation of the motor will be impossible. |
| AIR | Mass air flow parameter. It should not exceed 12 kg/hour. Start the engine and press the gas pedal so that the number of revolutions increases to 5 thousand per minute. In this case, the parameter should increase to approximately 250 kg/hour. Naturally, if the device is working properly, then the indicator will be like this. |
| UOZ | Represents the ignition timing angle. It should change in the range from 6 to 15 degrees. |
| INJ | This parameter bk represents the duration of the injection pulse (the time required to open each injector so that gasoline enters the cylinder). Ideally, this parameter should be between 3 and 5 milliseconds when driving at neutral speed. If the readings obtained during diagnostics are much higher, then, most likely, the injectors are already clogged and need to be cleaned. Or this indicates low gasoline pressure as a result of a clogged gasoline filter or pump. Press down the gas pedal sharply. The injection time should increase to 20 ms. Ideally, accurate diagnosis of injectors is only possible using a test bench. |
| FSM | Idle speed sensor performance indicator. Ideally, this parameter should not exceed 50-60. If you press the gas pedal sharply, it can increase to 160-180. |
| ALAM 1 | Indicates the voltage level recorded on the oxygen level monitoring device. When the car engine is warmed up, this indicator should increase from 0.007 to 0.7 V. If this indicator differs, then something is wrong with the circuit. |
| LUMS_W | This coefficient indicates the rotation of the crank pulley. Ideally, it should vary around 4 revolutions per second. If it is slightly larger, then this already indicates a misfire in the engine cylinders. This means that you should pay attention to checking the spark plugs (whether they are working, filled or not), as well as the condition of the high-voltage wires. |
| QT | Gasoline consumption coefficient. With the engine running and idling, it should not exceed 0.9 liters per hour. |
Checking instrument panel sensors before diagnostics
| Code | Description |
| 1 | This code indicates an excessively high voltage detected by the bk in the on-board circuit of the Lada Grant. |
| 2 | If there is a break in the gasoline level sensor circuit for twenty seconds, then this code indicates the need to check the network. |
| 3 | This code indicates the need to replace the refrigerant temperature control device in the refrigeration system. |
| 4 | Something has happened in the operation of the air temperature control device; the circuit needs to be checked or the sensor replaced. |
| 5 | Code 5 indicates overheating of the internal combustion engine. In this case, the problem may be a broken thermostat. In addition, this code may indicate more complex failures. For example, if the cylinder head gasket is broken, the engine will also overheat from time to time. |
| 6 | This indicates an emergency pressure of the engine fluid in the injection system. |
| 7 | Indicates a malfunction in the brake system. |
| 8 | Battery malfunction. Code 8 tells the owner of the Lada Grant that the battery needs to be replaced due to the charge being too low. |
Error code 4 on the dashboard
Below is a breakdown of the most common error codes encountered when diagnosing a Lada Granta.
| Error code | Description of the malfunction |
| P0106 | The error code indicates an incorrect wiring signal coming from the absolute motion sensor. |
| P0107, P0108 | These error codes indicate a very low or high signal coming from the intake manifold pressure control device. |
| P0112, P0113 | These error codes on the State X1 on-board computer indicate a breakdown of the intake air flow temperature control device. Or this may indicate an incorrect sensor signal. |
| P0115 - P0118 | One of these error codes may indicate that the refrigerant temperature sensor is not functioning properly. In addition, this may indicate an incorrect signal coming from it. You should check the circuit and operation of the sensor itself. If it shows too high a result, and the antifreeze in the expansion tank does not boil, then most likely the problem is with the sensor. |
| P0122, P0123 | Incorrect signal from the TPS, the device and its circuit should be checked. |
| P0131 - P0135 | These error codes on the on-board computer indicate a breakdown in the operation of the oxygen level control device before the converter. As in previous cases, it is necessary to check the circuit, and then diagnose the sensor itself. |
| P0171, P0172 | We are talking about too low or high level of the combustible mixture. |
| P0301 - P0304 | The Lada Grant's on-board computer tells the owner that a misfire has been registered in one of the engine's four cylinders. |
| P0325 | The knock sensor is not functioning correctly or the Lada Grant on-board computer has detected a break in its circuit. |
| P0645, P0647 | BC reports the need for additional diagnostics of the climate system clutch relay. It is possible that the relay itself may break down or the circuit may break in one of the sections, which requires additional testing. |
| P0660 - P0662 | A failure or open circuit of the intake system channel length control valve is reported. |
| P0830 | Damage to the clutch system. Perhaps the pedal switch itself or another element of the system is faulty. But in this case everything will be fine with the chain. |
| P1102 | The oxygen sensor heater gives a too low signal, which the on-board computer warns the car owner about. |
Loading …
Transmission malfunctions
| Code | Description of the error |
| P0717 | In this case, the BC reports incorrect operation of the turbine speed control device. |
| P0706, P0705 | The on-board computer reports the absence of a signal or several simultaneous signals coming from the automatic transmission selector. |
| P0720 | A failure of the output signal speed control device has been registered. |
| P0973, P0974 | BK detected an open circuit or short circuit in the wiring of the gearbox on/off solenoid. |
| P0962, P0963 | The motorist is notified of an open circuit or incorrect signal coming from the transmission pressure control solenoid. |
Installing BC on “Granta”
Before installing the BC on Granta, you need to decide on the choice of this device based on your needs. Know that the cheaper the on-board computer for the Lada-Granta, the less its functionality. However, inexpensive models may also have functions that are not available to regular standard bookmakers. For example, heating candles in winter or adjustable activation of a cooling fan. The choice of such models is quite wide, and it all depends on the needs of the buyer.
On the Grant, the on-board computer can be installed either in a standard location or in an alternative location on the instrument panel. The “STATE” type BCs are mounted instead of button covers on the front side of the torpedo. There are trip computers that can be installed in the floor tunnel, on the instrument panel instead of the radio, mounted on the windshield, or even completely replace the instrument panel. To install such a trip computer, just secure it according to the instructions and connect it to the connector on the car controller. On the Lada Granta, this connector is located in front of the passenger seat in the left corner.
On-board computer STATE x1-g for Lada Granta
The choice of on-board devices for this model is small; there are several worthy models on the domestic market.
Multitronics TC 700-750 is a universal trip computer that is suitable for installation on most modern domestically produced car models, including Lada Kalina, Priora, etc. The Multitronics company does not produce devices for a specific model, so the company’s products are famous for their versatility. As for the Grant model, such a computer can be installed anywhere in the car, and the connection can be made in several ways.
Multitronics universal trip computer
The Orion is usually mounted on the windshield or on top of the dashboard. It has all the necessary settings and parameters of a high-quality trip computer. State X1 is the most suitable and popular model of on-board computer for the VAZ 2190 Granta. The model was developed specifically for a specific model, which is why installing such a “route router” will not be difficult; the device is placed on the instrument panel in the place of the right button cover. This on-board model has such necessary functions as:
- indicator of average fuel consumption and travel time,
- decoding error codes from the engine ECU,
- possibility to set the cooling fan activation temperature,
- “plasmer” – function of warming up spark plugs during the cold period of car operation,
- display of engine temperature, ambient temperature, remaining amount of fuel in the tank.
Model State X1 for VAZ 2190 Granta
In addition, ease of installation and low price (up to 1000 rubles per set), as well as a large number of positive reviews from car enthusiasts, force Granta owners to choose this particular on-board device. Let's look at how to correctly install State X1 in the Grants dashboard.
In the package of the State X1 device you can find the case itself with a computer, a set of wires for connection and detailed installation instructions. Since the BC is made in the form of an additional button, it can easily replace the standard plug in the lower part of the center console.
State X1 device kit
Location of the on-board computer in the car console
Using a simple screwdriver, you need to remove the standard plug on the center console. Next, you need to find a diagnostic connector with standard wires; it is located on the left side of the cabin at the feet of the front passenger (the same connector is used to clear error codes when diagnosing the engine and other vehicle systems).
According to the diagram and instructions from the BC kit, you should connect the wires in series to the block, which means you don’t need to crash into the standard electrical system, which preserves the warranty on the car if one is valid. It is important to remember that all connections must be made after first disconnecting the negative terminal from the battery.
All existing models of on-board aircraft are quite informatively equipped. This advantage is beneficial for people with poor vision and especially for women who do not understand the operation of engine systems.
The router can easily point to parameters such as:
- Fuel consumption in various driving modes;
- Average speed and amount of fuel consumed during the entire trip;
- Travel time;
- Engine temperature both before and after warming up;
- Temperature outside and inside the car;
- Malfunctions of various vehicle systems;
- Warm up and dry spark plugs when required.
By the way, if the device cannot decipher errors in engine operation, but only shows its number, then the malfunction can be diagnosed using a list of codes.
In addition to the above, the computer has non-volatile memory and an indicator that the headlights or turn signals are on.
The STATE model provides for installation of the router directly on the instrument panel, which prevents the warranty of a new car from being violated in the event of damage to the trim. Installation is carried out by removing the plug under the button, then installing a device with connected wiring in the free space.
Installing the device into a standard connector
Low cost, ease of operation, and compactness are quite convincing arguments for purchasing the STAT X1 device for your car. This will make using the car convenient and safe.
You can read about installing door seals on Granta in the Repair section.
Brake pedal sensor for Lada Granta
Lada Granta Sport video
Painting mirror covers for Lada Granta
Types of armrests for Lada Granta
An on-board computer is a device that can increasingly be found not only in foreign, but also in domestic cars. The Lada Granta in the “Norma” and “Lux” trim levels is no exception (owners of a car in the “Standard” trim level can buy it additionally, although the price is quite high).
The Lada Granta is equipped with a standard on-board computer, called “State X1 M”, which works thanks to the E-Gas system. The main element of the device is a trip computer with an output to the display. It displays indicators such as:
- Amount of fuel.
- The amount of mileage a car can travel on the remaining fuel.
- Travel time.
- Distance traveled.
- Fuel consumption meter.
Thanks to this, you will know exactly how long you are driving and how critically empty your tank is.
The on-board computer installed in the Lada Granta car is equipped with a diagnostic tester, which contains system diagnostic codes. In addition, thanks to it you can obtain information about the engine temperature and adjust its parameters. It also contains data on the position of the damper, the voltage in the car’s electrical network, as well as a tachometer and speedometer.
https://www.youtube.com/watch?v=B1MvJ8InExU
Under the hood of the Lada Grant, which is equipped with this device, there are sensors. In case of any violations, all information will be displayed on the on-board computer, which will warn you about them. In particular, you may receive warnings:
- about overheating;
- about problems in the electrical circuit;
- about speeding.
In addition, the device is equipped with a supervisor who is always ready to remind the driver that his lights or turn signals are not turned off. In addition, it will immediately give a signal if the car begins to move forward or backward on its own.
Bumper tuning for Lada Granta
Setting up such an on-board computer is not something extremely difficult; detailed instructions are always attached to it. If some points are not clear to you, you can always find a video of this process. At the same time, the device can also upset you with an error, despite the fact that there is not always time to look for instructions. Here's an example of a few common device errors you may encounter along the way:
- P0030, 0031, 0032. Errors in the oxygen sensor before the heater. In this case, the on-board computer checks for an open circuit, as well as a possible short circuit to the ground or to the on-board network, respectively;
- P0036, 0037, 0038. In this case, you will be signaled by a sensor located behind the heater. The description of the errors is similar to the previous ones;
- P0112.0113. Intake air temperature sensor signal. In this case, we are talking about too low or high signal, respectively;
- P0116, 0117, 0118. Alert from the coolant temperature sensor. The code signals either that the signal is out of range, or that the readings are too low or too high;
- P0122, 0123. In this case, throttle valve sensor No. 1 signals you, notifying you that the signal level is too high or low.
These and other errors must be indicated in the instructions, so try to always have it with you if you do not know them by heart (which is highly unlikely due to their large number).
With the manual at hand, you will always be able to determine which error code means what.
Thanks to them, you can always quickly identify a particular malfunction in your car, quickly fix it and continue on your way with minimal delay.
If the check engine light comes on or problems are noticed in the operation of the vehicle systems, then you can quickly find out the cause using the on-board computer. or high-quality vehicle diagnostics at a service station. The article provides explanations of error codes.
Error Explanation of the error code: 0102 Low signal level of the mass air flow sensor 0103 High signal level of the mass air flow sensor 0112 Low level of the intake air temperature sensor 0113 High level of the intake air temperature sensor 0115 Incorrect signal of the coolant temperature sensor 0116 Incorrect signal of the coolant temperature sensor 0117 Low level of the sensor signal coolant temperature 0118 Coolant temperature sensor signal high 0122 Throttle position sensor signal low 0123 Throttle position sensor signal high 0130 Oxygen sensor signal incorrect 10131 Oxygen sensor signal low 10132 Crankshaft sensor signal high 10133 Oxygen sensor slow response 10134 No signal oxygen sensor 10135 Oxygen sensor heater fault 10136 Oxygen sensor ground short 20137 Oxygen sensor signal low 20138 Oxygen sensor signal high 20140 Oxygen sensor open 20141 Oxygen sensor heater fault 20171 Mixture too lean 0172 Mixture too rich 0201 Injector control circuit open 10202 Open injector control circuit 20203 Open injector control circuit 30204 Open injector control circuit 40261 Short to ground injector circuit 10264 Short to ground injector circuit 20267 Short to ground injector circuit 30270 Short to ground injector circuit 40262 Short to 12V injector circuit 10265 Short to 12V injector circuit 20268 Short to 12V injector circuit 30271 Short to 12V injector circuit 40300 Many misfires 0301 Misfire in cylinder 1 0302 Misfire in cylinder 2 0303 Misfire in cylinder 3 0304 Misfire in cylinder 4 0325 Open circuit of knock sensor 0327 Low sensor signal level detonation 0328 High signal level of the knock sensor 0335 Incorrect position sensor signal crankshaft position sensor signal error 0340 Phase sensor error 0342 Phase sensor signal low 0343 Phase sensor signal high 0422 Low converter efficiency 0443 Canister purge valve circuit malfunction 0444 Canister purge valve shorted or broken 0445 Canister purge valve short to ground 04 80 Cooling fan circuit malfunction 10500 Invalid speed sensor signal 0501 Incorrect speed sensor signal0503 Interruption of the speed sensor signal0505 Idle speed controller error0506 Low idle speed0507 High idle speed0560 Incorrect on-board network voltage0562 Low on-board network voltage0563 High on-board network voltage0601 ROM error0603 External RAM error0604 Internal RAM error 0607 Knock channel malfunction 1102 Low oxygen sensor heater resistance 1115 Faulty circuit O2 Sensor Heat1123 Idle Rich1124 Idle Lean1127 Part Load Rich1128 Part Load Lean1135 O2 Sensor Heater Circuit 1 open, short1136 Light Load Rich1137 Light Load Lean1140 Measured Load differs from the calculation1171 Low level of CO potentiometer1172 High level of CO potentiometer1386 Detonation channel test error1410 Control circuit of the canister purge valve short circuit to 12V1425 Control circuit of the canister purge valve short circuit to ground1426 Control circuit of the canister purge valve open circuit1500 rpm Break in the control circuit of the fuel pump relay 1501 Short circuit to ground of the control circuit fuel pump relay 1502 Short circuit to 12V of the fuel pump relay control circuit 1509 Overload of the idle speed regulator control circuit 1513 Idle speed regulator circuit short circuit to ground 1514 Idle speed regulator circuit short circuit to 12V, open 1541 Fuel pump relay control circuit open 1570 Incorrect APS signal 160 0 No connection with APS1602 Loss of on-board power supply voltage on the ECU 1603 Error EEPROM1606 Rough road sensor incorrect signal1616 Rough road sensor low signal1612 Reset error ECU1617 Rough road sensor high signal1620 EPROM error1621 RAM error1622 EPROM error1640 Test error EEPROM1689 Incorrect error codes 0337 Crankshaft position sensor, short to ground 0338 Crankshaft position sensor, open circuit 0441 Air flow through the valve is incorrect 0481 Cooling fan circuit malfunction 20615 Starter relay circuit open 0616 Starter relay circuit short circuit to ground 0617 Starter relay circuit short circuit to 12V 1141 Oxygen sensor 1 heater malfunction after the neutralizer 230 Fuel pump relay circuit malfunction 263 Injector driver malfunction 1266 Injector driver fault 2269 Injector driver fault 3272 Fault injector driver 4650 CheckEngine lamp circuit malfunction
- The ignition is turned off. Battery included.
- Press the “Reset” control button and, holding it pressed, turn on the ignition. All positions of the familiar areas (segments) should light up on the LCD—LCD control.
- Press any of the control buttons. The LCD should display the program version (Ver 1.0).
- Press any of the control buttons.
The following error codes (if any) should be displayed on the positions of the first and second lines of the LCD. - Press the “Reset” control button and hold it for no more than 3 seconds. (maybe a typo, I need more than 3c). Error codes should clear to zero.
- Press any of the control buttons. All positions of the familiar areas (segments) should light up on the LCD—LCD control.
Functionality on board the vehicle
The manufactured models of onboard vehicles for the Lada Granta have a wide information memory and are equipped with a monitor. This significant advantage is beneficial even for drivers with poor vision and women who are not very confident in the functioning of the car. In this regard, the on-board computer can help the car owner. He points to:
- travel time;
- fuel consumption at different speeds and driving rates, up to a liter;
- average speed levels and gasoline costs per trip;
- residual quantity in the fuel tank;
- speed when starting the car;
- speed when driving until the engine is completely warmed up;
- engine heating level to avoid overheating;
- various problems with Lada mechanisms;
- timely heating and drying of candles;
- temperature in the cabin and outside.
In addition to these functions, the on-board computer on the Lada Granta has volatile memory, a malfunction indicator, a supervisor (warning about unplanned vehicle movement, unswitched headlights and direction indicators) and afterburner. The latter resets the memory when switching to the gas pedal when accelerating the Lada to its original settings when using gasoline no lower than 95.
The standard on-board computer of the Lada Grant, namely the State X1 M (Multi-Set) model, is considered the highest priority on-board computer for the Lada family. Compact dimensions allow it to be built into the instrument panel in the recess of the button cover. If a car owner wants to buy a State on-board computer, then, in addition to the device, the kit will include instructions and wiring.
The filling of the State X1 M model consists of a built-in trip computer, in which all the necessary information on the operation and diagnosis of Lada mechanisms will be processed.
A diagnostic tester can provide a lot of information about the car's condition.
The on-board computer diagnostic tester is equipped with a plasma, digital tachometer and speedometer. Using the tester, it is easy to clarify the position of the throttle valve and the state of the electrical network on board, which will help prevent possible damage and fire to the vehicle's electrical wiring.
All Lada Grant errors in one table: ECU, internal combustion engine, sensor, gearbox errors
The “check engine” icon on Grant came on, you scanned the car and received an error code. It remains to find out its meaning. In one article we have collected all the Lada Grant errors that may appear while driving.
The list of possible faults is long. So we've broken it down into three parts based on the original issues. These are the error codes that it produces:
- Electronic control unit (ECU);
- If equipped - automatic transmission (automatic transmission);
- Problem with EEPROM data transfer.
Of course, if you have a manual transmission, you will not receive an error code related to the automatic transmission.
The largest group of faults. This includes data on internal combustion engine sensors. Code numbering from P0030 to P2501.
Р0030-Р0172Р0200-Р0363Р0422-Р0660Р0661-Р1388Р1389-Р1689Р2070-Р2501
All automatic transmission error codes fit into one block
The smallest group of codes. There are only six of them, all starting with U - automatic transmission and internal combustion engine faults are indicated by the letter P.
All known data transfer errors on Grant
For accurate diagnostics, you need an OBD2 diagnostic scanner - also known as ELM327. The professional version costs several thousand, the Chinese amateur version costs 200 rubles.
Cheap Chinese diagnostic devices are not guaranteed to work with your machine's software.
Versatile alternative
You can install other models of devices on the Lada VAZ 2190 car. A good alternative in this regard would be the Multitronics router. Various types of device housing allow it to be installed in any place convenient for the driver. However, when mounting grants into the dashboard, it may be difficult to pull the wiring to the diagnostic block.
Multitronix has a very convenient user interface and simple settings, as well as clarity and speed in operation. Naturally, under the supervision of such an “assistant” the car will always be under vigilant control. Its price will be higher than that of the STAT on-board vehicle, which is more adapted to the Grant.
Since the release of the Lada VAZ 2190 for sale began at the end of 2011, it was quite difficult to initially purchase some electronic components for this car. This circumstance slightly slowed down the growth of the popularity of this car. However, today you can buy a router for a VAZ 2190 from almost any supplier of automotive products.
As already mentioned, Multitronics produces universal on-board computers that can be installed on various models of domestically produced cars: Chevrolet Niva, UAZ, GAZ, etc. In the case of the Lada Granta, the most convenient and popular installation location is the inside of the central panel.
To install the BC, you need to remove the central plastic console. To do this, remove the radio and disconnect all power cables. Next, use a flat-head screwdriver to pry the handles of the temperature and air controls at the bottom and carefully remove them. Using your hands, disconnect the air intake flap control lever.
BC Multitronics for Lada Granta
Along the entire contour of the plastic panel, unsnap the 6 system latches and carefully remove the contour of the lining. Next, disconnect all the wires coming from the switches and remove the “mask” of the central panel. Now you can begin installing the on-board computer in the central part above the panel. On the removed panel, make several holes for routing wires.
Connect the connector from the computer to the diagnostic connector (as when installing the State X1 model). The device must detect the ECU protocol; if this does not happen, it means that the BC firmware does not comply with the CAN protocol and needs to be updated. The on-board computer housing itself can be secured with sealant during the process of reassembling the instrument panel and connecting all devices.
Installation of Multitronics in the central area above the panel
In addition to the Multitronics c750 model, the Multitronics C700 or VC731 on-board device models are also suitable for the Lada Granta. The latter is mounted in the upper part of the dashboard and in its functionality (and cost) is superior to all presented models, however, during operation, some Lada owners noted problems in the operation of this BC.
Two methods for installing the on-board computer
On the Lada Granta, installation of the STATE on-board computer is carried out in two ways. In the first case, the BC is fixed on the central panel, in the second - on the lining of the floor tunnel. The BC housing is installed instead of the plug (see photo).
Torpedo and tunnel, two options
The wiring harness that comes with the kit must connect the OBD connector (see photo) to the computer connector. First, find the required connector, then disconnect the battery.
What's above the tunnel on the right?
To perform the last action you will need a key “10”. You only need to disconnect the minus terminal.
Before installation
First, let's check whether our BC turns on and whether it is compatible with the machine. We carry out the standard connection, and then connect the battery. The on-board computer on the Lada Grant will show the firmware version.
Here is version “027”
Note that the version display time is limited to two seconds.
In “new” firmware (“019” and newer), you can find out the software version like this: press the right BC button, “scroll through” all the functions, reach the inscription “dro”, press the button for a long time.
The point is that “old” versions are not compatible with new equipment: firmware “026” is not suitable for the 27th engine, etc. Check operation: select “function 2” (degrees Celsius), wait for the readings to appear. Typically, if incompatible, “minus 40” is displayed.
Computer in the tunnel
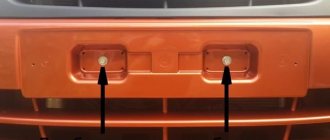
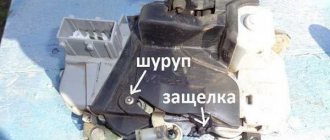
To mount the BC into the tunnel, unscrew the two screws located on the right side of the casing. You will also need to remove the lever cover.
Remove the casing using a screwdriver
In the version with automatic transmission, more actions are required.
Here you need to unscrew two screws on the right and left, and then remove the handbrake trim (3 screws). When it is removed, unscrew the screw holding the limit switch. And then the screw on the casing is unscrewed through the hole in the end switch.
Everything is ready for installation of the BC
When the lever niche is open, you can reach the plug, which replaces the button. The plug can be easily removed.
A wire is pulled from the button hole to the corner of the casing. Wires are tied to the wire and pulled out. The terminal block should protrude 2-3 cm from the hole. Make all connections: the computer to the “white” terminal block, and the “black” terminal block to the OBD connector.
At the last step, the BC module is installed in the niche. But first you need to secure the casing. We looked at how to install an on-board computer on a Lada Granta with any “box”.
Installing an on-board computer on a “torpedo”
To install the BC on the dashboard, you do not need to unscrew anything. We simply dismantle the plug and extend the wire to the corner of the tunnel. Then a tourniquet is tied to the wire, and so on.
The wiring harness goes under the dashboard
All actions are illustrated in the photo.
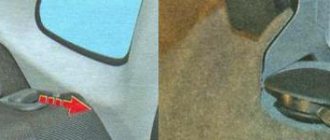
For those who cannot cope with the task, we recommend doing this: you need to open the glove compartment, empty it completely, and then unclip the two stops on the back wall. Then the entire structure “opens”, and through the appeared slot the plugs are reached by hand.
When connecting the harness provided in the kit, it is almost impossible to make a mistake - all connectors are made asymmetrical. It's a pity that the wiring cannot be completely hidden.
A couple of wires remained visible