Removing the deflector on VAZ cars: step by step
The most common problem faced by owners of VAZ cars is the breakdown of the plastic curtains on the central deflector, as well as the air intake clogged with debris and dust.
On VAZ 2106
The rotary air duct deflectors on the VAZ 2106 are round and are located on top of the instrument panel. It is held in place by three plastic snap fasteners.
Layout of deflectors on the VAZ 2107
On the classic, there are two deflectors (33) in the center, separated by a plastic partition. They are inserted into the sealing rubber inside and held in place by compression. Plus there are small floating clips on the top and bottom. Easy to remove. At the attachment points they are pryed with a screwdriver and pulled out. The side deflectors (5) are removed in the same way.
On old-style cars VAZ 2110, 2111, 2112, everything is also very simple. The grille is held in place by latches, so you just need to pry the grille with a screwdriver and it will snap off. You must first remove the plastic cover on the slider. The deflector on new cars cannot be dealt with so easily, since the grille is additionally fixed with screws. To remove it, you will need a Phillips and slotted screwdriver.
- The fasteners that need to be unscrewed are located behind the plastic cover.
- Pry it off with a flathead screwdriver.
- Under the insert you will see two screws, you need to unscrew them with a Phillips screwdriver.
- After removing the screws, simply remove the grille; it is no longer secured in any way.
Video: dismantling deflectors on a VAZ 2110
On the Lada Granta the process is trivial. The air duct deflectors are simply pulled out of their seats.
Video: removing deflectors on Lada Granta
On Priora and Kalina, air duct deflectors can also be removed without additional labor costs. On Kalina, for example, they are attached with two screws: from the top.
Top mount
Bottom mount
However, Lada Vesta will throw up a lot of surprises in this sense. Since the air duct deflectors are additionally fixed there, and the screws of the side air ducts are located in hard-to-reach places.
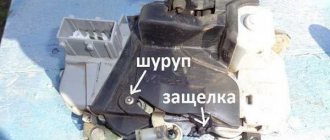
| Removing the plastic cover | First, remove the cover shared with the radio. It is held in place by fasteners. We pry it up with a screwdriver and gradually unclip it around the perimeter. |
| Fasteners | Under the cover you will see 4 screws that hold the deflectors in place. Unscrew them. |
| Vesta with deflectors removed | Remove the grille. |
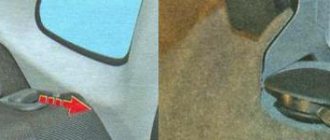
To remove the side deflectors, remove the cover covering the fuse box on the left. It can be secured with a nail with a black plastic cover.
Video: dismantling the fuse cover on the Lada Vesta
| To dismantle the deflector, you need to remove the fuse box | First, the fastenings of the fuse box are unscrewed and it is moved aside so that it does not interfere. The deflector is secured at the bottom with two screws. Turn them inside out. Then simply unclip the latches. |
| Plastic cover | Quite simple if you only need to remove the trim. If you need to completely remove the grille, you will have to remove the dashboard. |
| There is a mount at the top | The grille is additionally attached to the top. |
Replacing the cabin filter on Lada Granta video instructions
Almost all modern cars are equipped with air conditioning. In order for them to work properly, it is necessary to carry out preventive maintenance on time. The air conditioning system of the Lada Granta most often needs to replace the cabin filter. Let's figure out how to carry out this procedure correctly, without going to a service station.
When is replacement recommended?
The domestic manufacturer recommends changing the filter at least every 10 thousand kilometers, but for the Lada Granta this is not the optimal figure. After all, air has a significant influence on the condition of the filtration system. Preventive maintenance work will need to be carried out more often if there is a lot of air in your region:
- sand;
- dust;
- exhaust gases;
- carbon dioxide and other compounds.
If you live in a rural area, then it is enough to replace it every 7,500 kilometers. In megacities and when using a car mainly in southern latitudes, the filter service life is reduced to 3-5 thousand kilometers.
Regardless of the intensity of vehicle use, the cabin air conditioner filtration element is replaced annually. It is best to do this at the end of summer, so that in winter, when the heating is on, you do not breathe in the dust and pollution accumulated during the warm season.
Signs that an urgent filter replacement is necessary
In addition to mileage and time of year, you should pay attention to signs of contamination of the cabin filter. First of all, trust your gut
If you feel a strong admixture of dust in the air, then replacing the element of the air filtration system is necessary in the near future. The appearance of a foreign odor in the air means that the air has ceased to be purified. In winter, you may notice that your furnace becomes less efficient.
It is advisable to conduct an additional test. Turn on the interior ventilation system at full power (for the Lada Grant this is the fourth speed). If you do not feel a strong stream of air, then it is time to replace the air filter. It is so clogged that it is not able to pass air streams through it. Gray dust particles may appear on the duct nozzles during this test.
How to change the filter
Owners of cars with air conditioning should ensure timely replacement of freon and cabin filter. It is worth buying an air purification system element specifically designed for the Lada Granta. The box must be marked accordingly. Remember that this is a consumable item, and its service life does not depend on the brand, so purchase original stock filters for Granta or Kalina (they are interchangeable). If you do the work yourself, the replacement will cost you only 300 rubles. In services you will have to pay from 500 to 1,000 rubles for this work.
The work will take only 10 minutes if you follow the instructions:
- Open the hood and inspect the area underneath. In the area of the windshield you can see a black plastic protective cover.
- Place the wipers in a vertical position.
- Unscrew the screws of the plastic cover and remove it.
- Then do the same with the filter plastic.
- After you remove the protective cover, you will see an accordion of the air purification system.
- You will be able to see a gray coating and lumps of dust on a component that has exhausted its service life.
- The filter is located in a special plastic frame from which it must be detached.
- The new filter is placed back into the frame, after which the reassembly and installation process must be carried out.
After this procedure, you can use your car again without restrictions. As you can see, the procedure is not too time-consuming and labor-intensive. Even a fragile girl can unscrew the protective covers. If you still have questions, watch the video instructions for performing this work on the Lada Granta.
After you have made the first replacement and you know how to get to the cleaning system, you can diagnose its condition using a visual inspection. Periodically remove the protective cover and inspect the condition of the paper air barrier. This way you will be able to understand whether an urgent replacement of this consumable is needed.
How to Remove Air Ducts on an Accent
Content
Heating and ventilation system panel Accent: 1 – fan operating mode switch; 2 – ventilation mode selection knob; 3 – air temperature adjustment knob; 4 – air intake mode selection switch.
Hyundai Accent heater fan operating mode switch
The switch is designed to turn the fan on and off and select its rotation speed. The fan speed and, therefore, the amount of air flow coming from the ventilation system can be changed manually by turning the switch between positions “1” and “4”.
Switch for selecting the air intake mode of the Hyundai Accent stove
The switch is designed to switch ventilation modes between outside air intake mode and recirculation mode.
Outdoor air intake mode
Outside air enters the vehicle interior, heated or cooled depending on the selection of other functions
Air recirculation mode
The air inside the vehicle is recirculated and heated or cooled depending on the selection of other functions.
Selecting the ventilation direction mode for the Hyundai Accent stove
The ventilation mode selector knob is used to select the airflow direction.
To the head area
The air flow through the deflectors enters the upper part of the car interior
To the legs/head area
Air flows through the deflectors into the upper part of the car interior and into the footwell area. This allows warm air to flow through the vents to the feet at the same time, rather than heated or weakly heated air through the vents into the upper part of the cabin.
To the leg area
Air flows only to the leg area
In the foot area / to the heated deflectors of the windshield and side windows
Air flows through the deflectors to the footwell area, as well as to the windshield and door windows. When selecting the mode (to the heated windshield and side windows), the air conditioning will be automatically turned on
To the heated windshield and side window deflectors
Air flows through the deflectors only to the windshield and car door windows. When you select the mode (to the heated windshield and side windows), the air conditioning will be automatically turned on.
Installation of the structure on a car
How to install a purchased roof rack? Using the instructions that should be included in the kit, you can complete the entire amount of work yourself. The Lada Granta car already has special mounting brackets for installation, located under the rubber seal, so there is no need to drill other holes. The seal should be removed with special care, then the surfaces should be cleaned, and the entire structure should be applied and secured to the machine. As you can see, the installation is not difficult.
First you need to “bait” the structure, and only after alignment, tighten all the bolts sequentially. Also pay special attention to anti-corrosion treatment at the joints. Without this, the body will begin to rot and problems may begin in a few years. After installation is completed, the seals are returned to their place. A roof rack kit purchased from an auto store usually includes:
- - transverse arches;
- — racks;
- - subtexts;
- - end caps.
It should be noted that there is a large space between the body and other parts, so there is no need to worry about the paintwork.
Using the roof rack of a domestic Lada Granta car, you can unload the main luggage compartment and leave the interior free during transportation. Now you know how to install it. You can also transport long and bulky loads yourself. An airbox is perfect for transporting a small amount of things, and fishermen and hunters can use roof rails to install a tent on the roof of a car.
Removing and installing the capacitor
We place the car on the lift.
We unload the refrigerant from the air conditioning system.
We raise the car for convenient work.
We remove the front bumper, as stated in the article - How to remove the bumper of a Lada Granta car.
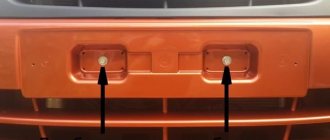
Using a 10mm socket, unscrew the four nuts 1, Figure 1, remove the washers and beam 4 of the front bumper.
We remove the sound signal 2.
Disconnect block 3 of the ignition system wires from the block of the electric fan harness 5 of the capacitor.
Using a 10 socket, unscrew two nuts 1, Figure 2, fastening the high pressure pipeline 5 and the suction compressor pipeline 4 to the condenser 3, remove the washers 2.
We disconnect the pipelines and install technological plugs on the pipelines and in the condenser holes.
Using a 10mm head, unscrew the two bolts 1, Figure 3, securing the condenser to the radiator, remove the washers 3, remove the radiator 4 from the clamps and remove the condenser 2 with the electric fan assembly.
Using a 10mm socket, unscrew the four bolts 1, Figure 4, remove the washers 2 and remove the electric fan 4 from the condenser 3.
Condenser installation
We install the electric fan 4, Figure 4, on the capacitor 3 and tighten the four bolts 1 securing the electric fan with washers 2.
We install the capacitor 2, Figure 3, with the electric fan assembly into the radiator clamps 4 and with a 10-point head we tighten the two fastening bolts 1 with washers 3.
We connect block 3 of the ignition system wiring harness to the block of the electric fan harness 5 of the capacitor.
We remove the plugs from the pipelines and the condenser. We install new o-rings. Apply compressor oil FD 46XG to the sealing rings.
Add 15 cm3 of compressor oil to the condenser.
We attach pipelines 4 and 5, Figure 2, to condenser 3, install washers 2 and secure with nuts 1. The tightening torque of the nuts securing the pipelines to the condenser is 3.7 - 4.6 Nm (0.37 - 0.46 kgf.m).
Install sound signal 2, Figure 1.
Install beam 4 of the front bumper, install washers and screw four nuts 1. The tightening torque of the nuts securing the front bumper beam is 5 – 7 Nm (0.5 – 0.7 kgf.m).
Evacuate the system and load the system with refrigerant, loading rate 500±25 grams.