Modernization of suspension systems
1. For front suspension:
2. For the rear suspension, the springs were strengthened and gas-filled shock absorbers were installed. It is worth noting that factory tuning of the suspension is combined with improved sound insulation of the car. With this modification, the car feels quite comfortable on the road up to 150 km/h, while coping well with cornering on almost any road surface.
A detailed analysis of the reliability of the suspension for the Lada Granta liftback is quite difficult to carry out. This is due to the short life of the car. Life tests of the machine are still ahead. However, based on reviews from owners and the results of warranty and service maintenance of these cars, we can characterize the main faults:
- loosening the anti-roll bar fixing bolts;
- failure of hydraulic shock absorbers (after 60-80 thousand km), leakage of shock absorbers;
- wear (increased clearance) of the front wheel bearings, which causes accelerated wear of the silent blocks of the levers;
- loss of spring stiffness (especially for springs with a smaller diameter);
- wear of the ball joints of the front suspension.
- the appearance of squeaks in the place where the shock absorber strut is attached;
- shock absorber failure;
- violation of wheel alignment angles, including due to violation of the adjustment of the clearance of the hub bearings or their destruction;
- Damage to the shock absorber protective covers.
This approach can easily be justified by the increased costs of deferred repairs. Worn bearings will place increased load on ball joints, rubber bushings of levers, and cause disruption of the alignment angles of the front wheels. Over time, the tires will begin to wear out faster. A sagging spring will not only lead to possible damage to the bumper on the first high curb. The shock absorber will wear out faster, and the car will lose comfort at high speeds.
Removing the rear suspension shock absorber strut on a Lada Granta car is done to replace a sagging or burst spring, as well as to replace the shock absorber itself or repair it if it is dismountable and you have the appropriate repair kit.
Prepare a standard set of tools and perform the following sequence of actions:
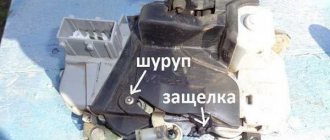
Inside the car, fold down the back of the rear seat and use a flat screwdriver to pry off the rubber plug of the shock absorber strut cup.
We remove the rubber plug, then use a socket and a regular open-end wrench to unscrew the nut of the upper fastening of the shock absorber rod to the car body.
- We install stops under the front wheels and hang the rear part of the body, remove the wheel from the side being repaired.
- Unscrew the nut of the bolt securing the lower shock absorber to the rear beam bracket.
- We remove the lower end of the rack from the bracket and remove it along with the spring.
Remove the spring from the shock absorber along with its rubber spacer. Next, remove the bushing and lower cushion along with the boot from the rod. All rubber elements must be replaced if the rubber has lost its elasticity, is severely cracked, or has other defects. Don't forget to remove the rubber compression buffer from the boot.
Having completed the necessary repairs or replacement of worn elements, we proceed to install the rack. The installation sequence is carried out in the reverse order of removal
First of all, using insulating tape, fix the rubber spacer on the upper end of the spring.
We put the spring on the strut so that its end fits neatly into the corresponding groove of the shock absorber support cup.
When installing, make sure that the lower end of the spring faces the wheel.
At this point, the repair work on removing and installing the rear suspension shock absorber strut on the VAZ 2190 has been completed.
Sources
- https://vashalada.ru/mashiny/lada-granta/podveska-lada-granta.html
- https://1ladagranta.ru/harakteristiki/podveska-osobennosti.html
- https://remladavaz.ru/snyatie-i-ustanovka-stojki-amortizatora-zadnej-podveski-lada-granta
Reviews about the suspension
The owners highlight a number of positive points:
- The suspension is well suited for Russian roads, especially outside the city.
- On the highway, the suspension does its job well, and the car holds the road well.
- The suspension is moderately soft even at -30C.
- After a big hole, we had to change two wheels; we checked the suspension during maintenance - no complaints. On all previous cars with such a mileage it was necessary to completely “shake up” the suspension.
There are also negative points:
- On bumps the suspension is noisy.
- Compared to the Renault Logan, the Lada Granta's suspension is a bit harsh.
Let us remind you that you can get acquainted with the car in more detail from other reviews and tests of the Lada Grant.
Keywords: front suspension of Lada Granta | rear suspension of Lada Granta | front suspension of Lada Kalina | Lada Kalina rear suspension
4
2
Found an error? Select it and press Ctrl+Enter..
- AvtoVAZ announced the “Hot Days” campaign, the prize is a car (until 09/30/2020)
- How much does it cost to repair a Jatco CVT?
- Replacing and checking the mirror control unit on Lada XRAY
- What tire and wheel sizes are best to choose on the Lada XRAY
Cigarette lighter selection
Not many motorists and Lada Granta owners know that in addition to the standard VAZ cigarette lighter, there are several more analogues of this part.
Let's look at the catalog numbers and names of the spare parts:
- The original article number for the cigarette lighter is divided into 3 parts: 1. Movable part of the cigarette lighter (21230-3725200-00); 2. Cigarette lighter socket (21230-3725100-00); 3. Cigarette lighter illumination ring (21230-3725400-00). As you can see from the catalog number, the Lada Granta has a part from the Niva Taiga installed.
- An alternative to the standard Granta cigarette lighter can be the manufactured part (DA5100F0109).
Both parts fit perfectly into the seat and do not require modifications or modifications to the fastening.
Reasons for cigarette lighter failure
There are several reasons for the failure of the Lada Grant cigarette lighter:
- Short circuit caused by a failure of the on-board network.
- Actions of the passenger or driver that caused the part to break.
- Wear.
Sequence of actions when replacing the front shock absorbers of a Lada Granta with your own hands
We prepare a set of tools, rags, WD-40 fluid, a set of new racks, and other components for related repairs.
- We place the car within the perimeter of the repair area, jack it up, and secure the rear row of wheels with wheel chocks;
- We remove the wheel, disconnect the tie rod end, the ball joint;
- We loosen the rod (key to “9”), while holding the main nut to “22”;
- With a key set to “13”, unscrew the three nuts securing the upper support;
- In order to minimize the violation of the camber angle - wheel toe, we use a chisel to mark the relative placement of the steering knuckle and the bracket;
- Unscrew the bolts at the bottom of the fastening (key set to “17”);
- We remove the Grant shock absorber assembly;
- Use a puller to compress the spring several turns.
We replace the Granta racks and assemble the elements in the reverse order. At the same time, we carry out troubleshooting and replace worn-out consumables with new ones (anthers, bumpers). Don’t forget to visit a service station and have your wheel alignment adjusted. Otherwise, the tires will wear out faster. Motorists at a number of service stations prefer replacing the shock absorber assembly, as opposed to partial repairs. The cost of the service is a third less than the price of a new rack, but no one guarantees the serviceability of the accompanying elements. Ultimately, the cost of purchasing consumables will increase.
How to check the front suspension
Checking the front suspension should be carried out in the engine compartment and from below the car, mounted on an inspection ditch or supports (with the front wheels hanging out).
The condition of the protective covers of the suspension ball joints (they should not be mechanically damaged) should be checked during each maintenance and repair of the vehicle.
Check the condition of the rubber-to-metal joints, rubber cushions, suspension ball joints and the condition of the upper suspension strut mounts.
Rubber-metal hinges and rubber cushions must be replaced in case of ruptures and one-sided bulging of rubber, as well as when their end surfaces are trimmed.
Suspensions on rubber parts are not allowed:
- signs of rubber aging;
- mechanical damage.
Pay special attention to mechanical damage (deformations, cracks, traces of contact with road obstacles, etc.) of suspension elements, especially levers.
1. Check the tightness of the shock absorber rod mounting nut.
2. Check the tightness of the nuts securing the upper strut support to the body. Similarly, check the fastenings of the rod and the upper support of the second rack.
3. Check the condition of the protective covers of the ball joints. If the boots are damaged, replace the ball joints.
4. Check the ball joints for play. To do this, measure the distance H (see Fig. 7.1) between the transverse arm 17 and the brake disc 21. Insert the mounting blade A (see photo) between the steering knuckle and the suspension arm and, leaning on the lever, try to swing the steering knuckle. If this distance changes by more than 0.8 mm when the suspension is rocked, replace the ball joint.
5. If the ball joints are in good condition, rock the wheels in a vertical plane and make sure there is no play in the hub bearings. The maximum permissible axial clearance is no more than 0.015 mm. If the gap is greater than the specified value, replace the bearings.
Advice
: When swinging the suspended front wheel, it is difficult to distinguish play in the hub bearings and ball joints. Ask an assistant to press the brake pedal: if you feel play in this case, then the ball joints are faulty.
6. Check the rubber-to-metal joints in the places where the transverse arm is attached to the body bracket for play.
7. To do this, insert a mounting spudger or a large screwdriver into the gap between the lever and the bracket and try to rock the lever. If there is significant play, it is recommended to replace the lever assembly with hinges.
8. Check the rubber-metal hinges for attaching the stabilizer struts for play. To do this, insert the mounting blade between the wishbone and the stabilizer bar and rock the bar. If necessary, replace the stabilizer links.
9. Check the tightness of the nuts securing the brace to the lever.
10. . and to the brace bracket.
11. Check the tightness of the nut securing the stabilizer link to the front suspension arm. Replace the racks whose hinges have noticeable play.
12. Check the condition of the rubber cushions where the stabilizer bar is attached to the body.
Possible faults
Malfunctions and breakdowns can occur in any car, especially with regard to the suspension. This is explained by the fact that the suspension endures constant vibration when driving, softens shocks, and takes the entire weight of the car, including passengers and luggage, on itself. Based on this, a Granta in a liftback body is more susceptible to breakdown than a sedan, since the liftback body has a larger luggage compartment designed for greater weight.
The first problem that is most often encountered is the presence of knocking or extraneous noise. In this case, it is necessary to check the shock absorbers, as they need timely replacement and can often fail. Also, the reason may be that the shock absorber mounting bolts are not fully tightened.
If this is not the case, then check the rubber bushings on the suspension support arms. They very often break when they fall into a hole, especially on a liftback body. Also, with a strong impact, not only the bushings can be damaged, but also the struts themselves. Then the repairs will be more serious and expensive.
The final cause of suspension knocking may be a broken spring. It is replaced literally within 5 minutes.
In addition to knocking noises, you need to check the suspension mechanism for leaks. If such traces are found, then this can only indicate one thing - a malfunction of the shock absorbers. If all the fluid leaks out and the shock absorber dries out, then when it hits a hole, the suspension will provide poor resistance, and the vibration from the impact will be very strong. The solution to this problem is quite simple - replace the worn element.
Since the Lada Granta in the liftback body is more subject to overloads, its owners often experience such trouble as: puncture of the rear suspension. This is due to exceeding the permissible weight on the rear axle of the car. With constant use in such conditions, shock absorbers and springs will very quickly become unusable.
The last malfunction that occurs on the Grant is that when braking or accelerating, the car pulls to the side. This indicates that on this side, one or two shock absorbers are worn out and sag somewhat more than the others. Because of this, the body has an overweight.
Rear suspension features
The rear suspension of the Grant is the same for the sedan and liftback. In fact, this is the same beam with springs and shock absorbers that is installed on Kalina, Samara and Samara 2. Instead of a stabilizer, a beam is used, which means the structure is dependent. Structurally, the rear part of the suspension system remains unchanged. Looking under the bottom, you can see the usual picture - a beam fixed in a semi-rigid position. It is attached to the body using hinges.
Support struts (springs with shock absorbers) are attached to the levers on the right and left. Despite the outdated design, a semi-rigid beam with racks has a number of undeniable advantages:
- even the maximum load actually has no effect on its behavior, which confirms the high level of energy intensity;
- maintenance, even according to regulations, should be carried out once every 100,000 km, but this period increases for the entire period of operation;
- Parts can be replaced in a garage even by beginners.
The rear suspension of the Granta has a feature that distinguishes it from the Priora - a negative camber of the rear wheels of 1° is created at the rear. This was done to improve the vehicle's directional stability, but given the design features of the suspension system, this solution is not capable of significantly changing anything.
conclusions
Thus, replacing the cigarette lighter is one of the simplest operations in repairing this car.
Since time immemorial, automakers have introduced maintenance regulations for their creations. Carrying out maintenance of the Lada Granta is necessary to maintain the car in technically sound condition throughout its entire service life and to timely identify and eliminate current faults, which leads to minimizing the cost of repairing the Lada Granta.
By clicking on the link you can read general recommendations for maintenance and below see our offer for maintenance of Lada Granta.