How to choose antifreeze: subtleties and nuances
Be careful when buying antifreeze. It is better to give preference to proven brands, despite the fact that their products may be somewhat more expensive than lesser-known analogues.
The color of the coolant should be blue. It makes sense to take red antifreeze only if the car is used in the Far North.
Take a closer look at the canister. It should have a straight, not crooked, sticker that contains all the necessary data such as the composition of the liquid and the name of the manufacturer (along with the address of the manufacturer). Compliance with this rule will protect you from crude counterfeits, although it does not guarantee the purchase of a quality product.
Antifreeze is toxic, and therefore, when working with it, it is highly advisable to wear rubber gloves and try not to inhale its fumes. If it spills, this place must be wiped with a rag or any cotton rag, otherwise corrosion may begin.
Tools and materials:
- 10 l. antifreeze (there may be some left over, but it’s better to have a small supply);
- drain container with a volume of 10 l;
- wrenches 10 and 8;
- crosshead screwdriver;
- head or key 13.
If possible, find yourself an assistant who will help you at one of the stages.
How to change antifreeze on a VAZ 2109
Ideally, replacing antifreeze on a VAZ 2109 is carried out in a pit, but if there is none, any flat surface will do.
1) Using a 10 key, remove the terminals from the battery and move the heater tap control knob to the extreme right position.
2) Open the expansion tank cap.
3) Unscrew the bolts securing the crankcase protection (if equipped) and remove it.
4) Prepare a container and then unscrew the radiator drain plug. Wait until the liquid drains out.
5) Move the container, take a 13mm socket or wrench, and then unscrew the drain plug in the block.
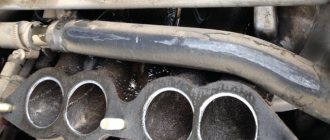
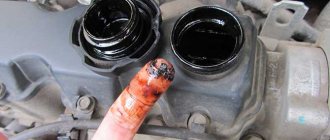
6) Has the antifreeze leaked? Tighten all the plugs and move on to the carburetor. Using a screwdriver, loosen the clamp securing the heating hose, and then disconnect this hose (see photo, indicated by a red arrow).
7) For an injection engine, you need to find the throttle assembly and loosen the screw securing the fluid supply hose (red arrow in the photo), then disconnect this hose (blue arrow).
At this stage, the help of an assistant is desirable. While you are pouring new antifreeze, he should keep an eye on the fitting from where the hose was removed. As soon as coolant starts dripping from it, an assistant needs to install the hose back as quickly as possible. However, you can do this yourself, although the process will take longer.
9) Is the hose in place? Great, add antifreeze to the MAX mark on the tank, and then install the terminals and start the engine so that it runs until the fan turns on or at least until the thermostat opens. At the same time, check how the stove works. Then turn it off and inspect the cooling system for leaks. If everything is fine, then all you have to do is add antifreeze to the mark (if necessary), but this must be done only on a cooled engine, otherwise hot liquid will flow out like a fountain as soon as you open the tank lid.
In conclusion, we note that if everything is done correctly, then no additional manipulations will be needed. However, if the drained antifreeze turns out to be brown, it is better to rinse the cooling system (with water or a special product), and only then fill in a new one.
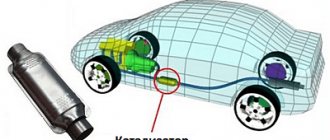
coolant The cooling system of the “nine” engine is a closed circuit through which the working fluid – liquid (coolant) – is forced to circulate. The main elements of the circuit are an expansion tank, two radiators, a centrifugal-type vane pump, a thermostat and pipes.
How to drain antifreeze or antifreeze from the engine?
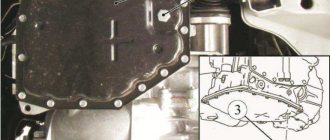
Now you need to move the container under the engine block, there is a drain plug on it, you will need to unscrew it.
But first you will have to remove the ignition module along with the bracket on which it is attached, so the plug is located under it.
We wait until everything drains, after which we wrap all the parts back so that we don’t forget about them later. Now you know how to drain the coolant, but another question arises. Does the system need to be flushed?
If the car is not old, then you don’t have to wash it, it depends on the condition, but they are mostly washed with distilled water; if it is a more neglected option, then you can buy special washes specifically for these purposes. Then fill in new antifreeze or antifreeze.
When should you think about replacing?
The schedule approved by the manufacturer indicates that the replacement of antifreeze on a VAZ 2109 should be carried out:
- Once every three years, regardless of mileage;
- every 60 thousand km. mileage regardless of operating time.
The expediency of carrying out the operation is relevant when carrying out repair and restoration work with elements of the “cooling” circuit, preparation for which involves draining the coolant. Such work may include replacement:
- heater radiator or cooling system heat exchanger;
- thermostat;
- expansion tank;
- centrifugal pump;
- antifreeze temperature sensor.
Required accessories
Maintenance of the engine cooling system is possible with at least 8 liters of special composition. In the service book, Lada specialists display a list of suitable coolants:
- Antifreeze AM;
- "OZHK LENA";
- "LENA-40";
- Antifreeze A-40M;
- SPEKTROL ANTIFREEZE;
- AGIP ANTIFREEZE EXTRA;
- Glisantin G 03.
The accessories are an open-end wrench set to “13”, a screwdriver and a container for draining antifreeze with a volume of at least 8 liters.
DIY technology for replacing antifreeze on injection VAZ 2109
The replacement concept involves draining the used compound through special holes and filling the system with new antifreeze. The designers provide two drain holes in the cooling system of VAZ engines:
- on the left side of the main radiator;
- on the front wall of the cylinder block.
Replacing antifreeze on VAZ 2109 engines is not possible without first dismantling the ignition module located on the front surface of the cylinder block:
- remove the negative terminal from the battery;
- disconnect the wires from the spark plugs;
- remove the ignition module power supply block;
- unscrew the bolts securing the module relative to the cylinder block and clutch housing;
- loosen the upper left bolt of the front engine mount;
- remove the module bracket from under the bolt;
- remove the module with wires from the engine compartment.
Draining of used antifreeze is carried out according to the following method:
- open the heater tap;
- connect the expansion tank to the atmosphere by unscrewing the cap (under such conditions, rapid flow of liquid from the system is ensured);
- place the container and unscrew the cap in the lower left corner of the engine radiator, wait for the liquid to drain;
- Unscrew the drain nut on the cylinder block and drain the coolant from the “jacket”.
For your information. If the drained liquid is dirty and rich in various inclusions, the system should be flushed with plain water:
- clog the drain holes;
- pour water through the expansion tank and close it;
- start the engine for 3-4 minutes;
- shut down and drain.
The operation is repeated until the waste water is clean.
Having removed all the liquid from the system, you should:
- install all drain fittings back;
- install the ignition module in reverse order;
- connect the vehicle's ground to the battery;
- pour new antifreeze through the expansion tank (see filling technology below);
- start the engine for 1-2 minutes;
- add coolant and close the expansion tank;
- warm up the engine until the cooling fan operates and turn off;
- if necessary, add coolant to the virtual average mark (between MIN and MAX).
The procedure for replacing coolant on a VAZ 2109-2108
So, the first thing you need to do is unscrew the cap in the expansion tank to relieve pressure in the system - this will allow antifreeze or antifreeze to drain faster:
Then we put a thin hose on the outlet of the radiator tap, which is located in the lower right corner and turn off the tap:
And at the same time, lower the end of the hose into the drain container. Personally I did it like this:
At the same time, you can immediately unscrew the plug in the engine block with a key number 13:
And substituting another container, we wait until all the coolant drains from the block and the cooling radiator:
If antifreeze or antifreeze flows out of the system and is very dirty, has traces of rust and other particles, then it is necessary to flush the cooling system several times, pouring ordinary water into it and draining it back. This procedure must be repeated until the water comes out clean!
Then you can screw the block plug back in:
Also close the radiator tap and you can start pouring new antifreeze into the VAZ 2109-2108 system.
This must be done in a thin stream without sudden movements, so as not to form an air lock. Otherwise, you will have to drive it out later by opening the cap of the expansion tank and, with the “face” raised, heavily revving the engine on a warm engine.
After the new coolant is poured into the system up to the mark in the MAX expander, tighten the tank cap and start the engine. Let it run until the radiator cooling fan comes on. Then you can turn off the engine and, after a long stay, check the fluid level in the tank again. If it drops below the MAX mark, you need to top it up to the required level!
In this article we will look in detail at how to drain antifreeze on a VAZ 2109 and completely replace it. We’ll also look at how to fix a leak.
It is necessary to change antifreeze or antifreeze according to the manufacturer's instructions or if the vehicle is operated at low temperatures. Any brand of antifreeze has a certain operating temperature, when reduced, the process of its crystallization can begin. To carry out the work, we need a lift, overpass or inspection hole.
Features of coolant replacement technology
fluid replacement The procedure for replacing used antifreeze on a VAZ 2109 is fraught with a significant pitfall: in the process of filling the system with a new composition, there is a high probability of air pockets appearing. When the engine warms up for the first time after replacing the coolant, it is necessary to monitor the engine temperature:
- the coolant temperature arrow is approaching the red zone, and the cooling fan has not worked and cold air is blowing from the heater - there is an air lock in the system;
- hot air comes from the stove, but the fan does not work at the set temperature (about 105-107 degrees) - the fan is faulty;
- The fluid level in the expansion tank tends to increase.
The correct method of filling the system with liquid will help to avoid the appearance of an air lock:
- pour antifreeze into the expansion tank (full filling of the container is allowed);
- disconnect the compound supply hose from the throttle assembly heating fitting;
- add the composition as the expansion tank is emptied;
- if there is a phenomenon of liquid leakage from the heating fitting of the throttle assembly, put on the antifreeze supply hose (you may need to create a slight pressure in the tank (one or two deep exhalations into the tank are enough);
- close the tank.
Briefly about replacement
The process of replacing antifreeze on VAZ 2109 engines is carried out either once every three years, or once every 60 thousand km, or (advisable) when carrying out repair work on cooling system units. The operation route looks like this:
- remove the ignition module (on injection models);
- drain the used antifreeze;
- Having disconnected the coolant supply hose to the throttle assembly (injector) or to the carburetor, fill in a new mixture through the expansion tank;
- start the engine for 1-2 minutes;
- check and, if necessary, add antifreeze;
- start and warm up the engine to the fan operating temperature (105-107 degrees);
- turn off the engine, inspect the system for leaks, and if necessary, add antifreeze to the medium level.
VAZ 2109 antifreeze replacement
The car engine runs, constantly producing a lot of energy and increasing the temperature. To make it work stably, smart people came up with a liquid cooling system. The coolant in this system needs to be changed periodically. This is what we will do now. These instructions for replacing antifreeze on a VAZ 2109 car will help you change the antifreeze right in your garage with your own hands and without going to a service station or paying for repairs. Photos and videos will tell you how to do it right.
- When is it necessary to replace antifreeze?
- What to choose?
- Antifreeze
- Antifreeze
- Conclusion
- We change antifreeze ourselves
- Tools and fixture
- Draining antifreeze
- Flushing the cooling system
- Pouring antifreeze
- Ending the process
How to drain antifreeze or antifreeze?
Using the example of VAZ 2114, VAZ 2115 cars, we will consider how to drain antifreeze or antifreeze, who has what is filled in, this process is not at all complicated and is done in two stages.
- Drain the coolant from the engine.
- And drain the antifreeze from the radiator.
So, let's start in order, for this process we need a set of keys and some kind of container for the liquid.
Attention! To avoid burns, this procedure is performed on a cold engine or slightly warm.
When is it necessary to replace antifreeze?
VAZ 2109 antifreeze needs to be replaced on time
- This issue should not be overlooked in any case. Because if the antifreeze is unsuitable, the engine will not cool properly.
- If the engine does not cool to the required degree, then there may be problems with the cooling system (partial failure) and spare parts will have to be replaced.
- In the worst case, the engine may boil - this does not bode well for you and your car.
- Thus, the engine must be well cooled, especially in winter. In winter, problems most often arise with the cooling system.
- In view of this fact, it is better to prepare in advance. That is, in the fall it is necessary to change the antifreeze.
- It is advisable to change antifreeze every autumn closer to winter. You should also replace parts of your car's engine cooling system that are damaged or close to failure.
Note! It is especially recommended to change antifreeze every year on older cars, since there is a greater likelihood of rust contaminating the radiator and other parts of the cooling system.
- Also, if rusty antifreeze is detected in the car’s cooling system, it is extremely necessary to flush the system. This will be mentioned below.
Replacement
The procedure for replacing antifreeze can be divided into four main stages:
- Draining the old coolant;
- Flushing the system;
- Filling with new antifreeze;
- Checking the functionality of the system.
Now we will go through each stage separately.
Expansion tank
Draining old coolant
- To work you will need a pit or overpass. In garage conditions this is not a problem.
- The procedure should only be started with a cold engine. Do not add new coolant if you just turned off the engine a couple of minutes ago. Otherwise, there is a risk of cracks in the cylinder block.
- Remove the negative terminal from the battery.
- Place a prepared container with a volume of about 10 liters under the car.
- Remove the cap from the CO expansion tank.
- Using a socket or a 13mm wrench, unscrew the drain plug from the cylinder block.
- Hold the plug so that the coolant pressure does not blow it away. There is no point in losing such an element.
- When all the liquid has come out, screw the lid on.
- Drain the coolant now from the radiator by unscrewing the plastic plug. The liquid will flow into the prepared container.
- Screw the drain cap on by hand. No tool required here.
Drain procedure
Flushing
If you find traces of contamination in the drained antifreeze, the liquid has acquired a rusty tint, it is better to rinse the system thoroughly. If you ignore this recommendation, the new antifreeze will not last long, so you will soon have to change it again.
- For washing, use special compounds or ordinary water. It is better to use distilled water, but if you really want to save money, take tap water;
- Pour CO flushing liquid into the system through the neck of the expansion tank;
- Start the engine, raise the speed a little and let the engine run for about 10 minutes;
- Turn off the engine and repeat the draining procedure according to the instructions that you read above. Only now the system will not contain antifreeze, but a flushing composition;
- Repeat flushing as necessary until the water coming out of the drain holes is clear.
Flushing the system
Flushing is just a recommendation, not a mandatory procedure. But those who regularly flush the system claim that it works more reliably and longer this way. So decide for yourself what to do.
Fill
To fill in new antifreeze, you don’t have to do anything complicated. You just need a special watering can. Many containers in which antifreeze is sold are not particularly convenient for pouring directly from them. Use a funnel to avoid spilling coolant.
It is extremely important to know exactly how much antifreeze is in the cooling system. The coolant for the VAZ 2109 requires 7.8 liters. Therefore, antifreeze should be purchased in 8-liter containers.
- Take a watering can and insert it into the neck of the expansion tank. This way you won’t spill precious grams of antifreeze.
- Check that all drain plugs are securely tightened. Otherwise, the coolant will simply spill out onto the floor and you will have to buy new coolant.
- Start gradually pouring in new antifreeze.
- Stop periodically for 1-2 minutes so that the liquid has time to distribute throughout the system.
- After filling the system, add coolant to the middle of the expansion tank level.
- Next, the most important thing is to get rid of the air that has entered the cooling system.
- Air accumulates in the upper pipe. To remove it, you just need to squeeze the upper pipe several times. Squeeze until you feel liquid appear inside.
- Bleed the cooling system. To do this, use a screwdriver or a size 8 wrench to unscrew the clamp that holds the return hose to the CO expansion tank (return).
- Now close the fitting with your finger, onto which the return line is put, so that air cannot escape from there.
- Next you need to blow into the expansion tank. Just imagine that you are trying to inflate the tank like a balloon.
- This will create pressure and coolant will begin to flow from the expansion tank into the CO, and excess air will escape through the return.
- As soon as antifreeze begins to flow out of the return line, the procedure can be stopped.
- Replace the return line and tighten the clamp.
- Reconnect the negative terminal of the battery, close the cap of the expansion tank and check the quality of the work done.
What to choose?
Many car owners often wonder about the choice of coolant - antifreeze or antifreeze: which is better? Let's try to figure out what's what without going into deep truths.
Antifreeze
- In fact, all coolants are and are called antifreeze. And antifreeze is no exception to the rule. In fact, antifreeze is just the name of one of the types of antifreeze developed in our area, for our area and for our cars.
- In terms of its performance and characteristics, antifreeze is in many ways inferior to other antifreezes.
- The price of antifreeze is much lower than other coolants.
- Antifreeze is more common among domestically produced cars.
Antifreeze
- There are very, very many antifreezes in the world. They differ in composition, base, color, and so on.
- Various antifreezes include various special additives that help better maintain the car's cooling system and at the same time increase the service life of the antifreeze itself.
- The cost of antifreeze is higher than antifreeze, and it is quite widespread.
Conclusion
Summarize. Antifreeze or other antifreeze? So:
- Antifreeze is undoubtedly better in quality.
- BUT antifreeze is much more practical for several reasons.
- Antifreeze was SPECIALLY designed for our climate and our cars.
- Antifreeze is available in almost every domestic car that passes you. And this can sometimes save (in case of a breakdown on the road).
- There is enough antifreeze for the car to function normally and the cooling system to work as expected.
It is more practical and cheaper (which is very important) to use antifreeze.
Antifreeze VAZ 2109
I never thought about what kind of coolant was in the cooling system before. I just bought blue and topped it up if necessary. For some reason, I was sure in my head that the VAZ needed blue antifreeze. I decided to look into this issue. It turns out that antifreeze is the domestic name for coolant for cars. Abroad it is called antifreeze. According to the regulations, antifreeze needs to be changed every two years, which few people do. The freezing point is written on the bottle of antifreeze, usually -40 degrees. Over time, this temperature will become lower, and the composition of the antifreeze itself will change from what is stated.
The most interesting thing is that after walking around the shops and gas stations, I noticed that mostly on the shelves there is G11 antifreeze in a wide variety of colors: blue, green, red, yellow, pink. Here the situation is such that they all have the same chemical composition, only the dye that is added to the liquid is different.
This situation creates a lot of confusion: many people, not knowing what type of antifreeze they have, rely on color. They think that if it’s filled with red, then you need to buy any red and fill it up. This is an error; regardless of color, there is an antifreeze compatibility table:
As you can see, you cannot add G11 to other types of antifreeze. The thing is that with such mixing a chemical reaction can occur, as a result of which a precipitate forms and the properties of the coolant change. This leads to big problems: alternatively, the thermostat may jam.
Therefore, when you ask the seller for good antifreeze, you should be asked: what is in your system now? If it’s blue, then in 99% of cases it will be G11. But with the rest of the colors you can’t guess. Currently, the service life of G12+ antifreeze is three years. You can find G13 antifreeze, marked long life; such antifreeze can not be changed at all for 5 years.
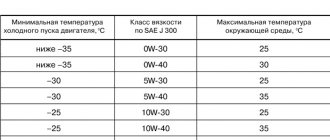
Antifreeze can be purchased as a concentrate and diluted yourself with distilled water to the required temperature. For northern regions, a very strong solution is needed, with a freezing temperature of up to -50 degrees. For the southern regions, -25 degrees may be enough. But there is an opinion here: it’s better not to skimp on antifreeze; a good concentrate costs about 1,000 rubles for two liters. If you dilute it one to one (you get 4 liters of antifreeze), then the freezing temperature will be about -40 degrees. If two to three (you get 5 liters of antifreeze), then it’s already -28 degrees. The specific ratio for each antifreeze should be indicated on the packaging.
What happens to antifreeze when it freezes? Unlike water, when antifreeze freezes it does not expand, but turns into mush. Therefore, even if very severe frosts hit and the antifreeze froze, nothing should break. After defrosting, everything should continue to function.
We change antifreeze ourselves
How to replace antifreeze on a VAZ 2109 yourself? The answer to this question is discussed below and until the end of the article. Be careful.
Important! Before replacing antifreeze, make sure that all parts of your car's cooling system are in working order and do not require repair. If this is not the case, then you should first repair the damaged parts or replace them, and then (or simultaneously) change the coolant.
Tools and accessories
What will be needed to ensure that the replacement of antifreeze on a VAZ 2109 occurs without wasting extra time and effort? Prepare the following in advance:
- Antifreeze or antifreeze - 8 liters
- Container for drainage (to fit under the car)
- 13mm socket, extension and ratchet
- Or a 13mm wrench (open-end or socket)
- Key for 8
- Key for 10
- Screwdriver
- Watering can
Have you prepared? You can start working.
Draining antifreeze
Now we begin to drain the antifreeze. Remember, car repairs are best done in an inspection pit or overpass. It’s still good on a lift, but this phenomenon is rarely seen in a garage:
Advice! Do not forget - you should replace the antifreeze on a cold engine. Under no circumstances should you fill in cold new antifreeze if you have just driven the car into the garage and it has not yet cooled down sufficiently. This threatens a crack in the cylinder block.
- So, our VAZ 2109 is in the pit and ready to drain the antifreeze.
- Before you start draining it, take a 10mm key and be sure to unscrew the negative terminal of the battery so that when you drain the antifreeze, a short circuit does not occur, and you don’t have to repair it later with an electrician.
- Place a previously prepared antifreeze container under the car, which should be about 10 liters in volume.
- Remove the cap on the expansion tank of the cooling system.
- Take a 13mm socket with the rest of the accessories or a 13mm wrench and unscrew the drain plug from the cylinder block.
How to properly drain antifreeze from the system
If your VAZ 2114 is about to replace the antifreeze, it is not necessary to take the car to a service center. Having prepared several tools, you can do everything alone without the help of craftsmen. If there is an old coolant container left in the garage, it is perfect for draining waste material. The tools we need are:
- Wrenches for 8, 13 and 17.
- Flathead and Phillips screwdrivers.
- Cleaning rag.
Its viscosity depends on the temperature of the liquid. Therefore, in order for the antifreeze to drain better, work must begin with a warm engine. In the VAZ 2114 cooling system, hot antifreeze is also used to heat the interior. When draining, be sure to unscrew the heater radiator valve.
Step-by-step instruction
The work consists of the following stages:
- First of all, open the hood and remove the engine block protection.
- Remove the cap from the expansion tank.
Remove the cap from the coolant reservoir VAZ 2114
- We place a container for draining under the bottom of the radiator (this is where an old antifreeze bottle comes in handy).
- Find the drain plug at the bottom of the radiator and carefully open it. Make sure that liquid does not get on nearby parts. The average coolant leak time is 15-20 minutes.
Open the plug at the bottom of the radiator and begin to drain the liquid - After all the antifreeze has been drained, thoroughly clean the plug and close it.
- Next, drain the liquid from the engine itself. Move the container under the engine drain plug and open it.
Open the plug on the engine and drain the antifreeze - The drain hole is located below the ignition module (it is recommended to remove the module in advance).
- We wait about the same time as with the radiator. We wipe the plug and put it in place.
The draining process is quite simple and will take you no more than an hour. After finishing the work, it will be useful to wipe the nearby parts from dirt.