Replacing and adjusting the clutch cable on a viburnum
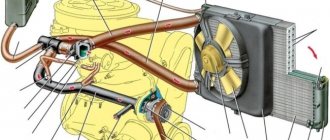
Welcome! Clutch cable - thanks to it, you can control the clutch fork, and at that moment it can disconnect the clutch from the flywheel, thanks to the release bearing, a cable is used on all front-wheel drive cars, because their gearbox is located deep in the front, on classics Together with the cable, the main and slave cylinders of the clutch are used (there is no clutch cable), these cylinders work differently, unlike the cable (the cable simply pulls), but the result is the same (the clutch is disconnected from the flywheel due to the release bearing) and the effect occurs due to one and the same unit, namely thanks to the clutch pedal.
Note! To carry out the replacement work, you will need to use: Be sure to use wrenches, as well as in addition to them, any other wrenches that can be used to unscrew bolts and nuts can also be used, in addition to this, you will also need a caliper or instead a ruler and stock up on pliers!
Where is the clutch cable located? We won’t be able to show you in detail where it is, because it is located at the bottom and the angle that was taken in the photo below simply won’t allow you to look into that place, but we’ll still try to describe where it is, first, find the box, it’s for For clarity, the red arrow is indicated in the photo, this gearbox is connected to a cable that comes from the passenger compartment, so you can already make an approximate conclusion about where the cable goes, in addition to all this, pay attention to the blue arrow, which also shows approximately the location of the clutch cable in under the hood of the car.
When should you change the clutch cable? Any cable, including the cable that goes to the handbrake, which goes to the gas (the throttle cable is correctly called) must be replaced if it breaks (If it breaks, you will not be able to use the system to which the cable goes, for example, the gas cable breaks, the car no longer will go, the clutch cable has broken, the clutch system will no longer work in the same way), with strong stretching, which by the way will greatly disrupt the operation of the clutch system (the clutch may not be completely disconnected from the flywheel, thereby changing gears will be harder and with a crunch), as well as it changes when souring, and souring of the cable is possible only if the car has not been used for a long time or is used in extreme winter conditions; when souring, the clutch pedal will be very difficult to press and will not be willing to return back, which can soon lead to an emergency situation on the road and therefore this the cable needs immediate replacement.
How to replace and adjust the clutch cable on a VAZ 1117-VAZ 1119?
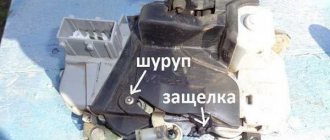
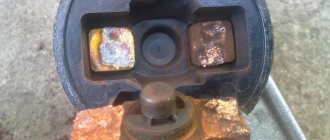
Removal: 1) First, while inside the car, get to the clutch pedal and remove the stop of the cable sheath from the pedal bracket, this is done very simply, namely, take a wrench and use it to unscrew the nut securing the stop (see photo 1), as soon as the nut will be unscrewed, the stop is removed from the bracket stud (see photo 2), after which you will have access to the clutch pin from which you will need to remove the stopper with pliers or a screwdriver (see photo 3), after the stopper is removed, remove it from of the same pin is the housing of the wear compensation mechanism for the driven disk linings (see photo 4).
2) Now remove the plastic bushing from the clutch pedal finger by hand (see photo 1), check its condition, it should not be deformed or heavily worn, otherwise replace it with a new bushing (Before installing the new bushing, lubricate it with Litol lubricant -24 or LSC-15), then remove the rubber seal of the cable sheath from the hole that it covers (see photo 2), then get out of the car and move into the engine compartment of the car to the box, having reached it, pull the tip of the clutch cable forward and then disengage it from the fork (see photo 3) and then unscrew the leash and remove it from the cable tip as shown in the fourth photo.
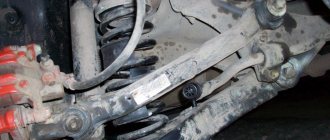
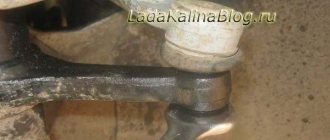
3) And finally, remove the cable from the bracket on the box, let’s immediately note the fact that the bracket on Lada Kalinas is solid and not split as shown in the photo below (The photo below just shows another car and it’s not the bracket, but the clutch fork that is shown there), so from this hole the cable will need to be taken out (the cable is indicated by a blue arrow) towards the car interior (in the direction indicated by a green arrow) and therefore you will bring the entire cable out into the car interior from the engine compartment and thereby completely remove it from car (When removing the cable, remove the guide sleeve of the clutch cable sheath).
Installation: Installation of a new cable begins from the passenger compartment, to be more precise, at the beginning you will need to insert the cable from the passenger compartment into the engine compartment and then, while in the passenger compartment, the housing of the wear compensation mechanism for the clutch driven disc linings will have to be put on the clutch pin and secured with a locking bracket, After securing the cable sheath stop, you will need to install it in its place and insert the rubber seal of the cable sheath into the hole while inside the car, and after that you can move into the engine compartment, where you will need to insert the cable through the bracket (see photo 1) and install the guide sleeve cable shell, when the bushing is installed, a leash is twisted onto the lower tip of the clutch cable, and it must be twisted in such a way that the tip of the cable protrudes relative to the end of the leash by 0-1 mm, having achieved this protrusion, overcoming the force of the cable spring, pull it forward all the way , and when the cable is fully extended, take a caliper and, holding the tip of the cable in an extended position, measure the distance indicated by the letter “L” in photo 2, this distance should be “27 mm”, if the distance does not match, then rotate the leash on the tip of the cable make sure that it is exactly like this, as soon as everything works out for you, install the cable tip in the groove of the clutch fork and release it, also make sure that under the action of the spring, the tip guide is installed on the clutch fork without a gap and finally press two or three times clutch pedal, re-measure the distance “L” and, if necessary, re-adjust the clutch cable on the car.
Note! This distance, which is indicated by the letter “L”, is the adjustment distance that should be exactly like this if the cable is adjusted correctly, but also take into account the fact that the cables are different and if you come across a defect that can be either longer than the standard original cable, or shorter , then there won’t even be a distance of “27 mm” on it, so buy good parts from proven places and if you see that with such an adjustment the release bearing is already starting to work (That is, you are not pressing the clutch pedal, but the noise is from the release bearing already exists), then in this case you can neglect it and adjust the cable not according to the information that the factory writes, but precisely by your own selection!
Additional video clip: Using the example of a VAZ 2110 car, you can see how the clutch cable is replaced in the video below, but just keep in mind the fact that on Lada Kalinas the cable is replaced a little differently, but after studying this article and watching the video clip , most likely you will not have any difficulties when replacing the cable.
Vaz-Russia.ru
Replacing the clutch release cable
You will need: keys “8”, “17”, calipers or ruler.
In the cabin, under the instrument panel, using an 8-mm wrench, unscrew the nut securing the cable sheath stop to the pedal bracket and remove the stop from the bracket.
Using a screwdriver, remove the retaining bracket and the housing of the driven disc lining wear compensation mechanism from the clutch pedal pin.
Remove the plastic bushing from the pedal pin and inspect it.
Replace a heavily worn or damaged bushing by lubricating it with Litol-24 or LSC-15 grease before installation.
In the engine compartment, remove the clutch release cable sheath seal from the hole in the front panel
By pulling the tip of the cable forward in the direction of movement of the car, remove the tip from the groove of the clutch release fork
Using a 17mm wrench, unscrew the nut securing the tip to the bracket on the gearbox, holding the tip from turning with a second wrench
Remove the end from the bracket and remove the cable from the car by pulling it out of the hole in the front panel
To install a new clutch release cable, first pass it through the hole in the bulkhead and secure the wear compensation mechanism housing to the clutch pedal pin.
Before installing the compensation mechanism on the pedal pin, apply LSC-15 or Litol-24 grease to the pin bushing.
Attach the cable sheath stop to the pedal bracket.
Install the cable sheath seal into the hole in the front shield.
Install the end of the cable sheath into the gearbox bracket and tighten the nut securing it.
Screw the leash onto the lower end of the cable, ensuring that the tip protrudes relative to the end of the leash by 0–1 mm.
Set the clutch release cable to its original position by moving the lower end of the cable all the way forward in the direction of vehicle movement.
Holding the tip in an extended position, measure the dimension L between the fork and the leader, it should be 27 mm.
If the size does not correspond to the specified value, set it by rotating the leash in the desired direction.
Insert the tip of the cable into the groove of the clutch release fork and release - under the action of the spring, the tip guide should be installed on the fork without any gap.
Before installing the tip driver on the fork, apply LSC-15 or Litol-24 lubricant to its surface in contact with the fork.
Press the clutch pedal three times all the way and re-measure distance L. If necessary, repeat the adjustment.
Clutch adjustment Kalina
To be more precise, we will talk about adjusting the clutch cable on the Lada Kalina. The Kalinovsky cable is much easier to adjust than the same cable on the 9, 10, 15. All because of the installed auto-compensator, which does this work for you. So if the autocompensator does everything itself, then why bother with it at all? Let's figure it out.
The fact is that for the correct operation of this machine, the clutch cable must be installed correctly. Correct installation is determined by measuring and adjusting several distances. The first is between the clutch fork and the plastic cable end. We pull the cable to the maximum possible distance, holding on to this plastic tip and using a caliper we measure the gap - it should be 27 mm (as in the book). To get to the fork you need to remove the air filter. If the distance is not the same, we adjust it to the norm using the same plastic tip.
The second thing you need to pay attention to is the cable rod on the interior side. The distance of its end to the plate should not exceed 3 mm, but at the same time some gap should remain. It is located on the clutch pedal itself.
You can set the gaps either from the hood or from the interior, where it is more convenient for you. Having set one gap, the second should happen automatically.
What does incorrect adjustment of the Kalina clutch lead to?
If the gaps are not set correctly, the auto compensator may not work correctly, or may not work at all if the gap under the hood is too low (10mm or less). The release bearing may also howl.
For example, my release bearing was humming in 4th and 5th gears. After adjusting the clutch cable correctly, the noise disappeared. Many questions also arise about the fact that the clutch “takes over” at the very end. This is, in principle, normal. Structurally, the clutch on Kalina begins to grab in the second half of the stroke. Therefore, setting it up to start the stroke means making constructive changes to its operation, which is not desirable.
car-hobby.ru
How to independently adjust the clutch on a Lada Kalina
Clutch adjustment Kalina
Such domestic cars as Kalina, Priora and other members of the VAZ family have their own shortcomings, which car owners try to cope with. The first VAZ 2117 (“Kalina”) appeared in 2004, and despite the fact that since then the car has been improved in many ways, the shortcomings remain the same.
This article will discuss clutch malfunctions and the process of adjusting them.
The Lada Kalina clutch is a single-disc “dry” one, equipped with a central pressure spring and a cable that is connected to the pedal by a ratchet mechanism (it allows you to adjust the length of the cable).
Problems with the Lada Kalina clutch
Long-term use of the car leads to wear and reduction of the driven disc lining. To compensate for wear, the ratchet automatically compensates for wear and tightens the cable. This occurs due to the rotation of the release fork, which contributes to the constant compression of the bushing spring. Due to the compression of the spring, the clamps of the cable tip are compressed, it is released and the cable is tightened.
Also check out
Indicators, when they appear, we can conclude that the Lada Kalina clutch needs to be adjusted:
- gears are difficult to engage;
- extraneous sounds when pressing the clutch pedal;
- poor traction;
- The clutch is not fully engaged.
There are other signs that indicate the clutch needs adjustment. To identify them, the following check is required:
- Turn off the engine.
- Depress the clutch pedal several times, make sure that there are no extraneous sounds (friction, squeaking, clicking).
- There should be no sticking when pressing the pedal. If it’s difficult to feel it with your foot, you can try pressing the pedal with your hand.
- If the pedal jerks or sticks while driving, it means that the clutch on the Lada Kalina needs to be adjusted.
Signs indicating that the clutch needs adjustment:
- Use a ruler to check the distance from the outside of the pedal to the floor of the car.
- Depress the pedal until it hits the floor.
- Let her go, check the distance. It should not be more than 14.6 centimeters. Otherwise, adjustment of the pedal travel is necessary.
- If the full pedal stroke is 14.6 centimeters, and the lower cable guide moves relative to the shift fork lever by more than 2.7 centimeters, then a runout of the driven disk linings appears that exceeds 0.5 millimeters, the distance between the rivets is less than 0.2 millimeters, also The clutch needs to be adjusted or completely replaced.
Clutch adjustment on Lada Kalina
- Open the hood and remove the air filter.
- Pull the end to tighten the cable as much as possible.
- Using a caliper, check the distance from the fork lever to the leash. If it exceeds 2.7 centimeters, the leader should be rotated along the thread of the tip to improve the size.
- After adjusting the distance, depress the clutch several times and check the clearances again. If there is any displacement, remove it. Repeat this until the desired result.
If you can’t adjust the clutch yourself, you should contact a service station or simply replace it yourself.
Worth checking out:
We recommend reading
prostovaz.ru
Additional Information on Clutch Cable Compensating Mechanism
The compensation mechanism on the Lada Kalina clutch cable is designed to ensure that the clutch cable is always in a tense state. A slight deviation of 1-2 mm is either “selected” or added to the length by the compensating mechanism.
During the operation of the car, the driver encounters a number of problems that indicate that it is necessary to adjust the clutch on Kalina. Due to the peculiarities of the mechanism installed on these VAZs, even when the driven disk linings are worn, the clutch release cable automatically lengthens.
This allows the car owner to adjust the pedal travel only occasionally, if a malfunction occurs. But even in these cases, it is possible to do it on your own, without resorting to the services of a car service.
Features of replacing the clutch cable on a Lada Kalina car
The clutch cable (TC) is one of the most important elements of the car, thanks to which the clutch operates. Its malfunction can seriously affect the operation of the clutch mechanism and even lead to a complete stop of the car and the impossibility of further movement. The article provides detailed instructions for replacing the clutch cable on a Lada Kalina.
Thanks to the clutch, torque is transmitted from the transmission to the power unit. The gearbox is connected to the engine by a vehicle, which is a metal cable. It is with the help of the vehicle that the car starts, gears are changed and braking is carried out. Thanks to this lever mechanism, the car moves.
Lada Kalina is equipped with a ratcheting mechanism, thanks to which the length of the cable is adjusted. During clutch operation, the friction linings of the disc are constantly worn out, and the tension of the vehicle changes. The tension is adjusted using a ratchet mechanism.
In theory, the ratchet mechanism works as follows:
- due to the tension of the cable, the clutch release fork (VVS) rotates, causing the spring to compress;
- when compressed, the spring causes compression of the clamps located on the tip of the vehicle;
- Thus, the tip is released, the vehicle is tensioned.
In reality, drivers often have to make frequent manual adjustments.
Clutch cable and adjustment mechanism
Signs that your vehicle needs adjustment or replacement:
- the appearance of extraneous sounds when the clutch is disengaged;
- gears shift poorly;
- insufficient traction;
- the clutch does not disengage completely;
- The clutch pedal (PS) has failed.
Before you start adjusting the vehicle on the Lada Kalina, you should check its condition. The vehicle requires replacement if it is rusty, torn or has any damage. To check the condition of the vehicle, it is necessary to remove the air filter.
Replacement process
If defects in the vehicle are detected, or if it breaks, it must be replaced.
Required Tools
To carry out work, the car is installed in a convenient position.
To replace the vehicle you will need a few tools:
- new cable;
- ruler or caliper;
- key to "8";
- screwdriver.
New vehicle for Kalina
Stages
The procedure for replacing a vehicle on a Lada Kalina consists of three stages: removal, installation and adjustment.
Removing the vehicle:
- Work begins on the car interior. First you need to remove the vehicle shell stopper. To do this, you need to find the fastening nut for the support of the vehicle shell to the PS bracket under the tool panel and unscrew it with a key “8”. The stop can then be removed from the stud.
- Next, use a flat screwdriver to pry and remove the spring clip from the PS groove.
- Then you need to remove the eye of the ratchet mechanism that regulates the tension of the vehicle.
- It is necessary to remove the plastic sleeve from the PS finger and make a visual inspection of it.
If it is worn or damaged, it should be replaced. Checking the condition of the plastic bushing Before installing the bushing in place, it must be lubricated with Litol-24 or LSC-15. - Work then continues in the engine compartment.
- In order to get to the vehicle, you need to remove the air filter.
- Next, you should pull the cable by the tip and pull the leash out of the groove of the vehicle lever.
- Having unscrewed the leash from the threaded end of the cable, remove the leash.
- Then you need to remove the protective rubber cover from the tip of the vehicle.
- Next, you need to remove the lower tip of the vehicle from the bracket, which is installed on the gearbox housing.
- Having moved back into the cabin, we remove the upper part of the vehicle from the pedal assembly bracket.
- Having pulled out the vehicle sealing cover from the hole in the front panel, remove the cable.
Pull the cable into the cabin
Vehicle installation:
- The vehicle should be passed through the hole in the front panel from the passenger compartment into the engine compartment.
- Next, you need to put the ratchet mechanism for adjusting the tension of the vehicle onto the PS finger and secure it with a fixing bracket.
- Then you need to secure the vehicle shell bracket to the PS bracket using a nut.
- Now the vehicle sealing cover is installed in the opening of the front end.
- Next, having passed the vehicle through the hole in the gearbox bracket, install the guide sleeve of the vehicle shell into this hole.
- Now you need to screw a plastic leash onto the lower tip of the vehicle so that the tip protrudes relative to the end no more than 1 mm; flush would be ideal.
- Next, we insert the leash into the groove of the Air Force lever.
Adjusting the vehicle on the Lada Kalina:
To adjust the clutch, it is necessary, overcoming the force of the PS spring, to pull the vehicle by the threaded tip forward along the movement of the vehicle until it stops and hold it in this position.
- It is necessary to measure the distance from the end of the plastic tip to the air force lever using a ruler or caliper; it should be 27 mm.
We measure the distance from the leash to the fork - If the distance does not match, then it must be adjusted by rotating the leash in the desired direction.
- Next, you need to insert the tip of the vehicle into the groove of the VVS lever and release it.
Thanks to the spring, the tip should fit without any gap. Example of correct and incorrect adjustment - Next, you need to press the PS several times until it stops so that the automatic mechanism for adjusting the length of the vehicle works. The full pedal stroke on the Lada Kalina should not exceed 146 mm.
Thus, replacing a vehicle with a Lada Kalina is a simple procedure that even a novice driver can perform. By learning how to change the cable yourself, you can save on a car service and replace it if it breaks on the road.
In order to avoid troubles with a vehicle breakage on the road, you should always carry a spare one in the glove compartment. If the vehicle breaks down on the road, this will not lead to problems; you can always replace the broken cable with a new one.
Video “Replacing the clutch cable on a Lada”
In this video you can clearly see how the vehicle changes on a Lada car.
AvtoZam.com
How to adjust the clutch cable
- Open the hood and remove the air filter;
- Visually evaluate the cable and, if it is in unsatisfactory condition, replace it with a new one;
- Using a caliper, measure the distance between the driver and the fork lever;
- If the obtained value is higher than 27 mm, then it must be corrected by rotating the driver along the thread of the tip;
- Press and release the pedal several times and repeat the procedure;
- It is necessary to repeat until the results align with the regulated value.
Sources
- https://mashinapro.ru/227-zamena-scepleniya-kalina.html
- https://carfrance.ru/kak-zamenit-sceplenie-na-lada-kalina-svoimi-rukami/
- https://autodont.ru/transmission/cohesion/regulirovka-na-kaline