We independently change the diode bridge on a VAZ 2107
A modern car is literally crammed with complex electronics, which are not so easy to repair. It is for this reason that car owners, at the slightest problem with on-board electrical devices, do not fool themselves, but immediately contact the nearest car service center. However, there are exceptions to this rule. For example, if the diode bridge on a VAZ 2107 is burnt out, then you can completely refrain from visiting a car service center and replace the burnt-out device yourself. Let's figure out how this is done.
How to independently replace the diode bridge on a VAZ 2107
A diode bridge or rectifier is one of the parts of the VAZ 2107, the replacement of which requires almost complete disassembly of the generator. As a rule, the failure of a generator, or more precisely one of its elements, is primarily determined by a loss of battery charging.
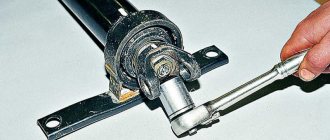
Before you begin the repair, you need to remove the generator from the VAZ 2107 engine. To do this, you will need two keys - 17 and 19. Use the 17 key to unscrew the fastening nut on the adjusting plate. This will relieve the tension on the drive belt, which can be freely removed.
After this, using a 19mm wrench, you need to unscrew the nut securing the generator to the VAZ 2107 engine housing. Having removed the bolt from the holes, remove the generator from the engine and begin repairing it.
Here you will additionally need:
- Hammer;
- Heads for 8 and 10;
- Head extension
First, let's disassemble the body. To do this, unscrew the nuts located on its back cover.
To separate both halves, you need to lightly tap one of the halves with a hammer in a vertical position at the point of their connection.
As a result, we get two parts - one with a rotor, the other with a stator. The diode bridge that we need to change is in the second half, so that’s what we’ll do.
A careful inspection of the part and the diode bridge inside will determine that the coils are held on by three nuts that clamp the wire terminals. An extension cord will come in handy here, since without it it is almost impossible to unscrew the nuts deep in the housing that secure the diode bridge.
After freeing the coil wires, the stator is easily removed from the metal case and we get free access to the rectifier. By pressing on the bolts (3 pcs.), we finally release the diode bridge and remove it from the housing.
Next, it is replaced with a new one, and you can begin assembly. It is done in the reverse order and usually does not cause any difficulties.
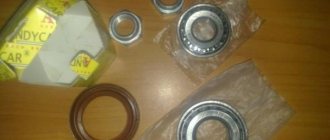
However, before starting assembly, it is recommended to check the remaining parts of the VAZ 2107 generator to ensure they are working properly. First of all, this concerns the bearing. Check them for lubrication and absence of play, and if the slightest suspicion arises, immediate replacement is recommended. This simple procedure will help you avoid repeated disassembly and reassembly in the future.
After replacing the diode bridge and assembling the generator, we install it in its original place. Do not fully tighten the nut securing it to the body. First, put the belt on the pulley and tighten it in accordance with the recommendations of the VAZ 2107 manufacturer. Usually, a pry bar or a large screwdriver is used for this.
This procedure should not be neglected, since if the belt is loose, charging may be lost, and if it is too tight, it can cause premature failure of the bearings.
A modern car is literally crammed with complex electronics, which are not so easy to repair. It is for this reason that car owners, at the slightest problem with on-board electrical devices, do not fool themselves, but immediately contact the nearest car service center. However, there are exceptions to this rule.
The main function of the diode bridge on the VAZ 2107
The diode bridge is an integral part of the VAZ 2107 generator. The car's generator produces alternating current. And the main task of the diode bridge is to convert the alternating current of the generator into direct current of the on-board network with subsequent charging of the battery. That is why car enthusiasts usually call a diode bridge a rectifier block. The peculiarity of this unit is that it allows direct current to pass only towards the battery. The current passed through the diode bridge is subsequently used to ensure the operation of the heater, low and high beam headlights, side lights, audio system, etc.
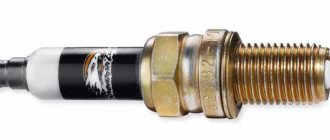
The charging voltage in a VAZ 2107 car ranges from 13.5 to 14.5 volts. To provide the required voltage, 2D219B diodes are most often used in the diode bridges of this car.
And there is a diode bridge inside the VAZ 2107 generator. And in order to get to the bridge, the car owner will first have to remove and disassemble the generator. There are no other options.
Signs and causes of diode bridge failure
As mentioned above, a generator equipped with a diode bridge is the most important component of a car. If the alternator fails for some reason, the battery will stop charging. And this is the only sign of a faulty diode bridge. Without additional recharge, the battery will work for a few hours at most, after which the car will be completely immobilized. A diode bridge fails when one or more diodes burn out in it. Here are the reasons why this happens:
- moisture has entered the generator. Most often, this is condensation that forms on the internal surfaces of the generator in the autumn-spring period, when relatively warm weather alternates with frosts;
How to ring a diode bridge on a VAZ 2107
To find out whether the diode bridge is working, the car owner does not need to have any special skills. All he needs is basic knowledge of electrical engineering and a couple of instruments:
- household multimeter;
- 12 volt incandescent light bulb.
We check the diode bridge with a regular light bulb
Before starting the test, make sure that the battery is charged. It is desirable that the battery charge level is maximum.
- The base of the diode bridge (i.e., the thin plate into which the diodes are screwed) is connected to the negative terminal of the battery. The plate itself must be firmly secured to the generator housing.
- Two wires are connected to the light bulb. Then one of them should be connected to the positive terminal of the battery, and the second wire should first be connected to the output provided for the additional diode, and then with the same wire you should touch the positive output bolt of the diode and the connection point of the stator winding.
Checking the diode bridge for open circuit
This verification method is similar to the one described above, with the exception of two nuances.
- The negative terminal of the light bulb is connected to the positive terminal of the battery.
- The second wire of the light bulb is connected to the negative terminal of the battery. Then the same points are checked as indicated above, but here the control light should be on. If the light does not light (or it lights up, but very dimly), then there is a broken bridge.
Checking the diode bridge with a household multimeter
Before checking the diode bridge using this method, it will need to be completely removed from the generator. There are no other options. With this testing method, each diode will have to be ringed individually.
- The multimeter switches to ringing. In this mode, when the electrodes touch, the multimeter begins to beep (and if the multimeter’s design does not provide sound signals, then in the ringing mode, a resistance of 1 kOhm should be displayed on its display).
It should be noted here that when burnt diodes are discovered, today no one fools themselves by replacing them. A bridge with a burnt-out diode is simply thrown away. Why? It's simple: firstly, the burnt-out diode will have to be desoldered very carefully. And for this you need to have the skill of working with a soldering iron, which not everyone has. And secondly, diodes of the 2D219B brand must be installed in the bridge, and only them. Yes, there are many other diodes on the market with similar electrical characteristics. There is only one problem with them: they burn, and very quickly. And finding the above-mentioned 2D219B on sale is becoming more and more difficult every year. I don’t know why this happens, but this is a fact that I personally encountered.
The process of replacing the diode bridge on a VAZ 2107
Before we get started, let's select the necessary tools. Here's what we need:
- open-end wrench 17;
- open-end wrench 19;
- socket head 8;
- 10mm socket with long wrench;
- flat screwdriver;
- a new diode bridge for the VAZ 2107 (cost about 400 rubles);
- hammer.
Sequencing
When getting started, you should understand the following: before removing the diode bridge, you will first have to remove the generator and disassemble it almost completely. Without this, it will not be possible to get to the diode bridge.
- Using a 19-mm open-end wrench, unscrew the fastening nut holding the generator bracket. The generator is removed.
Video: changing the diode bridge on a VAZ 2107
One mechanic I know, who was dismantling the diode bridge of the “seven” before my eyes, several times drew attention to the following nuance: if you have already disassembled the generator, please check not only the diode bridge, but also everything else. And special attention should be paid to generator bearings. They must be checked for lubrication and play. If even a very slight play is detected, it’s time to change the bearings. Moreover, it is “bearings”, not a bearing. This is the second important nuance: under no circumstances should you leave one old bearing and one new one in a VAZ generator, because such a design will last a very, very short time. I decided to change the generator bearings - change everything. Or don't touch them at all.
Repair of generator on VAZ 2107
Hello, dear users of our site! Today we are publishing relevant material for all owners of a VAZ 2107 car - do-it-yourself generator repair. Here we will look at the main faults that classic owners often have to fix.
We will need:
- a 19mm wrench - a ring one is more convenient; — socket heads for 8 and 10; - extension cord; - hammer.
Let us remind you that in the previous article we looked at how to replace the wiper motor on a VAZ 2107 with your own hands. The windshield wiper motor is very vulnerable in winter, so this breakdown occurs quite often in the cold season.
Now below I will describe in more detail the disassembly procedure, and I will also analyze the dismantling of each part separately.
Replacing brushes on the generator
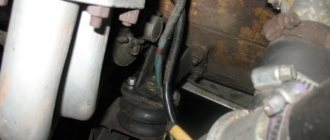
For this we need a Phillips screwdriver and that's it. The photo below shows the location of the brush holder.
Take a Phillips screwdriver and use it to unscrew one bolt securing the brushes to the generator.
After this, you can remove them from their seat.
Next, you need to check how much the brushes protrude, that is, their working area in height. Make sure it is at least 12mm. If this value is not reached, then the brushes need to be replaced. It is also worth paying attention to the uniformity of wear.
If necessary, we replace this part, the cost of which is no more than 100 rubles in most stores. And after that we perform the installation in reverse order.
Complete disassembly into parts
First, unscrew the 4 nuts that are located on the back cover of the device, and they are very clearly visible in the bottom photo.
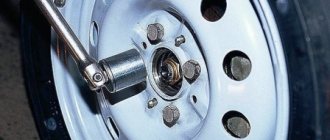
Then we try to unscrew the pulley mounting nut with a 19mm wrench. Usually, it is very tightly tightened and it is quite problematic to do this with the generator removed, unless you clamp it in a vice. But there is a way out of the situation - you can press on the bolts from the reverse side, where we unscrewed the nuts, so that they rest against the impeller blades, thereby fixing it in a stationary state. Next, you can try to unscrew this nut, holding the generator stationary.
Now we take a hammer and, with light tapping, try to separate the generator into two parts, as is clearly demonstrated in the photo below.
As a result, it should look something like this.
As you can see for yourself, there will be a rotor on one part, and a stator (winding) on the other. Removing and replacing the rotor
It is very easy to remove; first we remove the pulley, removing it from the shaft.
Then we remove the key.
And now you can easily remove the rotor of the VAZ 2107 generator, since it is easily released from the housing.
Now you can move on.
Let us note that our website has long published an article about replacing the generator on a VAZ 2107 with your own hands. When the generator cannot be restored, you simply need to replace it.
Removing the winding (stator)
To do this, you need to unscrew the three nuts from the inside with a head, as shown in the photo.
And after this, the stator can be removed without any problems, since it is disconnected from the diode bridge.
If it needs to be replaced and you need to remove it completely, then of course you will need to disconnect the plug with the wiring, which is visible in the top photo. Replacing the diode bridge (rectifier unit)
Since after removing the winding, the diode bridge is practically free, there is almost nothing to say about replacing it. The only thing you need to do is push the bolts from the inside so that they pop out from the outside.
And the diode bridge has been completely removed and can be replaced.
After carrying out the required repairs to your generator, we reassemble it in the reverse order and do not forget to connect all the winding wires correctly.
About installing an additional diode
Installing an additional diode is quite rare. Why is this being done? In order to slightly increase the voltage of the on-board network. The need for this increase arose due to new laws. As you know, in 2020, changes were made to the traffic rules, forcing drivers to constantly drive with their running lights on. And owners of classic VAZ models are forced to constantly drive with their low beams on. In such a situation, both battery charging and on-board voltage drop significantly. To somehow solve this problem, craftsmen install additional diodes, which are located between the voltage regulator terminals and the common output wires for the additional diode, as shown in the figure below.
For installation, KD202D diodes are usually used, which can be found in any radio parts store.
If the above diode is not available, you can choose any other one. The main thing is that the direct forward current is at least 5 amperes, and the maximum permissible reverse voltage is not lower than 20 volts.
So, in order to change the diode bridge on a VAZ 2107, you do not need to go to the nearest service center and pay a mechanic 800 rubles. Everything can be done on your own, and in a fairly short time. To remove and disassemble the generator, 20 minutes is enough for an experienced car enthusiast. It will take a beginner more time, but in the end he will cope with the task. All you need to do is follow the recommendations given above exactly.
How to independently replace the diode bridge on a VAZ 2107
Installing an additional diode is quite rare. Why is this being done? In order to slightly increase the voltage of the on-board network. The need for this increase arose due to new laws. As you know, in 2020, changes were made to the traffic rules, forcing drivers to constantly drive with their running lights on.
And owners of classic VAZ models are forced to constantly drive with their low beams on. In such a situation, both battery charging and on-board voltage drop significantly. To somehow solve this problem, craftsmen install additional diodes, which are located between the voltage regulator terminals and the common output wires for the additional diode, as shown in the figure below.
For installation, KD202D diodes are usually used, which can be found in any radio parts store.
If the above diode is not available, you can choose any other one. The main thing is that the direct forward current is at least 5 amperes, and the maximum permissible reverse voltage is not lower than 20 volts.
So, in order to change the diode bridge on a VAZ 2107, you do not need to go to the nearest service center and pay a mechanic 800 rubles. Everything can be done on your own, and in a fairly short time. To remove and disassemble the generator, 20 minutes is enough for an experienced car enthusiast. It will take a beginner more time, but in the end he will cope with the task. All you need to do is follow the recommendations given above exactly.
Removing the VAZ 2107 generator
First of all, you should disconnect the battery terminals. To make work easier and improve access to the generator, it is better to remove the battery from the car. The further order of work is as follows:
- disconnect the generator connector;
- remove the insulating cover from the terminal, unscrew the fastening nut using a 10mm wrench;
- disconnect the terminal;
- loosen the generator by unscrewing the nut and remove the belt;
- remove the adjusting bar by unscrewing the fastening nut;
- unscrew the lower fastening nut and remove the bushing with the bolt;
- get the generator.
Replacing a VAZ 2107 generator with your own hands
If you don’t want to overpay for the work of installing a new generator, you can install it yourself, especially since there is nothing complicated in this procedure.
- a socket wrench with a “cardan” for 17 (for models 372.3701) or the same for 13 (for models 9412.3701);
- socket wrench 19;
- 10mm socket wrench.
Work order
- Place the car on an overpass or car inspection pit and secure it with the parking brake.
- Raise the hood, disconnect the ground wire from the battery.
- For easy access to the generator mounts, remove the battery using a 10 mm wrench;
- Using a 17 or 13 socket wrench (depending on the model), unscrew the nut securing the generator to the adjusting bar.
- Go down into the inspection hole and remove the engine protection.
- Remove the alternator belt from its pulley.
- Disconnect the wire block from the generator contacts.
- Move aside the rubber protective cap and, using a 10mm wrench, unscrew the nut securing the ends of the electrical wires to the “positive” terminal of the generator connected to the corresponding battery terminal.
- Using a 19mm socket wrench, unscrew the nut securing the generator stator to the cylinder block bracket.
- Remove the retaining bolt and remove the generator from the bottom of the engine compartment.
- Install the new generator in place.
- Place the belt on its pulley, as well as on the water pump and crankshaft pulleys.
- Secure the generator and attach the engine protection.
Disassembling the VAZ 2107 generator
For a comprehensive repair, you need a puller to remove the bearing from the shaft, a mandrel for pressing and knocking out the bearing in the generator cover.
- unscrew the nut securing the pulley and impeller using a socket wrench, holding the rotor with a screwdriver so that it does not turn;
- dismantle the pulley and impeller, remove the key, remove the washers from the shaft;
- unscrew the screws securing the voltage regulator relay and remove it, having first disconnected the wire block;
- remove the regulator relay along with the brush assembly;
- unscrew the nuts and remove the bolts securing the generator cover;
- knock down the front cover by hitting the shaft with a rubber hammer (the cover must be rested against a wooden block);
- remove the spacer sleeve from the shaft;
- check the condition of the bearing in the front cover;
Tip: To check the bearing, you need to rock the inner race of the bearing while holding the cap. If there is play, the bearing must be replaced.
- if necessary, unscrew the bearing mounting nuts;
Attention: if the nuts do not unscrew, you should cut off the ends of the fastening bolts. During assembly, it is necessary to install new bolts and, after tightening the nuts, rivet their ends with a core.
- knock the bearing out of the cover using a drift (mandrel);
- rest the back cover against a pair of wooden blocks and knock out the rotor using a soft metal drift and a hammer;
- check the condition of the rear bearing (similar to the front);
- if necessary, replace the bearing by pulling it from the rotor with a puller;
- unscrew the nuts holding the VAZ 2107 diode bridge and the winding terminals;
- remove the bolts;
- remove the stator winding;
- visually check the condition of the winding;
- if the winding has breaks or has turned black from overheating, replace it;
- remove the generator output nut and insulating washer;
- dismantle the diode bridge;
- remove the capacitor by unscrewing the fastening screw;
- remove the bolt securing the rectifier unit;
- check the rotor and stator windings with a test lamp;
- check the diode bridge of the VAZ 2107 generator for broken diodes.
Checking the VAZ 2107 generator
The “seven” generator produces electric current when the engine is running. If problems arise with it, searching for the causes and eliminating the breakdowns must be done immediately. There can be many problems with a generator. Therefore, possible malfunctions need to be dealt with in more detail.
Checking the diode bridge
The diode bridge of the generator consists of several rectifier diodes, which receive an alternating voltage and output a constant voltage. The performance of the generator itself directly depends on the serviceability of these elements. Sometimes diodes fail and need to be checked and replaced. Diagnostics is carried out using a multimeter or a 12 V car light bulb.
Multimeter
The procedure consists of the following steps:
- We check each diode separately, connecting the probes of the device in one position, and then changing the polarity. In one direction the multimeter should show infinite resistance, and in the other - 500-700 ohms.
A light bulb
If you don’t have a multimeter at hand, you can use a regular 12 V light bulb:
- We connect the negative terminal of the battery to the body of the diode bridge. We connect the lamp into the gap between the positive terminal of the battery and the terminal of the generator marked “30”. If the lamp lights up, the diode bridge is faulty.
- To check the negative diodes of the rectifier, we connect the minus of the power supply in the same way as in the previous paragraph, and the plus - through a light bulb with a bolt securing the diode bridge. A burning or flickering lamp indicates problems with the diodes.
- To check the positive elements, plus the batteries, we connect through a lamp to contact “30” of the generator. We connect the negative terminal to the bolt. If the lamp does not light up, the rectifier is considered working.
- To diagnose additional diodes, the minus of the battery remains in the same place as in the previous paragraph, and the plus is connected through a lamp to contact “61” of the generator . A glowing lamp indicates problems with the diodes.
Video: diagnosing the rectifier unit with a light bulb
My father, like many other owners of domestic automobile industry products, used to repair the generator rectifier unit with his own hands. Then the necessary diodes could be obtained without problems. Nowadays, parts for repairing a rectifier are not so easy to find. Therefore, if the diode bridge breaks down, it is replaced with a new one, especially since this is much easier to do than to repair it.
Checking the relay regulator
Since different voltage regulators were installed on VAZ Sevens, it is worth checking each of them in more detail.
Combined relay
The combined relay is integral with the brushes and is mounted on the generator. You can remove it without dismantling the latter, although this will not be easy. You need to get to the back of the generator, unscrew the two screws securing the relay and remove it from the special hole.
To check the voltage regulator you will need:
- power supply with variable voltage 12–22 V;
- connecting wire;
- 12 V light bulb.
The process itself consists of the following steps:
- We connect the negative of the battery to the ground of the relay, and the positive to its contact “B”. We connect a light bulb to the brushes. We do not include the power source in the circuit yet. The light should light up, and the voltage should be about 12.7 V.
- We connect the power supply to the battery terminals, observing the polarity, and increase the voltage to 14.5 V. The light should go out. When the voltage drops, it should light up again. If this is not the case, the relay must be replaced.
- We continue to increase the tension. If it reaches 15–16 V, and the light continues to light, this will indicate that the relay regulator does not limit the voltage supplied to the battery. The part is considered non-working; it recharges the battery.
Separate relay
A separate relay is mounted on the car body, and the voltage from the generator first goes to it, and then to the battery. As an example, let's look at checking the Ya112B relay, which was also installed on classic Zhiguli cars . Depending on the version, such a regulator can be mounted both on the body and on the generator itself. We dismantle the part and perform the following steps:
- We assemble a circuit similar to the previous one; instead of brushes, we connect a light bulb to contacts “W” and “B” of the relay.
- We perform the check in the same way as in the method described above. The relay is also considered faulty if the lamp continues to light when the voltage increases.
Old type relay
Such a regulator was installed on the old “classic”. The device was mounted on the body; testing it has some differences from the described options. The regulator has two outputs - “67” and “15”. The first is connected to the negative terminal of the battery, and the second to the positive terminal. The light bulb is connected between ground and pin “67”. The sequence of voltage changes and the lamp's reaction to it are the same.
Once, when replacing a voltage regulator, I encountered a situation where, after purchasing and installing a new device, the device showed more than 15 V at the battery terminals instead of the required 14.2–14.5 V. The new relay regulator turned out to be simply faulty. This suggests that it is not always possible to be completely confident in the performance of a new part. When working with electricians, I always control the necessary parameters using the device. If problems arise with charging the battery (overcharging or undercharging), then I start troubleshooting with the voltage regulator. This is the most inexpensive part of the generator, which directly determines how the battery will be charged. That’s why I always carry a spare relay-regulator with me, since a malfunction can occur at the most inopportune moment, and you can’t travel very far without a battery charge.
Video: checking the generator relay regulator on a “classic”
Capacitor check
The capacitor is used in the voltage regulator circuit as a suppressor of high-frequency interference. The part is attached directly to the generator housing. Sometimes it can fail.
The serviceability of this element is checked using a special device. However, you can get by with a digital multimeter by selecting a measurement limit of 1 MOhm:
- We connect the probes of the device to the terminals of the capacitor. If the element is in good working order, the resistance will be small at first, after which it will begin to increase to infinity.
- We change the polarity. The device readings should be similar. If the capacitance is broken, then the resistance will be small.
If a part fails, it is easy to replace it. To do this, simply unscrew the fastening element holding the container and fixing the wire.
Video: how to check a car alternator capacitor
Checking brushes and slip rings
To check the slip rings on the rotor, the generator will need to be partially disassembled by removing the rear section. Diagnostics consists of visually inspecting the contacts for flaws and wear. The minimum diameter of the rings must be 12.8 mm. Otherwise, the anchor must be replaced. In addition, it is recommended to clean the contacts with fine-grained sandpaper.
The brushes are also inspected, and if they are severely worn out or damaged, they are replaced. The height of the brushes must be at least 4.5 mm. They should move freely and without jamming in their seats.
Video: checking the generator brush assembly
Checking the windings
The "seven" generator has two windings - rotor and stator. The first is fixed to the anchor and constantly rotates when the engine is running, the second is fixedly fixed on the body of the generator itself. Windings sometimes fail. To identify a malfunction, you need to know the testing procedure.
Rotor winding
To diagnose the rotor winding, you will need a multimeter, and the process itself consists of the following steps:
- We measure the resistance between the slip rings. Readings should be between 2.3 and 5.1 ohms. Higher values will indicate poor contact between the winding terminals and the rings. Low resistance indicates a short circuit between the turns. In both cases, the anchor requires repair or replacement.
Stator winding
A break or short circuit may occur with the stator winding. Diagnostics can also be carried out using a multimeter or a 12 V light bulb:
- On the device, select the resistance measurement mode and one by one connect the probes to the terminals of the windings. If there is no break, the resistance should be within 10 ohms. Otherwise it will be infinitely large.
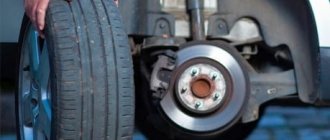
Checking the belt
The generator is driven by a belt from the engine crankshaft pulley. It is necessary to periodically check the belt tension, since if it is loosened, problems with charging the battery may occur. It is also worth paying attention to the integrity of the belt material. If there are visible peels, tears or other damage, the element needs to be replaced. To check its tension, follow these steps:
- We press on one of the belt branches, for example, with a screwdriver, while simultaneously measuring the deflection with a ruler.
Before a long trip, I always inspect the alternator belt. Even if the product is not damaged externally, I keep a belt in stock along with the voltage regulator, because anything can happen on the road. Once I was faced with a situation where the belt broke and two problems arose at the same time: the battery was not charged and the pump was not working because the pump did not rotate. A spare belt helped.
Bearing check
To ensure that a generator malfunction caused by jammed bearings does not take you by surprise, you need to check them when a characteristic noise appears. To do this, the generator will need to be removed from the car and disassembled. We carry out diagnostics in this order:
- We visually inspect the bearings, trying to identify damage to the race, balls, cage, and traces of corrosion.
When checking, you should also pay attention to the front cover of the generator. There should be no cracks or other damage on it. If damage is detected, the part is replaced with a new one.
Assembling a VAZ 2107 generator
Before assembling the generator, it is necessary to clean the parts from contamination. It is better to wash metal parts with gasoline, and wash windings and other complex parts with air from a compressor.
The new bearing is pressed onto the rotor using a mandrel. You can use a head or tube with a diameter that matches the size of the inner ring of the bearing.
Before installing the rear and front covers, it is necessary to check the condition of the bearing seats. They must not be damaged or scratched.
If there are cracks in the cover, they must be replaced with new ones. Bolts and nuts of poor quality must also be replaced.
The sequence of assembling the generator corresponds to the procedure for disassembling it.
After installing and connecting the generator, it is necessary to tighten the belt with the necessary force. If it is overtightened, the bearings will fail; if it is loose, the generator will slip under load and will not produce the required charging current.
Checking the diode bridge on the VAZ 2107 generator
In order for the car to be started, it contains a battery. In order to restore the battery capacity after starting the engine and ensure the normal operation of all electrical appliances, devices such as generators are used in the design of cars. Initially, they generate alternating current, and to convert it to direct current, a rectifier unit or diode bridge is used. We will look at how to check the diode bridge on a VAZ 2107 generator with your own hands below in the article.
The main function of the diode bridge on the VAZ 2107
The diode bridge of the VAZ 2107 generator is its integral and integral part, which serves to transform alternating current into direct current. The current is converted due to the fact that the vehicle's on-board network has a constant voltage of 12 V. An alternating current is supplied to the bridge, which is converted, and then goes to the battery in rectified form. And the voltage is removed from the battery and used to power all electrical appliances on the car.
This is interesting! Many people are accustomed to thinking that the on-board network of a car has a voltage of 12V. However, 12V is the battery voltage at rest, and in order to charge it, a charge of 13.5 to 14.5 volts must be generated. To ensure normal voltage supplied from the battery, the diode bridge is assembled from 2D219B diodes.
Signs and reasons why a diode bridge breaks
Malfunctions of the rectifier unit on the seven and other cars lead to complete immobilization of the car. If at least one diode located inside the generator fails, the supply of charging current to the battery will stop. The car will not drive for a long time without charging the battery (maximum 1.5-2 hours, provided that the car has a new and working battery and all electricity consumers are turned off) . Like all parts on a car, diodes tend to deteriorate (burn out), so if a decrease in the voltage of the on-board network is detected, which usually drops below 12V, and then begins to gradually fall, then the device should be checked and repaired.
The causes of breakdowns of the generator rectifier unit are as follows:
- Moisture getting into the generator. This can be either condensation or water that comes from outside during the operation of the car in rainy weather.
- Development of diode life. Usually in this case one diode fails, while all the others remain intact. The average service life of diodes is about 10 years, but it also depends on the mileage of the car.
- Burnout due to motorist negligence. Most often, diodes burn out when the car is not properly lit. If you light it incorrectly, then in this case you may have to change not only the diode bridge, but also the entire generator.
The first symptoms of rectifier unit breakdowns are identified by the following signs:
- The voltage of the on-board network decreases while the engine is running. This can be detected by the presence of an electronic voltmeter, which can be installed independently by the owner of the VAZ 2107. If the car has an on-board computer, it will also notify the driver of the malfunction. If there is no voltmeter or on-board computer, then a decrease in voltage can be diagnosed by such a sign as a decrease in the brightness of the lighting fixtures.
- The car loses power, and the longer you continue to drive with a faulty generator, the more the battery will discharge.
To establish the exact cause of such symptoms on the VAZ 2107, it is necessary to test first the charging current of the generator, and then the diodes. Sometimes the cause of a decrease in voltage may be oxidation of the terminals and contacts on the generator, and after cleaning them, the problem will be solved.
Checking the diode bridge
You can find out why the on-board network voltage is decreasing by checking the generator to ensure its serviceability. Burnout of the generator winding occurs rarely, but such a breakdown cannot be ruled out. The diode bridge can be checked by the vehicle owner independently without the need to visit a service station. If the check shows that the element is working, it means that the generator itself needs repair, but looking ahead, it must be said that sometimes it is easier to buy a new element than to change the winding on the old one.
To check the diode bridge, there are three ways that will help the car owner cope with this not difficult task. Which method to choose depends on the tools or consumables available. Let's consider all three methods of testing manipulations to identify a malfunction of the diode bridge of the VAZ 2107 generator.
Method 1 - light bulb test
To check the rectifier unit for serviceability in the first way, you will need a regular 12 V light bulb with a power of 21 Watts or more. The principle of carrying out measuring actions is based on the following factors:
- The generator must be removed from the vehicle for ease of testing.
- Remove the cover and remove the diode bridge.
- The principle of connecting a test lamp is as follows: connect the negative terminal from the battery to the ground of the light bulb, and from the positive contact of the lamp we will touch the diodes one by one. Connect a wire from the positive terminal of the battery, which we will touch alternately to the plate. Let's start checking.
- First of all, we connect the positive contact from the battery to output “61” on the plate, and the contact from the light bulb is alternately connected to the outputs of the negative diodes. The lamp should not light up.
- Now the polarity changes, that is, the output from the lamp is connected to the common bus (pin “61”), and the output from the positive terminal is alternately connected to the outputs of the diodes. The glow of the lamp indicates serviceability.
- Next, the serviceability of the positive diodes is checked. To do this, the positive contact from the battery is connected to the upper (positive) plate, and the contact from the light bulb is alternately touched to the terminals of the positive diodes. The lamp should not light up
- The polarity changes, that is, the lead from the light bulb is connected to the (+) plate, and we touch the leads of the diodes with the contact from the positive terminal of the battery. The glow of the lamp indicates the serviceability of the diodes.
- The contact from the light bulb is attached to the negative plate (bottom) of the diode bridge, and the positive terminal from the battery must be touched in turn to the terminals of each diode. The lamp should not glow. The polarity on the plate is changed, and the serviceability of the diodes is checked. The lamp should light up.
Diodes cannot be repaired, however, if one element fails, it can be replaced, and if several devices fail, it is recommended to replace the bridge completely.
Method 2 - checking the diode bridge for open circuit
To check the bridge for a break, you will need to use a similar circuit, but change the location of the contacts in it, or rather:
- The contact from the light bulb should be connected to the positive plate.
- The second wire from the positive terminal of the battery should be connected to the negative plate.
- With this connection, the lamp should light up, which indicates that the diodes are not broken.
- A check procedure is also carried out when changing the polarity, that is, the terminal from the llama is connected to the negative plate, and the terminal from the battery is connected to the positive terminal. The absence of light from the lamp indicates that the diodes are working properly and there is no break.
It should be taken into account that the method of checking a bridge for a break is not entirely correct, since it allows you to identify a malfunction in the presence of a pair of faulty diodes. If only one diode is faulty, then it will not be possible to determine this using this method, which is why the test should begin with the above instructions for checking the serviceability of each diode.
Method 3 - checking with a tester or multimeter
The serviceability of the device is also checked using a tool such as a tester or multimeter. When using this method, you will need to perform the following manipulations:
- Remove the diode block from the generator. This is necessary in order to ring each diode individually.
- To test the generator on a VAZ 2107, you will need to switch the device to dial mode.
- Initially, the multimeter probes must be connected to the two main contacts of the first diode.
- After this, the probes should be swapped and the diode terminals touched again.
- In this case, the readings are determined. In the first measurement mode, the resistance should tend to a value of 400-700 Ohms, and in the second the device should beep.
- If the diodes beep with both connections, this means that they are faulty.
Knowing how to check the diode bridge of a generator with a multimeter, it is necessary to carry out the appropriate manipulations and find out the cause of the breakdown. More often, if even one diode burns out, no one bothers with it, and to restore the integrity of the rectifier unit, the device is completely replaced.
In conclusion, it is worth noting the following that all sevens, both the carburetor and the injector, have built-in rectifier units in the generator. The above-described testing procedures are appropriate for all types of generators, so following the instructions, you can easily find a breakdown and fix it by replacing the diode bridge.
Reasons for failure of the VAZ 2107 generator
The generator on the “seven” rarely fails, but breakdowns still happen. Therefore, it is worth knowing in more detail how malfunctions manifest themselves.
Breakdown or winding break
Its performance directly depends on the health of the generator coils. With the coils, breakage and short circuit of the turns may occur, breakdown to the housing. If the rotor winding breaks, there will be no battery charge, as indicated by the glowing battery charge light on the dashboard. If the problem lies in the short circuit of the coil to the housing, then such a malfunction mainly occurs where the ends of the windings exit to the slip rings. A stator short circuit occurs due to a violation of the wire insulation. In this situation, the generator will become very hot and will not be able to provide a full charge to the battery. If the stator coils are shorted to the housing, the generator will hum, heat up, and the power will decrease.
Previously, generator windings were rewound when damaged, but now almost no one does this. The part is simply replaced with a new one.
Brush wear
The generator brushes supply voltage to the field winding. Their malfunction leads to unstable charging or its complete absence. If the brushes are faulty:
- consumers often disconnect for unknown reasons;
- lights are dim and flickering;
- the on-board network voltage drops sharply;
- The battery discharges quickly.
Relay regulator
If, after starting the engine, the voltage at the battery terminals is below 13 V or significantly above 14 V, then the malfunction may be caused by a problem with the voltage regulator. Failure of this device can significantly reduce battery life. If after an overnight stay the starter does not turn or you notice white streaks on the battery itself, then it’s time to diagnose the relay regulator.
The following problems may occur with this device:
- unreliable contact with brushes;
- breakdown of elements;
- internal open circuit.
There may be no charge due to wear or hanging of the brushes, which is associated with shrinkage of the springs during long-term use.
Diode breakdown
Failure of the diode bridge may be preceded by:
- moisture getting inside the generator;
- dirt and oil;
- “lighting the car” when the battery is completely discharged and the wires are connected incorrectly.
If the integrity of the diodes in the event of “lighting up” depends on the attentiveness of the car owner, then no one is immune from the effects of the first two factors.
Bearings
The VAZ 2107 generator has 2 ball bearings that ensure free rotation of the rotor. Sometimes the generator may make sounds that are uncharacteristic of its operation, such as hum or extraneous noise. Disassembling the generator and lubricating the bearings can only solve the problem temporarily. Therefore, it is best to replace the parts. If they have exhausted their resource, the generator will make a humming sound. You should not delay repairs, since there is a high probability of the unit jamming and stopping the rotor. Bearings can break and hum due to lack of lubrication, excessive wear, or poor workmanship.
Video: how generator bearings make noise
It is quite possible to fix any malfunction of the VAZ “Seven” generator with your own hands. To identify a problem, it is not necessary to have special equipment or have knowledge and skills in working with the electrical equipment of a car, although they will not be superfluous. To test the generator, a digital multimeter or a 12 V light bulb will suffice.
The electrical equipment of a modern car is a complex set of instruments and devices. The on-board power supply is supplied from the battery, and after starting the engine - from the generator. This device, in good condition, provides a voltage within 14 - 14.2 V. Checking the VAZ 2107 generator will not only help identify its malfunctions, but also avoid battery failure.
If the voltage is insufficient, its charge becomes incomplete, which causes a drop in the density of the electrolyte. At low temperatures, this phenomenon can cause the liquid to freeze. The formation of ice crystals leads to the gradual destruction of the battery plates. To establish the output voltage parameters of the generator, you can ring it with a conventional multimeter.