Pump repair manual
In some cases, the water pump can be repaired. It is recommended in situations where either wear of the bearings or the oil seal located inside the device occurs.
Repairing the pump will save you about 600–700 rubles, which in principle is not so little. The maintainability of the pump is determined by the condition of the impeller and shaft. If they are relatively new, then they can be restored.
A complete replacement of the pump on VAZ cars is only for the better. The new unit is inexpensive, and after replacement the car’s engine will begin to function fully.
To troubleshoot the VAZ 2101-07 water pump, you need to remove it from the car. The exception is the operation to replace the pulley; in this case, the pump does not have to be dismantled. To perform repair work, prepare the following set of tools and materials:
- hammer;
- flathead screwdriver;
- standard sets of sockets and spanners (sizes 9-22 mm);
- mounting blade (mount);
- a 10 liter container and a 1 m long garden hose for draining antifreeze from the cylinder block;
- 1 liter of antifreeze for topping up;
- cloth rags and gloves.
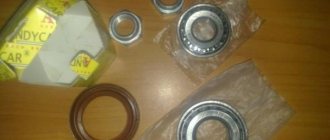
To restore the water pump you will need standard plumbing tools
Preparatory stage - removing the part
Before disassembling the unit, it is necessary to empty the engine water jacket so that antifreeze does not flow through the technological opening after dismantling the pump. To do this, unscrew the bolt - plug located on the left wall of the cylinder block (if you look in the direction of travel of the car). Place a basin and hose under the hole so as not to spill antifreeze on the ground.
When the stream of antifreeze subsides and begins to flow along the wall of the block, screw the plug into place and proceed to disassembling the unit, performed according to the step-by-step instructions:
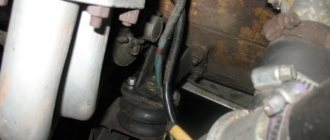
- Using a 17 mm wrench, loosen the nut on the long bolt securing the generator, located under its housing. There is no need to completely unscrew the nut.
To release the generator and loosen the belt, you need to unscrew the nut under its housing.
- Remove the 3 bolts securing the pump pulley using a 13 mm socket.
- Loosen the same nut on the upper adjusting bracket; it secures the belt drive in a tensioned state. Using a pry bar, move the generator housing towards the crankshaft and remove the belt.
The generator drive belt, which rotates the pump pulley, is removed after unscrewing the fixing nut on the bracket
- Completely unscrew the bolts holding the water pump pulley and remove the latter from the hub.
- Unscrew the 4 nuts (13 mm head) holding the pump flange to the body and pull it out of the socket. If the part is held firmly in place by the old sealant, gently tap the flange through the wooden adapter.
The pump is removed after unscrewing the four fastening nuts
After dismantling, clean the water pump seat from any remaining gasket and sealing compound, and also wipe the engine and nearby components from any antifreeze drips.
How to remove and change the impeller
Practice shows that destruction of the impeller blades occurs from contact with the mating part of the housing when the pump shaft is very loose. Therefore, breakage of blades despite other working pump elements is extremely rare and is the result of a manufacturing defect.
On water pumps of VAZ 2101-07 cars there are 2 types of impellers:
- old model, made of metal and equipped with an M18 internal thread with a pitch of 1.5 mm;
- new model - plastic elements without threads.
All new impellers are made without internal threads
Both types of impellers are attached to the shaft in the same way - by pressing with interference. The dismantling of the new plastic element is carried out in the following order:
- Secure the shaft hub in a vice and tap the threads inside the impeller. Before use, lubricate the tool with motor or other liquid oil.
- Screw a bolt-in-bolt puller into the hole and lightly tighten the outer bolt.
- By rotating the head of the inner bolt clockwise, press out the impeller and remove it from the shaft.
The inner bolt of the puller rests against the end of the shaft and pushes the impeller up
Replacing the pump on a VAZ 2101-07
1. Remove the battery to make it easier to get to it. We dismantle the electric fan for forced cooling of the radiator, if such is provided for in the design.
2. Drain the coolant from the engine cylinder block. There is no need to drain the radiator. Place a container under the engine and unscrew the drain bolt. To regulate the rate of fluid drainage, you can open or close the radiator filler cap.
3. Using a key set to “17”, unscrew the adjusting nut of the generator. This nut secures the position of the generator when adjusting the belt tension of VAZ 2107 attachments
4. Unscrew the nut securing the adjusting bar and remove it
5. We loosen the belt tension by moving the generator to the side with a pry bar or hand.
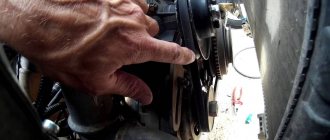
6. Remove the belt and unscrew the nuts securing the pulley to the pump shaft using a “13” wrench.
On VAZ models where there is no electric fan for forced cooling of the radiator, a fan impeller is installed on a pulley; remove it together with the pulley.
7. Using a “13” wrench, unscrew the four nuts securing half of the pump.
The two halves of the pump often stick well to each other. If you have already decided to change the pump, then you can safely tap the outer part of it with the handle of a hammer to rip it off.
8. Take out the old pump. We clean the junction of its two halves from sealant and old gasket.
If the kit includes a gasket made of cork or another material other than cardboard, then you do not need to use sealant. When the plane of connection between the two halves of the pump has obvious defects, you can use a sealant. You shouldn’t smear it generously, because parts of it can get into the engine cooling system, which can cause problems.
9. Installation of a new pump occurs in the reverse order.
10. The final stage is tensioning the attachment belt. How much force it needs to be pulled – we’ll talk about it in other articles. If you tighten the belt, the pump shaft will bend; if you don’t tighten it, the belt will “slip”, the generator will not recharge the battery, the pump impeller rotates at low speeds – the coolant will not circulate well.
11. Tighten the drain screw of the cylinder block and fill in coolant. If there are traces of oil or debris in it, or its appearance is far from ideal, then it is recommended to change it, first flushing the engine cooling system.
What kind of oil should I use?
VAZ engineers advise filling VAZ 2107 engines with an injector with oil that meets API SG/CD standards. A lubricant with API SH, SJ or SL parameters is even better.
Often, when purchasing engine oil, motorists first pay attention to the classification of the product according to the principles of the Society of Automotive Engineers of America - SAE. This classification determines only the viscosity of the product, not the quality
The car manufacturer recommends the following brands of oils:
- Esso Ultra - 10W40;
- Esso Uniflo - 10W40, 15W40;
- Lukoil Lux - 5W40, 10W40, 15W40;
- Lukoil Super - 5W30, 5W40, 10W40, 15W40;
- Omskoil Lux - 5W30, 5W40, 10W30, 10W40, 15W40, 20W40;
- Novoil-Sint - 5W30;
- Norsi Extra - 5W30, 10W30, 5W40, 10W40, 15W40;
- Shell Helix Super - 10W40.
Sensor check
Checking the functionality of this sensor is not difficult. But before you do it, it is advisable to check the integrity of the wiring going to it. You can also check the voltage coming from the control unit. To do this, you need to disconnect the chip with wires from the sensor and connect it to a voltmeter. After this, start the engine and measure the voltage supplied to the sensor; it should correspond to 5 V. If the voltage is normal, check the sensor for resistance.
To remove, check and replace the sensor you will not need much:
- Key to 19;
- Multimeter;
- Container for draining coolant;
- Electric kettle;
- Thermometer;
Before removing the element, you need to partially drain the liquid from the system. It is not necessary to drain it all, since it is located at the top of the engine; it is enough to drain it to a level below the position of the sensor.
Then the chip with wiring is disconnected from the sensor. Using the 19 key, it turns out of its seat.
Video: Checking the coolant temperature sensor
Check the sensor using an electric kettle with a thermometer and a multimeter set to resistance measurement mode. You can check in two ways.
- In the first method, the working part of the sensor is immersed in an electric kettle with cold water, and a thermometer is also placed there. You can only use an electronic thermometer that can measure high temperatures. A multimeter is connected to the sensor itself and the electric kettle is connected to the network. As the water temperature rises, the sensor resistance will drop. So, at a water temperature of +15 C, the resistance should be 4450 Ohms. At +40 C, the multimeter reading should be 1459 Ohms. The water needs to be heated to a temperature of 100 C. At this value, the resistance is minimal - 177 Ohms. If the values differ, it means that the sensor is providing incorrect information.
- The second method is suitable if you do not have a thermometer. To measure resistance, the sensor is immersed in water after it has boiled. In this case, the water temperature will approach 100 C, approximately 95-97 degrees. This is quite enough for taking measurements. After lowering the working part of the sensor, there is a resistance on it, which should be slightly more than 177 Ohms. If the difference is large, the sensor is faulty.
Selection and installation of new spare parts
Since the VAZ 2106 car and its parts have long been discontinued, original spare parts cannot be found. Therefore, when choosing a new pump, it is worth considering a number of recommendations.
- Check the part markings corresponding to catalog number 2107–1307011–75. A pump from Niva 2123–1307011–75 with a more powerful impeller is suitable for the “classic”.
- Buy a pump from trusted brands - Luzar, TZA, Phenox.
- Remove the spare part from the packaging and inspect the flange and impeller. The above manufacturers imprint the logo on the body or impeller blades.
- Pumps with plastic, cast iron and steel impellers are available on sale. It is better to give preference to plastic, since this material is light and quite durable. In second place is cast iron, in third place is steel.
- A cardboard or paronite gasket should be included with the pump.
Sometimes a fake can be identified by a discrepancy in size. Place the purchased product on the mounting pins and turn the shaft by hand. If the impeller blades begin to cling to the housing, you have been given a low-quality product.
Install the water pump in reverse order.
- Apply high temperature sealant to the gasket and slide it onto the studs. Apply the mixture to the pump flange.
- Insert the element into the hole correctly - the generator bracket mounting pin should be on the left.
- Screw and tighten the 4 nuts holding the pump to the body. Secure the pulley, install and tension the belt.
The cooling system is filled through the radiator neck. When pouring antifreeze, keep an eye on the tube disconnected from the manifold (on the injector - throttle). When antifreeze flows out of this tube, put it on the fitting, clamp it with a clamp and add fluid to the expansion tank to the nominal level.
Price and design of the pump for the VAZ 2107
The pump itself is inexpensive and, depending on the manufacturer, its price can range from 500 to 900 rubles. Zhiguli pumps are produced by dozens of enterprises in the Russian Federation and dozens of imported companies. No one can give unambiguous recommendations on choosing one manufacturer or another, since due to the irrelevance of the model, the quality of spare parts varies greatly. There are also shafts with pressed bearings on sale at a price of about 200-300 rubles for those who like to tinker.
Another sore spot of the water pump remains the impeller itself. The branded VAZ pump was produced with a cast iron impeller, and more modern technologies made it possible to cast it from composite materials. Which impeller is better is a big question, since antifreeze can be used in completely different ways and no one knows how the material will react to it. Uncertified coolants can turn a polymer impeller into nuclear ash, while with good antifreeze it can last more than 150 thousand km. But it can be quite the opposite - a low-quality cast iron alloy can corrode even when working with a good liquid.
How to replace the fuel filter - instructions for yourself
Of course, you can contact specialists who will replace this part in ten minutes. However, if you want to save a little, then doing a similar procedure yourself is quite possible, and now we will tell you how to change the fuel filter. To do this, you need to decide on its location, most often it is located under the hood, in the upper part of the engine (typical for diesel cars), but there are some models in which you can find it in the tank next to the gas pump (this is a feature of gasoline cars).
Then you should pull the fuse from the fuel pump and wait until the engine stalls, this way you will release the pressure and protect yourself from spilling fuel. Now disconnect the negative terminal of the battery so that a fire does not occur, and carefully study the method of attaching the old filter to the fuel line (inlet mount and outlet), these can be wing bolts or latches, the main thing is to remember in what order everything was in order to also install and new element. Visually mark the location of the sealing washers and rubber gaskets.
Now wrap the old filter in a rag to prevent fuel from leaking, and remove it, first removing it from the bracket that supports it in connection with the fuel line. Install the new part on the bracket in exactly the same position in which the old one was located (sometimes you can see an arrow on the filter showing how to insert it into the socket). Using new fasteners (they are included in the kit), connect the fuel line, having first checked the integrity of all its lines; if a defect is detected (cracks, kinks), it should be replaced.
All that remains is to insert the fuel pump fuse back, connect the terminal and start the engine, this does not always work the first time, since the pressure has been released
When it comes to replacing a fuel filter, great attention should be paid to safety precautions. If you smoke, then give up this bad habit while working.
Make sure the area is well ventilated and be sure to thoroughly wash off the fuel from your hands. It would also be a good idea to stock up on a fire extinguisher, just in case.
The fuel filter is designed to clean fuel from dirt and is a consumable item. The fastening of the pipes to the fuel filter differs depending on the engine: the fuel filter for the 1.5 l engine has a hexagonal fastener, for the 1.6 l engine it has a spring retainer.
There is no clear answer to the question of when to change the fuel filter. The plant recommends replacing the fuel filter after every 30 thousand km. mileage, but in reality everything is completely different: a lot depends on the quality of gasoline, and you need to look not at mileage, but at signs of contamination of the fuel filter.
If you experience any of the following symptoms, your fuel filter may be clogged and needs to be replaced.
In addition to the fuel filter, these signs also indicate a malfunction of the following elements: ECU, Spark plugs, High-voltage (HV) wires, DPKV, Mass air flow sensor, DD, DPS, Idle air control. So, when replacing the fuel filter, keep this in mind.
To find out where the fuel filter is located, we need an overpass or hole. The filter is located on the bottom of the car under the trunk.
What we need to replace:
Removing the old filter
With the fuel filter of a 1.6L engine, everything is much simpler: remove the fuel line tubes from the filter by pressing the fuel line clamps.
- First of all, we change the O-rings at the ends of the fuel pipes.
- Install the filter in reverse order.
How to remove the pump on a VAZ 2106 car
Regardless of the chosen method of troubleshooting, the water pump will have to be removed from the car. The operation cannot be called complicated, but it will take a lot of time, especially for inexperienced drivers. The whole procedure is performed in 4 stages.
- Preparation of tools and work location.
- Disassembly and dismantling of the element.
- Selecting a new spare part or repair kit for an old pump.
- Restoration or replacement of the pump.
After disassembly, the removed pumping unit should be examined for restoration. If only primary symptoms of wear are noticeable - a slight play of the shaft, as well as the absence of damage to the housing and the main bushing - the element can be restored.
Buying and supplying a new spare part is much easier than disassembling and restoring a worn-out pump
Required tools and supplies
You can remove the “six” water pump on any flat surface. The inspection ditch simplifies only one task - unscrewing the generator mounting nut in order to loosen the belt. If desired, the operation is performed lying under the car - it is not difficult to reach the bolt. The exception is cars that have preserved side casings - anthers, screwed on from the bottom with self-tapping screws.
No special pullers or devices are required. The tools you need to prepare are:
- a set of heads with a crank equipped with a ratchet;
- wide container and hose for draining antifreeze;
- a set of ring or open-end wrenches with dimensions of 8-19 mm;
- mounting blade;
- flathead screwdriver;
- knife and brush with metal bristles for cleaning flanges;
- rags;
- protective gloves.
From consumables, it is recommended to prepare antifreeze, high-temperature sealant and aerosol lubricant such as WD-40, which makes it easier to loosen threaded connections. The amount of antifreeze purchased depends on coolant losses due to pump failure. If there is a slight leak, it is enough to purchase a 1 liter bottle.
Taking this opportunity, you can replace the old antifreeze, since the liquid will still have to be drained. Then prepare a full filling volume of antifreeze - 10 liters.
Disassembly procedure
The procedure for dismantling the pump on the “six” is greatly simplified compared to the newer front-wheel drive VAZ models, where you have to remove the timing belt and disassemble half of the drive with markings. On the “classic” the pump is installed separately from the gas distribution mechanism and is located outside the engine.
Before starting disassembly, it is advisable to cool the warm engine so that you do not have to burn yourself with hot antifreeze. Drive the car into the workplace, apply the handbrake and disassemble according to the instructions.
- Lift the hood, find the drain plug on the cylinder block and place a cut canister underneath to drain the antifreeze. The mentioned plug in the form of a bolt is screwed into the left wall of the block (if you look in the direction of travel of the car).
- Partially drain the cooling system by unscrewing the plug with a 13 mm wrench. To prevent antifreeze from splashing in all directions, place the end of a garden hose lowered into the container against the hole. While draining, slowly open the radiator and expansion tank caps.
- When the bulk of the antifreeze has flowed out, feel free to screw the plug back, tightening it with a wrench. There is no need to completely drain the liquid from the system - the pump is located quite high. After this, loosen the lower nut securing the generator.
- Remove the belt drive between the crankshaft, pump and generator. To do this, use a 19 mm wrench to loosen the second nut securing the generator to the adjusting bracket. Using a pry bar, move the unit body to the right and remove the belt.
- Using a 10 mm spanner, unscrew the 3 M6 bolts holding the belt pulley to the pump hub. To prevent the shaft from spinning, insert a screwdriver between the bolt heads. Remove the pulley.
- Separate the belt tension adjusting bracket from the pump body by unscrewing the 17 mm nut on the side.
- Using a 13 mm socket, loosen and tighten the 4 pump mounting nuts. Using a flathead screwdriver, separate the flanges and pull the pump out of the housing.
After removing the pumping unit, perform 3 final steps:
- plug the open opening with a rag and use a knife to clean off the remaining cardboard gasket from the landing pad;
- wipe the block and other components where antifreeze previously splashed;
- remove the pipe at the highest point of the cooling system connected to the intake manifold fitting (on the injector, the heating pipe is connected to the throttle valve block).
The pipe at the highest point is turned off for one purpose - to open the way for air displaced by antifreeze when filling the system. If you ignore this operation, an air lock may form in the pipelines.
How to install an additional water pump?
To install an additional pump for the cooling system, you will have to prepare:
- high-quality pump;
- long and short hoses;
- sealants;
- fastening elements.
To the pump fittings you need to attach hoses fixed with clamps, the long one for supplying antifreeze to the pump, and the short one for draining the coolant.
To install the unit, you should proceed sequentially:
- find two hoses;
- disconnect the outlet pipe;
- connect the manufactured unit with pump No. 2;
- secure the resulting assembly with metal clamps;
- fix the pump with the gearbox housing;
- add antifreeze;
- start the engine;
- check the structure for fluid leaks.
The additional pump starts at the pressure pumped by pump No. 1, since the second unit will serve as long as possible. Fixing the pump will take a lot of time due to the fact that the timing belt and rollers will need to be replaced.
If a person doubts his own qualifications, then it is better to pay 1000 Russian rubles to specialists from a service station.
Didn't find the information you are looking for? on our forum.
We recommend reading:
- How to raise headlights on a VAZ 2110
- Replacing the thermostat on a VAZ 2110
- Knock in the rear suspension, when driving over uneven surfaces, VAZ 2110
- Thresholds for VAZ 2110 from Priora
- Cooling system for VAZ 2110, 8 and 16 valves, principle of operation, main malfunctions
- Air recirculation in a VAZ 2110 car
- VAZ 2112 16 valves technical specifications
- What racks to install on a VAZ 2110, the best manufacturers, a brief overview
Pump VAZ 2107
On cars with a liquid cooling system, including the VAZ 2107, one of the main elements responsible for maintaining the operating temperature of the engine is the pump. Thanks to this unit, the circulation of coolant is ensured. If problems arise or if the water pump fails, the normal operation of the power unit is disrupted, which can lead to serious consequences and expensive repairs.
The pump circulates coolant through the engine cooling system
Purpose
The operation of the pump is aimed at continuous circulation of coolant (coolant) through the engine cooling jacket. The antifreeze is heated under the influence of the rubbing elements of the power unit, and the necessary pressure in the system is created by a water pump. The liquid is directly cooled in the main radiator, after which the coolant again enters the cooling jacket. If circulation is interrupted for at least 5 minutes, the motor will overheat.
This is why it is so important to monitor the proper operation of the node in question.
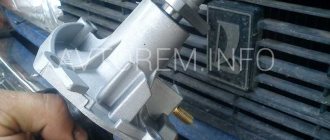
Pump design
On the VAZ 2107, as on many other passenger cars, the pump has almost the same design. The unit consists of a housing with a central shaft located inside, on which the impeller is fixed. The shaft is secured against axial displacement by means of a bearing, and the tightness of the structure is ensured by an oil seal that prevents coolant leakage. There is a hole in the pump cover through which the shaft comes out, where the pulley hub and then the pulley itself are attached to it. A belt is put on the latter, which on the “seven” rotates the generator and pump from the crankshaft. On modern cars, the pump rotates via a timing belt.
The main elements of the pump are the housing, shaft with bearing, impeller and oil seal
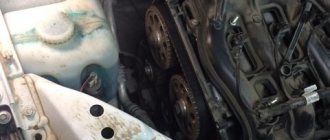
Where is
On classic Zhiguli models, the pump is located on the front of the power unit and is attached not to the block, but through a separate housing. By opening the hood, you can easily notice both the pump pulley and the assembly itself.
The pump is located in the front part of the engine and is part of the cooling system of the power unit: 1 - supply pipe to the cabin heater; 2 - expansion tank; 3 - radiator; 4 - pump; 5 — thermostat; 6 — manifold heating tube; 7 — return pipe from the cabin heater
Which pump is better
For the VAZ 2107, water pumps with catalog numbers 21073–1307010, 2107–1307011–75 and 2123–1307011–75 are suitable. The last two options have an enlarged impeller and a slightly reinforced structure. Initially, these pumps were produced for Niva. The slightly higher cost of such pumps is fully justified by the better performance.
The old pump has an impeller made of cast iron, and the new one is made of plastic.
The product in question is produced today by many companies, but the most popular are:
- luzar;
- Hepu;
- TZA;
- Phoenix.
At the car market you can find pumps with impellers made of different materials: plastic, cast iron, steel. Products with plastic impellers, which are equipped with embossed and elongated blades, receive positive reviews. Elements made of cast iron are characterized by lower performance, and as for steel ones, they are susceptible to corrosion and are quite often fake.
The housing is replaced if it is damaged, and in other cases only the pumping part is changed
The pump can be purchased either complete with a housing or separately. If the housing is not damaged, then it is enough to replace the pumping part. If the design has serious flaws or is completely broken, then you cannot do without replacing the housing.
Pump maintenance
As a rule, signs of pump failure on a VAZ 2106, 2107 will be increased noise, antifreeze leakage and jamming. Such products cannot be repaired, and if they fail, the coolant pump must be replaced. In addition to the appearance of extraneous noise, a sign of a malfunction can also be an increase in the temperature of the motor; the arrow indicating its value on the front panel moves to the red sector.
Removing the coolant pump itself is not particularly difficult and can be done on your own. To do this you need:
- drain the coolant;
- remove the generator belt and unscrew the adjusting bar;
- holding the pump pulley with a screwdriver, unscrew the three mounting bolts;
- Next, unscrew the four nuts securing the pump;
- remove the pump from the studs (in case of difficulty, tap the pump with a rubber hammer on all sides);
- We install the new pump in the reverse order, not forgetting to install a new gasket between the pump and the engine housing.
The pump, installed on the VAZ 2106, 2107, and other car models, has a mechanical drive and circulates antifreeze or water when the engine is running. Given the importance of maintaining the desired engine temperature, modern cars sometimes use an additional electric pump to force the engine to cool, thanks to the circulation of coolant when the engine is turned off.
What else is worth reading
Overhaul of the VAZ 2106 engine
Rear axle gearbox VAZ 2106
Fuel pump malfunctions
Operating principle of the fuel pump
Cooling system
When to change pads
1. In accordance with the recommendations of the car or pad manufacturer. A very controversial point, since the mileage a car travels, operating conditions, and driving style are different for everyone. For some, the pads will last for a couple of years, for others - for a season. The manufacturer's recommendations are nothing more than recommendations, you need to listen, but whether to follow them or not depends on the factors listed above.
2. When the thickness of the friction linings becomes less than 5mm. This is an unconditional point and should be followed in any case. There are craftsmen who feel sorry for changing: “they’re still thick, you can ride.” In principle, yes, but you can get into trouble. When driving for a long time on worn pads, the piston of the brake cylinder constantly “peeks out” from the boot - the pad is thin and the piston stroke is increased. As a result, minor rust may form on the piston surface. And after replacing the pads, the cylinder is recessed, and this rust gets directly onto the sealing seal of the brake piston. As a result, the cylinder leaks, it needs to be replaced, and hassle with bleeding the brakes. I hope I convinced you - thinner than 5 mm. - change the pads.
3. Increased pedal travel, squeaking brakes, warning light. I’ll tell you about squeaks and pedal travel a little later, but here I’ll just add that the ideal option is if the car is equipped with a pad tracking system. If there is excessive wear, a light will come on on the instrument panel (unfortunately, such a system is not available on all cars). What if your car is not equipped with a state-of-the-art brake pad monitoring system (consisting of two contacts and a light)?
Signs of Brake Pad Wear
There are several signs by which you can determine the time, if not for replacing the pads, then at least for a preventive inspection.
1. Increased travel of the handbrake lever. Relevant for rear pads. Previously, the handbrake clicked 3-4 times, but now it has become 5-7, or when the handbrake is pulled down, you can roll down the slightest hill - check the pads. Maybe the reason is a stretched cable, but don’t tempt fate - check the pads, and of course, check the front ones too.
2. Increased brake pedal travel and decreased braking efficiency. There could be a simple brake fluid leak, but if everything is dry, it’s worth checking the pads.
3. Various creaks, noises, knocking when braking, and sometimes vibration. Vibration relates to the disc brake system (as on the front wheels), and can indicate, in addition to pad wear, disc warping - it’s a good idea to check: spin the disc and watch the beats. If the “figure eight” is visible - like on an old bicycle wheel, the disk must be replaced or re-grooved (if thickness allows) - there are no options.
No conversation about pads would be complete without mentioning a few things you need to know.
1. After replacing the pads, perhaps for several tens of kilometers the brakes will be worse - in any case, there is wear on the brake disc or drum, and while the pads are rubbing in, there is no need to be reckless.
2. Change all the pads on the axle, or even better, on the entire car. Don’t even think about replacing the pads on the left and leaving the old ones on the right. Such savings are a direct path to problems with brakes.
3. Inspect the pads according to the season - when you “change shoes” of the car - change winter tires to summer ones, and vice versa.
4. When replacing pads, inspect the condition of the discs and drums. If there is significant wear or deep longitudinal grooves appear, it is better to replace it.
Replacing the electric motor of the heating system of a VAZ 2107
For work you will need: wrenches “8” and “10”, screwdrivers, pliers.
Removing the electric motor
Replacing the VAZ 2107 heater fan electric motor begins with removing it from the car. So:
- The side dampers of the air ducts are closed by placing the lower lever of the heater control unit in its extreme right position.
- The dashboard is removed.
- The storage shelf and glove compartment body are removed.
- The radio panel is removed.
- The red and blue-black wires are disconnected from the block of wires that provide switching of operating modes of the heating system fan.
- The bolt securing the flexible rod that controls the damper, installed behind the instrument panel, is loosened, and the rod is disconnected.
- The tip of the flexible rod is removed from the axis of the lever to drive the damper.
- Use a socket wrench to unscrew the nut holding the furnace radiator casing and the ground tip of the fan wire, which is located behind the central air duct.
- The tip of the ground wire is removed from the studs.
- The nut holding the right air duct is unscrewed.
- The same is done for the left air duct.
- Using a slotted screwdriver, the four holders installed along the perimeter of the air ducts are pressed out, which are then disconnected from the furnace radiator casing.
- The fan casings and the guide together with the fan are removed.
- The rubber seal is removed from the housing, and the wires are passed into the inside of the casing.
- The tip of the red wire that goes to the heater fan is disconnected from the plug on the additional resistor.
- The heater fan shroud is disconnected as shown in the photo.
- Use a slotted screwdriver to move the lock washer and remove it from the fan shaft.
- The adjusting washers are removed.
- The fan impeller is removed from the electric motor shaft.
- The two spring clips that secure the heater fan motor to the guide housing are disconnected.
- The electric motor and two rubber pads are pulled out.
Installing a new electric motor
After the electric motor of the heater fan on the VAZ 2107 has been replaced, all previously removed parts are installed in the reverse order. Instructions for removing and installing the electric motor of a VAZ 2107 car are clearly visible in the video. With its help, you can easily perform all operations yourself. In this case, the price of the work will be much lower than for repairs in a car service workshop.
Heating system electric motor repair
A malfunction in the heating system can most often be eliminated when the heater fan electric motor on a VAZ 2107 is replaced. But sometimes it is enough to clean the manifold or lubricate the bearings. To do this, the device must be disassembled.
Tip: Before disassembling, you must mark the relative position of the cover and the motor housing.
Next, the order of work will be as follows:
- The washer is removed from the armature axis.
- Using a screwdriver, remove the retaining ring and washers made of PCB.
- If the rubber cushions were not removed when dismantling the electric motor, they are removed.
- The screws securing the cover are unscrewed, which are screwed into special plates inserted into the slots of the electric motor housing on opposite sides and having threaded holes.
- The cover is removed along with the brush holder.
- The armature is removed from the housing and two washers are removed from the shaft.
- Coal dust is removed from the internal cavity of the electric motor by blowing with compressed air.
- The condition of the commutator, brushes, and armature windings is checked.
Tip: The brushes in the brush holders should move freely and without jamming. The springs have sufficient elasticity and are intact. When the collector is worn out or severely burnt, it is better if the heater motor is replaced with a VAZ 2107.
- The collector is first cleaned with fine-grained sandpaper and then degreased with gasoline or alcohol.
- The electric motor is assembled in reverse disassembly sequence.
Tip: Check that the marks on the body and cover match.
If the operations performed allowed the heating system to work correctly, then on the VAZ 2107 there will be no need to replace the heater motor. A timely replacement of the VAZ 2107 heater engine or its repair is the key to stable operation of the car’s heating.
Source
https://masteravaza.ru/sistema-otopleniya/u-klassiki-sistema-otopleniya/vaz-2107-zamena-elektrodvigatel-otopitelya-155
What does a pump do on a car?
The part consists of a housing, a shaft with an impeller, a sealed seal and bearings. As a rule, the housing and impeller are made of aluminum or magnesium alloy. As for the impeller, it is made of plastic.
If we keep in mind the design diagram, then the VAZ classic pump consists of two halves: one does not contain any moving elements and is permanently attached to the cylinder block, the other includes moving parts, such as an impeller and bearings.
Bearings ensure the rotation of the shaft. The housing has special channels for supplying and discharging liquid. The impeller rotates, a centrifugal force arises, which throws the coolant towards the outer walls of the housing. Thus, pressure is created, forcing the liquid into a specially designed tube located in the cylinder block (cylinder block). Making a large circle (circulation), the liquid again enters the pump through the lower pipe.
Due to this precise sequence and fluid circulation effect, the hottest engine elements are cooled.
As mentioned above, the detail on the classic has some features. Due to the fact that the pump consists of two parts, when replacing, many people confuse the front cover with a full-fledged pump. In fact, the name water pump refers to the entire assembly, which also includes pipes.
A sealed gasket is installed between the cover and the pump body to protect against leaks. During the replacement process, it should also be updated.
Replacement
The procedure for replacing a water pump differs depending on the number of valves in the engine.
This is due to the fact that for “fourteeners” with 8 valve engines, only one crankshaft pulley is provided, while 16-valve analogues have two. Therefore, the systems have slightly different designs.
Pumps for 8-valve and 16-valve engines are not interchangeable. When purchasing, be sure to ensure that the new water pump is compatible with your vehicle's engine.
Replacement procedure
Before you start replacing, check a few basic things.
- If a sign of pump malfunction is belt wear, check the condition of the tensioner roller. If there is rust, we recommend replacing it along with the pump.
- Check the quality and quantity of lubricant under the rubber seal. If there is a shortage, do not forget to add lubricant.
- Assess the degree of belt wear. If it breaks along the way, changing it is not the most pleasant experience. So think about the potential hazards before you decide to let a worn belt run for a while longer.
Faulty pump
8 valve engine
If your VAZ 2114 is equipped with an 8-valve power unit, then you need to change the pump according to the following algorithm.
- Remove the protective cover from the timing belt.
- Loosen the tensioner roller slightly. If its condition is questionable and the element needs to be replaced, then the roller is completely dismantled.
- Loosen the fixation of the generator, remove the generator belt and timing belt.
- Disconnect all hoses going to the water pump.
- Drain the existing coolant from the system.
- Disconnect the protective cover, and then remove the failed pump.
- After removal, be sure to clean the surfaces of the flange from the pump, and clean the cylinder block from accumulated dirt and rubber gasket residues.
- If you do not remove the dirt, then such growths will not allow you to install the new pump correctly and evenly. As a result, the timing belt will wear quickly and unevenly.
- When the replacement is made, do not forget to set the timing marks. Quite often the crankshaft moves relative to the camshaft.
To avoid possible coolant leakage, use red sealant and coat both sides with it - the pump and its seat.
Device location
16 valve engine
If there is a 16-valve power unit under the hood of your VAZ 2114, then the sequence of replacing the pump will look slightly different. This kind of work has certain difficulties, but is done with your own hands. Additionally, we recommend watching the video instructions.
- Remove the plastic cover.
- Remove the cover from your timing belt.
- To remove the casing, you need to remove the timing belt, remove the camshaft pulleys, as well as two rollers - a support and a tensioner. Without these manipulations, it will be impossible to dismantle the water pump.
- Also remove the right front wheel. This way you can finally get to the lower casing mounting bolts.
- Now calmly remove the pump, following the algorithm of the 8-valve power unit.
Do not forget to follow all the subtleties of water pump replacement technology. If you assemble it incorrectly with a new pump, it will leak and show the same signs of malfunction as the old unit. Plus, improper repairs will lead to rapid wear of the timing belt. And this means additional financial losses.
Loading …
How to change the pump yourself on a VAZ-2107
Having a passenger car in their arsenal, owners quite often have to replace failed components. Since a car is, first of all, a mechanism that can sooner or later fail, you must always be prepared for this.
In any car, the operation of each system must be carefully adjusted, including the cooling system. Basic
The first element of this system is the pump, which has a second name - “centrifugal or liquid pump”. A failed VAZ-2107 liquid pump, regardless of whether the injector is installed on the engine or the carburetor, must definitely be replaced. After all, only timely replacement of the pump on cars with direct fuel injection will help protect the main unit of the car - the engine - from overheating. If the engine overheats, then car owners will have to spend much more money to repair it.
Signs of sensor malfunction
This sensor is considered to be very reliable due to its comparative simplicity of design. However, there may be problems with it too. Usually they come down to a violation of the calibration, which leads to a violation of the resistance and, as a result, incorrect operation of the electronic unit, since it performs part of its functions based on the engine temperature.
One of the most obvious signs of failure of this sensor is the failure of the fan to turn on when the temperature exceeds the set value. But this indicator will not be reliable if there are two sensors - the main one, for transmitting the temperature value to the electronic unit, and an additional one, responsible for turning on the fan. In this case, failure to turn on the fan will indicate damage, oxidation of the wiring, or failure of the sensor responsible for its operation.
On modern cars, a malfunction indicating incorrect operation of the coolant temperature sensor is displayed on the display of the on-board computer. However, a fault message does not always indicate sensor failure. Often problems in its operation are associated with broken wiring or oxidation of contacts.
Incorrect functioning of the coolant temperature sensor or a break in its wiring leads to excessive fuel consumption, high idle speed, and detonation. It is possible that the power unit will have difficulty starting after warming up. The biggest problem that can occur due to the inoperability of this sensor is overheating of the power plant, which can cause the cylinder head to move.