Adjusting the VAZ clutch - debugging the VAZ clutch
Before you start adjusting the clutch, you need to understand how the mechanism works. The clutch is a structural element of a car, the operation of which is based on the action of friction forces, the so-called friction clutches. This unit is designed to transmit torque from the engine to the transmission, and then to the drive wheels.
Repair procedure
To avoid clutch disc slipping, you need to know how to adjust the VAZ clutch. Clutch adjustment is carried out according to technical specifications according to the following scheme:
Before starting work, the car is placed on a level road. After which the engine is started and first gear is engaged. The clutch pedal is released very gently and smoothly to determine the moment of operation when the car starts to move.
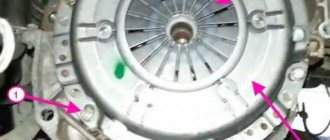
Adjusting nuts
If it happens that the car starts moving only at the very end of the pedal stroke, it is worth changing the free play of the pedal. The adjustment process is as follows: first open the hood, look for two small nuts that secure the pedal cable to the bracket. These two nuts are located on a small threaded section of the cable. By changing their position, you can set the pedal stroke. If you need to make a smaller stroke, slightly unscrew the nut located in the bracket itself, and tighten the one on the outside.
Reducing pedal travel
With this simple repair you can set the required pedal travel. They check it in the same way as at the beginning, if necessary, then either tighten it further or release it a little more.
If the nut does not come off due to rust, it is better to use special fluids. Do not apply excessive force: you can damage the clutch cable.
Clutch adjustment. Normal values
In normal working condition, the free play of the pedal should be from 125 to 135 mm. If the adjustment does not solve the problem, then most likely the clutch disc has worn out and needs to be replaced. Replacing a clutch is a labor-intensive process, so if you do not know how to properly adjust the clutch, it is best to use the services of a specialized service station. If it is not nearby, you can carry out the repair yourself. If you have the skills to assemble and disassemble a car, or a car engine, replacing the clutch will take about five hours. If you don’t have the skills, it’s very difficult to calculate the time, since for this you first need to become better acquainted with the structure of the car, as well as the diagram of the main components. Replacing the clutch on VAZ cars occurs in several stages:
Removed box
Afterwards, a special mandrel is installed in the hole located in the pressure disk, with the help of which the disassembly process will be greatly facilitated. You can also work without a mandrel; to do this, you need to hold the driven disk with your hand. This is necessary so that the disk does not fall out of the casing in the future.
Clutch
- Using a screwdriver or other similar tool, block the flywheel from turning. Then carefully unscrew all six bolts that secure the casing to the body. Next, the casing is dismantled along with the pressure and driven disks.
- The disk has been removed. It is necessary to inspect it for defects, cracks and any other inconsistencies. If during inspection cracks or an oily surface of the friction linings were found, the disc must be replaced. Replacement also occurs if the rivets that secure the linings have been loosened. Severely recessed rivet heads or broken damper springs are also reasons for replacement.
Replacing the drive
- After inspection, it is better to check the disc for runout; this is done on a special stand. The runout parameter should not exceed 0.5 mm.
- Next, the friction surface of the flywheel and pressure plate is inspected. If cracks or other defects are found, the entire basket must be replaced.
When all the checks have been completed and the replacement has been made, install everything in its place, only in the reverse order.
Using grenades in a VAZ 2112 car
They began to use grenades when converting cars to front-wheel drive. If in such a design you use crosspieces in the cardan transmission, as in rear-wheel drive cars that have four needle bearings that work in pairs, then equality of angular velocities on the drive and driven shafts will not be ensured. So:
- The use of such a device will lead to an increase in the dimensions of the unit, the price becomes significantly higher, and strong pulsation occurs during the transmission of torque, which increases as the angle between the shafts increases.
- The design of the grenades initially included the same service life as the entire car, but after using the car, it was clear that its outer part would wear out more. The use of flexible, moisture- and frost-resistant material for manufacturing protects the surface of the grenade, but over time, external factors destroy the element and it cannot be used for a long time.
- Rapid wear is explained by the action of constant deformations, abrasive particles and moisture in large quantities. During operation or during repairs, the boot (see) may be damaged. Cracks appearing on the protective rubber lead to failure of the element. The shaft leading to the grenade must not be damaged, which can be seen during a visual inspection of the part.
Replacing the external grenade of a VAZ 2112 car
The instructions for replacing a grenade on a VAZ 2112 indicate that the work is carried out with the part of the car raised and the wheel removed. So:
- First you need to unscrew the hub nut.
- Remove crankcase protection.
- Release the ball joint from the connection with the lower suspension arm. If the support in the lever is pressed in, unscrew them at the same time.
- The ball joint is removed.
- You need to move the stand to the side, it will be in a bent position, and the splined shaft entering through the bearing into the hub will be located at an angle to the drive shaft. The latter connects the inner and outer grenades.
- The splined shaft of the grenade is knocked out of the bearing using a metal spacer from the outside of the wheel.
- Removed from the grenade drive shaft.
- The boot is removed.
- All old grease is wiped off. To make the work easier, you can use WD-40 or another similar aerosol.
Tip: Replacing a grenade on a VAZ 2112 is carried out simultaneously with replacing the thrust and locking rings. There is a locking ring inside the grenade. The assembly must be well lubricated with a large layer of lubricant.
- After installing the grenade on the drive shaft, before its final pressing, you need to center the assembly so that the fork enters without jamming.
- Installing a grenade on the seat.
- Crimping the boot with clamps.
- Assembling the unit yourself is done in the reverse order.
How to replace an internal grenade
Replacing the internal grenade of a VAZ 2112 differs from the external one in that it needs to be done when all the oil has been drained.
Tip: You need to drain the oil from the gearbox with the car raised. If its quality is low, it is better to replace the liquid so that in the near future you do not have to repeat all the operations again.
So:
- The wheel is removed.
- The ball joint is unscrewed, which frees the strut from the lower arm.
- For the external grenade to move freely, the wheel must be moved to the side.
- You need to knock out the outer grenade from the wheel.
- Both the external and internal elements are removed from the gearbox.
Tip: The hole must be covered to prevent dirt from getting into the gearbox.
- The drive shaft is clamped in a vice carefully so as not to damage it.
- Use a screwdriver to release the clamp securing the boot to the body of the internal grenade.
- The boot is removed. An element that has become unusable can be cut.
- Replacing a VAZ 2112 grenade is done by knocking the old one off the drive shaft.
- A new boot and grenade are put on the shaft.
Tip: A plastic plug is installed at the end of the shaft. The space inside the grenade must be generously lubricated with grease.
- During installation, you need to ensure that the seat coincides with the direction of the drive.
- New rings are replaced and installed - retaining and thrust rings.
- Graphite lubricant must be applied to the spline surfaces of the hinge.
- The assembly is inserted into the gearbox as shown in the photo.
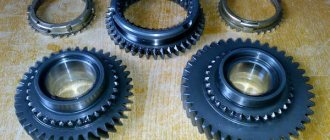
Gears and bearings
Clutch adjustment VAZ 2109
The drive gears of the system are located on the drive shaft and are combined into a block. They constantly work in conjunction with driven gears of all front transmission torques. The secondary shaft also contains gears on needle-type bearings. The main transmission system is equipped with a solid-turned gear combined with a shaft. Roller bearings are installed on the front shaft in the box, while ball bearings are located on the rear shaft. The oil reservoir is located directly under the front of the secondary shaft, where the bearing is located. The role of the collector is to determine the direction of oil flow; with the help of a torque shaft, it is directed directly inside.
A two-satellite differential is installed on the device; it is adjusted by changing the thickness of the bearing spacer ring. This spacer ring is located in the core of the gearbox housing. The differential of the box has a flange that has a clutch with a driven gear of the main transmitting moment. This gear is directly connected to the speedometer gear.
SACHS 3000951033 Clutch kit buy, photo, OEM numbers, crosses, applicability 2112-1601130
Number:
3000951033
Clutch kit
6 reasons to buy from us:
- You can trust us. Make sure of this >>
- Quality and Return Guarantee
- Pickup points in 400 cities
- Delivery by courier, mail, transport company >>
- More than 10 convenient payment methods
- A large assortment
Organizations:
- We work with VAT
To buy the product “Clutch kit”
with the number “3000951033”, select the price and delivery time that suits you from the proposed list and click the “Add to cart” button. Detailed information “How to buy” in the Customers section
*Applicability information for SACHS part 3000951033 is for reference only.
Applicability indicates that the spare part SACHS 3000951033 can be used for the listed models produced during the specified period. The applicability of a part to a specific vehicle must be checked using the VIN code in the original spare parts catalogue.
Additional number:
D471S
Number:
620316600
Clutch kit
Number:
826222
Clutch kit
Number:
CK63 005C3
CK63005C3 Clutch kit VAZ2108-2112 (engineering engine) with installation sleeve in ind.
pack., cart. disk, support direction FENOX Number:
CP61 006C3
CP61006C3 Clutch disc VAZ 2108-2112, injection engine
Number:
MK9626
Clutch kit
Number:
WLD005
Clutch kit
Reasons for the check engine to fire
clutch adjustment gazelle business engine 4216
If you go back a little in time and remember the early 90s, then this light only signaled that the oil level was insufficient. But since a lot of time has passed since then, and progress does not stand still, this indicator can signal a lot of things due to several sensors connected to the light bulb.
Although there are various possible reasons, one piece of advice is common to everyone: if the check light stays on longer than usual, you need to show the car to a mechanic.
- The first reason, which was already mentioned earlier, may be an insufficient amount of lubricant on the parts. In order to determine the criticality of the malfunction, it is necessary to start the car and by ear determine the presence of extraneous sounds in the engine operation. You should also conduct a visual inspection for damage or leaks that could cause oil loss. If any of the listed problems are detected, the car must be delivered to a service station, and in order to avoid big problems, not under its own power, but with the help of a tow truck;
- the second common problem is gasoline of low quality or simply diluted, and this is a fairly common practice of careless sellers. When using fuel of inadequate quality, carbon deposits form on the spark plugs very quickly, which prevents the normal formation of a spark on all spark plugs. If one spark plug starts to flicker, the sensor will immediately signal this with a “check” light. The solution to the problem is quite simple - you need to replace the fuel with high-quality one. In addition, it is advisable to clean the spark plugs. Advice: do not buy gasoline from unverified suppliers, you will save 100 rubles, and repairs will cost 1,000;
- The third possible malfunction, due to which the VAZ-2110 16 valve check light is on, is a problem in the spark plugs themselves. The problem with the spark plugs will manifest itself when the car is moving, and this is especially noticeable at the beginning of the movement - small jerks will be heard. This can be resolved by simply replacing the faulty spark plug. Also check the gaps on all spark plugs, they should be 1.3 millimeters;
- The fourth problem for which the “check” lights up is a malfunction of the lambda probe. If this sensor fails, the data entering the system that regulates the fuel supply system is unreliable. This can lead to problems such as increased fuel consumption, disruptions in the operation of the catalyst and even its failure, deviations in the chemical composition of the exhaust gases from the norm and other troubles. Incorrect sensor readings may be due to sensor failure or simple contamination, which can be visually distinguished after removing the sensor;
- The fifth possible problem that the check engine “screams” about is a problem with the catalyst. As a rule, it is difficult not to notice, and it appears even before the warning light comes on. Signs of problems with the catalyst are, first of all, a significant decrease in power, poor acceleration of the car, as well as increased fuel consumption. To fix the problem, you should contact a specialist or replace the catalyst yourself;
- The sixth possible problem is a problem with the injectors. If this malfunction occurs, the injectors must be blown out, or replaced if they have become unusable;
- The seventh reason for the light to come on may simply be that the tank lid is not tightly closed, which breaks the seal, and the sensor reacts to this. This can be easily fixed by sealing the tank tightly.
As you can see, there are quite a few reasons why the check engine light may come on, so you should pay close attention to such signals and take appropriate measures, and then your car will reward you with long and trouble-free operation.
To post a reply you must log in or register.
Video of replacing front struts, springs, supports and bearings on a VAZ 2110-2112
To watch the video in high quality, click on the gear icon in the bottom right, and select HD 1080.
This review was made using the example of the 2110, which I once had for analysis. I think that everything is shown clearly. As for installing new suspension elements, I personally recommend installing original factory spare parts produced by AvtoVAZ. And this only applies to the VAZ 2110, since the factory suspension has proven itself quite well.
I do not support any underestimations and other experiments, although I do not particularly criticize them: as they say, “it depends on the taste and color...”. But personal experience has shown that underestimation is a loss of comfort during city driving, and all road irregularities will constantly fall on the fifth point. It is also worth noting that many manufacturers of shortened suspension elements highly recommend installing short springs only in pairs with equally short struts. That is, you should not install shortened springs on factory-length racks, even if the length is only 30 or 50 mm shorter.
In this case, the spring will be in a constantly relaxed state, which will negatively affect the efficiency of the suspension and will also lead to unwanted sounds from the front struts.
Also, a significant role should be given to the tightening torques of threaded connections when installing new elements. For example, the nuts securing the upper strut support to the car body should be tightened with a force of no more than 19.6–24.2 N*m.
The photo above shows an example of Kalina, but the meaning is not lost in any way.
The same should be said about the other connections. The mounting of the strut to the steering knuckle is 77.5–96.1 N*m. And the nut securing the tip to the stand is tightened with a torque of 27.05–33.42 N*m.
As for the symptoms of malfunction of supports, bearings and springs, they can be different. For example, when you turn the steering wheel, you hear a grinding or even crunching sound, and this is pronounced even when the car is parked - most likely this indicates a failure of the support bearings. Also, if they are worn out enough, a knock may appear from the top of the rack - more precisely from the support.
Over time, springs may lose their properties and sag during prolonged or overly loaded use. This leads to a loss of suspension efficiency, sagging of the car, and there is a high probability that the wheels, when driving on uneven roads, will begin to catch on the fender liners, which even happened on one of my cars.
VAZ 2110 engine injector, operation diagram
Clutch faults. Self-adjustment of the clutch on Lada Kalina
Power units with an injector differ from carburetor versions in the principle of supplying fuel to the combustion chamber of a gasoline engine. If a carburetor engine needs to “suck” fuel from the carburetor chambers, then in the injection version fuel is injected under pressure through nozzles. This is much more economical, since the solenoid valves of the injectors allow only the required amount of fuel to pass through and not a drop more. This is closely monitored by electronics, which gives commands using information from various sensors; after analyzing all the data, the necessary impulse is sent to the injector and it supplies fuel to the engine. Moreover, the entire process occurs almost instantly. Below is a detailed diagram of the operation of the VAZ 2110 engine injector.
- 1 – ignition relay
- 2 – battery
- 3 – ignition switch
- 4 – neutralizer
- 5 – oxygen concentration sensor
- 6 – nozzle
- 7 – fuel rail
- 8 – fuel pressure regulator
- 9 – idle speed regulator
- 10 – air filter
- 11 – diagnostic block
- 12 – mass air flow sensor
- 13 – tachometer
- 14 – throttle position sensor
- 15 – indicator lamp “CHECK ENGINE”
- 16 – throttle assembly
- 17 – immobilizer control unit
- 18 – ignition module
- 19 – coolant temperature sensor
- 20 – controller
- 21 – spark plug
- 22 – knock sensor
- 23 – fuel filter
- 24 – fan switch relay
- 25 – electric fan of the cooling system
- 26 – relay for turning on the electric fuel pump
- 27 – fuel tank
- 28 – electric fuel pump with fuel level indicator sensor
- 29 – gasoline vapor separator
- 30 – gravity valve
- 31 – safety valve
- 32 – speed sensor
- 33 – crankshaft position sensor
- 34 – two-way valve
The most important element of the power system of the “ten” injection engine is the electric fuel pump, which is located in the tank; it is this that constantly provides the necessary pressure in the ramp with injectors through which fuel is supplied to the intake manifolds. The fuel pump in the VAZ 2110 injector is quite noisy. It is enough to insert the ignition key and turn it, and you will hear the characteristic “buzzing” of the electric fuel pump inside the car. If you do not hear a buzzing sound before starting the engine, but the engine still does not start, then the fuel pump is faulty. And therefore, it will not be possible to start an injection engine from the “pusher”, because there is still no pressure in the ramp and injectors, which means that fuel will not be supplied.
Repair and maintenance of injection engines requires special diagnostic equipment. The VAZ 2110 was equipped mainly with injection engines with a displacement of 1.5 and 1.6 liters, both 8 and 16 valve versions. Below are brief characteristics of these motors in the table below.
| Working volume | Number of valves | Power hp(kW) | Torque Nm | |
| VAZ 2111 | 1499 cm3 | 8 | 76 (56) | 115.7 |
| VAZ 2112 | 1499 cm3 | 16 | 93.5 (69) | 128 |
| VAZ 21114 | 1596 cm3 | 8 | 82 (60) | 125 |
| VAZ 21124 | 1596 cm3 | 16 | 89 (65.5) | 131 |
The most powerful engine of all that was installed on the “ten” is the injection 16-valve VAZ-2112 with a volume of 1.5 liters. However, this power unit has one drawback: if the timing belt breaks, the pistons meet the valves, which leads to serious and expensive repairs of the power unit. And high-quality repair and maintenance of VAZ-2110 injection engines requires special diagnostic equipment. Often, a malfunction of just one sensor leads to unstable operation of the entire engine.
Choosing the best front strut
The best front struts for the VAZ 2112 are produced by the Japanese company Kayaba. By installing Kayaba front struts on a VAZ 2112, the car enthusiast provides himself with maximum comfort and low vehicle noise when driving at low speeds. Even at high speeds, optimal shock absorption and a high level of safety are ensured. The best front struts for the VAZ 2112 do not create any problems when replacing parts. The strut can be changed easily and quickly, which reduces the time required to repair the shock absorber. Very often, the quality of shock absorbers can be improved if a stretcher is installed on the front struts on the VAZ 2112. In this case:
- Increases accuracy when driving a car when cornering.
- The machine's stability increases when moving in a straight line.
- Deformation of the body is reduced when the car is driven on dirt roads and on turns, which leads to a reduction in the appearance of cracks on the body.
If you do all the work efficiently and without haste, then you won’t have to redo it for a long time. Also on our resource you can find out how to replace the rear struts.
Which spark plugs are better to install on a VAZ-2114 survey
Today, the choice of spark plugs is very large, and choosing the ones that need to be installed is not so easy. On most forums, owners of VAZ-2114 cars are most often advised, “Finwhale” “Champion” “Brisk Premium” “Bosch Platinum”, “DENSO”.
Remember that the best spark and the greatest amount of heat will be given by the spark plug that has the thinnest electrode, 0.4-0.8 mm in size, and they are usually made from alloys of iridium, platinum, palladium and gold.
Also, the situation with a spark that has a coating of platinum, silver or gold on its body has the best effect. For comparison, the “stock” spark plug from DVRM has a thickness of 2.5 mm, while on imported analogues it barely exceeds 0.6-0.8 mm, so there is no point in talking about any competition here.
Video about how to avoid falling into fake candles
https://youtube.com/watch?v=MoZ2XaOggM4
Pay special attention to the integrity of the packaging, as well as the cost of the goods, because counterfeits, which are quite common today, can be sold at a discount from the average market price. Therefore, always remove each candle from its individual box and inspect it more carefully.
Clutch disc diameter VAZ 2110
Workbook
To the seminar
VAZ CARS"
DRIVE DISC
There are two “classic” pressure plates available:
2103
- intended for engines up to
1500 cm3
inclusive, and
2121
- for engines
1600
and
1700 cm3
.
They differ in the pressure spring force. The latter has an average of 13% more. They are easy to confuse - they are almost identical in appearance and have the same dimension - 200 mm
(outer diameter of the working surface of the cast iron disk).
But there is a clever distinctive sign. Disc 2121
- can be recognized by the recesses in two adjacent lobes of the pressure spring, forming a kind of hole.
The flat tips of the pressure spring petals are characteristic of the disk model 2109
.
It was the beginning of backlash-free couplings - in this design there is a constant rotation release bearing. The size of this disc is 190mm.
VAZ-2110 cars
can be equipped with two types of clutches, which differ in the stiffness of the pressure spring depending on the installed engine, or more precisely, on its torque.
The first design is intended for cars with engines 2110
and
2111,
the second - for
2112
Repair of VAZ 2110 Lada Clutch drive adjustment
- Repair manuals
- Repair manual for VAZ 2110 (Lada) 1996+.
- Clutch drive adjustment
3.1.7. Clutch drive adjustment
| EXECUTION ORDER | |
| 2. In the engine compartment, loosen locknut 1 on the cable end. By rotating adjusting nut 2, set the full travel of the clutch pedal to 120–130 mm. When screwing the nut onto the tip, the full stroke of the pedal increases, and when unscrewing it, it decreases. | |
| 3. Press the clutch pedal at least three times until it touches the floor mat and check the distance from the pedal pad to the floor mat again. | |
| 4. If necessary, adjust the full pedal stroke with the adjusting nut and tighten the lock nut. | |
| 5. Slide the rubber stopper into the fork until it stops. |
↓ Comments ↓
1. General data 1.0 General data 1.1. Vehicle Specifications
2. Engine 2.0 Engine 2.1 Possible engine malfunctions. 2.2 Replacing the coolant 2.3 Replacing the engine oil and oil filter 2.4. Installing the piston of the first cylinder to the TDC position of the compression stroke 2.5 Replacing the camshaft drive belt and tension roller 2.6 Adjusting the camshaft drive belt tension 2.7 Removing, troubleshooting and installing the flywheel 2.8. Replacing engine seal parts 2.9 Cylinder head 2.10 Grinding in valves 2.11 Adjusting clearances in valve drive 2.12 Removing and installing engine 2.13. Engine repair 2.14. Lubrication system 2.15. Cooling system 2.16. Exhaust gas system 2.18. Features of VAZ-2112 engine repair
3. Transmission 3.0 Transmission 3.1. Clutch 3.2. Gearbox 3.3. Front wheel drives
4. Chassis 4.0 Chassis 4.1. Checking the technical condition of suspension parts on the car 4.2. Rear suspension
5. Steering 5.0 Steering 5.1 Inspection and check of the steering on the car 5.2. Steering column 5.4. Steering mechanism 5.5 Possible steering malfunctions.
6. Brake system 6.0 Brake system 6.1. Vacuum booster 6.2. Main brake cylinder 6.3. Pressure regulator 6.4. Brake hoses and tubes 6.5 Bleeding the brake system 6.6 Replacing brake fluid 6.7. Front wheel brakes 6.8. Braking mechanisms of the rear wheels 6.9. Parking brake 6.10 Possible malfunctions of the brake system.
7. Electrical equipment 7.0 Electrical equipment 7.1. Mounting block 7.2. Generator 7.3. Starter 7.4. Ignition switch (lock) 7.5. Checking and replacing spark plugs 7.6. Integrated engine management system (fuel injection system) 7.7. Contactless ignition system 7.8. Lighting, light and sound signaling 7.9. Windshield wiper 7.10 Replacing the electric motor of the radiator fan of the cooling system 7.11. Heater electric motor 7.12. Cigarette lighter 7.13. Instrument cluster 7.14 Checking the carburetor solenoid valve control unit 7.15 Possible malfunctions of the EPHH control unit. 7.16 Electrical diagram of a VAZ-21102 car 7.17 Electrical diagram of a car with a carburetor engine 2110 7.18 Engine control diagram 2111 (pin M1.5.4) 7.19 Engine control diagram 2111 (pin MP7.0) 7.20 Control diagram for engines 2111 and 2112 (pin M1) .5.4N, "January-5.1")
8. Body 8.0 Body 8.1 Possible body malfunctions. 8.2. Replacing the buffers 8.3 Removing and installing the radiator trim 8.4 Removing and installing the locker 8.5 Removing and installing the wing 8.6. Hood 8.7 Removing and installing upholstery, trim and windshield frame lining 8.8. Trunk lid 8.9. Side doors 8.10 Removing and installing the front seat 8.11 Removing and installing the upper and lower lining of the floor tunnel 8.12. Seat belts 8.13. Rear view mirrors 8.14. Instrument panel 8.15. Heater 8.16 Anti-corrosion compounds for body treatment 8.17. Features of body repair of models 2111 and 2112 8.18. Body care
9. Appendices 9.0 Appendices 9.1 Fuels, lubricants and operating fluids 9.2 Basic data for adjustments and control 9.3 Filling volumes 9.4 Lamps used in the car
Selection of parts and necessary tools
Before you start directly replacing silent blocks, it is important to properly prepare for it. There are few recommendations specifically for choosing new parts.
The auto parts market is simply filled with silent blocks from different manufacturers, mostly they are all quite good. The only thing you can do to make a better choice of new parts is to consult with auto mechanics in your area. The main thing is that the new vibration isolators fit completely.
For repair work you will need the following things:
- new silent blocks;
- a set of spanners and socket wrenches (required sizes 17, 19, 24);
- a hammer, a vice or a special puller (also known as a “press presser”) for vibration isolators;
- any lubricant, WD-40 is most convenient;
- inspection hole (lift);
- jack.
Important! Despite the complexity of replacing silent blocks, it is necessary to have at least basic repair skills. Therefore, objectively weigh your strengths before replacing and decide whether you can do it.
Replacing suspension silent blocks with your own hands
The suspension silent blocks on the VAZ-2112 are located in the arms of both the rear beam and the front one. It is advisable to replace them comprehensively. The replacement process is approximately the same on both the rear and front parts of the suspension. Below are instructions for both cases.
Front control arms
Replacing front control arm silent blocks on a VAZ-2112 is the following process:
- First of all, the car must be placed above the inspection hole or use a lift. Then remove the engine compartment protection represented by the casing.
- After this, the nuts securing the front arms are unscrewed, then the stabilizers, all this is done with a 17 wrench.
- After loosening the nuts securing the required wheel, you need to jack up the car and remove it completely.
- Use a 24mm wrench to unscrew the nut on the extension. Then unscrew the fastening bolts of the ball joint and dismantle it.
- Next, the suspension arm is completely released.
- It is necessary to remove the old silent blocks from the removed lever with a hammer or puller. After this, clean the seat from rust and dirt, lubricating the surface with a thin layer of lubricant. You can make your own puller. It will be especially useful when you want to replace the silent block without removing the lever.
- Having pressed the new silent blocks into the mounting groove with a vice or a puller, you need to assemble everything in the reverse order.
- Ready.
Important! Many car enthusiasts do not press out silent blocks, but burn them out, which is extremely wrong. During heat treatment, the quality of the metal from which the lever is made seriously changes for the worse.
Replacing silent blocks in the rear beam
Replacing the rear silent blocks is done as follows:
- Again, the car must be driven into a viewing hole or raised on a lift.
- Then, taking a 19mm wrench, you need to disconnect the rear beam from the bracket by unscrewing the nuts securing it.
- After this, the bolt freed from the nut should be removed, and a wooden beam the size of a brick should be inserted between the beam and the body.
- Then the silent block is knocked out with a hammer or puller, and the freed groove is cleaned and lubricated.
- Next, a new silent block is pressed into the mounting groove.
- The last step is to assemble the entire structure back.
Important! After carrying out measures to replace silent blocks (both front and rear), it is very important to do a wheel alignment.
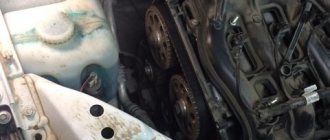
Adjusting the VAZ-2112 clutch with your own hands photo and video
One of the most basic elements of any transmission, including the VAZ-2112, is a mechanism designed to transmit torque from the crankshaft to the gearbox - the clutch. And after a certain mileage with the clutch drive, certain problems may arise.
The video below describes in detail the process of adjusting the clutch on a VAZ 2110-2112:
Clutch diagnostics
In order to understand that there is something wrong with the clutch drive, YOU do not need any special skills!
As a rule, they manifest themselves in the form of extraneous noise, creaking while the car is moving, and also when the clutch pedal is pressed.
If such facts exist, it is necessary first of all to carry out diagnostics and first adjust the clutch pedal. Despite the seemingly complicated course of work from the outside, you can carry it out yourself. How to do this correctly is written below in our article.
Tool
To make adjusting the clutch easier, you need to prepare the following tools:
- Jack.
- Wheel chocks.
- Set of socket wrenches.
- Hammer and punch.
- Ruler.
- New clutch cable.
As a rule, work on adjusting the clutch pedal is accompanied by replacing the cable. Since the old cable will be significantly worn out, making adjustments will only be easier.
The maximum permissible values for the clutch pedal travel on the VAZ-2112 should be no more than 160 millimeters, at its maximum values. And ideal readings should vary between 120-130 millimeters. This distance (from the mat to the edge of the clutch pedal - approx.) can be easily measured using a regular ruler, without any help with your own hands.
Step-by-step procedure for adjusting the clutch pedal on a VAZ-2112
Before starting work, make sure that the car is on a level surface, wheel chocks are placed under the rear wheels, and the car itself is with the hand brake on.
It is also recommended to disconnect the negative terminal from the battery.
- First of all, we check the travel distance of the clutch drive; to do this, we apply a ruler perpendicular to the floor and the pedal rod.
If the readings are 160 millimeters or more, then adjustment for the pedal is a must. We evaluate the measurement result. - Moving on to the adjustment process, open the hood and find the fastening of the clutch cable to the pedal from below. For convenience, remove the air filter housing.
The cable is clearly visible under the hood.In the process of adjusting the clutch, we spray WD-40 on it, since the bolts are very acidic.
- At the very end of the cable there are two nuts, one of which is intended for unscrewing, and the second for tightening.
Thereby reducing the free play of the pedal to the 120-130 millimeters we need. The numbers indicate two nuts.
How could you understand that if you tighten the first nut and unscrew the second, then the pedal stroke will increase, not decrease.
- When work on adjusting the nuts is carried out, periodically check the pedal travel by pressing them 3-4 times at each approach, and then take the measurements again.
- When you reach the desired distance in the free travel of the clutch pedal, tighten the nuts as close to each other as possible, thereby creating a locknut effect.
- Next, slide the restrictive sleeve made of rubber into the fork until it stops, after which we check all cable connections and close the hood.
Please note that adjusting the clutch pedal on a VAZ-2112 car is not a complicated process and can be done even by the most novice car owner. The main thing is to carefully read our instructions and this work will no longer present any difficulties.
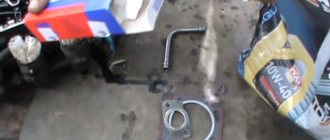
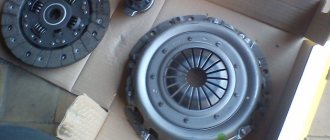
Clutch installation and assembly
Replacing the clutch on a VAZ-2112 is carried out according to the following algorithm:
- Unscrew all the bolts that secure the basket to the flywheel. If you plan to install it again, then you need to unscrew the bolts evenly, crosswise. The main thing is not to damage the basket.
- Remove the basket and disk, install new elements in their place.
- Tighten all the bolts (be sure to use new ones, since the old ones are threaded) and install the guide sleeve.
- Tighten the bolts evenly, crosswise.
- Remove the old release bearing and install a new one.
- Reassemble everything in reverse order.
Read more: How to disable automatic Internet renewal Megafon
This is a short tutorial, but the hardest part is lifting and lowering the box, as it is quite heavy.
The speedometer on the VAZ-2110 injector does not work, reasons, what to do
In a situation when the speedometer and the injector installed on the VAZ-2110 do not work properly, the person behind the wheel puts both his own health and the lives of passengers at risk. At the same time, he can easily “earn” a fine from a traffic police officer for speeding too high. Thus, a working speedometer allows you to avoid a considerable amount of trouble.
What does it mean that the speedometer is broken?
The main signs of malfunction of this device are as follows:
- the arrow remains in place, regardless of the fact that the car is moving;
- when driving it fluctuates or freezes;
- the device functions normally when the power plant is not warmed up, but later the needle stops moving.
Why does the speedometer break?
Thus, oxidation of contacts is considered a fairly easy to fix fault. It is characterized by the “jumping” of the arrow, despite the fact that the speed of movement remains stable. The problem is resolved by cleaning the contacts.
The wires are frayed. This reason can be suspected by the chaotic movement of the needle when starting the engine. Meanwhile, experts note that sometimes the problem does not manifest itself for a long time. It can be identified using a tester.
Sensor failure. A speed control device whose performance is questioned is replaced with a known good one. If the speedometer begins to function normally after this procedure, then there is no point in further looking for damage. Often sensors become unusable after their housing is destroyed and water or dirt gets inside.
Connectors. They are located in the VAZ-2110 in a place where they are constantly exposed to dirt. As a result, the contact is broken and the speedometer needle moves chaotically. The connectors must be completely cleaned and the connection must be checked for reliability.
Often the speedometer also begins to malfunction due to shaft wear. In this situation, it will be possible to get rid of the problem only after completely replacing the above-mentioned part.
Speedometer on VAZ-2110
As you know, the manufacturer installs an electronic speedometer on this model. If it has become unusable, then this problem is quite serious, since the above-mentioned device itself is not for sale. For this reason, you will have to buy a whole shield. However, in fact, in nine out of ten cases the problem is in a completely different place.
On a VAZ-2110 with an 8-valve engine, the speedometer receives information from the speed sensor. It, in turn, is located in the gearbox. There, through two gears, it receives torque data from the gearbox shaft.
Everything works similarly for cars with 16-valve engines.
Most often, as noted above, the problem is that the sensor is too dirty. In general, dust always accumulates under the hood of the VAZ-2110. It, when mixed with oil, creates a fairly stable barrier. As a result, the reliability of the speedometer readings becomes unconditional. The problem is easily solved - the sensor is cleaned and dried.
It is worth recalling that it will be more convenient to access it directly through the gearbox, since doing this from below is very inconvenient.
Another very common reason is problems with the electrical network. It all needs to be checked
In addition, attention is also paid to:
- reliable fastening of wiring in terminals;
- their general condition;
- fuses located within the mounting block.
In a situation where no damage to the electrical network is detected, you will have to take on the sensor itself. Its breakdown is the third most common cause of speedometer failure. It is checked in the following sequence:
- the sensor is removed from the gearbox;
- a drill or a screwdriver is applied to the drive, switched to the unscrewing mode;
- the ignition turns on;
- By pressing the drill button, rotate the drive.
In a situation where the speedometer needle begins to move, it should be recognized that the monitoring device is fully operational. This means one thing - the fault lies somewhere in the gearbox. Here, only an experienced car enthusiast or a professional locksmith can fix the breakdown on their own. When the arrow does not move, it will be enough to replace the sensor itself.
Conclusion
As you can easily understand, in most cases it is possible to repair the speedometer on your own. However, in situations where there is no confidence in them, it is better to turn to experts. Wrong actions often lead to aggravation of the problem, which, in turn, results in unnecessary expenses.
Choice (poll)
When is replacement necessary (symptoms)?
You can understand that the clutch needs replacement by the following signs and behavior of the car:
- Vibration occurs when pressing the clutch pedal.
- When you press the clutch pedal you hear a humming noise.
Read more: Fan ural db cooling fan
I used THIS manual, which was very useful to me, the beauty is that you don’t need to pull out the drive and drain the oil accordingly.
The only thing is that I did not completely remove the longitudinal rod, but only unscrewed the ball joint at the place where the lever is attached to the body. Move it a little to the side and the box will go down well.
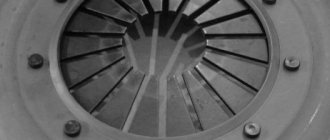
Unscrew the 6 bolts under the eight-point head and take out the basket with the disc
The clutch basket was heavily (or so it seems to me) ground down by the release bearing, there were deep “cuts” on the petals
Looking at the clutch disc
My choice fell on the LUK clutch kit
I had a Kraft one
Well, that's it, let's put everything back together in reverse order. And yes, I centered the clutch disc with a plastic bushing
P.S. Lyokha, you can finally be calm, I won’t disturb you)
Happiness and goodness to everyone!
Price: 2,400 ₽ Mileage: 129,900 km
How to adjust the clutch on a VAZ-2110 instructions with video
If during the operation of the car you notice that the clutch system is not working at the proper level, then you need to find out the cause of the unit malfunction as quickly as possible. After all, the operation of the machine depends on this element. The problem is that in such a situation it is difficult or impossible to change gear. Most often, the driver notices a malfunction if, when pressing the pedal, it goes very hard or, on the contrary, fails. In this case, you need to know how to properly adjust the clutch on a VAZ-2110.
What signs indicate a clutch malfunction?
The following signs may indicate problems with the unit:
- the appearance of peculiar sounds that had not previously manifested themselves, especially when trying to change speed;
- any difficulties that appear when changing gears;
- if the clutch is lost when overtaking another vehicle.
If any of these situations occur, you need to identify the cause of their occurrence as quickly as possible, take appropriate measures yourself or contact technical service.
This process will not take much time and is not labor-intensive, therefore, to save time and money, it is time to adjust the unit and identify minor damage yourself, of course, taking into account the recommendations of professional craftsmen.
Step-by-step adjustment of the unit
Unfortunately, it is in the popular VAZ-2110 that the injector, the most important clutch unit, most often fails. In order for the system to return to normal, you just need to adjust it, performing this process step by step and taking into account the advice of professionals who know a lot about car repair.
First you need to check the clutch pedal travel. According to the factory instruction manual, a stroke not exceeding 12 centimeters is considered normal. If this indicator increases, you need to check the disc linings, since worn elements can raise the pedal above the permissible limit. To measure the pedal stroke, you will need a regular ruler, and the measurement is carried out as follows:
- Before measuring, debris and debris are removed from around the leftmost pedal to ensure accurate results.
- The edge of the ruler needs to be rested against the mat, placing the tool in a perpendicular position.
- If the measurements show inflated results, then you need to immediately begin adjusting the unit.
To independently adjust the clutch, you will need two keys size 13. During the procedure, you will not need to disassemble anything; the process should be carried out both from inside the car and from under the hood:
- Having opened the hood, you need to find the clutch cable;
- there is a lock nut at the end of the cable that needs to be loosened with a wrench;
- Using a second key, the nut is unscrewed to adjust the stroke. It is this part that helps to both increase and decrease the stroke of the unit, so when unscrewing it, you need to monitor the change in the pedal stroke inside the car;
- As soon as the distance indicator approaches 12 cm, you need to sharply press the pedal and release it again.
If in the end it was not possible to completely adjust the pedal, the procedure should be repeated again, and after completing the adjustment, carefully tighten the lock nut.
Further actions
You should slide the rubber stopper in the form of a fork until it stops. If necessary, replace parts of the unit that have become unusable. Most often, clutch cables fail, so these parts need to be checked most often and replaced in a timely manner. This is not difficult, considering that such an element is quite inexpensive.
The above procedures for adjusting the clutch, as you can see, are quite simple and understandable. But if difficulties still arise during the replacement, you can watch a training video at any time, conducted by real masters who are well versed in car repairs.
Replacing the clutch cable
The price of replacing a clutch on a VAZ-2112 is quite high - you will have to pay about 3,000 rubles for more or less high-quality spare parts, and at least the same for labor. But if you do everything yourself, you can save a lot of money.
Replacing the cable is much easier. The old one needs to be dismantled, and the new one needs to be fixed on the pedal and fork. The most difficult thing is to stretch it from the engine compartment into the cabin: the hole is quite small, and there are no amenities. But everything is doable, and all the work will take you, including preparation, no more than half an hour.
Car : VAZ-2112. Asks : Anzorin Maxim. The essence of the question : How to replace the clutch on a VAZ-2112 yourself?
Hello! Please tell me how to properly replace the clutch on a VAZ-2112? I want to replace it because it seems to me to be very worn out. Sometimes I press the pedal and then when I release it, it somehow doesn’t grab right away. And the service announced a price of 3,000 rubles.
The speedometer on the VAZ 2110 does not work
Author of the article June 05, 2014
A speedometer is a device that measures the speed of a vehicle and its distance traveled. In the event that it does not work, although it is not fatal, it is very unpleasant. It is very difficult to determine the speed of a car without a speedometer. So, if you drive a car with a non-functional speedometer, you may accidentally exceed the speed limit and get a fine. If the speedometer on a VAZ 2110 does not work, then it must be repaired.
A faulty speedometer can cause an accident. For example, you may choose the wrong speed for cornering, or drive at a speed that is dangerous for certain weather or road conditions.
Reasons for the speedometer not working correctly
On a VAZ 2110 car, the speedometer may not work for several reasons. One of these reasons may be oxidation of contacts. Although this is the most banal and simple reason, it is very common. To fix it, you need to remove and clean the contacts, and then put them back in place. Also, one of the reasons may be chafing of the wire. Upon inspection, the wire may appear intact, but the strands inside may be broken. To find such a fault, you need to test the wire using a tester.
The problem due to which the speedometer does not work may be the breaking of the splines that turn the speedometer cable. If the speedometer is electronic, the instrument panel may fail. To verify it, it is necessary to conduct testing.
Another reason why the speedometer on a VAZ 2110 may not work is a breakdown of the speed sensor. To diagnose this problem, it is best to take a working sensor and replace it with your speed sensor. If the speedometer works, then the conclusion is obvious. If the speedometer stops working after repairing the gearbox or clutch, you should see if you forgot to connect it.
The speed sensor, or its other name the Hall sensor, works on the following principle. When the wheels of a VAZ 2110 car rotate, the controller receives impulses from the speed sensor, which are proportional to the wheel speed. Replacing the sensor is quite simple, but getting to it is not so easy. When removing the sensor, you need to be careful not to break off the sensor rod.
Replacing the sensor on a VAZ 2110
In order to replace the speed sensor on a VAZ 2110, you will need keys 10 and 22. It is best to replace the sensor from the top of the engine.
First of all, you need to disconnect the battery ground, or remove the negative terminal. Next, disconnect the contact chips from the speed sensor and use a 21 wrench to unscrew the sensor. If the rod breaks, then removing the drive in this case is not necessary. The rod can be unscrewed with a 10 mm wrench, but when removing it you should be careful not to let the rod go inside the gearbox.
When installing the drive rod on a VAZ 2110 car, you must first lubricate the rubber ring with oil. Next, you need to connect the terminal block and check the operation of the speedometer.
“Likes” on social media networks:
Work order
Before deciding how to change the front shock absorbers, you need to thoroughly prepare. An inspection ditch is not required here; in good weather, everything can be done outside, on a flat concrete platform. Replacement of racks is carried out using the following tools:
- standard set of open-end wrenches and sockets with sizes from 6 to 22 mm;
- plumbing tools - hammer, screwdriver, pliers;
- jack complete with wheel wrench;
- puller for squeezing out ball joints and pins;
- a pair of pin-shaped clamps with grips for compressing springs;
- rags and cloth gloves.
The specified set of tools and the algorithm for performing the work are suitable for all models of the “tenth” Zhiguli family, including the VAZ 2112. To change the struts on the VAZ 2110, you should park the car on the site, fix its wheels and lift it with a jack from the required side. Then remove the front wheel, open the hood and follow this algorithm:
- Disassembly begins in the engine compartment. The shock absorber rod must be freed from the protective cap (if there is one) and the 3 nuts must be loosened with a 14 mm wrench.
- There is a round rod with a groove or a tetrahedral one measuring 6 mm. In the first case, a powerful slotted screwdriver is inserted into the groove; in the second, the rod must be held with a key. Loosen and unscrew the 19 mm fastening nut.
- For further disassembly you need to move under the wheel arch. There, you need to remove the brake fluid hose from the groove in the strut, and then unscrew the 2 nuts securing it to the steering knuckle. The remaining bolts should be knocked out of the holes by hitting them with a hammer through a soft metal guide.
- Remove the cotter pin from the nut holding the steering rod ball pin, having first straightened its ends. Unscrew the nut and use a puller to press the pin out of the seat in the rack bracket.
- Finally unscrew the 3 nuts located under the hood and holding the assembly suspended. Now the shock absorber along with the spring can be removed from the car.
It is recommended to treat stuck threaded connections with WD-40 aerosol lubricant before unscrewing. It is more convenient to do the remaining work in a vice with copper or aluminum pads, but you can do without them. Further replacement of the front struts of a VAZ (“tens”) consists of compressing the springs with clamps and final disassembly of the unit in order to remove the faulty shock absorber. To do this, you will have to remove the cup, support, boot and compression stroke buffer.
When disassembling, pay attention to the condition of the support bearing and replace it if necessary. After this, you can install the new stand on the machine in reverse order.
If the parts were changed after an impact on the suspension, then the procedure is mandatory.
Master cylinder with reservoir
1 – main cylinder body; 2 – low pressure sealing ring; 3 – drive piston of the “left front–right rear brake” circuit; 4 – spacer ring; 5 – high pressure sealing ring; 6 – pressure spring of the sealing ring; 7 – spring plate; 8 – piston return spring; 9 – washer; 10 – locking screw; 11 – drive piston of the “right front–left rear brake” circuit; 12 – connecting sleeve; 13 – tank; 14 – brake fluid emergency level sensor; A – gap
Master cylinder with sequential pistons. A tank 13 is mounted on the master cylinder body, in the filler neck of which a sensor 14 for emergency brake fluid level is installed. The high pressure O-rings 5 and the rear wheel cylinder rings are interchangeable.
Changing the clutch cable, basic algorithm
Replacing the VAZ 2110 clutch cable is extremely simple. Even a novice amateur motorist will be able to do the job, and it’s quite difficult to make a mistake. What we do:
- 1. To start, use two 19 mm open-end wrenches. loosen the nuts of the clutch cable end, tilting it away from the bracket;
- 2. Disconnect the cable from the fork that controls the clutch release;
- 3. Now you need to disconnect the cable end from the clutch pedal lever. This can be done through the interior, but if you worry about dismantling in advance, then the task is greatly simplified. First, remove the protective cover of the mechanism.
- 4. The end of the cable is unscrewed with a nut, additionally secured with a locking bracket. Unscrew the pedal lever nut, thereby releasing the cable;
- 5. To release the upper end of the cable sheath, unscrew the corresponding bolt of the thrust plate in the passenger compartment. Then the thrust plate is removed along with the cable;
- 6. The old cable is removed through the interior. When replacing, the lead of the new cable is lubricated with silicone.