Radiator leaking on Priora? Don't know what radiator you need? In this article we will briefly describe how to choose the right radiator for a VAZ 2170.
In total, Priora can have up to three radiators:
1) engine cooling radiator,
2) air conditioner radiator (condenser),
3) heater radiator or stove radiator.
Let's talk about the main engine cooling radiator. When selecting, you need to check whether your car has an air conditioner, since in a Priora with air conditioning, an air conditioning radiator is additionally installed, so the engine radiator is made thinner and with different mounts. This entails an increase in its price due to a more complex design, since with a smaller size it is necessary to achieve the same heat transfer.
So, if you need an engine radiator for a VAZ 2170 Priora 2007 to 2020 without air conditioning, then you need a radiator with catalog number 2170-1301012, CORE SIZE, MM: 560*340*34. The LUZAR company (St. Petersburg) produces a high-quality analogue of this radiator with a 2-year guarantee CODE LUZAR LRc 0127. Click to buy a radiator for Priora without air conditioning available in Orenburg.
If you need to replace the radiator on a VAZ 2170 Priora with air conditioning, you should check which air conditioner you have: PANASONIC or HALLA.
This can be done by knowing their differences. Here are some of them:
1) the Panasonic system’s blower speed selection knob has about 16 positions, which provides fewer steps than Halla’s, which has 4 speeds.
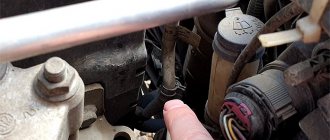
2) under the hood, the Hall system lines are aluminum, while Panasonic’s upper line is a flexible black hose (the line is located to the left of the engine protective cover).
If you have a Halla air conditioner, then you need an engine radiator CORE SIZE, MM: 560*340*26. The LUZAR company (St. Petersburg) produces a high-quality analogue of this radiator with a 2-year guarantee CODE LUZAR LRc 01270b. Click to buy a radiator for Priora with Halla air conditioner available in Orenburg.
If you have a Panasonic air conditioner, then you need an engine radiator CORE SIZE, MM: 560*340*26. The LUZAR company (St. Petersburg) produces a high-quality analogue of this radiator with a 2-year guarantee CODE LUZAR LRc 01272b. Click to buy a radiator for a Priora with Panasonic air conditioning in stock in Orenburg.
Accordingly, the air conditioner radiators in these cases are also different.
The use of various climate systems in the Priora VAZ 2170 necessitated the use of various heater radiators (stoves).
Still have questions? Do you want to order free delivery of a radiator by courier in Orenburg? Call (3532)28-12-88
Pick up radiators at your own expense from our warehouse on the street. Shosseynaya 24a, 2nd floor, office 213 (BC Navigator).
Surely all owners of a Lada Priora have had to replace the alternator belt. Its resource is not eternal and it has a replacement schedule, which is 60,000 thousand km, or two years, after its installation on the car. But as a rule, a forced replacement is an unpleasant creaking sound when the belt slips, since the belt stretches over time. Also, upon visual inspection of the belt, you can see cracks and abrasions, this also indicates its imminent demise. Here, owners of Lada Priora have difficulties when buying a belt for auxiliary units, since their sizes are different.
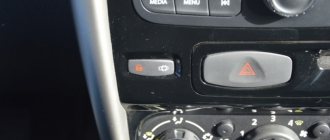
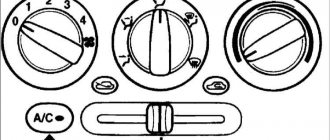
How to find out which air conditioner is on the Priora
There are not many differences between the Halla and Panasonic cabin air conditioning systems, but they still exist. The first thing you need to pay attention to is the climate control unit.
- The middle button (air flow direction) has a glass blowing function. When you press it, the stove fan turns on at maximum speed and the air conditioner turns on.
- In the extreme button (air flow speed), Panassonik has more than 15 speed positions.
- The hose from the air conditioning compressor is soft, rubber
- There is a plug in the middle button (direction of air flow).
- In the extreme button (air flow speed), Halla has four blowing speed positions.
- The hose from the air conditioning compressor is rigid, aluminum
1.1.27 Automatic air conditioner
1.1.27. Automatic air conditioner
| GENERAL INFORMATION |
Automatic air conditioning mode
In the “AUTO” mode, the system automatically maintains the set air temperature in the vehicle interior. At the same time, the electronic control unit regulates the temperature and flow of air entering the cabin through the ventilation grilles, and also turns on the air conditioning if necessary.
The mode of air distribution throughout the cabin is selected manually.
If necessary, the air recirculation mode is automatically activated. When the air conditioner is operating in automatic control mode, the central display 3 is turned off.
Within a few seconds after turning on the ignition, a slight noise may be heard from the operation of the air conditioning units. This is normal.
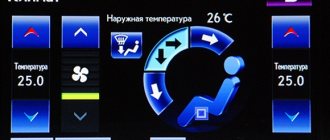
Automatic air conditioning control
| 1. Switching between air recirculation and fresh air ventilation modes 2. Turning the air conditioner on and off 3. Display 4. Window transparency program switch. The program provides for an increase in the supply of air supplied to the windshield and front door windows, for example, at high humidity. There is no need to change the assigned air temperature. If the air conditioner was operating in manual control mode, pressing the button turns the air conditioner into automatic mode. A constant flow of air passes through the central and side ventilation grilles, which depends on the set operating mode of the air conditioner 5. Button for turning on the mixed air distribution mode: part of the air is directed to blowing the windshield (defrosting and removing condensation), and the other part enters the cabin through the central and side ventilation grilles, as well as through the air duct openings in the footwell areas of the front and rear passengers | 6. Button for turning on the air distribution mode: air flows through the central and side ventilation grilles 7. Button for turning on the air distribution mode: most of the air enters the cabin through the central and side grilles, and a smaller part through the air duct openings in the front and rear footwell areas passengers 8. Button for turning on the air distribution mode: most of the air enters the cabin through the air duct openings in the footwell areas of the front and rear passengers, and a smaller part through the central and side grilles 9. Buttons for setting the air temperature in the cabin. Possible temperature range: from 14° C to 30° C. The assigned temperature is displayed on the display. It is recommended to first set the temperature at about 22° C, and then gradually change the setting to the desired value 10. “AUTO” button. Includes a program to maintain the most comfortable conditions in the cabin, while simultaneously ensuring the removal of condensation from the windows. The “AUTO” indicator lights up on the display 11. Air flow control A. Fan operating mode diagram |
Warning
The air conditioning control system includes an air temperature sensor built into the overhead console and a solar radiation sensor located between the windshield vents in the front of the control panel.
Manual control of the air conditioner
The air supply is regulated by button 11 “MAN”. The air supply increases or decreases when you press the right or left edge of the button, respectively. The set fan operating mode is reflected graphically on the display (diagram A). At the minimum air supply level, one vertical strip lights up. Turning off the fan turns off the air conditioner. The fan symbol goes out and the “ECO” symbol lights up on the display.
The operating mode of the ventilation system is set by button 1 “RECIRC”.
Air recirculation. The symbol lights up on the display. Turns on when you press the button once. The access of outside air to the cabin is stopped, thereby preventing the entry of unpleasant odors and dust. The air conditioning system circulates the air inside the car. Recirculation mode should only be used in exceptional cases.
Supply ventilation mode. The symbol lights up on the display. Turns on when button 1 “RECIRC” is pressed again. In this mode, fresh outside air enters the cabin.
The air conditioner is turned on by button 2 “A/C”. When you press button 2 once, the air conditioner switches to automatic control mode (previously the air conditioner worked in the same mode), the “A/C” symbol lights up on the display. Pressing button 2 again turns off the air conditioner. At the same time, the “ECO” symbol lights up on the display. To return to automatic mode, press button 10 “AUTO”. In this case, the symbols for manual air conditioner control mode that were lit on the display will go out.
Recommendations for using the air conditioner
To quickly achieve a comfortable air temperature in the cabin, first set the temperature at 22° C, and then gradually change the setting to the desired value.
Use manual air conditioning control only if the uncomfortable air temperature in the cabin remains for a long time.
If the vehicle is not in use, manual mode settings are stored in the memory of the air conditioning control unit. However, if the temperature in the cabin changes significantly compared to the set value, the air conditioning control program is automatically activated, which ensures the fastest achievement of comfortable conditions. In any case, press the “AUTO” button to return to automatic mode.
Air Conditioner Installation Guide
Before you complete this task, you need to decide which option you will use. There are quite a lot of manufacturers of air conditioning units on the market today, so the purchased unit must meet the requirements and characteristics of the car. The device must have a long service life, resistant to vibrations that are typical for cars used to drive on our roads. It's no secret that our car enthusiasts are more inclined to trust Conder cars and products in general from foreign manufacturers.
How to connect an air conditioner to a Priora with power steering
If we talk about foreign installations, here you can choose Panasonic, Halla or any other system. As for domestic manufacturers, according to reviews, the August air conditioner has proven itself well.
11.2.3 Operating principle of the air conditioner
Operating principle of the air conditioner
A compressor with swing washers is installed on the car.
It is located on the left side of the engine and serves to compress the refrigerant (about 1 kg) under pressure, which is in a gaseous state. The compressor is driven by a belt drive from the crankshaft. When compressed in the compressor, the refrigerant turns into a liquid state and is supplied to the evaporator located in the heater housing under the instrument panel. There the refrigerant evaporates again, absorbing energy, resulting in cold. The air flowing past the evaporator is cooled against its plates. The refrigerant is then fed back into the compressor (Fig. 10.5). For better condensation after compression, two additional fans are installed in front of the condenser. The cooling power of the air conditioner is electronically controlled and depends on the outside temperature, the interior temperature and the desired temperature set point. Rice. 10.5. Compressor (sectional view) with oscillating discs and six pistons: 1 - main control valve; 2 - electromagnetic coupling; 3 - belt pulley; 4 — swinging disk; 5 - piston; 6 - compression chamber
Additional information about the air conditioner
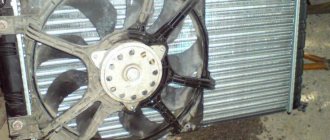
Additional fans (Fig. 10.6) have two speeds. When the coolant pressure reaches 20 bar, the switch is activated. The relay is then activated and the additional fans receive voltage through the pre-resistors. When the coolant temperature is more than +107 °C, the fans operate at maximum speed.
Rice. 10.6. Both additional fans are accessible after removing the radiator trim
When the compressor is turned on, the engine idle speed setting immediately changes so that it does not stop. The compressor consumes about 9 kW.
To avoid thermal overload of the engine, at a coolant temperature of about +115 °C, the compressor is turned off.
The air conditioner control device receives information about the compressor speed from an inductive sensor. The engine speed data comes in the form of a TD signal from the Motronic system. If the resulting ratio between the two values is outside the specified range, it may indicate that the compressor is difficult to rotate and the accessory drive belt is slipping on the pulleys. In this case, a protective shutdown of the compressor occurs.
When removing the engine, the closed air conditioning fluid circulation system, which is under high pressure, should not be opened without special equipment. Adding refrigerant to the system is only possible at a service station. Therefore, when removing the engine, it is recommended to unscrew the compressor and system pipelines along with the brackets from it and secure them to the side in the engine compartment with wire.
The air conditioner control device has a self-diagnosis system. Information about any faults that have occurred can then be read from the device’s memory at a service station.
Installation of foreign-made climate systems
Lada Priora air conditioner "August" is one of the most inexpensive options. If you want to buy a higher quality device, then you can opt for the Hull, Panasonic or Frost systems. In practice, the latest model is characterized by good compatibility with the Priora heating system, due to which the air flow filtration will be of better quality. As for the installation scheme, it is practically no different (the author of the video is Auto World).
But Frost also has its drawbacks: it happens that the installation gets very hot, does not cool the air well, and generally does not cope well with its assigned functions. But even if the unit works well, it will take longer to cool the interior. This is because the compressor itself is not particularly powerful. But despite the disadvantages, Frost also has advantages. When the air conditioning is turned on, it will generally not affect the functionality of the vehicle.
Instructions for activating the immobilizer
The process of activating the immobilizer on a Priora is carried out in a car with the door locks locked.
Activation is done like this:
- The training key is installed in the switch and the ignition is turned on. You must wait at least six seconds and then turn it off.
- When the actions are performed correctly, the indicator light blinks on the dashboard throughout the entire time it is turned on. If it goes out, then an error was made during the task. The immobilizer may be faulty or the time interval has been violated. The LED indicator on the device indicates that the switch is turned on correctly.
- During the period of time while the light is blinking, it is necessary to activate the ignition using the working key. The sound beepper will start beeping. If this does not happen, there was an error in the process.
- After playing three sound pulses, you must wait about six seconds. The beepper will then beep two more times. If they are absent, the blocking agent is diagnosed for malfunctions. The microprocessor module may have been trained using a different key.
- After two beeps, you need to turn off the ignition system. If the car owner plans to register not one, but several keys, then the activation procedure is repeated for each.
- If the indicator light on the instrument panel blinks, the control element is removed from the switch. Then the training key is installed in it again, and the ignition is activated. If there are no errors, the beeper will emit a triple beep, indicating that the blocker has been successfully activated. The ignition does not turn off, and after six seconds the beepper will again emit a double beep.
- The key in the lock turns counterclockwise. After turning off the ignition, you must wait six seconds, this will trigger the beepper. The indicator light on the instrument will blink more frequently. If an error was made during the process, all steps are repeated again.
- While the light on the control panel is flashing at a high frequency, the ignition is activated with the learning key. After 2-3 seconds. it needs to be turned off. After another five seconds, the indicator will stop blinking and the beeper will play a triple pulse.
- Then the ignition turns off and does not need to be activated for at least 10 seconds. The alarm will be activated, as well as the emergency indicator. This completes the training procedure.
New Lada: We independently change the injectors on a Lada Priora car
During the implementation of a task, it may happen that the blocker and the control module lose synchronization in the execution of commands. In order to set it up, the ignition is activated using a trained key. The indicator on the instrument panel may indicate a malfunction and flash rapidly. Then the ignition will need to be turned off for ten seconds. When it is reactivated, the indicator light should not blink.
The immo package includes three keys, two of them are working, and the third is a training one. The first keys are black, and the remaining one is red. It is the latter that is used to activate the engine blocker if this procedure was not performed in the cabin.
The Avtodopka channel talked about independently turning on the power unit blocker on a Priora.
Why does Priora have air conditioning?
Before you find out how to install a cooling system with a control unit in accordance with the electrical diagram and whether this is possible, let's understand its purpose. Today, buying a Priora with a climate control system is not a particularly cheap pleasure. Therefore, many owners decide to equip their car with Halla, Panasonic or another climate system. Installing an air conditioner in any case is a reasonable decision if the driver wants to achieve comfort when driving a vehicle.
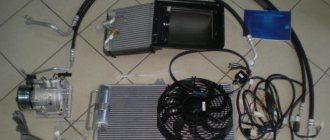
All elements for the air conditioning system of Lada Priora
Moreover, the air conditioning on the Priora will subsequently affect the cost of the car when sold. And if you consider that many motorists today change their cars quite often, this seems quite advisable. Installing a climate control unit with your own hands (Hall, Panasonic) with a coupling, rollers, all pipes, pressure sensors, an air conditioner fan and other elements will not only cool the interior. With proper installation of the electrical circuit, it is possible to ensure that the switched on operating station will cool the motor when it warms up. Currently, such an installation is indispensable, especially when operating a vehicle in the heat.
We install the air conditioner on the Lada Priora with our own hands
In a Lada Priora car, a device such as air conditioning plays an important role in terms of comfort for the driver and passengers. Is it possible to install such a climate control device in your car yourself? How installation is carried out, how to refuel the air conditioning system - read about it below.
Before you find out how to install a cooling system with a control unit in accordance with the electrical diagram and whether this is possible, let's understand its purpose. Today, buying a Priora with a climate control system is not a particularly cheap pleasure. Therefore, many owners decide to equip their car with Halla, Panasonic or another climate system. Installing an air conditioner in any case is a reasonable decision if the driver wants to achieve comfort when driving a vehicle.
All elements for the air conditioning system of Lada Priora
Moreover, the air conditioning on the Priora will subsequently affect the cost of the car when sold. And if you consider that many motorists today change their cars quite often, this seems quite advisable. Installing a climate control unit with your own hands (Hall, Panasonic) with a coupling, rollers, all pipes, pressure sensors, an air conditioner fan and other elements will not only cool the interior. With proper installation of the electrical circuit, it is possible to ensure that the switched on operating station will cool the motor when it warms up. Currently, such an installation is indispensable, especially when operating a vehicle in the heat.
Air Conditioner Installation Guide
Before you complete this task, you need to decide which option you will use. There are quite a lot of manufacturers of air conditioning units on the market today, so the purchased unit must meet the requirements and characteristics of the car. The device must have a long service life, resistant to vibrations that are typical for cars used to drive on our roads. It's no secret that our car enthusiasts are more inclined to trust Conder cars and products in general from foreign manufacturers.
If we talk about foreign installations, here you can choose Panasonic, Halla or any other system. As for domestic manufacturers, according to reviews, the August air conditioner has proven itself well.
The installation kit should include:
- cooling radiator or air conditioning radiator;
- the installation itself, which includes the Priora air conditioning compressor;
- tension roller bracket;
- highways.
Heating device of the Hull installation
If we talk about the domestic product, then in this case the only drawback can be called the evaporator housing, since it is plastic, which raises certain doubts. There is a possibility that the compressor will fail before other elements. In any case, you need to choose a manufacturer in accordance with the reviews that our car enthusiasts leave online.
Installing an air conditioning system involves removing the heating system, which first requires dismantling the air filter housing and draining the coolant. Next, the front bumper is dismantled. After removing the components, you can begin to remove the generator. The kit for the installed air conditioner must include a separate generator designed for a specific car. So you need to install the device instead of the old one.
First of all, you need to install supports on which the unit’s compressor, as well as the generator, will be mounted. Next, you should fix the tension roller installation bracket. To mount the roller bracket, you may need to drill a hole in the strap cover, after which the oven housings and the evaporation device are connected to each other. Next, on a Priora with air conditioning, you should install a compressor, radiator, and fan. After installing the components, including the roller, all elements must be included in the wiring diagram.
Scheme of operation of a foreign-made air conditioner Frost
If you choose a Russian-made unit, please note that it does not include a cabin air filter element. Therefore, you will have to isolate the electric motor in the cooling system yourself. If you notice that the unit does not turn on, you may need to refuel it, which, in turn, involves dismantling the radiator. Of course, in this case we are talking about Russian-made Conders.
If you notice that the air conditioner is not working, this does not necessarily indicate that the unit is not working. Perhaps the compressor is overheating, or perhaps the bearing simply needs to be replaced. In any case, you should not immediately think that the manufacturer is to blame - you need to diagnose all elements of the cooling system.
Installation of foreign-made climate systems
Lada Priora air conditioner "August" is one of the most inexpensive options. If you want to buy a higher quality device, then you can opt for the Hull, Panasonic or Frost systems. In practice, the latest model is characterized by good compatibility with the Priora heating system, due to which the air flow filtration will be of better quality. As for the installation scheme, it is practically no different (the author of the video is Auto World).
But Frost also has its drawbacks: it happens that the installation gets very hot, does not cool the air well, and generally does not cope well with its assigned functions. But even if the unit works well, it will take longer to cool the interior. This is because the compressor itself is not particularly powerful. But despite the disadvantages, Frost also has advantages. When the air conditioning is turned on, it will generally not affect the functionality of the vehicle.
It should also be noted that the air conditioning units of this manufacturer were tested in African countries, and this says a lot. In particular, during testing, the installation cooled the interior well, while the engine of cars of various brands did not overheat. On sale you can find several variants of Frost condensers, which differ from each other only in the installation method. When installing the device, you will need to remove the heating system damper, but this will allow you to install an air filter, which is no less important.
In any case, when purchasing, you should focus on your preferences, as well as your budget. If the device gets very hot, you need to pay attention to diagnosing all its components and components. As a rule, this problem is caused by the need to replace the radiator. In addition, during operation, one should not forget about refueling the system, as well as its periodic cleaning. We have already written in more detail about how to clean the air conditioner on your own using improvised means; you will find information about this here.
Video “What do you need to know about installing an air conditioner on a Priora?”
All the nuances of the system installation process are presented in the video below (the author of the video is Valik Maloy).
avtozam.com
Where is it located and how is it removed?
VAZ designers placed the DTVS module in a very original way. It is located in the plastic housing of the interior lighting unit. Directly under the rearview mirror. Under two backlights for the driver and passenger, you can see the air intake holes for supply to the combustion engine.
The module is dismantled quite simply. First, the rearview mirror is removed.
After this, two bolts are opened that secure the light module to the body and upholstery. They are simply unscrewed with a screwdriver or hexagon, depending on the type of bolts. When this unit begins to separate, it becomes possible to disconnect the wire connectors from the Priora interior air temperature sensor and directly from the backlight unit.
The DFA itself is a plastic box secured to the module body with two screws. And a wiring harness with a connector coming out of it. By unscrewing these bolts, you can freely separate the diesel fuel assembly.
And when the node is removed, various actions can be carried out with it. But most often, this is simply cleaning and lubricating the fan. Or replacing one of the nodes.
Although practice shows that most often drivers prefer, without bothering too much, to simply replace the complete combustion engine assembly. It’s really simpler, since its cost is not so high. Around 400-500 rubles.
And installing a new one according to the description above, proceeding in the reverse order, is generally not difficult.
And you can watch a short video on this issue:
There is no need to explain why you need air conditioning in a car - the heat sometimes reaches about 0 and above, and even more in the car interior. This is very uncomfortable and even dangerous for the driver and passengers - you can get heatstroke. Open windows are not an option. The noise of the street will accompany you all the way. And this is of little use if the air is very hot.
Car air conditioning is no longer a new product - it can be ordered when purchasing any new car, even a domestic one. For most of them, air conditioning is already offered as standard.
And if there is no air conditioning, if desired, you can even install it on a VAZ “classic” - there are now enough specialists and equipment. However, in recent years, instead of air conditioning, more and more car buyers are ordering climate control in Priora.
How does the Priora climate control differ from a conventional air conditioner? If you have a simple air conditioner in your car, then you have to do everything manually - turn the air cooling on and off, adjust the temperature, strength and direction of the air flow.
This is certainly better than frying in a frying pan, but still not very convenient. You have to constantly be distracted from the controls in order to adjust the climate in the cabin so that everyone is comfortable - or ask passengers to adjust something.
If your Lada Priora car has climate control installed instead of an air conditioner, then, of course, you can be envied. The driver only sets the air temperature with the regulator - the climate control system does the rest. It monitors the current thermometer readings in the cabin and, in accordance with this, changes the ratio of hot and cold air flows, as well as the strength of the flows supplied to the cabin.
Climate control on Priora can be two-, three-, or even four-zone. In this case, the driver and passengers can each set the temperature in their own part of the cabin, independently of each other (or with a certain maximum difference).
Such systems, however, are not always effective - it depends, first of all, on whether the manufacturer has saved on the number of fans, air tunnels and other parts of the climate system.
As for the main malfunctions, everything is quite interesting. An ordinary air conditioner is a fairly simple thing; repair and maintenance are not particularly difficult (among the main faults are rupture of tubes, breakdown of the compressor and evaporator, insufficient level of freon in the system).
Climate control on the Lada Priora is a much more complex device, and therefore mechanics have to rack their brains over its malfunctions much more.
On a Lada Priora car, the climate control is single-zone, but still, it includes, in addition to the usual components of the air conditioner, many control modules (especially an expensive part), sensors, sensors, cables, electric motors, resistors, printed circuit boards and other things. When replaced, these parts can cost a pretty penny!