Greetings to all! The post is being updated; I will add more as interesting links appear.
Everything is the same (except for the YouTube video), but in one place
Thank you for your help in filling out the entry: gosharik73 nlck
In this post I have collected links to interesting and useful materials for owners of this car and simply interested people. Because The car is new, I think it will be interesting. I don't consider reviews, because... as a rule, they are all the same in almost everything and do not provide useful information for car owners.
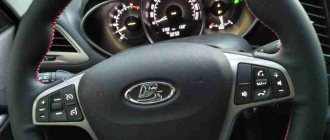
Video instructions for activating and deactivating auto-locking doors
Backlight operation algorithm
About head lighting DRL, Dimensions, Low and high beam
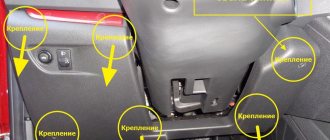
Rear door disassembly
Lada Vesta, like any other modern car, is “stuffed” with electronics. The OBD diagnostic connector is needed to check all these systems. Almost any Lada Vesta component has either an electronic control or a drive. Especially important are the connections between the electronic control unit and the internal combustion engine sensors. The problem in these connections, as well as the incorrect operation of the circuit components, can rarely be detected with the naked eye, mechanically. To do this, you need special devices that connect to the Vesta diagnostic connector. They quickly and specifically recognize the error. Electronics in a car is progress, but it is also a bait for thieves - protection against theft of the connector will not be an unnecessary plus for the car. Read the article and find out about the OBD connectors: where they are located and what to do with them!
Diagnostic adapters
Recently, diagnostic adapters that transmit information via Bluetooth to the phone have become widespread among car owners, as well as professionals. It can be used to read and erase error codes. The OBD-II V1.5 adapter is suitable for the Lada Vesta (the first part of the name is the type, the second is the version). The advantage of such a scanner is its low price, the disadvantage is that it is only suitable for a specific brand of car. However, for the owners of the Lada Vesta, the minus does not matter, but the pluses make you think - maybe they can buy it after all.
How to launch the scanner program
Select “connect” and select our device. Reports that the firmware version is 2.1. As you can see, no parameters are displayed on the screen. Turn off the ignition, remove the diagnostic adapter from the connector and insert the adapter with firmware version 1.5. On the phone, we break the pairing with the previous adapter.
You can start the car to see the displayed parameters clearly. Looking for a new adapter. The adapter appears, enter the standard password 1234. After that, go to the main screen and open the OpenDiag Mobile program. Select the “connect” item.
The connection did not occur because the program is trying to connect to the previous adapter. Click again, connection is in progress. There is a connection to the car unit. The following items appeared: engine errors, the check light on the car does not light up. Information about the car, firmware, immobilizer data is also available.
What is a diagnostic connector?
This is a plastic 16-pin trapezoidal OBD-II type input. Below is a diagram for its sixteen pins:
2 - J1850 (Bus+); 4 - Body grounding; 5 - Alarm grounding; 6 - J-2284 (CAN-High Line); 7 - ISO 9141-2 and ISO/DIS 14230-4 (“K” diagnostic line); 9 - SCS (Output of self-diagnosis codes); 12 - Program output; 13 — Input/output for controlling VTM-4 and immobilizer; 14 - J-2284 (CAN-Low Line); 15 - ISO 9141-2 and ISO/DIS 14230-4 (“L” diagnostic line); 16 - 12 volt power supply from battery.
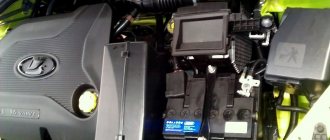
Protection of the Lada Vesta engine control unit
Despite the alarm system and central locking, the vehicle is stolen. It is enough to hack the hood locking device and replace the Lada's electronic engine control unit with the attackers' ECU, which operates from a different immobilizer.
You can protect your car from theft. It is necessary to block access to the ECU, to make sure that the unit is not easy to remove. There are manufacturers who develop protection for engine control units, and it is also possible for a turner to make the protection individually.
Protection for the Lada Vesta ECU looks like a metal case 3 mm thick. The assembly is placed in such a container made of cold sheet steel, and is attached to the body with studs and shear nuts. The advantages of the modification are that hijackers will have to cut the metal to remove the device (they are unlikely to do this). Cons: if you install it yourself, there is a risk of breaking the studs; to repair the “brains”, you will have to go to the protection installers.
Features of a protective safe
If you decide to buy ECU protection in our store, you can get the following benefits:
- Closing access to the control device and the connectors connected to it.
- Blocking access to the control unit.
- The case is mounted on standard fasteners in the vehicle body, after which the shear bolts are closed. Retaining elements can be made of different materials depending on the manufacturer, but are usually high-strength steel. After installing the safe and tightening the bolts, the heads of the latter are torn off, resulting in a flat surface. This installation principle prevents drilling.
- After making the case, all seams are welded, and the safe itself is primed and painted. Upon completion of installation, some devices are covered with special materials to hide the seams and joints.
- Some manufacturers use special bolts with thermal and chemical treatment of steel. Thanks to this, the possibility of drilling them out using a drill is eliminated.
ECU protection by this method can be supplemented by an electronic component that provides additional software blocking of the control unit. With its help, even after opening the safe and replacing the control module with a “donor” one, it will not be possible to start the engine.
To buy protection for the electronic engine control unit, add the product to your cart and submit your request. You can also contact directly the manager of the Pandora-Alarm company and place an order, consulting with a specialist on questions of interest regarding cost and choice.
Article rating:
Replacing the Lada Vesta ECU Link to main publication
Related publications
- VAZ 2109 stalls when starting off
Blocking the diagnostic connector
You can mislead hijackers in other ways. Here are some examples of blocking access to a contact:
- reworking the input from a sixteen-pin one to another (minus - it will complicate the work of service engineers);
- removal of OBD - input to another place (questions regarding warranty service may arise);
- installing a blocking relay on the path from the connector to the control unit (self-installation may lead to a short circuit).
All these modifications create difficulties - maybe you can park your car in a guarded parking lot and not have to worry?
The diagnostic connector is a necessary, useful device, without which a modern car cannot be imagined. On the other hand, this is a vulnerable spot, a “tidbit” for car thieves. There are solutions to this problem. Use one of them and sleep peacefully.
Where is the diagnostic connector for Lada Granta (diagram)
Thanks to the diagnostic connector, you can determine many parameters and display them on the on-board computer screen. In addition to the on-board computer, you can also exchange data with a smartphone using a Bluetooth adapter. A special application will also allow you to view some information.
Why do you need a diagnostic connector?
Every time the vehicle undergoes a technical inspection, the data is updated. If any breakdown occurs, it is likely that it will be much easier to fix it by receiving data about the condition of the car during maintenance by connecting to the diagnostic connector.
Diagnostics of this type is not a panacea for a breakdown: with its help, the average car owner is unlikely to determine the exact cause of the malfunction. The fact is that information can be displayed with serious deviations. Therefore, only a professional is able to determine the cause of the malfunction, based only on the data received from the diagnostic connector. However, sometimes, if the problem is obvious, this information can help any car owner - too large a deviation of the parameters from the norm excludes the possibility that the problem is an error.
Thus, the data will help determine the cause of the breakdown.
Where is the diagnostic connector located in the Lada Granta?
To find the diagnostic connector in Grant, you should look under the front passenger seat. In the place where the passenger's feet should be, there is a small space above which the glove compartment is located. On the left wall of this recess you will find a ventilation grille through which air is blown when the stove is on. Directly above this grille is the diagnostic connector.
To get to it and establish a connection, you will have to unscrew several bolts from the plug. The connector is quite large and has a distinctive appearance, so you are unlikely to miss it.
It is recommended to be careful when connecting the adapter to the diagnostic connector of the Lada Granta. The fact is that the location of the connector is not very convenient. Because of this, when the adapter is turned on, there is always a risk that a passenger will touch it with his foot. In principle, the adapter itself is held in the connector quite firmly. However, if a passenger hits it hard (and this most often happens completely by accident), he will easily break both the connector and the adapter. The simplest solution would be to either warn the passenger not to move their legs too actively (which does not always help), or not to ride with the adapter installed in the connector. Some car owners solve this problem radically - car service centers ask them to move the connector to another, safer and more convenient place. However, this will cost a decent amount.
How to use the diagnostic connector
The diagnostic connector allows you to read various information from the internal memory of the vehicle computer. With its help, a specialist can carry out diagnostics by examining error codes. In addition, data from sensors that display engine operation is also received through the diagnostic connector.
To use the connector, you need special equipment. The most common adapter is called ELM 327. It is small in size, easily connects to the connector, and then transmits data from the car’s memory via the Bluetooth interface. Using various programs, you can view the main parameters even from a smartphone (for example, using the Torque program).
This connector also includes an on-board computer and a scanner. With their help, error codes and various vehicle parameters are read. If during the diagnostics you have received error codes for some parameters, you should contact a specialist. The documentation should describe what exactly this error means.
Early Grant models did not have an engine temperature indicator on the dashboard. Therefore, the diagnostic connector was often used precisely to monitor this particular indicator. In general, it is most often used to display various engine parameters in digital form. Given the complexity of diagnostics, few car owners take it seriously.
Sometimes diagnostic connectors are used by car thieves. The fact is that the circuit provides a contact for monitoring the immobilizer. However, this method is used extremely rarely. If you still want to protect yourself from it, you should purchase a special circuit that distributes contacts differently. In this case, the hijacker will not be able to disable the protection.
Why do you need an ecu unit?
The electronic control unit is the electronic brain of any car. The ECU unit receives and analyzes information from all sensors available in the car: indicators of engine temperature in operating condition, air temperature, travel speed sensor, brake system activity sensor, steering. In essence, the ECU unit organizes and monitors the operation of all vehicle systems. Using the device, the process of air exchange in the car is regulated, maintaining a certain temperature regime, the process of fuel supply/consumption, the content of exhaust gases, and the functioning of the transmission. Having gained access to it, car thieves easily start the engine and steal the car. This method of theft is common. That is why take care of the safety of your car. It won't require a lot of money. If the owner does not have the skills to work with the computer, it would be advisable to contact a service center to ensure protection.
From December 26, 2020 Scanner tester DST-14T-KF, Scanner tester DST-14T/NK1 is sold with complete software developed by NTS LLC since 1994. until December 31, 2016
For users who already own DST-14T(14), a software update is provided at a price of 25,000 rubles. up to 45,000 rub. depending on the software you are using.
The following 2020 update modules are sold separately:
— UAZ Parktronic ABIX — UAZ Bosch ABS 9.0CE CAN
Description and technical specifications
Automotive diagnostic scanner tester DST-14T supports diagnostics of electronic control systems of VAZ vehicles (including Lada Granta, Lada Largus), GAZ, UAZ, IZH, ZAZ, ZIL, PAZ, MAZ, GM-AVTOVAZ, SeAZ, KAMAZ, VAG group (Audi, VW, Skoda, Seat), Daewoo/Chevrolet, Kia, Opel, Renault, Peugeot, Fiat, Citroen, Hyundai, Ford, BAW, Great Wall, Chery, Mazda, Toyota/Lexus, Nissan, Mitsubishi, Nissan/Infiniti , Honda, Foton, Ssang Yong, Hafei, Geely, Samand, as well as HDV commercial vehicles (trucks), including vehicles with CUMMINS engines (OBD-II SAE J1939). DST-14T also allows you to reprogram a number of ECUs.
DST-14T is recommended by AvtoVAZ as a dealer scanner for a number of VAZ vehicles.
Diagnostics of LADA VESTA cars using NTS devices. From November 17, 2015 NTS began selling update modules for LADA VESTA diagnostics for DST-14T, DST-14 tester scanners. Please note that AVTOVAZ has decided to diagnose the LADA VESTA car with special Western-made equipment, which will be supplied only to a limited number of dealer stations. DST-14 will not be a dealer device for LADA VESTA, XRAY, LARGUS cars. We have officially received all the information on diagnostics of LADA VESTA, developed software for diagnostic equipment, which was tested by AVTOVAZ specialists before making a decision on other specialized equipment, this software is relevant at the current time. Please note that production engineering services use our equipment with this software on the assembly line to diagnose LADA VESTA cars. The software for LADA VESTA is relevant for currently produced cars. NTS will monitor potential changes to keep diagnostic functionality up to date, although it cannot fully guarantee that all future changes will be implemented. Reprogramming functions for LADA VESTA will not be supported by the software.
What can be connected to the connector
This connector is mainly used for connecting diagnostic devices, as its name suggests. Among other things, the well-known Chinese OBD adapters ELM 327 are connected to it. However, there are other home-made and newly emerging devices that can also be connected to the diagnostic connector.
For example, the Lada Kalina has the same connector, and a separate button with a glowing indicator is connected to it. It shows the engine temperature, since standard instruments do not have such an indicator. In addition, even an entire diagnostic computer is built into such buttons, with many capabilities and functions. But on the Lada Vesta, of course, there are readings of the coolant temperature. And you can’t compare Vesta with Kalina.
Description and technical specifications
Since March 2014 Instead of the DST-14 scanner-tester, its new modification DST-14T is being produced.
DST-14T differs only in the housing and the location of the connectors; the software and functionality have not changed. The diagnostic connector is now located at the bottom, the USB connector at the top.
Software support for the previous DST-14 model is retained in full; all software is suitable for both DST-14 and DST-14T.
The discontinued DST-14 differs from the DST-14T only in its housing and the location of the connectors, software and functionality have not changed.
DST-14 software support remains in full; all software is suitable for both DST-14 and DST-14T.
DST-14 is recommended by AvtoVAZ as a dealer scanner for VAZ cars.
Software. Updating the software of the scanner tester DST-14.
DST-14 software support remains in full; all software is suitable for both DST-14 and DST-14T.
The latest versions of software modules are on the NTS website. On our website you can view the detailed composition and download the software modules of the DST-14 tester scanner.
Procedure for updating the software: Software modules are stored in the Program Files folder of the tester scanner and have the corresponding extensions: diagnostic .d14 and system .sys Updating the DST-14 can be done at dealers or independently. Software updates are performed via USB using a standard USB cable. To update the software, you will need a scanner tester DST-14 , a standard USB cable and a power supply (from the main package), a computer with a USB 2.0 port, an Internet connection and basic skills in working with a computer, programs and files. The DstManager program allows you to automatically check for updates for DST-14, download modules from the website, unpack from the archive and install them into a tester scanner. To operate the program, you need Internet access and a computer connection to the DST-14. If, when you start the DstManager program, there are no modules marked with arrows in the list, this means that the latest versions of the modules are currently installed in your DST-14. From January 20, 2020, the sales policy for update modules for DST scanner-testers has changed due to the situation on the sales market. Scanner-testers DST-14T are sold with the “all inclusive” option until 2020 (until December 31, 2014). All DST update modules released in 2020, 2020 and later will be sold separately. Updates to fix errors in already purchased software are available to users free of charge.
When purchasing a new update module, the user is sent an activation key. Software modules already authorized by the activation key will work indefinitely. As development progresses, new software modules are posted on the NTS website.
Contents of delivery
The delivery set includes DST-14, passport, consumer packaging and documentation on CD.
Add. cables (supplied separately)
For DST-14 you can purchase the same additional cables as for DST-14T.
Specifications
The scanner is suitable for Vesta
If you have a domestic-made car, then you should choose firmware version 1.5, because the adapter with firmware 2.1 does not work with the OpenDiag Mobile program, which is designed specifically for diagnosing domestic cars. In firmware version 2.1, some protocols are processed incorrectly.
If the adapter has firmware 1.5, then it will work with foreign cars after 1996 that support the OBD-2 standard, and with domestic cars through the OpenDiag Mobile program. Machines after 2008-2009 work reliably on an adapter with firmware 2.1.
Before 2008-2009, it happens that if a car uses a non-standard diagnostic protocol, then 2.1 may not connect to your car. Therefore, if you have a car from 1998, then it is better to choose an adapter with firmware version 1.5.
First, let's connect the adapter with firmware version 2.1. To do this, insert it into the diagnostic connector of the Lada Vesta and turn on the ignition of the car. Go to settings on your smartphone. Select Bluetooth, turn on the search for a new device, click on the found device.