Brakes are, of course, considered the key to the safety of both the car and the driver. The behavior of the car not only in the usual mode of travel, but also in unforeseen emergency situations, when the life and health of passengers and the driver is in danger, depends on the state they are in now. I will tell you further what is the correct procedure for bleeding the brakes. First of all, I believe that the brake system of a car should always be kept in good condition at all times. In addition to replacing pads, turning discs and servicing components in the system, it is imperative to periodically pump it.
When should you pump?
First, let's look at the instruction manual. The manufacturer's recommendation is presented there. So, brake fluid needs to be replaced every two years or after a mileage of fifty to sixty thousand kilometers. This is a constant. It is this replacement as planned that is the reason for subsequent bleeding of the brakes. This is if planned. But do not underestimate unplanned cases when:
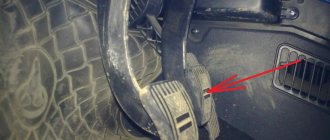
- The behavior of the braking system changes. This can be caused by a variety of reasons. For example, if it is depressurized, that is, air gets into it. A plug of air in the tubes makes it impossible for the pressure to actuate the pads and exert an impact on the working brake cylinders. But the reasons are not that important. The only important thing is that we noticed a “softness” of the brake pedal or an increase in the working stroke.
- Repair work was carried out, of any kind, with the brake system: its complete tuning, replacement of pads, repair or maintenance of brake cylinders and discs, and much more.
In order not to bother yourself with all this, you can simply contact a special service. There, for the express procedure, they use a special device, which is available at every car service center that respects the client. But this, of course, costs money. But I don’t look for easy ways, so I do all the work to maintain my car in working condition myself. So, before directly discussing the technology of how to properly bleed the brakes, I would like to draw your attention to some trouble. It can occur when everything is done according to the example, but for some reason it doesn’t work out.
It is necessary to carefully study the manual for a specific car model. When the general principle of the sequence and order of actions performed is known, you may not know about the individual design features of the braking system of a particular car.
What you need to know before starting work
Before you begin the renovation, you need to know a few things that will come in handy during the process. It is very important to know how to properly bleed the brakes on a passenger car. Please note that it is necessary to use fluid exclusively from the manufacturer and brand that was previously in the system. If you recently purchased a car and for this reason do not know what fluid was in the tank, you must resort to the car manufacturer's recommendations. There is a high probability that the previous owner also paid attention to these recommendations. You will also need a partner to help you bleed the brakes. Its function will be to press the brake pedal in a timely manner, thereby creating pressure in the brake system.
In this article you will learn how to bleed the brakes on a VAZ and any other car. It doesn’t matter at all who the car manufacturer is; the design of the brake system is the same for everyone. If you are only changing the fluid, then it is advisable to carefully inspect the elements of the system and make sure that there are no leaks anywhere. Pay special attention to rubber tubes, which tend to crack and, naturally, fail. In these places, brake fluid leaks and depressurization occurs, which can lead to an emergency. If it is installed on your car, you must completely disable it. To do this, you need to open the fuse box. Then find the fuse in it, which is responsible for powering the ABS. Typically it is rated at 30 or 40 amps. And now about how to pump the brakes alone, without resorting to the services of a service station.
Procedure for bleeding the brakes
What can reduce the performance properties of brake fluid over time? Of course, temperature changes, dust, dirt, pressure in the system. At the same time, I advise replacing fluid in the system to always be accompanied by pumping. Let me remind you that bleeding of the system is regulated by the manufacturer. I would like to note that pumping up alone is quite difficult and very inconvenient. The procedure takes a lot of time. Therefore, first I advise you to find a partner. What is pumping? First of all, this is the removal of air from hoses, pipelines, and working cavities in the brake system. Due to the fact that the working brake cylinders are the end points in the working circuits, the air bleed fittings are located on the wheels.
And now I will give detailed instructions for similar work with a partner.
- Fill the container with brake fluid slightly above the specified level.
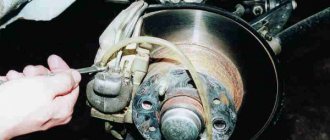
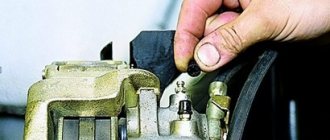
- We clean the fitting for bleeding the brakes near all wheels from dirt.
- Prepare a small container in advance and pour a little brake fluid into it.
- Connect the hose (you can also use the pumping hose as a hose) to the fitting. As for its second end, we place it in a container with liquid.
- Now why do you need a partner? The partner must pump the pedal intensively 5-6 times, press it and hold it until I stop it.
- The brake bleeder screw is slightly unscrewed. The liquid that comes out will indicate whether there is air there. If bubbles appear in the container where the end of the hose was previously lowered, then there is air in the system. As soon as the pedal touches the floor and your partner reports this, the fitting must be tightened.
- We repeat these steps. Again you need to pump the pedal and bleed the air. This must be done until the air bubbles disappear completely.
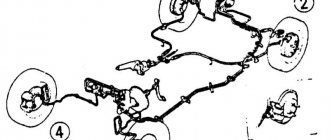
We perform all these actions with all wheels one by one in the order of a certain pattern. Scheme for bleeding the brakes of a passenger car: first the rear right wheel, then the rear left, after that the front right wheel and then the front left.
How do I level up if I'm alone, without a partner? First of all, I need to get a brake bleeder. Its role will be played by an improvised traveling kit for bleeding the brakes: a syringe, a brake fluid reservoir cap, and a container. I seal the syringe into the reservoir cap using ordinary sealant, then screw this device onto the brake reservoir, having first collected a certain amount of brake fluid into the syringe. I unscrew the fitting at the outlet of the circuit that needs to be pumped. I install a container into which the leaking brake fluid will be collected. I inject it with a syringe.
It is worth dwelling on one more method of pumping brakes without an assistant. As a device for bleeding the brakes, I take a block or any other stop. I top up the brake reservoir, pump the pedal several times, and hold it pressed. Then I carry out the standard procedure: I unscrew the fitting, wait until the flow of brake fluid becomes weak and uniform. I tighten the fitting that was needed to bleed it. I release the pedal and repeat the actions. After sequentially performing all the procedures described above, I add brake fluid. That's all.
I hope my tips based on personal experience will help you, just be sure to choose the right brake bleeding kit.
How to bleed a brake with a broken fitting
Many car owners have encountered problems with pumping brakes. In this article I will tell you how to bleed a brake with a broken fitting.
To bleed the brakes you need: a container (preferably transparent), a rubber or plastic hose (preferably transparent) and brake fluid. In addition, we need another homo sapiens who will press the brake pedal and make sure that all the fluid does not leak out of the head brake cylinder.
Usually, to bleed the brakes, you need to pour a little water into a jar. Then attach a hose or tube to the bleeder fitting located on the brake cylinder or caliper. Place the other end of the hose or tube into a jar of brake fluid. One person presses the brake pedal a couple of times. When the brake pedal begins to be pressed with force, the person presses the pedal and keeps it pressed. Another person opens the bleeder fitting by unscrewing it a little with a wrench. There are air bubbles in the jar. When the pedal is pressed all the way, the fitting is closed and the function is repeated. After several such cycles, no air is observed in the can, and the brake pedal begins to be pressed with force (not to fall through).
Features of unscrewing a rusted tube
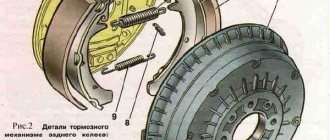
Parts of the brake system (TS), except for “consumables”, last quite a long time, mainly the pads and, if necessary, discs are changed on the car. Connections of brake pipes (TT), cylinders, hoses “sour” over time for a number of reasons:
- Dirt, salt, and moisture enter the parts located at the bottom of the car from the road;
- the temperature difference influences - when the pads interact with the drums/discs, heating occurs, when water or snow “porridge” gets in, a sharp cooling occurs;
- nuts, fittings, bolts are not loosened for a long time, a kind of sticking occurs.
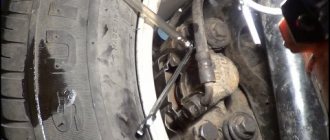
Unscrewing a stuck TT from the working cylinder after a long mileage (say, after 100 thousand km) is problematic if you don’t know how to do it correctly, because many people pick up a regular open-end wrench. As a rule, the key immediately slips through the fitting, the edges roll up, and then difficulties arise in disconnecting the CT, and you have to contact specialists.
Basic rules for unscrewing the tube:
- You only need to use a special split wrench with a fixing bolt;
- Before you start unscrewing, it is necessary to thoroughly clean the parts of the connection from dirt;
- before starting work, you should treat with WD-40, wait 5-10 minutes for the “Vedashka” to eat away the rust;
- In some cases, it is not harmful to unscrew the brake bleeder fitting, as it will get in the way, and it can also be accidentally broken.
Using a special wrench is quite simple: twist the clamping bolt, place the wrench on the fitting, tighten and clamp the bolt so that the hexagon is tightly grasped, without any play. After this, we begin unscrewing, but we cannot use much force, as the tube may break off.
In a car service center, they often use a gas cutter and heat the joint. But here you need to heat it extremely carefully; it is possible that the cylinder cuffs will be damaged.
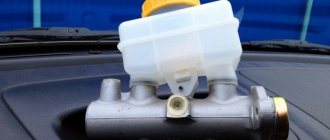
↑ Removing and installing the main brake cylinder
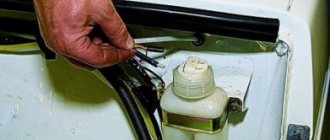
- Disconnect the flexible hoses from the master cylinder and cover the hose openings and fittings on the cylinder to prevent fluid from leaking from the reservoir and preventing dust and dirt from entering the cylinder.
- Disconnect the steel pipes from the master cylinder that drain fluid to the wheel cylinders of the front and rear brakes, first unscrewing the pipe nuts.
- Remove the cylinder by unscrewing the nuts securing it to the vacuum booster.
Install the master cylinder in the reverse order of removal. After installing the cylinder, bleed the brake system to remove air from it.