A voltmeter in a car is a rather rare feature. This probably happens because the average motorist is unlikely to often think about voltage, which cannot be said about those who like to keep everything under control... Installing a voltmeter in the car yourself will help you always be aware of the “volts”!
Which voltmeter to choose?
It is extremely difficult to find a car voltmeter, and even a decent looking one, in stores. This happens because such equipment is installed from the factory in literally single cars. If we discard the tuned instruments, then in reality you can only find voltmeters from the VAZ-2107 and UAZ.
The voltmeter from the VAZ “Seven” does not have a housing and this is a huge minus. According to the “statement”, it is attached to the dashboard and “naked” consists of unprotected windings on a small frame and an arrow made of soft metal...
The UAZ voltmeter is a full-fledged device in a sturdy case. The only real negative is the appearance. It is, as befits this car, extremely unpretentious, even military.
The design and quality of the voltmeters considered are unlikely to be suitable for beautiful tuning. Therefore, for those who not only add functionality to their car, but also take into account the interior design of the car, it is better to look for a specialized tuned device.
Connecting a voltmeter to a car
Ideally, the voltmeter should be connected to the positive terminal of the battery - then it will show the most accurate charging voltage. It is required to conduct a wire from the terminal into the interior to the place where the device will be installed. Before starting work, you need to disconnect the battery, take a wire with a cross-section of about 0.5 mm and stretch it into the cabin along the standard wiring harness. It is quite possible that for this you will have to disassemble some of the casing and run wires under the dashboard.
The voltmeter should only work when the ignition is on. When connected directly to the battery terminal, it will be constantly on. You can get around this problem using a conventional electromechanical relay, which is used in abundance in any car.
You can read in detail about how a relay works in a car and how to connect through a relay by following the links. Installing a voltmeter in a car follows the same scheme, namely:
— The wire going from the battery to the device is “power” in this case. A relay is installed in its gap, which, when turned off, opens this wire, turning off the voltmeter.
— We take the voltage to the “positive” control contact of the relay from the place where it appears when the ignition is turned on. It could be anything - a mounting block, ignition switch wires, and so on.
— We connect the “minus” of the voltmeter and the second control contact of the relay to “ground”, that is, we screw it to the body with a standard “bolt” terminal.
Now, when you turn on the ignition, the installed relay will operate, connect the voltmeter, and it, in turn, will show the number of volts in the on-board network.
Read more: Spare parts for MTZ on Avito Bashkiria
Voltmeter protection and backlight
At this point, installing a voltmeter in a car may be completed, but ideally two more steps need to be performed - one for safety, and the second for comfort.
To protect the voltmeter's power circuit from a short circuit, it is necessary to install a fuse on the wire coming from the battery. This is very simple to do, just cut this wire in a suitable place, crimp two female terminals on it and put them on the terminals of the fuse. Its rating should be small, for example, 5A (More details about fuse ratings are here). It is better to wrap the terminals, and for reliability, the fuse itself, with electrical tape.
And finally, the final step is to illuminate the voltmeter. All devices that are placed in the housing must have it. It is necessary to extend the wire to the backlight contact from where the voltage appears when the side lights are turned on. The “minus” of the backlight, as a rule, is combined with the common negative terminal of the device, and in our case it is already connected to the car body.
Thus, by running just one additional wire, we will get not only a working voltmeter, but also illumination of its scale.
PS You need to connect a voltmeter to the battery terminal so that it shows the most accurate voltage. If special accuracy is not required, you can connect the device to any wire in the car interior, on which voltage appears when the ignition is turned on. This is much simpler and faster, does not require the installation of a relay and fuse, since the electrical circuit is protected by default.
With this connection, the voltmeter readings will be slightly lower than in the method discussed in detail above, because on the way from the battery to the passenger compartment, the voltage may decrease due to the large number of different contacts and the resistance on them.
You can download convenient instructions for connecting a voltmeter on an A4 sheet. Print it out and take it with you. File size 1.5 MB, jpg format.
Hi all. Replacing the standard UAZ ammeter with a digital voltmeter. Briefly about production: 1. Analysis of the old voltmeter. 2. Cleaning the glass and polishing the iron frame. 3. Making a plate for the display itself with a frame and painting. 4. Assembly.
Features of the device
How to make an electronic LED voltmeter-thermometer on a microcontroller for a car from a calculator with your own hands? How to connect a voltmeter with an ammeter in a car to the cigarette lighter? First, let's look at the main features of automotive voltmeters.
Description
The main purpose of the device is to measure the voltage parameter in the automotive network. Analogue and tube devices are equipped with a scale with a pointer indicator, but it is better to install a digital gadget in the car. In such devices, all parameters are displayed. Switch devices are gradually fading into the background; today they are obsolete (video published by the China channel in SHOPe).
Varieties
Voltmeters can be either standard or combined:
- The key feature of standard voltmeters is their fairly small dimensions, which makes it possible to install the device absolutely anywhere in the car’s interior. In practice, such devices are most often connected to the cigarette lighter. With this connection, the voltmeter will be able to record the voltage in the network both when the power unit is running and when it is switched off. In the first case, the operating parameter should be 13.5-14.5 volts, in the second - about 12.5 V.
- Combined devices. Such devices can also be equipped with tachometers, ammeters and even thermometers. Combined voltmeters are considered more functional devices, so they are more in demand on the market.
Selecting a voltmeter model
Digital voltmeter circuit.
The modern market of devices for cars offers a wide selection of voltmeter models. The most popular types of devices are:
- analog “pointer” voltmeters - installed mainly on domestic cars, connecting to the dashboard instead of a clock;
- digital sensors connected to the cigarette lighter socket;
- digital voltmeters mounted in the dashboard.
The last two types of devices are most often used, as they combine a modern appearance, accurate readings and ease of installation.
The measurement results that best correspond to reality are provided by voltmeters connected directly to the dashboard. Although their installation is sometimes fraught with some difficulties, by installing them you can get constant monitoring of the battery condition, which is especially important when there are a large number of connected nodes.
The cost of a digital voltmeter is quite low and ranges from 120-150 rubles if ordered through online stores. It has a standard rectangular shape, thanks to which it will harmoniously fit into the interior of any car. Backlight color - white, yellow, blue, green, red. Sometimes a problem arises with the high brightness of the screen, which acts as a distraction and makes it difficult to concentrate on the road, but this problem can be quickly solved with the help of a tint film.
How to build a homemade voltmeter for a car?
How to build an LED device with your own hands? A detailed guide to developing and connecting this device is presented below; first, we recommend that you find out the description of the circuit.
Scheme
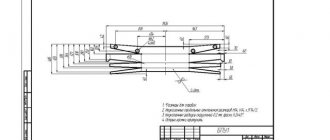
To manufacture a device in accordance with the diagram, you must at least have the skills and experience in constructing such devices. Otherwise, achieving the desired result will not be easy. Alternatively, you can always purchase a ready-made voltmeter at a store that sells electronics for cars. You can see an example of device development on pic16f676 with a circuit in which the measurement limit is 50 volts, this parameter will be sufficient.
A voltage divider is installed on two resistor elements marked R1 and R2, and the purpose of resistor R3 is to calibrate the device. Capacitor element C1 is used to protect the device from impulse noise; this capacitor also smoothes the input signal. In the circuit on pic there is also a device VD1, which is a zener diode, which is used to limit the input voltage parameter, in particular, we are talking about the controller input. This element is very important, because without it, the MK input can simply burn out during voltage surges in the on-board network.
The voltmeter inverting device is assembled on resistor elements R11, R12 and R13; also, for normal operation of the inverter, transistor VT1 is required. The inverter is used to light the dot on the device indicator. An indicator with an anode must be connected to the output of the MK, and it is desirable that the latter has low current consumption (the author of the video is the By garage channel #229).
Connection features
Before you start connecting the device on the controller to the car’s on-board network, you need to understand where the device will be installed in the cabin. Choose any convenient place so that, if necessary, you can always look at the voltmeter display and determine the voltage in the network.
Below we will look at an example of installing a VAZ 2113 car into a dashboard with a connection; the installation process itself looks like this:
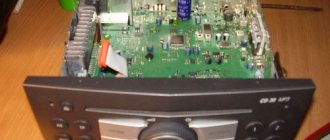
- So, first you need to remove the plastic trim installed on the right side of the control panel, in particular, it is located above the car radio. The cover is fixed using plastic fasteners, so when removing it you should be as careful as possible. If you damage the fasteners, you will have to install new ones.
- Then, using an electric jigsaw, you will need to make a hole in the plug. The dimensions of the hole must correspond to the dimensions of the device display. Be careful, because you need to ensure that the device fits optimally under the hole made.
- The device is mounted on the back side of the plastic cover; first, the device must be secured in the seat using rubber bands. This should only be done at the beginning, since, of course, you won’t be able to drive like this all the time. When the voltmeter is fixed, on the back side the entire resulting space will need to be filled with plumbing sealant. You need to ensure that the board is securely fixed in place. After the sealant has dried and the voltmeter will hold, the rubber bands can be removed.
- To connect the device to the vehicle's electrical network, you can use the output from the computer power supply. Whether this connector will fit or not depends on your device, so if the plug does not fit, you will have to solder the device. Once the connection is complete, replace the plastic plug. You can put a frame around the device screen to improve the appearance of the display. You'll want to ensure that the voltmeter doesn't distract you while you're driving, so if the display brightness is too high, you'll need to lower it. Alternatively, you can darken the display with regular women's varnish or install a piece of tint film on the screen.
- The voltmeter can be powered from a battery or the ignition switch. In the case of a battery, it will always work, but in the second case, only after the ignition is turned on. It should be noted that the second option is more optimal, since you can monitor the voltage readings without draining the battery.
Photo gallery “Installing the device in the center console”
Tags: voltmeter, installation of a voltmeter, connecting a voltmeter, voltmeter VAZ
Comments 55
Hello. Is the voltmeter still alive? My second one has already fallen into disrepair.
It can be from the dimensions, or it can be like mine from the radio control wire
controversial place for installation, in my opinion.
I also installed only three in one and put it in place of the standard clock.
where can I buy one and for how much?
I bought it in a radio store for 200 rubles, from Aliexpress you can order it for 80 rubles
Thank you! screwed up ok!
Good idea! Cool idea. And if you need to mold the balls, then at the very least you can tint them)))
The place is not suitable at all. It just gets in the way.
in fact, it is located in such a way that when driving the steering wheel covers it, it is not noticeable
they are calibrated so you can tighten the regulator on the back to show the voltage on the battery
I didn’t spoil the plastic, but inserted it into the glove box, here it is - www.drive2.ru/l/5273023/
5 for ingenuity! If I didn't have b.c. I would also follow your example!
I agree, everyone does it for themselves)
h.z. I don’t like it to burn too much
I think in a month it will be fucked, in two months it will be removed =)
It’s not bad if you can’t purchase a Gamma instrument panel or on-board vehicle. It’s convenient that it’s always in front of your eyes, but, in my opinion, the brightness of the backlight hurts your eyes (relative to the standard backlighting of the instruments)… I would recommend improving it. Reducing the brightness of the backlight when the dimensions are turned on - this will be a completely complete and convenient device! I press plus. Good luck with your improvements!
To successfully monitor the state of charge of the battery, it is important to know how to connect a voltmeter in the car and how to decipher its readings. Since the advent of cars equipped with an on-board computer, the need for a separate voltmeter has faded into the background, because it does not provide complete monitoring of all electrical components of the car. The relevance of the device is also determined by the need to constantly monitor the battery charge, which is especially important in winter. In the event of a sharp drop in voltmeter readings, it becomes possible to take appropriate countermeasures and avoid unexpected engine shutdown.
A voltmeter is a useful device for cars that do not have an on-board computer. Using it you can monitor the battery charge status.
Connection diagrams and methods
The question often arises of how to connect an ammeter, in series or in parallel. Connecting the device in question into an electrical circuit break is not difficult. For safety reasons, this procedure is performed when the power source is turned off. You need to make sure in advance that the maximum current will not exceed the permissible values of the device.
Such scales are duplicated in the accompanying technical documentation. When the supply voltage is applied, readings are taken. You need to wait until the needle stops oscillating. When it moves in the opposite direction, the polarity of the connection changes. If the current is too high, additional shunting is used.
The connection diagram of the device can be direct or indirect. In the first case, the device is directly connected to the electrical circuit between the power source and the load.
Before connecting the device, you must consider:
- direct or alternating current in the electrical network;
- Is the polarity of the device correct?
- the arrow of the device should be located beyond the middle of the scale;
- limits for measuring the maximum possible current surges in the circuit;
- whether the external environment meets the recommended indicators;
- Is the measurement location free from vibration?
Connecting the device
Direct current can pass through different electrical circuits. As an example, we can cite all kinds of chargers and power supplies. To repair such devices, the technician must have an understanding of how the ammeter is connected to the electrical circuit.
At home, such skills will also not be superfluous. They help a person who is not too keen on radio electronics to determine for himself, for example, the time it takes to charge the battery from a camera.
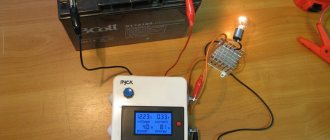
To conduct the experiment, you will need a fully charged battery with a nominal voltage of, for example, 3.5 V. In addition, you need to use a lamp of the same rating to create a series circuit:
- battery;
- ammeter;
- bulb.
The entry that is marked on the measuring device is recorded. For example, a lighting fixture will consume 150 milliamps of electricity, and the battery has a capacity of 1500 milliamp-hours. Therefore, it will work for 10 hours, delivering a current of 150 mA.
DC circuit
The question often arises of how to properly connect an ammeter to a charger. When using a charger, the need arises to measure the current. This will make it possible to control the process of accumulating electricity by the battery, and avoid overcharging and undercharging. As a result, the service life of the battery will increase significantly.
When operating a large number of technical devices, it becomes necessary to control the current strength. The ammeter needles or indicators on the monitor of a discrete device will show the operator such a physical parameter. The measurements taken are needed to maintain the operating condition and to signal the occurrence of an emergency.
Connecting to the charger
Figure - Diagram of direct connection of an ammeter
Figure - Scheme of indirect connection of an ammeter through a shunt and a current transformer
Voltmeter with switch
Another simple and reliable way is to install a measuring device with a built-in switch. Installing such a voltmeter on a motorcycle is extremely simple:
- we fix the device in a convenient and clearly visible place (usually using a clamp on the steering wheel spoke);
- lay the wires from the device to the battery;
- connect them to the battery (red to “+”, black to “–”);
- install a 0.5÷1.0 A fuse in the cut of the red wire (if one is not included in the delivery set);
- We secure the wires with plastic clamps.
This is interesting: Why antifreeze “leaves”
Attention! After you have turned off the engine, be sure to turn off the voltmeter using the switch. During long-term parking, the device can drain the battery quite significantly.
What products are used?
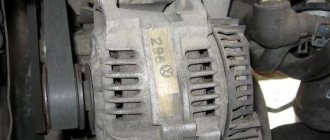
Some time ago, finding and installing such a device was a big problem. Motorists installed ammeters from trucks on their cars, and those drivers who were familiar with radio electronics selected the measuring instruments themselves. The first domestic cars in which the voltmeter took its permanent place on the instrument panel was the VAZ 2105, and a little later they appeared on other models.
Today such a problem does not exist, since there is a large selection of such products in retail chains. You can install an electronic clock in the panel, which simultaneously shows the voltage of the on-board network along with the current time. There are electronic tachometers, which, after pressing the desired button, perform the functions of a voltmeter. Such devices do not cause any particular problems for owners.
Also today, automobile ammeters and voltmeters are available for sale, and individual drivers independently adjust the devices that are used in radio-electronic devices. Installing such indicators is fraught with some difficulties, since it is necessary to select shunts for them, calibrate or manufacture new scales. Therefore, we will not dwell on this.
How to install such indicators?
Let's assume that you managed to purchase an ammeter or voltmeter intended for use in cars; now let's look at the process of installing them. It is worth recalling the features of connecting them to electrical circuits.
How to choose a shunt for an ammeter
To calculate the parameters of the additional circuit, use the formula Rsh=Rin*Ipr/(Iin-Ipr), where:
- Rsh – shunt resistance;
- Rin – internal resistance of the ammeter (given in the data sheet);
- Ipr – maximum current for which the device is designed;
- Iin – input current (source) before circuit branching.
How is an ammeter connected to a circuit with a shunt?
Voltmeter on operational amplifier LM393
This simple automotive voltmeter is built on an LM393 operational amplifier. As an indicator, as in the previous circuit, three LEDs are used.
When the voltage is low (less than 11V), the red LED lights up. If the voltage is normal (12.4…14V), then the light turns green. If the voltage exceeds 14V, the yellow LED lights up. Zener diode VD1 forms the reference voltage. This circuit is similar to the car voltage indicator circuit.
Connecting the ammeter
Let's start with the fact that work can only begin after the battery is disconnected. Significant current flows through this device, so you need to select wires of the appropriate cross-section. It should be connected to the wire gap that supplies power to the ignition switch. Tips should be installed and crimped with pliers on the ends of the wires, otherwise the connection point will heat up due to poor contact.
After installing the wires, check that the connections are correct. To do this, turn on the load, for example, low or high beam. The ammeter should show a discharge; if it shows the opposite value, then the connection wires should be swapped. Next, you should start the engine and make sure that the battery is charging.