Replacing the clutch on Lifan Solano
Problems with clutch can arise both after 15-30 thousand kilometers covered, and with small kilometers.
Sometimes malfunctions occur even in “undriven” cars. Careless handling or natural wear and tear - the reasons are not so important. The main thing is that you can replace the clutch yourself, without contacting a car service. How do you know if the clutch needs replacing?
A common symptom is slippage. For example, when switching from 2nd to 3rd gear, a drop in power may occur with a simultaneous increase in speed and fuel consumption. If this happens, most likely there is something wrong with the driven disk.
Other signs include a noise or dull crackling sound when shifting gears. These sounds are associated with damage to the disc lining or contamination of the hydraulic drive. Incomplete disengagement of the clutch when it “drives” can also indicate a malfunction. In all these cases, it is better not to delay the matter and replace it at the first convenient opportunity, otherwise you will also have to buy a new flywheel. And these are completely different expenses.
Preparing for replacement
To get started you will need:
- Buy a new basket and clutch disc. You can purchase them in the KITZAP online store. This will cost much less (often 2-3 times) than repairs from an official dealer.
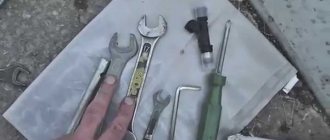
- Prepare tools for work: a set of sockets with extensions and cardans, a hammer, a jack, pliers, a centering device for the clutch disc.
- Set aside 3 to 8 free hours in your schedule. Replacing a clutch is a long process.
- It is advisable to ask a friend for help. It will be difficult for one person to cope.
The clutch replacement process can be divided into 4 conventional stages. Let's look at each of them in detail.
The first stage is work under the hood
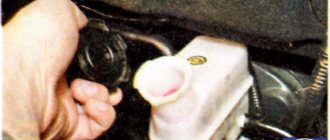
First you need to remove the crankcase protection from below and unscrew the plug on the gearbox (the easiest way to do this is with a 22-mm open-end wrench). Let the oil drain into a clean bowl or large plastic bottle - then it can be refilled.
Then you will need to sequentially remove several more units:
- Battery: disconnect the terminals (first “minus”, then “plus”), unscrew both nuts and remove the battery along with the tray.
- Air filter: loosen the air duct clamp, remove the top cover to the throttle body, and then remove the lower part of the housing.
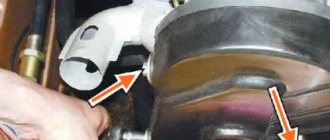
- Absorber (first disconnect both hoses from it).
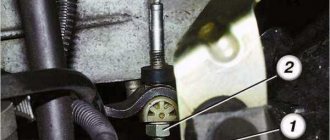
First, disconnect the cables and the working cylinder from the gearbox (it is all held on by 5 bolts), and then the connectors of the reverse, speed and crankshaft position sensors. You need to be careful with the crankshaft sensor: it is installed very close to the thermostat, it is easy to miss and break.
Now it’s time to tackle the “lower level”.
Getting ready to remove the checkpoint
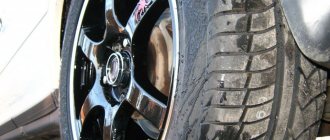
Raise the front of the car on a jack (one or two). It is not advisable to leave the car on a jack; it is better to substitute wooden blocks. Once the machine is in the desired position, remove both wheels and disconnect the ball joints. Now pull out the right wire from the gearbox, while simultaneously pulling back the right hub (this is a difficult number - it’s better not to do it alone). The left wire will have to be knocked out through the socket of the right drive, and also while simultaneously pulling back the left hub.
The starter will be released, which can be removed or moved a little to the side so that it does not interfere with subsequent work. All that remains is to remove the gearbox.
Dismantling the gearbox
Removal is carried out in 3 steps:
- It is imperative to hang the engine using a hoist, although this is a labor-intensive operation.
- Deprive the gearbox and engine of contact points by unscrewing all the supports (they are held on by a total of 6 bolts).
- Remove the box very carefully and smoothly.
When disconnecting the engine, it is better to secure the gearbox with a jack so that it does not fall and be damaged.
Clutch replacement
After much preparatory work, direct access to the clutch finally appears. All that remains is to do what all this was started for:
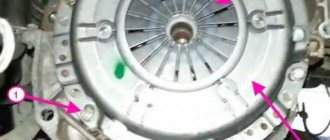
- disconnect the clutch basket from the flywheel (the flywheel itself must be thoroughly cleaned from dirt with a cloth);
- install a new clutch basket with the disc, center the disc and tightly tighten all the previously removed bolts (in that order);
- replace the release bearing on the gearbox shaft, having previously lubricated the shaft;
- put the gearbox back and reassemble everything according to the same scheme, but strictly in the reverse order.
Ready! The job is done, and on the corrected Solano you can hit the road again. Just in case, do not forget to adjust the clutch before doing this so that no annoying interference occurs.
Transmission repair cost:
| Type of repair | Price * |
| Transmission repair | from 5000 rub. |
| Welding the box body | from 1500 rub. |
| Replacing reverse or 5th/6th gear** | from 800 rub. |
| Gear selection mechanism repair | from 2500 rub. |
| Removal/installation of gearbox | from 4500 rub. |
Car transmission repair services in St. Petersburg:
Kupchino - 245-34-84 Citizen - 603-55-05 Bolsheviks -
WhatAapp/Viber: 8-911-766-42-33
* — The cost of repairing a gearbox (gearbox) is indicated without the cost of spare parts. ** — When replacing rear, 5th or 6th gear, where removal of the gearbox is not required
Transmission repair time: - partial repair of the gearbox, if all spare parts are available: 2-4 days. — major overhaul of the box, if all spare parts are available — 4-6 days.
Signs of a gearbox malfunction: - a whine from the gearbox, which disappears or becomes smaller when the clutch pedal is pressed; — difficult gear shifting; — the transmission is knocked out; — do not engage (stick) a certain gear; — extraneous metallic sounds from the box;
Warranty for partial repairs - 3 months. no mileage limitation. Warranty for major repairs - 6 months. no mileage limitation.
Diagnostics during repairs are free with us!
If the car is not drivable, we can send a tow truck.
Addresses in St. Petersburg: Service station on Bolshevikov: st. Voroshilova, house 7, from 10 to 18, t. 8 (812) 701-02-01, Sat, Sun - closed. Service station on Grazhdansky: st. Uchitelskaya, building 23, from 9.30 to 21.00, t. 8 (812) 603-55-05, seven days a week. Service station on Kupchino: st. Dimitrova, building 1, from 10 to 20.00, t. 8 (812) 245-34-84, seven days a week.
- your phone number
The Lifan Solano has had its manual transmission repaired. The owner complained that the 3rd gear was stuck. Troubleshooting showed that the problem was wear of the gear shift fork and destruction of the bearing. A possible cause of the malfunction was the use of low-quality oil and its untimely replacement. Thickening and a decrease in the oil level led to the destruction of the bearing, fragments of which damaged the fork.
Repairing a manual transmission on this car is a task of average complexity. It is only necessary to remove the gearbox itself, without dismantling other components and assemblies.
Did you like the article? add it to your bookmarks so as not to lose it - PRESS “Ctrl + D”
Replacing the clutch on Lifan Solano
The modern automobile market is developing rapidly and the Lifan Solano car, which appeared not so long ago in the CIS countries, has managed to win the trust of many drivers. This is due to the low cost, ease of operation and maintenance of the car, as well as its safety and attractive appearance.
Of course, this is not an elite vehicle and it is designed for “ordinary” people, so drivers, as a rule, carry out identification and elimination of all problems and carry out repair work themselves.
Problems with the clutch can occur both in well-used cars that have covered more than one thousand kilometers, and in almost brand new cars. To determine what exactly is broken or is not functioning correctly, you should know the “symptoms” of a faulty clutch. By the way, not always, if the car’s gears do not engage, it is the fault; read more in the material: Why the gears on the Lifan Solano do not engage.
Signs and causes of a faulty clutch
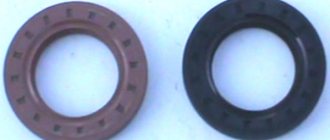
This is what a new clutch disc looks like
The main causes of failure of clutch structural elements are:
- Careless behavior of the driver when operating the vehicle - pressing the clutch while the vehicle is moving, etc.
- Of course, you may end up with an “unsuccessful” car with a obviously low-quality part, non-original components, etc.
- All things have their own service life and parts can simply wear out, this especially applies to the driven disk - with careful driving, it becomes unusable after 100 thousand kilometers, but for lovers of “high speeds” even faster.
- Due to wear or damage to the integrity of the gearbox or engine oil seals, oiling of the fractional lining of the driven disk may occur.
Signs of clutch problems most likely include:
- When incomplete shutdown is observed, they say “the car is driving,” and difficulties arise at the moment of shifting gears with the engine running, accompanied by crackling, humming, and noise. This may indicate possible damage to the driven disk lining, contamination or depressurization of the hydraulic drive, etc.
- When the clutch “slips,” that is, poor vehicle dynamics are observed, fuel consumption increases sharply, the engine overheats, etc. This “behavior” is typical when oiling, damage to the integrity or wear of the driven disk, breakdown of the working cylinder, etc.
Replacement process
It must be said right away that this is a difficult and time-consuming process, so if the need for replacement arises, you should prepare all the necessary tools in advance - for the work to be fast and productive, everything should be “at hand”.
Working "under the hood".
- First, you need to remove the protection from the bottom of the engine compartment (engine crankcase), and, opening the drain cover with a key, drain all the oil. If it is subsequently used again, it must be placed in a clean container (can be in a 2.5–3 liter jar, since the total amount of oil is 2.1 liters).
- As stated earlier, replacement is a long process and there is not a moment to waste. So, while the oil is drained, you can begin other manipulations - removing the battery and its platform. In this case, the terminals are disconnected from the battery in the order: “minus”, then “plus”.
- Afterwards, the air filter is removed and its top cover is removed along with the pipe up to the throttle valve. To do this, you need to loosen the clamp on the throttle body pipe and quickly disconnect the pipe, then unscrew the 3 bolts that secure the lower part of the air filter. Note: To prevent dirt and dust from getting into the throttle assembly, it must be covered with a clean piece of cloth.
- Now you need to disconnect the two hoses connected to the absorber and remove the absorber from the bracket (with a sharp upward movement).
- The cables are separated from the gearbox and moved to the side, and the same is done with the working cylinder.
- All existing crankshaft position, speed and reverse sensor connectors are disconnected.
Replacing the clutch on Lifan Solano
Problems with clutch can arise both after 15-30 thousand kilometers covered, and with small kilometers. Sometimes malfunctions occur even in “undriven” cars. Careless handling or natural wear and tear - the reasons are not so important. The main thing is that you can replace the clutch yourself, without contacting a car service.
How do you know if the clutch needs replacing?
A common symptom is slippage. For example, when switching from 2nd to 3rd gear, a drop in power may occur with a simultaneous increase in speed and fuel consumption. If this happens, most likely there is something wrong with the driven disk.
Other signs include a noise or dull crackling sound when shifting gears. These sounds are associated with damage to the disc lining or contamination of the hydraulic drive. Incomplete disengagement of the clutch when it “drives” can also indicate a malfunction. In all these cases, it is better not to delay the matter and replace it at the first convenient opportunity, otherwise you will also have to buy a new flywheel. And these are completely different expenses.
Preparing for replacement
To get started you will need:
- Buy a new basket and clutch disc. You can purchase them in the KITZAP online store. This will cost much less (often 2-3 times) than repairs from an official dealer.
- Prepare tools for work: a set of sockets with extensions and cardans, a hammer, a jack, pliers, a centering device for the clutch disc.
- Set aside 3 to 8 free hours in your schedule. Replacing a clutch is a long process.
- It is advisable to ask a friend for help. It will be difficult for one person to cope.
The clutch replacement process can be divided into 4 conventional stages. Let's look at each of them in detail.
The first stage is work under the hood
First you need to remove the crankcase protection from below and unscrew the plug on the gearbox (the easiest way to do this is with a 22-mm open-end wrench). Let the oil drain into a clean bowl or large plastic bottle - then it can be refilled.
Then you will need to sequentially remove several more units:
- Battery: disconnect the terminals (first “minus”, then “plus”), unscrew both nuts and remove the battery along with the tray.
- Air filter: loosen the air duct clamp, remove the top cover to the throttle body, and then remove the lower part of the housing.
- Absorber (first disconnect both hoses from it).
First, disconnect the cables and the working cylinder from the gearbox (it is all held on by 5 bolts), and then the connectors of the reverse, speed and crankshaft position sensors. You need to be careful with the crankshaft sensor: it is installed very close to the thermostat, it is easy to miss and break.
Now it’s time to tackle the “lower level”.
Getting ready to remove the checkpoint
Raise the front of the car on a jack (one or two). It is not advisable to leave the car on a jack; it is better to substitute wooden blocks. Once the machine is in the desired position, remove both wheels and disconnect the ball joints. Now pull out the right wire from the gearbox, while simultaneously pulling back the right hub (this is a difficult number - it’s better not to do it alone). The left wire will have to be knocked out through the socket of the right drive, and also while simultaneously pulling back the left hub.
The starter will be released, which can be removed or moved a little to the side so that it does not interfere with subsequent work. All that remains is to remove the gearbox.
Dismantling the gearbox
Removal is carried out in 3 steps:
- It is imperative to hang the engine using a hoist, although this is a labor-intensive operation.
- Deprive the gearbox and engine of contact points by unscrewing all the supports (they are held on by a total of 6 bolts).
- Remove the box very carefully and smoothly.
When disconnecting the engine, it is better to secure the gearbox with a jack so that it does not fall and be damaged.
Clutch replacement
After much preparatory work, direct access to the clutch finally appears. All that remains is to do what all this was started for:
- disconnect the clutch basket from the flywheel (the flywheel itself must be thoroughly cleaned from dirt with a cloth);
- install a new clutch basket with the disc, center the disc and tightly tighten all the previously removed bolts (in that order);
- replace the release bearing on the gearbox shaft, having previously lubricated the shaft;
- put the gearbox back and reassemble everything according to the same scheme, but strictly in the reverse order.
Ready! The job is done, and on the corrected Solano you can hit the road again. Just in case, do not forget to adjust the clutch before doing this so that no annoying interference occurs.
Lifan Solano 1.6 specifications, repairs, replacement of spare parts, analogues and articles
Korean manufacturers never cease to amaze. Thus, another sedan from the Lifan brand, well-known throughout the CIS, began to conquer the heights of consumer demand in 2009. The simple and at the same time elegant design appeals to car enthusiasts. And, ease of maintenance makes it one of those cars that consumers want to buy. By the way, the price is also not bad, and is only 500 thousand rubles
- Technical characteristics of Lifan Solano 1.6
- What is the resource of the internal combustion engine?
- How to replace the timing belt Lifan Solano 1.6
- How to replace the oil filter
- Do valves bend on Solano 1.6
- Spark plug
- What is the fuel consumption
- Replacing the valve cover gasket
- Replacing the pump
- Replacing the belt and alternator
- Clutch replacement
- Replacing Lifan Solano 1.6 speed sensor
- Replacing the Lifan Solano 1.6 air filter
- Replacing the Lifan Solano fuel filter
- Adjustment of valves
- Radiator replacement
- Catalog of spare parts and their analogues
- Reviews
Korean manufacturers never cease to amaze. Thus, another sedan from the Lifan brand, well-known throughout the CIS, began to conquer the heights of consumer demand in 2009. The simple and at the same time elegant design appeals to car enthusiasts. And, ease of maintenance makes it one of those cars that consumers want to buy. By the way, the price is also not bad, and is only 500 thousand rubles.
Technical characteristics of Lifan Solano 1.6
This car is equipped with an injection inline four with a volume of 1587 cm3. Power characteristics reach 106 horses and torque of 149 Nm. This sedan has front-wheel drive and a standard suspension for a representative of its type. The front chassis is a MacPherson type, and the rear is a beam, so there is no multi-link. The transmission can be configured in 2 options: 5-speed manual transmission and 4-automatic transmission. Overall dimensions – 4,550*1,705*1,495 m.
What is the resource of the Solano internal combustion engine?
According to regulatory and technical literature, the production life of this car is 500,000 km. Once this mileage is reached, the engine should be overhauled or replaced.
How to replace the timing belt of Lifan Solano 1.6?
In order to change the belt, you must first assemble the necessary tools. For this process you will need a set of keys, screwdrivers and car lifting mechanisms. When we have collected everything we need, we can get to work.
- Remove the headlight on the right.
- We raise the car, and then raise the internal combustion engine.
- Remove the right wheel, mudguard and fender liner.
- Remove the right motor mount.
- Remove all drive belts.
- Remove the shaft pulley.
- Remove the valve cover.
- Remove the generator.
- Set VTM.
- Remove the timing belt protective cover. It consists of 3 parts.
- Remove the air conditioner tensioner pulley.
- We fix the crankshaft.
- Loosen the timing belt and remove it.
- At the same time, you need to replace the timing belt roller.
- The assembly sequence is reversed.
Replacing the clutch on Lifan Solano with your own hands
The modern automobile market is developing rapidly and the Lifan Solano car, which appeared not so long ago in the CIS countries, has managed to win the trust of many drivers. This is due to the low cost, ease of operation and maintenance of the car, as well as its safety and attractive appearance.
Of course, this is not an elite vehicle and it is designed for “ordinary” people, so drivers, as a rule, carry out identification and elimination of all problems and carry out repair work themselves.
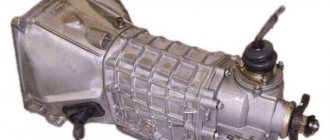
Gearbox for Lifan Solano
The box on the Solano is called LF481Q3, and the engine on the Solano is also named in the same way. The transmission is 5-speed (5 forward and 1 reverse), has a differential. The front gears have synchronizers, but the rear gears do not have synchronizers. Therefore, sometimes there may be noise when turning into reverse.
The synchronizer serves to equalize the rotation speed of the shaft and gear, thanks to which gears shift smoothly and the service life of all mechanisms is significantly increased.
Disadvantages include: unclear engagement of first or reverse gear on some cars, lack of protection against accidental engagement of reverse gear. I rarely encountered noise in the box.
Some photos of disassembling the Solano box
We will consider disassembling the gearbox, I think that there should be no problems with removing the gearbox.
To remove the box, you need to remove the front wheels, subframe and front wheel drive shafts. Jack up the box, unscrew the bolts and remove it.
Let's disassemble the box
1. Remove the release bearing and clutch fork
2 Remove the reverse switch, clamp and unscrew the bolts securing the gear selection mechanism.
Set the lever to the neutral position and use a rubber hammer to carefully separate the mechanism housing from the gearbox housing and lift it up.
3 Unscrew and remove the speed sensor, unscrew the gearbox housing bolts
4 Remove the bolt securing the reverse idler gear axle and the gearbox housing bolts. Separate the gearbox housing from the clutch housing and remove it.
5 Pull up the reverse idler gear shaft and remove the reverse gear itself. Unscrew the mounting bolts and remove the reverse gear lever.
6 Separate from the clutch housing as a single unit: the input shaft assembly, the secondary shaft assembly, the gearshift rods with forks. If necessary, to facilitate the process of separating the shafts from the crankcase, tap with a plastic hammer (or through a wooden spacer) on the end of the input shaft from inside the clutch housing (from the side of the release bearing guide sleeve).
7 Remove the differential assembly from the clutch housing with the driven gear of the main drive.
Video: acceleration dynamics of Lifan Solano