Determining the location of the break
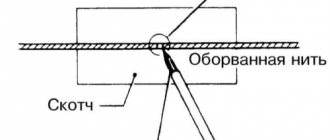
Finding a cliff is not difficult. The fog or frost around the thread will not disappear. That is why, in order to quickly find a damaged element, the threads are counted and then the damaged area is found. But sometimes the breaks are so insignificant that it is very difficult to notice them. Then you should use a voltmeter.
Due to the fact that one of the buses is connected to the car body, the negative wire of the multimeter is connected to the body. Next, the positive wire with the probe touches the first and second tires. On the first, the voltage is +12 V, and on the second – 0 V. If for some reason there is no access to the tires, then measurements can be taken where the threads come out from under the seal.
If there is voltage not only on the first, but also on the second bus, then look for bad contacts in the circuit connecting the heating system wires to ground.
How to fix a heated rear window with your own hands
p, blockquote 32,0,0,0,0 –>
To repair the heated rear window, you should purchase a special conductive adhesive or ready-made heater repair kits. It is necessary to carefully read the repair technology, which should be described on the packaging or attached instructions in Russian. The success of repair work is determined by strict adherence to the technology specified in the instructions.
p, blockquote 33,0,0,0,0 –>
Video - do-it-yourself repair of rear window heating threads:
p, blockquote 34,0,0,0,0 –>
p, blockquote 35,1,0,0,0 –>
Repair
There are several ways to repair this system. The most effective and fastest way is to use a rear window heating filament repair kit.
So how to make repairs? Everything is very simple:
- Using alcohol or solvent, clean the area of the glass where the thread breaks.
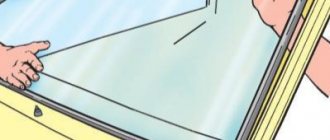
- We take the tape in our hands and stick it on both sides of the heating element. In this case, the distance between the tape should not differ from the thickness of the heating filament.
- Using a brush or syringe, apply conductive glue or paste (depending on which kit will be used). How to apply it? The glue should cover an entire part of the thread, 10 millimeters on each side.
- Remove the tape and wait for the glue to dry. According to the instructions, the composition dries in 24 hours.
- After a day, remove excess glue. This can be done with a sharp knife - kitchen or stationery. Be careful - a knife can easily damage the surface of the heating element.
- Wipe the glass with a soft and slightly damp cloth.
- We check the functionality of the element.
You can also use another product to repair the rear window heating filaments. This is “Elekont” of domestic production. The mass is applied to the place where the thread is broken. Apply glue so that it covers the entire part of the thread on each side. Once cured, the electrical heating system will work again.
Repair methods
Before you begin repairing the heated rear window yourself, make sure that the current conducting strip is clear of varnish. This must be done extremely carefully, using a paper clip. After cleaning, degrease the work surface.
There are several ways to repair a car window defroster:
- Conductive paste. To use it, turn off the window heater and allow the glass time to cool. After cleaning the thread, mark the work area, and then apply a layer of paste about 2 cm to each of the damaged ends of the heater element. The paste dries within 24 hours, during which time window heating cannot be used. However, to speed up the process, drying with a hair dryer is possible.
Conductive paste for repairing heated car glass
- Paint with chips. Take a block of copper and brass or graphite and grind it into shavings with a fine file. You will need paint to match the color of the threads. It needs to be mixed with the resulting shavings 1:1. You will end up with a dough-like mixture. After turning on the heater, paint is applied to the area where the thread breaks. The application site is pre-marked with electrical tape. As you apply the paint, you will hear a hissing sound that will soon disappear. After this, the thread will start working. The composition itself hardens within a minute.
- Prepare small iron filings, a magnet and colorless glue (varnish will do). Place the magnet on the outside of the car above the location of the breakdown. Then pour sawdust on the side of the heater filament. Move the magnet and in this way move the chips to the desired place. The procedure is completed once the thread begins to heat up. To hold the sawdust in place, apply a drop of glue or varnish to it. Then remove the magnet, removing any excess sawdust.
- Conductive adhesive. It is considered one of the simplest methods, since it alone (without sawdust) ensures the conduction of current. The glue, sold in a set with stencils and a brush, is applied to the area where the threads are broken using a syringe or brush. You must overlap a whole part of the thread by 1 cm on both sides. The product dries in about a day. Some users believe that a little iodine should be added to the glue. This will turn it the red color of the heaters. Reviews about the product are contradictory.
How the system works
There is nothing supernatural in the very principle of operation of such a system. It is most often used to heat the rear window, but some car models implement heating of the front window, side glass and wiper locations when turned off.
The task of such a system is to create conditions on the surface of the glass that prevent frostbite or fogging. As you know, at temperatures below zero degrees Celsius, moisture freezes and ice forms. Therefore, to eliminate this phenomenon, it is enough to ensure the surface temperature is above zero degrees, and icing will not occur.
This is done quite simply - conductive strips are created on the glass, one end of which is connected to the vehicle’s on-board network, and the other through an appropriate control circuit to ground. When the heating is turned on, current begins to flow through such conductors; thanks to the generated heat, the glass is heated, which causes it to be freed from the formed ice.
Video “Repair of rear window heating threads”
Detailed explanation of heating filament repair. The video was taken from the channel “Flight Magazine Renault Megan”.
2 strips didn’t work, which are in the middle where the contacts are... I repaired one and soldered it, but couldn’t handle the second)) and retoned it with a new one)
You need to find the break point: 1st method: - on the fogged glass, turn on the heating and at the break point the glass quickly fogs up with a stain, while the entire thread with the break does not fog up.
2nd method: - to detect a break in the rear window defogger conductor, turn on the ignition and turn on the rear window defroster. - connect one voltmeter probe to the ground of the car, and wrap the second probe in foil and move the foil along the heater conductor. — Connect the voltmeter probe in the center of each conductor of the rear window defroster. If the voltmeter shows a voltage of about 5 V, then the heater conductor is working. If the voltmeter shows a voltage of 0 V or 12 V, then there is a break in the heater conductor. — to locate the break point in the heater conductor, connect one voltmeter probe to the positive terminal of the heater, and move the second probe along the heater conductor from the negative terminal of the heater. The point at which the voltage indicated by the voltmeter drops from a few volts to zero is where the heater conductor breaks.
3rd method: - ohmmeter, in kilo mode, or better yet mego. One probe clings to one terminal of the heater, the second probe to the other terminal of the heater. Take a piece of cotton wool soaked in distilled water and move it along the threads of the heater, monitor the readings of the kilometer, the megohmmeter at the point of break, the needle will twitch. — it is better to use an analog ohmmeter (with an arrow). — works if there is a break in one place!
Direct thread repair:
In all the methods listed below, you must first clean the conductive strip from varnish (preferably with a bent steel wire or paper clip) until a metallic sheen appears and degrease it.
1st method (conductive paste): - you can restore a broken conductor of the rear window heater using conductive paste. — before starting repairs, turn off the rear window heating and allow time for the glass to cool. - Using caution, strip the heater conductor and rinse it with alcohol. - Use adhesive tape to mark the area to be repaired. - Apply conductive paste approximately 20mm from each end of the damaged conductor. — after drying the electrically conductive paste for 24 hours, you can use the rear window defroster. You can dry it at a high temperature, then you can use heating earlier.
2nd method (electrolytic coating): - the reagents you need are copper sulfate - better known as copper sulfate (used in crop production and construction), and sulfuric acid - an electrolyte from a battery is quite suitable. - from a tool - a piece of copper (preferably copper - not brass. Several pieces of copper wire folded into a bundle are quite suitable) tube or rod with a diameter of 6-10 mm and a strip of fabric 20-30 mm wide and about half a meter long. - wrap a strip of fabric half its width around the end of the rod - you should get something like a tassel. You need to put a thread bandage on top to prevent the fabric from unwinding. - preparing the electrolyte - not to be confused with the battery electrolyte - is also not difficult. Pour a couple of teaspoons of copper sulfate into half a glass of water and stir until dissolved; if it doesn’t dissolve completely, don’t worry, don’t pay attention. To the resulting pp you need to add 0.2-0.3% concentrated sulfuric acid or 0.5-1% battery electrolyte - this is about half a teaspoon of electrolyte for this half glass. — the process itself. Both terminals of the glass are connected to ground (if the glass is installed in the car and at least one heating thread is intact, nothing needs to be done), and the positive of the battery is connected to the tube with a rag. We wet the positive electrode in the solution and begin to actively and continuously rub the area where the thread broke for 3-5 minutes. A current passes through the solution, which transfers copper ions from the electrode to the heating filament. In case of slight damage to the thread, the gap is completely covered with copper; in case of large gaps, the copper-plated areas should be tinned with a non-overheated soldering iron and a jumper made of thin wire should be soldered. There is no need to limit the current, because After a few seconds, the anode becomes passivated and limits the flow of current. Don't forget that the solution contains sulfuric acid!
Is the rear window heating working and how to check?
An initial conclusion about how well the rear window heating works or does not work can be made based on observing whether the glass is cleared of ice, and how evenly over the entire surface. If some of the heating filaments do not work, the result will be isolated areas covered with ice. In this case, you can think about restoring the heated rear window.
Often, the cause of heating failure can be not only the burnout of the heating element filaments. Among the possible reasons it is enough to mention:
- failure of contact in the terminals supplying voltage to the heater;
- failure of the switch or relay for turning on the heating system;
- The fuse in the heating circuit has blown.
As a rule, the most common defect will be broken heater filaments ; in all other cases, to restore heating, a simple external inspection is sufficient to identify a blown fuse or broken contact. In those cases when the rear window heating does not work due to breaks or microcracks in the heating filaments, it is quite problematic to detect the specific place where the circuit failure occurred.
The fact is that heating filaments are typically connected in parallel, so using a tester to find the location of the damage is useless; the connections will “ring” through parallel circuits. You need to look for damage visually using a magnifying glass, having previously determined which of the tracks is not working.
Heated rear window repair | Homemade catalog
We will consider in detail the repair of a break in one or more threads, when some horizontal strips of the rear window heater do not work. Cases when the heating on the glass does not turn on at all are no longer associated with broken threads, because 12–16 pieces cannot burn out at the same time, but with some other reasons:
- installation wires are broken;
- the intermediate relay does not work;
- the power button is faulty;
A warning light that is not lit in the instrument panel clearly indicates that only the rear window heater switch button is faulty.
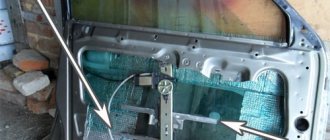
Finding thread breaks
The place where threads break can be detected without a special tool, visually - if large breaks, wide scratches, and oxidation of damaged areas are visible to the naked eye.
Also, when it’s cold outside, on a fogged rear window with the heater on, you can find that the surface dries out near the break points, although the thread itself does not heat up.
If nothing is visible, then you will need either an indicator with a battery or a multimeter, which can certainly detect breaks, and there may be several of them in one thread.
A phase indicator with a continuity function , into which a battery is inserted, is a very convenient tool; it helps out not only when you need to find broken threads in the rear window heater, as in our case, but also when searching for broken hidden wiring in the house. It is even useful for repairing such popular accessories as music headphones, because their thin wires break so often.
And everyone should have a multimeter; it is always needed in the car. Especially now, when one such device, of a simple design, without an accuracy class, is very cheap.
In general, one of the mentioned tools is enough. You will need to screw a thin wire onto the dial indicator, onto its metal handle hook. Then, the free end of this wiring is hooked to the ground of the car, perhaps to the door lock of an open door, and the indicator itself is guided by a sting along the conductive path of the heater. You need to connect the multimeter probes for testing in the same way, do not forget to just switch the universal measuring device to DCV, 20 - measure DC voltage with a measurement limit of up to 20 volts.
It is recommended, in order to avoid scratching thin copper traces, to wrap a piece of cotton wool soaked in water around the tip of the indicator or the sharp probe of the voltmeter.
At the point where the thread breaks, the voltage will disappear when the rear window heating is turned on, which will be indicated by the indicator light going out or the absence of readings on the multimeter.
Soft soldering
At the factory, copper conductive paths are applied to glass by electrolytic deposition in a bath of copper sulfate. But in a garage environment, fiddling with reagents and sulfuric acid solutions is dangerous, and can lead to lightened spots on the back shelf, as well as the seat, as well as holes in your clothes. But it’s of little use - you can only patch scratches with a homemade electrolyzer or only clean oxidized areas near large tears.
Minor scratches can be repaired by soldering . Before soldering, to remove green oxide, just wipe the damaged surface once with a cloth soaked in alcohol or any of the available solvents. When trying to remove green plaque, you cannot use a knife, scalpel, or sandpaper - you will only scratch the damaged area even more.
It is recommended to use zinc chloride as a flux, but you can use any active fat, Vaseline or other special composition that does not leave a lot of residue after soldering. Solid rosin or rosin dissolved in alcohol will not work - it leaves too much dirt.
Thin copper wire, 0.3–0.4 mm in diameter, will be needed to patch wide tears. What you need to solder is a thin copper wire, no more than 0.4 mm thick, because otherwise a thicker one with its low resistance will create more heat at the junction point than the rest of the intact part of the thread.
You can only tin copper wire, not the ends of a torn track, since the thick tin tail can cause the coating on the glass to fall off.
Restoration with conductive glue
The above-described repair method is sloppy and subsequently leaves a noticeable mark of tampering on the glass. There is a special two-component conductive glue , the cost of which in a small set is 10–15 dollars. The composition is prepared by mixing the most heat-resistant cyanoacrylic glue with copper powder, strictly in the proportion specified in the instructions on the package.
You should not turn on the rear window heater immediately after applying the repair compound; you need to let the glue harden. The hardening time of the conductive composition is about 30 minutes.
The prepared conductive paste must be applied thinly , not thicker than the working part of the rear window heater thread. Just as in the case of repairs with copper wire, a too thick layer of hardened paste, having low resistance, will heat up more than the rest of the conductive path. But in general, you will get the impression that the repaired filament heats up less than others that have not been repaired.
A little trick: so that the too light conductive paste, after drying, matches the color of the sprayed copper tracks, you can add a few drops of medical iodine to it.
Few people know that covering the repair area on glass with ordinary transparent tape is wrong: it leaves too much sticky glue and comes off along with part of the conductive paste. The repair area should be limited horizontally and vertically with narrow paper masking tape - this is the only way professionals do it. Some repair kits include a ready-made stencil, but you have to hold it with your hand when working.
How to restore heated rear window
When a damaged area of the heater filaments is found, it is worth thinking about how to restore the heating in full. Of course, you can restore it simply by replacing the glass, but this is a rather expensive operation, while there are several ways that allow you to eliminate the defect on your own, without too much effort. Before work, it is necessary to prepare the place where a break is detected and the heating filaments will be restored. To do this, the conductive path in the right place must be carefully cleaned of varnish and degreased with alcohol. A characteristic metallic sheen should be visible on the prepared area.
Track restoration can be done in the following ways:
- Using special conductive paste. It is applied to cold glass. When performing work, do not turn on the heating. The path, prepared as described above, at the site of damage should be limited on both sides with adhesive tape. The paste is then applied to the area that is not working. It hardens, as a rule, within 24 hours; you can check and use the heating after this day has passed.
- Using metal filings. This method allows you to restore functionality when there is no paste. For this, pre-prepared small iron filings are used. During the work process you will need transparent glue and a magnet. It must be secured over the area where the damage is detected, and then iron filings must be applied to this place. The magnetic field will force them to line up along the section of the track that is not working. Having leveled the sawdust and ensured electrical contact with the damaged area, they are covered with a layer of glue. You can check whether the repairs have been successfully completed and whether the heating is working in one and a half to two hours.
- Using shavings and paint, in this case shavings of non-ferrous metals are used. It is mixed with paint in such a way that a mass similar to plasticine is obtained. Using tape, a kind of stencil is formed around the damaged area. The heating is turned on, and the prepared mixture is applied to the desired area, and a characteristic hissing may occur at the point of contact, but after a while it disappears. This mixture hardens in twenty to thirty minutes; you can check and use the restored system after an hour.
There are some other methods that allow you to restore a non-working heating system, but those described are the simplest and most accessible.
Unfortunately, such methods are unlikely to be applicable to windshield restoration. It uses thinner conductive tracks and the repair area will appear quite rough, impairing the driver's visibility. For a car, heated rear window is not a luxury, but can significantly improve driving safety. And if it does not work, then with the help of fairly simple techniques you can restore its functionality. » alt=»»>
Conductive adhesive for repairing heated rear window
At any time of the year, the driver needs a properly working car. And sometimes some details are considered not so important, but according to the law of meanness, they will be needed in difficult times. One of the troubles that can happen to a driver on the road is damage to the rear window heating system. Both in winter during cold weather and in summer during rainy weather, this function of the car must be performed in full. Otherwise, moisture will enter the cabin, and visibility will be reduced to the limit, as a result, the driver will be forced to repair the rear window heater of the car.
Rear window heating repair
Heating system and functions
The heater operates using electricity. It is known that the windshield is affected by warm air currents; the rear glass requires special heating elements. It's no secret that the inside of the rear window is equipped with metal tracks that have high resistance to electric current. When current flows through the ribbons, heat is released and, accordingly, heating occurs. The result is obvious: clear, dry, heated glass.
The main function of this structural element is to combat icing, humidity and fogging. As soon as the system starts working, after a short period of time the glass is clean and transparent. In addition, this function allows you to avoid drying out the air inside the car.
Damage to the heating system
As a rule, the driver notices damage in this part of the car only when the rear window constantly sweats and does not get rid of ice. After turning on the heater, ideally after a couple of minutes it should be transparent and clean, but if this does not happen, it means that damage has occurred or the functioning is defective. Among the damage to the system, the following should be highlighted:
- Slow defogging of glass. If visibility does not improve after a few minutes of heating operation, then the operation is impaired. The reason may lie in the weak contact of the circuit connector.
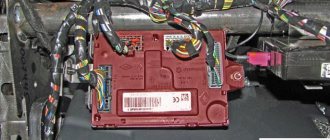
- The heater does not work when it is turned on. In this case, after pressing the indicator does not light up. This may be due to a faulty key or a blown fuse.
- Presence of horizontal streaks of fog on the glass. As a rule, such a malfunction can occur due to the breakage of the heating threads that are applied to the glass surface.
Slow defogging of glass
Whatever happens, the main thing is to make the correct repair of the heated rear window yourself or with the help of a specialist.
Troubleshooting and repair
It is believed that it is quite simple to determine damage to the heating system, and every driver can cope with the given task. Before starting work, it is recommended to count the threads applied to the glass, so that later it will be easier to remember which one is damaged. There are times when the gap cannot be seen: it is so small that one of the devices should be used. This could be a voltmeter or multimeter. In any case, in order to repair the rear window heating threads, you need to carefully examine the surface and identify damage.
There are several effective troubleshooting methods:
- Visual diagnostic method - in damaged areas, when the heating is on, the glass does not warm up and remains fogged up.
- Using a voltmeter - with the heater on, one probe should be placed on the “ground” of the machine, and the second, wrapped in foil, should be placed in the center of the thread. It is necessary to monitor the voltage; its value should not exceed 5 V. If the device shows 0 or 12 V, then there is a gap in this place.
- Using an ohmmeter, the device is turned on in “kilo-ohm” mode and connected to the opposite terminals of the heater. You should moisten the cotton wool and run it along the thread. In the place where the arrow will twitch, there is a gap.
Determining whether the rear window heating is faulty
You can repair the heater using a variety of methods, for example, purchase a special kit for repairing the rear window heating filaments.
You can repair the system using a repair kit, conductive paste and traditional methods. The main difference between all options is the materials that are used during work.
Repair materials
By purchasing a repair kit, the driver has the opportunity to repair a heating filament up to 10 cm. Materials used in such kits:
- template with threads;
- thermally active polymer resin in a cylinder.
Materials for repairing heated rear window
Work is carried out strictly with the heating system turned off. Having determined the location of the damage, it is necessary to remove the protective film from the template and attach it to the location found. The polymer material is applied using a brush and, after drying, repeated several times. After completing the work, the stencil is removed and it is advisable not to turn on the heater for 24 hours.
In the case of using conductive paste, you may only need a hair dryer, which speeds up the drying of the material.
The materials that are used in “folk” methods of repairing a heater are paint (glue) and shavings, metal for soldering the damaged area. As a rule, the paint is selected in accordance with the color of the threads and combined with shavings, maintaining a 1:1 ratio. To work, you will need a stencil on which to apply the mixture (with the device turned on). The advantage of this repair method is that there is no need to wait 24 hours for drying. The driver can immediately drive after completing the work. Zinc chloride is suitable for soldering.
How to restore heat with glue
Quite often, drivers use conductive glue to repair the heated rear window. The material is mixed with shavings, which are extracted with a file or a copper-brass bar. The proportion is 1:1. The result is a soft dough consistency. A stencil is made using electrical tape or adhesive tape, and the prepared mixture is applied to the damaged area. After the procedure, there is no need to wait for the materials to dry and you can immediately hit the road.
Adhesive for repairing heated rear window
What to do with contacts, and other methods
If the contacts in the heating system of this element of the car are damaged, then it is best to use the soldering method. This method is the most reliable and will help you forget about this problem for a long time. Zinc chloride is perfect for the job. It is recommended to use solder with a minimum tin content. After finishing work, the glass should be rinsed well with water to remove any remaining chemicals.
Heat recovery price
Repairing a heater is actually quite simple and inexpensive. Using the “paint + shavings” method, the driver will incur minimal costs by purchasing paint of the desired color (or using existing material) and preparing sawdust. If you purchase a repair kit, it will be much more expensive. The cost also depends on the manufacturer of the conductive adhesive. This can be a well-known and expensive company Keller or a cheaper manufacturer - Loctite. An alternative option would be glue from a Russian company.
Today, every driver can independently repair the heating system of this part of the car. To do this, you do not need to have special skills, you just need to decide on the method of carrying out the work and the materials used. Thanks to the many options, repairs can be carried out either using expensive materials or at minimal cost using traditional methods. It is very important to correctly determine the location of the damage and then easily repair the damage.