How to replace the alternator belt on a Matiz yourself
To replace or tighten the alternator belt on a Matiz, you will have to do a fairly large amount of work. This is due to the design features of the Daewoo hatchback. It is easier to tighten the alternator belt on a Matiz by placing the car in a viewing hole. However, this procedure can also be performed outdoors. But in this case, you will have to remove several parts located in the engine compartment and hiding access to the Matiz generator belt.
When to change
The Daewoo company recommends changing the belt drive located in the engine compartment every 40 thousand kilometers. This frequency is established based on the results of test measurements. That is, in real conditions it is necessary to replace more often.
You will also have to install a new belt on your Daewoo Matiz if you are concerned about the following “symptoms”:
- a strong whistle that occurs after starting the engine;
- on-board electronics shows low battery charge when the battery is fully charged;
- During inspection, sagging and cracks were revealed.
If elasticity decreases, you can tighten the belt. This procedure gives a temporary effect. After several tens or hundreds of kilometers, the part will have to be replaced. To tighten the belt on a Daewoo Matiz you will need:
- Open the hood and remove the coolant reservoir.
- Using a 12mm wrench, loosen the top bolt that secures the generator.
- Place the ratchet wrench on the bolt and tighten the belt using a screwdriver.
- Tighten the loose bolt.
At the end of the manipulations, you need to start the engine and check if there is a whistle from the engine compartment.
On the way to the generator
Next, disconnect the fuel line from the fuel rail. To do this, press two clamps on both sides of the fuel line. Raise the clamps up until they click and lower them back. So, we disconnected the fuel line from the rail.
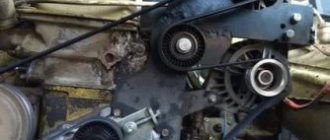
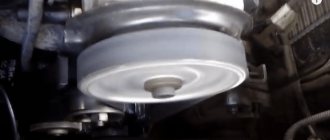
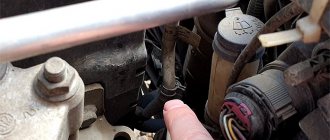
The generator has one electrical connector that goes to the battery charge indicator light. We will need to disconnect it. A wire (plus) is attached to the nearby nose terminal, which can be disconnected by unscrewing the nut using a 10mm wrench. We need to unscrew the generator tension bolt and two bolts securing the generator bar.
We remove the top bar and monitor the fuel rail, the tube of which can bend if not handled carefully. The generator itself has a bolt and a bracket fastening. To dismantle them, you need to use a 12mm wrench. Next, remove the boot under the generator, which is held on by two nuts with a 10mm head and one bolt.
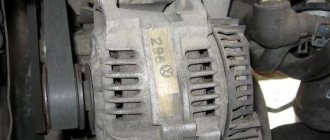
Now we get directly to the generator itself.
On one side there is a bolt, and on the other there is a bolt and nut. To dismantle the generator, we will need to unscrew the bolt from the rear bracket of the engine mount. Don't worry, this won't damage the engine. You will also need to remove the alternator belt.
If necessary, you can replace it if it is damaged.
Now we need to unscrew the two support mounting bolts that go under head 12. If they don’t unscrew very well, you can use WD-40. On the bolt, which is located closer to the center of the engine, there is a ground wire. Don't forget to connect it back later when you reassemble.
Having previously removed the support mounting bolt (however, you don’t have to completely unscrew it, but only loosen it a little until there is noticeable play), we remove the generator through the hole between the pan and the right side of the spar. When disconnecting the rear engine mount, there must be enough space to remove the generator.
Once we have managed to remove the generator, we can begin repairing or replacing it.
The steps to reinstall the generator are exactly the opposite of those already performed. Of course, this method of accessing the generator is not as convenient as when working with a lift, but it allows you to quickly repair it while being away from a car service center.
Continuing the fascinating journey through the components and assemblies of our favorite car, in today’s article we will discuss such an important unit as the Daewoo Matiz generator
. This unit is the main supplier of energy to the systems and components of your car. It is the Daewoo Matiz generator that ensures the formation of a spark on the spark plugs, illuminates the road with headlights and spins your favorite disc in the radio.
And if it fails, the car becomes real estate - well, at least until the generator is replaced or repaired.
As one nice Englishman once said: “Let’s sit on the ground covered with the first spring grass, pass a cup of wine around and tell strange stories about kings...” Well, I mean about generators...
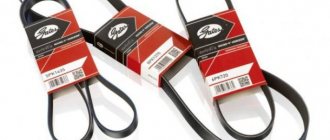
Which alternator belt to choose for Daewoo Matiz
The belt under article number 96568068 is suitable for Daewoo Matiz.
Hatchbacks with automatic and manual transmissions are equipped with the same components.
Due to the fact that it is difficult to find consumable parts for Daewoo Matiz, you can purchase an analogue of the Lynx brand for this car. Moreover, original components are more expensive, when the service life of both belts is almost the same.
Self-replacement
Changing the Daewoo Matiz alternator belt is quite difficult. To do this you will need to do the following:
- Open the hood and drain the coolant from the reservoir. Therefore, before starting the procedure, it is recommended to prepare an appropriate container (a soda bottle will do).
- Holding the clamp with pliers, disconnect the pipe going from the reservoir to the throttle valve.
- Connect the disconnected pipe to the prepared container, start the engine and wait until the liquid has completely drained. There is no pressure in this system. Therefore, after dismantling, the liquid will not immediately begin to flow.
- Remove the terminals from the battery. This must be done to avoid electric shocks.
- Remove the remaining pipe and lift the power steering reservoir.
- Move the expansion tank aside and, by sliding the clamping clamp, remove the lower pipe.
- Remove the tank, thereby opening direct access to the generator.
- Loosen the top and bottom bolts.
- Remove the old belt drive and install the new one.
After completing the above manipulations, you need to perform all the steps in reverse order. In a similar way, you can adjust the belt on the Daewoo Matiz.
The instructions described above are suitable for those cases when it is impossible to tighten or replace a part in a pit or using a jack. If the car can be placed on an overpass, then the procedure becomes much easier.
On the overpass
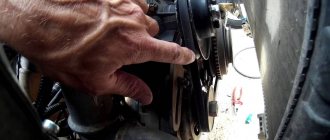
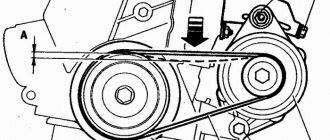
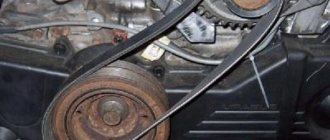
To tighten the part, you will need to remove the right front wheel, behind which the generator is hidden. After this, you need to check the tension level. To do this, you need to press on the belt in the area between the generator and crankshaft pulleys. If, as measured by a ruler, the deflection exceeds 10 mm, then the part should be tightened by performing the steps described below:
- Using a 12mm wrench, loosen the bottom nut. At this moment, you need to use the same tool to hold the left bolt securing the generator from turning.
- Loosen the top bolt.
- Loosen the bolt that secures the generator to the adjustment bar.
- Using a mounting spatula inserted between the part to be disassembled and the bracket, press out the generator.
- Tension the belt, and then tighten the fastening bolt that secures the parts to the bracket.
- Recheck the tension force.
If the belt on a Daewoo Matiz is overtightened, this may lead to early wear of the generator bearings. If defects are found on this consumable part, you must:
- Dismantle and remove the mudguard from the wheel arch.
- Remove the drive belt for the power steering pump.
- Loosen the bracket and use the mounting spatula to move the generator to the side.
- Replace the failed part.
Price:
Car services in St. Petersburg:
When is it time to change:
— a whistle that occurs when the electrical equipment of a car is loaded; - cracks on the belt; - loss of elasticity; — alarm about a decrease in battery charge when it is fully charged.
Work guarantee
- 180 days.
Which to choose:
1. Contitech (Germany) 2. Dayco (Italy) 3. SKF (Sweden) 4. Gates (USA) 5. Flennor (European Union)) When purchasing spare parts from us, we will provide a discount on replacement.
Symptoms:
The generator is not working, the generator is not working efficiently.
Possible reason:
The generator drive belt is damaged or torn.
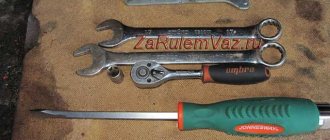
Tools:
wrench set, socket set, flat blade screwdriver, Phillips blade screwdriver.
The following work is carried out on an overpass or inspection ditch.
1. To check the tension of the generator belt, press the belt between the generator pulley and the crankshaft pulley, measuring the deflection of the generator belt with a ruler.
Note.
The deflection of the generator belt should not exceed 10 millimeters with a pressing force of 10 kgf. If the deflection exceeds the maximum permissible limits, tension it, following the instructions given below.
2. Loosen the tightening of nut “A” using a “12” wrench, holding the bolt of the left fastening of the generator to the bracket from turning with a second “12” wrench; loosen the bolt “B” of the right generator mounting.
3. Loosen the generator mounting bolt to the adjustment bar using a wrench.
4. Insert the mounting spade between the generator and its bracket.
5. Press the generator away from the BC, tensioning the belt.
6. Tighten the generator mounting bolt to the adjustment bar.
7. Check the generator belt tension again.
Note.
Avoid over-tensioning the alternator belt, as this may cause accelerated failure of the alternator bearings.
If signs of wear or tears are found on the generator belt, the belt should be replaced following the further instructions.
8. Remove the mudguard and remove it from the right front wheel arch.
9. Remove the hydraulic power steering pump drive belt.
10. Loosen the generator bracket.
11. Move the generator towards the cylinder block using a mounting blade.
12. Remove the generator drive belt.
13. Install the belt in reverse order.
Pavel Kurakin Car enthusiast
Daewoo Matiz. Insufficient oil pressure (low oil pressure indicator light is on)
| List of possible faults | Diagnostics | Elimination methods |
| Low engine oil | According to the oil level indicator | Add oil |
| Oil filter is faulty | Replace the filter with a known good one. | Replace the faulty oil filter |
| The bolt securing the auxiliary drive pulley is loose | Check bolt tightness | Tighten the bolt to the specified torque |
| Clogged oil receiver mesh | Inspection | Clear the mesh |
| Skewed, clogged oil pump pressure relief valve or weakened valve spring | Inspection when disassembling the oil pump | Clean or replace the faulty relief valve. Replace the pump |
| Worn oil pump gears | Replace the oil pump | |
| Excessive clearance between bearing shells and crankshaft journals | Determined by measuring parts after disassembling the oil pump (at a service station) | Replace worn liners. If necessary, replace or repair the crankshaft |
| Insufficient oil pressure sensor is faulty | We unscrew the low oil pressure sensor from the hole in the cylinder head and install a known-good sensor in its place. If the warning light goes out while the engine is running, the inverted sensor is faulty | Replace the faulty low oil pressure sensor |
Causes of drop in oil pressure
There is a light on the instrument panel that indicates emergency oil pressure in the engine. When it lights up, it is a clear sign of a problem. We'll tell you what to do if the oil pressure light comes on and how to fix the problem.
The oil check light can come on for two different reasons: either low oil pressure or low oil level. But what exactly does the oil light on the dashboard mean, only the operating instructions will help you find out. It will help us that, as a rule, budget cars do not have a low oil level indicator, but only a low oil pressure indicator.
Insufficient oil pressure
If the oil light comes on, this means insufficient oil pressure in the engine. As a rule, it lights up only for a few seconds and does not pose a great threat to the engine. For example, it can light up when the car rolls heavily during a turn or during a cold start in winter.
If the low oil pressure light comes on due to a low oil level, then this level, as a rule, is already critically low. First of all, when the oil pressure light comes on, check for the presence of engine oil. If the oil level is below normal, then this is the reason for this lamp to light up. This problem can be solved simply - you need to add oil to the required level. If the light goes out, we rejoice, and do not forget to add oil on time, otherwise this could result in serious problems.
If the oil pressure light is on, but the oil level on the dipstick is fine, then another reason why the indicator could light up is a failed oil pump. It does not do its job of ensuring sufficient oil circulation in the engine lubrication system.
In any case, if the oil pressure or low oil level light comes on, the car must be stopped immediately by pulling to the side of the road or to a safer place and turning off. Why do you need to stop right away? Because if the oil in the engine has depleted significantly, then the engine may stop and break down, with the prospect of very expensive repairs. Don't forget that oil is very important to keep your engine running. Without oil, the engine will fail very quickly - sometimes in just a few minutes of operation.
This situation also occurs when the engine oil is changed to new one. After the first start, the oil pressure light may come on. If the oil is of good quality, it should go out within 10-20 seconds. If it does not go out, the reason is a defective or non-functioning oil filter. It needs to be replaced with a new quality one.
Oil pressure sensor malfunction
The oil pressure at idle speed (at approximately 800 - 900 rpm) should not be less than 0.5 kgf/cm2. Sensors for measuring emergency oil pressure come with different response ranges: from 0.4 to 0.8 kgf/cm2. If a car is equipped with a sensor with a response value of 0.7 kgf/cm2, then even at 0.6 kgf/cm2 it will turn on a warning lamp, signaling a kind of emergency oil pressure in the engine. To understand whether the oil pressure sensor is to blame for the light coming on or not, you need to increase the crankshaft speed to 1000 rpm at idle. If the light goes out, then the oil pressure in the engine is normal. If not, then you need to contact specialists who will measure the oil pressure with a pressure gauge, connecting it instead of the sensor. Cleaning the sensor helps prevent false alarms. You need to unscrew it and thoroughly clean all the oil channels, because the cause of false alarms of the sensor may be due to blockages.
If the oil level is normal and the sensor is working
First of all, you need to check the oil dipstick and make sure that the oil level has not increased since the last check? Does the dipstick smell like gasoline? It is possible that gasoline or antifreeze is getting into the engine. It’s easy to check the presence of gasoline in the oil; you need to dip the dipstick in water and see if gasoline stains remain. If yes, then you need to contact a car service; the engine may need to be repaired. If there is a malfunction in the engine, which is caused by the oil pressure light coming on, it is easy to notice. Engine malfunctions are accompanied by loss of power, increased fuel consumption, and black or blue smoke coming out of the exhaust pipe.
If the oil level is normal, then there is no need to worry about a prolonged indication of low oil pressure, for example during a cold start. In winter, at low temperatures, this is an absolutely normal effect. After parking overnight, the oil drains from all lines and thickens. The pump needs a certain time to fill the lines and create the necessary pressure. Oil reaches the main and connecting rod journals earlier than the pressure sensor, so wear of engine parts is eliminated. If the oil pressure light does not go out for about 3 seconds, it is not dangerous.
What you can do yourself
Measuring engine oil pressure The problem of low oil pressure is greatly complicated by the relationship between lubricant consumption and level drop with the overall pressure in the system. In this case, a number of malfunctions can be eliminated independently.
If leaks are detected, the problem is quite easy to localize and solve. For example, oil leakage from under the oil filter can be eliminated by tightening or replacing it. The problem with the oil pressure sensor, through which lubricant flows, is solved in a similar way. The sensor is tightened or simply replaced with a new one. As for seal leaks, in this case you will need time, tools and skills. In this case, you can replace the front or rear crankshaft oil seal with your own hands in your garage with an inspection hole.
Oil leaks from under the valve cover or in the pan area can be eliminated by tightening fasteners, replacing rubber gaskets, and using special engine sealants. Violation of the geometry of the connecting planes or damage to the valve cover/pan will indicate the need to replace such parts.
If the coolant gets into the engine oil, then you can remove the cylinder head yourself and replace the head gasket, while following all the recommendations regarding the removal and subsequent re-covering of the cylinder head. An additional check of the mating planes will indicate whether the cylinder head needs to be ground. If cracks are found in the cylinder block or head, repairs are also possible. As for the oil pump, if this element wears out, it is better to immediately replace it with a new one. It is also not recommended to clean the oil receiver, that is, the part is completely changed. In the case where the problem in the lubrication system is not so obvious, and you have to repair the car yourself, then at the very beginning you should measure the oil pressure in the engine. To solve the problem, as well as taking into account an accurate understanding of where the oil pressure in the engine is measured and how it is done, additional equipment must be prepared in advance. Note that there is a ready-made device for measuring engine oil pressure available for free sale.
As an option, a universal oil pressure gauge will “Measure”. This device is quite affordable and comes with everything you need. You can also make a similar device with your own hands. To do this, you will need a suitable oil-resistant hose, pressure gauge and adapters.
To measure, a ready-made or home-made device is connected instead of an oil pressure sensor, after which the pressure readings on the pressure gauge are assessed. Please note that ordinary hoses cannot be used for self-production. The fact is that oil quickly corrodes rubber, after which the detached parts can get into the oil system.
Results
The pressure in the lubrication system can drop for many reasons: - quality of the oil or loss of its properties; - leaks of oil seals, gaskets, seals; -oil “presses” out of the engine (pressure increases due to malfunctions of the crankcase ventilation system); - oil pump malfunctions, other breakdowns; -the power unit may be severely worn out, etc.
In some cases, drivers resort to using an additive to increase engine oil pressure. For example, XADO revitalizant. According to manufacturers, such an anti-smoke additive with revitalizant reduces oil consumption, allows the lubricant to maintain the required viscosity when heated to high temperatures, restores damaged crankshaft journals and liners, etc.
As practice shows, additives cannot be considered an effective solution to the problem of low pressure, but as a temporary measure for old worn-out engines, this method may be suitable. I would also like to draw your attention to the fact that the blinking oil pressure light does not always indicate problems with the internal combustion engine and its systems. It's rare, but it does happen that electrical problems arise. For this reason, the possibility of damage to electrical components, contacts, pressure sensor or the wiring itself should not be ruled out.
Finally, we would like to add that using only the recommended oil helps to avoid many problems with the oil system and engine. It is also necessary to select a lubricant taking into account individual operating conditions. The correct selection of viscosity index for the season (summer or winter oil) deserves no less attention.
Engine oil and filters must be changed correctly and done strictly according to regulations, since an increase in the service interval leads to severe contamination of the lubrication system. In this case, decomposition products and other deposits actively settle on the surfaces of parts and channel walls, clogging filters and the oil receiver mesh. Under such conditions, the oil pump may not provide the required pressure, causing oil starvation and significantly increasing engine wear.
Sometimes situations happen that it is necessary to remove the generator from a Daewoo Matiz car in order to repair or replace it. However, we do not always have access to an inspection hole, overpass or lift. Therefore, now we will learn how to replace the generator without additional tools. This way we won't need to lift the car
, instead working only in the engine compartment. All actions will be performed from the right wheel.
Daewoo Matiz WTG › Logbook › Repair: Replacing the generator drive belt
For the last two or three days, the car would start every now and then, but the starter simply wouldn’t turn. And when it started, the headlights burned dimly while driving, the radio refused to work and the engine ran very unevenly. I started to blame the generator and for good reason. I went to Marshall to buy an alternator belt, gave the guys all the information about the car and they sold me the belt.
I went to the house, took off the Wheel, removed the locker, unscrewed the service panel or whatever it was, looked and my belt was a rivulet, not a V-belt. I went back to change the strap for another one. Approaching Marshall, my belt broke and the car stopped right in the middle of the northern avenue. I pushed him into the parking lot next to the store. I go into the store and it’s closed. I decided to go to a nearby car service center. They named the price, well, I think since I stood in front of your service, I will get it repaired from you. They told me to come in the morning. I closed the car and stomped home sadly.
I didn’t sleep all night - I was worried about how poor he was, standing alone in a strange area. I arrived early in the morning, they changed the belt at the store (very reluctantly, because they didn’t believe that a Matiz without steering wheel and AC could have a rivulet belt).
I went to the service to register. They said you can come in. And then I realized how much lack of sleep affects the physical condition of the body, pushing the Matiz literally for meters turned out to be unbearably difficult for me, which I myself had little faith in, because I’m far from wimpy. Thanks to the men who helped push the car into the box.
The master got to work, but as a future mechanical engineer, I never understood what he was doing, he was changing the belt from under the hood with a MOUNTER! And he did it quickly, while I was texting my friend, the belt was already on.
Get started! - shouted the master. Wind up by the cheek - I thought and turned the key
Of course, nothing happened because the battery was discharged. The master with a sad face stomped behind a huge box with crocodiles sticking out of it =) Having connected the whole thing to the battery, he shouted again:
Get started! This time, deciding to do without vulgar jokes, I simply turned the key in the ignition. Matiz started up
source
Daewoo Matiz rotten maklay › Logbook › Replacing the timing belt, alternator belt,
And so, no one knows whether the previous owner changed the timing belt, so it was purchased: -GMBGT-30010 Timing belt tension roller for 424 rubles. -ContitechCT 910 Timing belt for 557 rubles -General Motors96565821 0.7 V-belt alternator for free, got it with the former owner. But according to existential costs 224 rubles.
I haven’t changed the pump until it plays and drives the coolant into the reservoir well. Next, many unscrew the crankshaft pulley with the help of a partner, a huge wrench, use their wives, come up with devices, generally do complete crap) It’s the 21st century, there’s a wrench for that, well or, as a last resort, use a starter, and since I made the replacement in the garage, the bolt was unscrewed using the starter. Not the first time, but the swing in the Matiz allows you to hit the key properly.
Instructions for replacing the alternator belt
Another common problem is the alternator belt. Fortunately, replacing it is one of the easiest operations. It is not particularly difficult even for those who are not very well versed in how the Daewoo Matiz generator works.
Periodicity
Checking the condition of the generator belt and its tension should be carried out regularly. As practice shows, this part is one of those that fail most often. Therefore, experienced craftsmen recommend checking the condition of the strap once a year and replacing it if necessary.
Unlike timing belts, there is no clear data on how far a car travels before it needs it. It is necessary to check its tension. But in most cases, under severe operating conditions, replacement is required every 80 thousand kilometers. Under normal conditions, the Daewoo Nexia generator belt will withstand 120 thousand km or more.
Stages
The scheme of your actions for replacing the generator strap with Nexia should be as follows:
- first remove the air-conducting sleeve, which is assembled with an additional muffler for the intake air noise;
- then check the belt tension by pressing it with your finger between the pulleys;
- with a pressing force of 10 kgf, the belt deflection should be in the range from 10 to 15 mm;
- to adjust the tension, loosen or tighten the bolt attaching to the tension bar;
- If you have a car without air conditioning, then removing the belt is done simply after loosening the tension by removing it from the pulleys:
- if the car has air conditioning, you need to remove the drive belt of its compressor; to do this, loosen the nut;
- to install a new belt, all parts are mounted in a ritual manner;
- At the same time, tighten the compressor drive belt so that at a pressure of 10 kgf it bends by 5-8 mm.