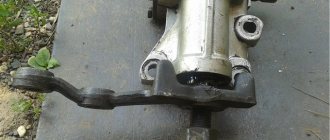
Purpose of steering rod on Chevrolet Niva
A tie rod is a steering part that transmits force from the steering wheel to the steering knuckles, which ultimately causes the wheels to rotate. The rod is a steel tube, at the ends of which there is a threaded connection and a steering tip. The threaded design ensures the connection between the short and long tips. The tips are also called hinges. They are designed to allow free movement of moving parts in the steering structure.
Faulty steering rods of the Niva Chevrolet
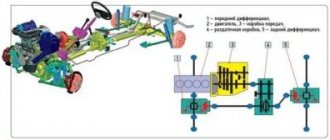
The steering mechanism is a rather capricious design that requires diagnosis every year, especially for a car like the Chevrolet Niva. After all, as you know, Shniva is designed to overcome particularly harsh road and off-road surfaces.
The first sign of a faulty steering mechanism is increased play. This may indicate a malfunction of the steering rods due to extreme wear of the hinges. In this case, there are two ways to correct the situation:
- Carry out restoration of steering rods, replacing worn mechanisms (hinges).
- Replace the entire mechanism.
Also an important indication of a faulty steering linkage is difficulty turning the steering wheel. This suggests that, most likely, low-quality parts were installed or the factory technology was violated during their manufacture. Incomplete lubrication of connections from the factory will soon lead to product malfunction; in this case, squeaks will be heard from under the wheels when the steering wheel is rotated.
Steering rod puller
Mechanical damage to the protective cover of the rods often occurs, which leads to water and dirt getting into the mechanism and compromising the integrity of the device. To protect yourself from waste and your car from malfunctions, it is necessary to periodically carry out a technical inspection of the vehicle.
Removing the side link
We hang and remove the wheel.
To remove the right side rod, turn the steering wheel all the way to the left.
Use pliers to remove the cotter pin
Using a 22mm wrench, unscrew the nut securing the side link to the steering knuckle lever.
Use a puller to press the ball pin out of the lever.
A fork puller can be used.
If there is no puller, unscrew the nut not completely, insert the mounting blade into the spacer between the side rod and the steering knuckle lever and hit the end of the lever with a hammer.
The ball pin can also be pressed out of the lever by striking a sharp blow from below with the back of a hammer on the steering knuckle lever near the hinge
We remove the ball pin from the eye of the steering knuckle lever.
Use a puller to press the ball pin out of the pendulum arm.
The finger can also be pressed out by striking a sharp blow from below with a hammer through a chisel with a blunt end on the pendulum lever.
We take out the right side rod.
Similarly, remove the left side rod.
We install the side link so that a long tip is attached to the steering knuckle lever.
Having replaced the rod, we check the wheel alignment (see Checking and adjusting the alignment angles of the front wheels of the VAZ-2123)
Malfunctions
Since the entire steering mechanism is a rather shaky structure, it constantly requires diagnosis and must be carefully monitored, and all necessary repair measures must be taken as soon as possible if the following symptoms occur:
- There was a backlash. This may indicate that the hinges are very worn. In this case, you can try to replace only the hinges or completely change the entire mechanism.
- The steering wheel turns hard and you can hear a squeaking sound around the wheels
Replacement
To replace, we will need new steering rods for the Chevrolet Niva and a set of tools; after everything is ready, we can proceed to replacement:
- Installing the car in the pit
- We remove the wheel from the side where the replacement will be made.
- Remove the pin pin from the outer hinge
- We take a special puller and remove the hinge pin from the steering knuckle. If there is no puller, you can use a hammer to apply small blows to the end of the lever
- Remove the cotter pin from the inner hinge nut, then unscrew the nut
- We press out the ball joint pin, this can be done using the same puller or a hammer
- Removing the steering rod
- Install the new part in reverse order
Replacing the middle link
- We press out the pin of the side rods and move the entire structure to the side
- Unscrew the four nuts and disconnect the gearbox stabilizer
- We remove the cotter pin of the ball joint and the fastening nut and unscrew the fasteners
- Pressing out the tip
- Removing the rods
- Replace with new ones
Replacing the drive yourself
During operation, mechanical wear of the hinge joint inevitably occurs. Also, off-road, you can easily bend any traction joint, which will lead to difficult driving and increased wear on the vehicle's tires.
In these cases, it is necessary to immediately replace the defective parts.
Advice! This procedure can be performed with your own hands in the garage or at a service station with subsequent wheel alignment adjustment.
To perform work on replacing the side rods you will need:
- new steering rod (or a set if more than 50% of the unit is worn);
- metal brush;
- WD-40;
- hammer;
- chisel or large slotted impact screwdriver;
- key to "22";
- long nose pliers;
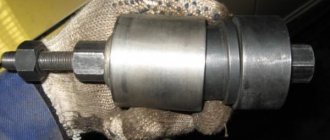
- screw puller for car suspension joints;
- fork puller.
Replacement of side drives and tips
- Place the car on a pit or lift. It is necessary to observe safety precautions by installing anti-roll bars and additional supports (if using a jack).
- Unscrew and remove the wheel. Turn the steering wheel all the way to the repair side for easy replacement of parts.
- Use a wire brush to clean the connecting nodes of the rods and ends.
- Use long-nose pliers to bend and remove the cotter pin from the outer hinge pin.
- Using a 22mm wrench, unscrew the nut securing the side connecting rod to the wheel axle lever.
- Install the threaded steering joint puller onto the connection and, overcoming the force, press out the ball pin of the outer steering end.
During the pressing process (for faster dismantling of the unit), you can make light blows with the back of the hammer on the mounting hole of the steering knuckle. - Using a fork puller, press the ball pin of the rod out of the pendulum arm.
- By analogy, we extract the left and right side rods assemblies.
- Replace the worn part assembly in reverse order.
- After assembling and tightening the fasteners, it is necessary to set the appropriate wheel alignment angles.
Replacing the middle part
The work is carried out according to a similar algorithm for dismantling the side rods.
Replacing the middle transverse link on a car is carried out in the following sequence:
- The fixing wire cotter pins are removed from the hinge joints. After assembling the new mechanism, it is recommended to replace all cotter pins with new ones.
- Using a 22mm wrench, remove the nut securing the middle link to the pendulum arm.
- Using a fork puller, remove the ball pin of the middle rod from the mounting hole of the pendulum arm.
- We remove the hinge pin from the eye of the pendulum mechanism.
- In a similar way, we release the ball pin from the steering bipod.
- We dismantle the central link assembly.
- When installing a new part in the reverse order, we orient it so that the longitudinal axis is located in front of the axes of the movable joints of the hinges.
Reinforced
The standard set of steering rods for the Niva Chevrolet is not strong enough, since the car is usually used mainly off-road. Therefore, a reinforced version was developed that has the following advantages:
- Long service life
- There is a protective threaded connection thanks to which the toe can be adjusted over a long period of time
- Serial tips, this indicates the quality of manufactured parts
- You can lubricate yourself without removing the protective cover
The main disadvantage is the high price of the product, which reaches 3,500 thousand. Even before installing them, they need to be additionally lubricated.
To summarize, we can conclude that it is necessary to periodically diagnose your car, this will allow you to identify the malfunction in a timely manner, thereby helping to avoid serious breakdowns. If it is possible, replace the standard rods with reinforced ones, this will help you forget about the problems with this element for several seasons.
Removing the middle link
We carry out the work on an inspection ditch or a lift.
Use pliers to remove the cotter pin
Using a 22mm wrench, unscrew the nut securing the middle link to the pendulum arm.
Using a fork puller, press the middle link ball pin out of the hole in the pendulum arm.
The pin can also be pressed out by applying a sharp blow from below (near the hinge) with a chisel with a blunt end to the pendulum arm.
Remove the ball pin from the eye of the pendulum arm.
Similarly, we press the ball pin out of the bipod.
Remove the middle link.
Install the middle link in the reverse order.
The left hinge pin (inserted into the bipod hole), in addition to rotation, can swing (unlike the right one).
In this case, when installing the rod on the car, we orient it so that its longitudinal axis is in front of the hinge axes