How to recognize problems with the hub?
The fact is that the hub is the most important element of any rotating mechanism, including a car wheel. It is the central part of the rotating parts with a hole to allow it to be attached to an axis or shaft. Thus, its main task is to provide rotational motion. To prevent free rotation on the axle, rolling bearings or special plugs are pressed into the hub hole. In addition, it is thanks to the bearings that the hub, as well as the wheel, can rotate.
It is quite easy to notice that the wheel bearing is urgently needed to be replaced; in this case, a characteristic knock occurs in the lower rear part of the body, most often it intensifies when driving on an uneven road or when hitting potholes and bumps. When driving on a relatively flat road surface, a hum may occur. In addition, the brake drum gets very hot.
Three ways to remove and replace a VAZ 2110 wheel bearing
Let's consider 3 options when replacing the front wheel bearings of a VAZ 2110 is required.
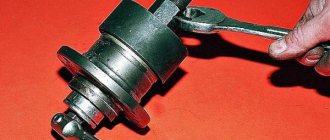
Method No. 1. The idea is to replace the wheel bearing using a puller, without removing the steering knuckle (without removing the strut). The advantage of this replacement is that there is no need to loosen the camber fasteners. It is best to work on a lift or on a viewing hole. The inconvenience is knocking out the hub and then pressing it out. You risk damaging the bearing even before replacement.
The replacement process with this method, after performing steps 1-4 above:
- Use a puller to remove the bearing from the assembly.
- Using the same puller, we press the new part back into the hub.
- We assemble everything in reverse order (at the beginning of the article).
Checking whether the rear wheel hub bearing needs to be replaced
First of all, the cause of such breakdowns is poor, uneven roads, especially since in some cases our road surface can hardly be called a road at all. The second reason why a bearing may become unusable is the poor quality of the material from which it was made. Refitting the rear wheel is not a very complicated process, so it can be done quite easily on your own at home.
However, before proceeding directly to action, you should find out whether this is really the case. To do this, you need to hang out the wheel from which the hum is heard, and, rocking it with your hands, check the play. If, when carrying out these actions, play is detected, and dull knocks occur, then you cannot delay replacement. A bearing that falls apart along the way will cause damage to other parts of the hub system.
The key to fast and high-quality work is a properly selected tool and high-quality materials, in this case a bearing. Therefore, do not try to save on it, purchase options only from good manufacturers, because the service life largely depends on this.
How to remove the rear wheel hub - we work on our own
In principle, there is nothing difficult in how to remove the rear wheel hub, the main thing is to remember that the bearings are quite fragile, so it is worth adjusting your force so as not to damage them
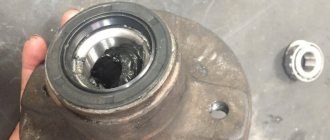
. The hub is replaced as follows. First you need to lift the car onto supports and disconnect the decorative cap. Next, unscrew the nuts that secure the wheels. Now you need to remove the brake drums from the hub, of course, if there are any.
If the car model has rear disc brakes, then you need to remove the brake caliper and brake discs.
Now you need to unscrew the bolts that secure the hub to the bracket. They can only be accessed through a special hole in the hub itself. To do this, you need to rotate the flange and align the hole with each of the bolts. These nuts are usually tightened with a large torque, so for safety reasons it is necessary to fix the car and engage the gear with the parking brake; it would not hurt to install wheel chocks under the wheels.
Now the caliper mounting bolts, steering knuckle mounting bolts and brake pad guides can be safely unscrewed. Next, you need to remove the hub by pulling it through the brake mechanism. If not installed, then the rear wheel hubs are removed from the bearing, intended for its replacement. But this requires a special tool, and if one is not available, you need to contact a service station, where they will replace this part.
The wheel bearing is one of the important components of the vehicle's chassis. Sooner or later, every car owner is faced with the question of the need to replace this element due to its failure or the end of its service life. You need to figure out how to diagnose a faulty rear wheel bearing on a VAZ-2110 and replace it correctly.
The manufacturer recommends replacing these parts every 100 thousand kilometers traveled by the car, but only in rare cases do they completely use up their resource. Much more often they become faulty approximately 1.5-2 times faster. In many ways, the rate of wear depends on the road conditions in which the car is operated, as well as on the driving style of its owner. Naturally, a lot depends on the quality of the bearing itself.
Replacement procedure
Before changing the rear wheel bearing, block the car using wheel chocks. We loosen the fasteners on the wheel being diagnosed. Also, having gotten rid of the central cap, loosen the central nut 1-2 turns. Now you can jack up this side.
We install safety stands under the body and remove the wheel. The brake drum seat can be filled with WD-40 to make removal easier. In some cases, brake fluid or diesel fuel is used. Before unscrewing the guide bolts, they are usually tapped with a copper hammer so that the “stuck” threads “give in”.
We dismantle the brake drum. In problematic cases, a special puller is used for such an operation, and for easier situations, bolts are screwed into the threads intended for them, and with their help a tension is created for removal.
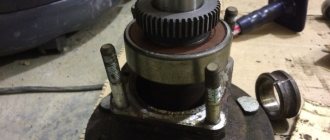
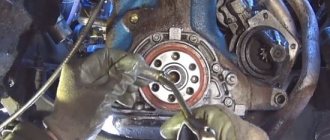
Step 1. Remove the cap Step 2. Use a puller to unscrew the nut Step 3. Remove the hub with a puller Step 4. Take out the ring and prepare the bearing Step 5. Use a puller to press the bearing in Step 6. Mount the hub back Step 7. Roll the nut
Remove the central nut and stretch the entire hub along the axis. Sometimes a bearing cage remains on the shaft, then using a puller or chisel it is removed separately after the hub
. We carry out the operation so as not to damage the seating surface.
We inspect the axle to identify rotation of the bearing race. If there are any such marks (the presence of grooves on the landing diameter), then the hub will also have to be changed.
You need to know that forming notches using a chisel or a punch on a worn surface for a more rigid fit of the bearing race is strictly unacceptable! It is necessary to replace the worn hub completely in such a situation!
Routine replacement of the rear wheel bearing can be carried out with accompanying diagnostics of other elements. It is worth checking the brake cylinder for leaks at the same time, and the brake pads are monitored for wear.
Using a removable device, we remove the retaining ring, and if necessary, pour special cleaning fluid under it to make it easier to press out the bearing. It is customary to use one of three popular methods for removing the outer race from the hub:
- using a hydraulic press
, which is not found in every garage; - reusable puller
, its cost is affordable, and the unit can be used in the future; - using a hammer
or sledgehammer 2-3 kg; for this method, a special spacer of the appropriate diameter must be used.
We install the hub on a hard surface and apply a couple of blows to the prepared mandrel with a hammer. This is done carefully so as not to damage the seating surface with the mandrel or the remaining parts with a heavy hammer.
The surface freed from the holder can be cleaned with fine sandpaper to remove possible corrosion stains and then lubricated with oil (working can be used). It will facilitate the installation of a new bearing, which must first be assembled using two washers and a bolt. The outer diameter of the washers should be 2-3 mm less than the diameter of the bearing.
Before assembly, you can add lubricants to the double row cage. Using a hammer, preferably with a copper or bronze end, we “seat” the bearing by lightly tapping on opposite sides.
You need to know that bearings are made from high-alloy steel, which can crumble under strong dynamic loads (sharp impacts), so it is recommended to use a “soft” copper or bronze spacer so as not to damage the races.
If at the initial stage the approach turns out to be tight, then there is probably a misalignment, so it is worth using light blows to level it out, rather than using unnecessary force. When the new clip goes halfway, the old one can be used as a spacer. We continue until the groove for the retaining ring appears. We fix the bearing with a ring.
Hub installation
We get rid of the tightening device from a bolt and two washers. Now you can return the hub to its place. Be sure to install a new central nut, having previously lubricated the threads with “lithol” or other lubricant.
We install the brake drum on the fasteners. We install the wheel and secure it with mounting bolts. We turn the wheel “by hand” and listen to extraneous noise. The absence of a hum or grinding noise, as well as free rotation, indicates correct assembly.
We lower the wheel with a jack, and only after that we carry out the final tightening of the central nut. It is recommended to use a torque wrench for this operation. The tension value should be close to 20 kg/m. This value is quite large, so without a special key you will need to increase the length of the key. Now you can tighten the hook and tighten the mounting bolts on the wheel to the required torque.
As a rule, replacing the rear wheel bearing of a VAZ 2110 is not carried out very often. The service life should be equal to a relatively long mileage (at least 100 thousand km). But due to the state of modern roads, this period is significantly reduced, as a result, an early replacement of the rear wheel bearing of the VAZ 2110 will be required.
Video of replacing the front wheel bearing of a VAZ 2110
With the help of these videos, the repair will be much easier. A step-by-step guide will help you achieve your goal, and in just a couple of tens of minutes you will be able to enjoy the results of your work without extra costs or contacting service station specialists.
Replacing the front wheel bearing of a VAZ 2110
How to change the front wheel bearing
A few tips for motorists
- It is quite easy to understand that the front wheel hub of a VAZ 2110 is faulty. While the car is moving, you will hear grinding, humming and knocking noises every now and then.
- To ensure that the wheel alignment remains normal after replacement, perform the replacement without unscrewing the alignment bolts.
- The manufacturer recommends that car owners change the components of the front wheel hub at 55,000 km.
As you have already seen, do-it-yourself repair of front and rear wheel bearings on a VAZ is easy. Such repairs may have to be done every year, because the roads in the country leave much to be desired. But self-service will cost several times less than if you turn to a service station for the service. If you prepare in advance and do all the work sequentially, taking into account each step, the replacement will not take much time. You do not risk anything, the cost of the part is not that high. But such a simple job involves many nuances that are important to consider.
When a part needs to be replaced
If you hear a noise, hum or howl from the rear that increases significantly when cornering, this indicates that it is time to check the rear hubs. Modern verification methods are quite simple:
- Having stopped the wheel diagonally - opposite to the jacking point, you need to hang the two rear wheels alternately.
Note! Why each one separately? Mistakes are often made in identifying the side of the noise; in addition, it often becomes necessary to replace two bearings at once.
- The raised wheel needs to be spun as much as possible. If you hear extraneous sounds similar to a hum, in any case you cannot do without replacing the part;
- if you still have some doubts, you can look at the lateral play. You need to take the wheel by the edges and roll it away from you - towards you. If the bearing is bad, you will feel the movement of the wheel on its axle.
Today, stores sell individual bearings and assembled hubs. In fact, there is no point in buying an assembled unit (except in individual cases), since replacing the bearing is not as difficult as it immediately seems.
Detailed instructions for replacing the rear wheel bearing
So:
- The car stops at the front.
- Wheel bolts break off.
- The nut in the center of the hub breaks off, and you must first remove the cap.
- The required side is jacked up and the trestles are positioned.
- The wheel is removed.
- The installation site is filled with WD-40 or other special liquids.
Note! In this situation, you can use diesel fuel or any brake fluid.
- The guide bolts are unscrewed, which it is recommended to first tap with a hammer.
- Carefully remove the brake drum. If removal is difficult, you need to screw special bolts into the threads on this drum, tighten it and lightly tap it with a hammer. Usually such measures produce positive results.
Note! You can buy specialized drum pullers, but this is the last option when you can’t do anything on your own.
- The central nut is completely unscrewed. Of course, you can unscrew it immediately and remove the hub, wheel and drum together, but in this case there will be a high risk of damage.
- The hub tightens. If one of the bearing races remains on the axis, you need to move it out of place using a puller or sharpened chisels.
- The axle is inspected for the presence of marks from bearing rotation; if such marks are present, the assembled hub will need to be replaced.
- The brake cylinder is assessed for leakage, and the pads are assessed for wear.
- The retaining ring is removed from the hub using pliers or screwdrivers.
- The edge must be cleaned of rust, after which it must be moistened with WD-40 or a similar liquid that is at hand.
- There are three ways to press out a bearing: using a special press, a puller or a heavy hammer (sledgehammer). The third method may seem aggressive, but it is preferred by most service station technicians, so let’s look at it in more detail.
- The hub is securely installed on a hard surface, and the bearing is dislodged from its place through the mandrel with several blows of a hammer or sledgehammer. After this, the hub is installed on a vice.
Note! There must be a stop for the part and a place for the bearing to bounce off.
- A couple more blows are made, after which the bearing comes out.
- The bearing seating surface must be carefully inspected, any existing rust should be sanded off and lubricated with plain motor oil.
- The purchased bearing must be screwed using a selected bolt through a washer, which must be selected in accordance with the internal races. Since the bearings are double row, they will have to be disassembled during installation.
- The hub is installed on a hard surface.
- A twisted bearing is installed on top, but first you need to lubricate its installed plane with oil.
- Use a one-kilogram hammer to slightly level the element in a plane.
- Take a suitable mandrel, for example, a pry bar, which is used to hit the part to press the bearing.
Note! The main thing is not to apply strong blows, since the pressing will be uneven.
- When the bearing is about halfway through, you can hit harder.
- When reaching the cut part of the hub, you need to use the old clip as a mandrel.
Note! Do not apply strong blows, as this is a high-carbon metal that can burst.
- You need to push it all the way, after which the stopper is installed; if it is not possible to install the last element normally, then most likely the bearing was not finished completely.
Note! The stopper should spring back into the groove without difficulty.
Bearing assembly procedure
So:
- Now it's time for assembly, the hub is put on the axle, and you need to remove the bolt used to tighten the cage.
- The central nut is tightened and tightened as much as possible. In this case, it means installing a new nut. We also install a thrust washer.
- The previously removed brake drum and wheel are put on and screwed on.
- The rotation is evaluated, if there is no noise, then all actions were performed correctly. The car is removed from the jack.
- The wheel with the central nut is tightened.
- The hub nuts are closed and the wheels are tightened securely.
Many experts agree that on the VAZ 2109, like other domestic cars, the rear wheel bearing (RH) is a weak point. This is not due to the low quality of the products. It's all because of the condition of the roads.
Considering the condition of the road surface, as well as the need to have a car always ready for travel, replacing a faulty bearing should be done in a timely manner. Otherwise, the consequences of operating a car with a worn bearing could result in expensive repairs and an accident.
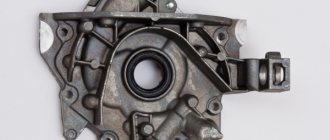
Rear hub replacement tools
To dismantle the hub you will need the following tools:
How to replace the hub:
- Loosen the wheel nuts.
- Raise the car with a jack. Place supports for belaying. Place anti-recoil devices (shoes).
- Remove the decorative cap (center of the wheel).
- Unscrew the wheel nuts.
- Remove the brake drum from the hub or remove the disc brake caliper.
- Unscrew the bolts securing the hub to the bracket. The bolt is unscrewed through a special hole in the hub itself. To gain access, you need to rotate the flange until the holes line up with the bolts. These nuts are tightened with a large torque, so unscrewing them is not so easy.
- Unscrew the caliper mounting bolts, steering knuckle mounting bolts and brake pad guides.
- Pull out the hub. The rear hub is removed from the bearing. You need a special puller to press the hub off the bearing.
When to replace
The rear wheel bearing should be changed no later than every 100 thousand kilometers. But the realities of our roads and the quality of products are such that in fact the service life of the element is noticeably less than the specified period.
Practice shows that it is necessary to change the spare parts every 50-60 thousand kilometers, and in some cases even more often. It is best to focus not on mileage, but on signs of wear.
Symptoms of a problem
The car itself will tell you that it’s time to change the air conditioner by displaying the following signs:
- There is a noise, a strong hum or knocking sound in the rear of the car when driving;
- Play is detected in the bearing.
Checking status
If one of the symptoms appears on your VAZ 2109, you must lift the rear wheels one by one and make sure whether the problem is really in the bearings. For this:
- Lift the wheels and spin each one by hand;
- Listen to whether any extraneous sounds appear when the wheel spins;
- If you hear a characteristic hum, this indicates wear on the wheel bearing;
- Check the assembly for play. The wheels must be hung;
- Firmly grasp the top of the wheel and pull away from you and towards you;
- If the bearing is in good condition, the wheel will not move, that is, play;
- If there is a build-up, then you will have to replace the spare parts.
VAZ 2110 rear wheel bearing replacement
As you know, the condition of domestic roads leaves much to be desired, and in some places of our vast homeland there are none at all.
Naturally, the vehicle's chassis experiences increased loads, which, in turn, lead to accelerated wear of its components, which provokes failures and malfunctions. One of the most important components of the chassis is the hub bearing. Many car enthusiasts have probably encountered the need to replace it, but it is not easy to implement. In this article we will tell you about all the subtleties and nuances of this procedure on a VAZ-2110 car.
Content:
Selection of ZPS
When choosing a rear wheel bearing, you should focus on the required characteristics and manufacturers who today produce ZPS suitable for the VAZ 2109.
Let's start with the characteristics. The choice should be made in favor of bearings with the following parameters.
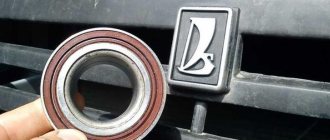
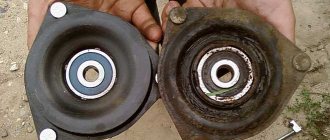
For the rear hub, a ball, angular contact, double-row closed type bearing is used.
Now let's talk about manufacturers. There are several of them, each of which has its own characteristics.
| Bearing manufacturer | Peculiarities |
| VBF from the Volgograd plant | Motorists consider this bearing plant to be quite reliable and proven. An important advantage is that fakes from the Volgograd manufacturer are quite rare on the market. |
| Bearings of the Saratov plant - SPZ | A close option to the Volgograd plant, which is famous for its reliability and has impressive popularity among owners of domestic cars. There are a few more fakes |
| These are products of the same Saratov plant, only for budget consumers. Quite cheap bearings are characterized by less durability. Otherwise, there are no serious complaints about quality | |
| 20 GPZ. Kursk plant | Nowadays it is very rare to come across products from this plant, since the company produced bearings back in the days of the USSR and for some time after the cessation of its existence. Today there is no production, but occasionally the remains of bearings can be found. The quality is excellent (USSR, after all), but the shutdown of production will not allow you to easily find it. Maybe they are no longer anywhere at all. |
Replacement
Since the test results showed that the old rear wheel bearing has already served its purpose, it will need to be replaced.
Many people ignore the noise and hum of the ZPS until a certain time. But if timely repairs are not done, this can lead to serious problems that can result in the following consequences:
- Initially, hum and noise will cause discomfort due to their unpleasant sounds. Many motorists are accustomed to comfort, so they will do everything to get rid of the noise;
- If you continue to ignore the problem bearing, you will soon have to replace not only it, but the entire rear strut. And these are serious financial losses;
- Bearing wear leads to disruption of the running system. From here, the car can behave in the most unpredictable ways, increasing the likelihood of an accident.
Don’t joke with a problematic air conditioning system, but it is better to start repairing it immediately when you notice signs of its malfunction.
- After checking, lower the car to the ground, loosen the hub nut and bolts holding the wheels.
- Remove the decorative cap from the hub nut, then unlock the nut, loosen the tightening and use a socket with a lever to increase the force, remove the fasteners. Please note that these nuts are tightened with a large torque, so you will have to work hard.
- Loosen the tension on the wheel bolts.
- Use a jack to lift the side on which you will begin the repair. In this case, the car must be in the first gear position at the gearbox.
- Remove the wheel.
- Remove the brake pads and drums, which will allow you to completely unscrew the hub nut and put it aside along with the thrust washer.
- Now you have got rid of everything unnecessary, so you can arm yourself with a special puller to press the hub off the axle.
- You will need a vise to hold the removed hub. Without them, removing the bearing will be quite problematic. Don't forget to remove the retaining ring before doing this.
- Using a mandrel and puller, press out the old bearing.
- It is extremely important to treat the hub, wash it, removing all dirt.
- Only after the hub has been cleaned can a new bearing be pressed in that meets the parameters required by the VAZ 2109.
- Replace the retaining ring. It is also better to replace it rather than use the old ring.
- Press the hub into its rightful place using a mandrel of suitable diameter. The force must be applied to the inner ring of the new bearing, and not to the outer one.
- All you have to do is assemble the knot in reverse order. There shouldn't be any serious difficulties with this.
- The last step is the mandatory replacement of the old hub mounting nut. It is not advisable to use an old nut. After installing the fastener, lock the nut.
- Carry out a similar operation with the second hub. Experts recommend replacing the rear hub bearings in pairs so that their wear is equal and uniform. In addition, if one bearing fails, the second will soon follow. Why put off already obligatory events?
A competent approach to replacement, the correct choice of rear wheel bearing in accordance with the stated parameters are a guarantee of successful repair of your VAZ 2109. Do not delay in solving this problem, otherwise it will result in serious financial costs for you or, God forbid, an accident.
No component of the car is subjected to such a load as the chassis. Hence the large number of malfunctions. A striking example of this is the rear wheel hub bearing. According to the design and calculations of the designers, it should serve regularly for at least 100,000 km. mileage But domestic roads and improper operation make their own adjustments. Very often, a bearing fails without serving even half its service life.
In this case, you cannot delay the replacement. It's not even that a faulty bearing will cause an even more serious problem. In this case we are talking about safety. You don’t need to think that such complex repairs can only be done at a car service center. It is quite possible to replace the rear wheel hub bearing yourself.
Symptoms and causes
Let's look at how to check the rear wheel hub bearing. Unlike many others, this fault can be localized with almost 100% accuracy. And this is true not only for experienced, but also for novice car enthusiasts, if you know the characteristic signs. The main ones:
- Extraneous noise when the car is moving. It is often mistakenly confused with the “howl” of the transmission, but in this case the sound does not disappear even when switching to neutral.
- The unpleasant sound is especially noticeable in the back seat, from the side of the faulty wheel;
- When turning, you can feel a clear braking of the faulty side, and in especially severe cases, clicks are heard;
- The wheel heats up while driving.
All these are indirect symptoms, upon hearing which the car owner should be wary and conduct a more detailed check. To do this, use a jack to hang the supposedly faulty wheel. Now you need to spin it well.
We are looking for the most passable crossover - 10 contenders. Take a look
A rumble is heard - bad, but not fatal yet. Holding the wheel with your hands from above and below, you need to swing it vertically. If there is play, the bearing should be scrapped.
What does this come from? Surprisingly, only a third of bearings “die” from natural wear of metal parts. The remaining two thirds are due to the following reasons:
- Manufacturing defects;
- Severe operating conditions. For example, constant driving on country roads at high speed;
- Lack of timely service. As a rule, there is a lack of lubrication and dust and dirt enter the bearing;
In addition, there is another reason - incorrect installation during the previous repair. However, this can be easily avoided if, before replacing the rear wheel hub bearing yourself, you study the sequence of work in advance and focus on some details.
Do-it-yourself replacement of the rear wheel hub bearing
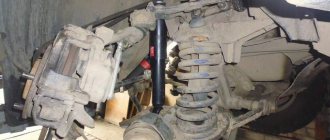
Any repair of a car's chassis cannot be called simple. Not because it requires special education and special skills. The difficulty, first of all, lies in the labor intensity of the repair. Removing some parts requires a fair amount of effort and a lot of patience.
You need to be prepared for this in advance. You can’t take a car with a half-disassembled rear hub to a service center anymore. If your determination is not lost, first of all, you need to stock up on tools.
Tools and accessories
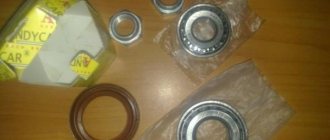
To change the rear wheel hub bearing yourself you will need:
- Jack and suitable wooden support;
- A socket wrench, usually 30, and a suitable piece of pipe, as a reinforcement for the wrench;
- Key 12, for disk guides;
- Balloon wrench;
- Round nose pliers for removing retaining rings;
- Hammer;
- Chisel;
- Universal puller. You can do without it, but this requires some experience. Therefore, it is better to buy it; it is also suitable for the front wheel bearing.
- Mount.
- And, of course, a new bearing. It does not need to be taken out of the packaging ahead of time to prevent dirt from getting in.
Front wheel bearing size VAZ 2108
Any spare part of a modern car must be perfectly matched to fit and technological dimensions. Unfortunately, the manufacturer does not always take into account the specifics of using materials in spare parts, which affects their service life, reliability, and, ultimately, traffic safety. The chassis of a car is subject to enormous loads, so it is simply impossible not to pay attention to the correspondence of the factory dimensions with the ones being replaced.
Content:
VAZ 2108 front wheel bearing size
If we take this issue more specifically, the chassis of cars of popular models and brands most often suffers from low-quality spare parts. First, let's look at this problem using the example of a VAZ 2108 front wheel bearing.
It would seem that there is nothing complicated - the hub has its own standard dimensions, which the roller bearing must correspond to:
internal diameter - 34 mm; outer diameter - 64 mm; Bearing width - 37 mm.
Only by these parameters can you select a bearing, of which domestic factories produce thousands. Manufacturers from China actively help in this, providing products that are not of the best quality and do not stand up to any criticism. Neither the steel grade, nor the number of balls, nor the dynamic performance of such bearings meet the standards. There are bearings without any markings at all, and there are particularly zealous owners who buy them. Such bearings burn out within 1000 km and simply fall apart while driving.
Features of choosing a wheel bearing for a VAZ 2108
Naturally, we will not be able to check the dynamic load on the bearing races and on each of its balls. But you need to remember, like the Our Father, that:
- The VAZ 2108 wheel bearing is marked 25 69 07;
- according to the international marking system it is designated 53 20 66 DA;
- the bearing has a mass of 0.445 kg;
- ball diameter - 9.525 mm;
- number of balls - 28.
The difficulty in choosing bearings is that they are not consumable parts, and they are not changed as often as piston rings or silent blocks. That's why some manufacturers don't even bother making human packaging. In addition, the bearing used in the front wheel hub of the VAZ 2108 is maintenance-free, which means:
- the bearing does not require lubrication;
- does not require preload;
- does not require adjustments during installation and operation;
- must have a very high resource.
Design of wheel bearings for VAZ 2108
All VAZ cars are equipped with only three types of wheel bearings - wheel bearings for front-wheel drive VAZ cars, wheel hub bearings for rear wheels, and wheel bearings for Kalina and Grant cars, which are smaller in size.
All VAZ bearings are of the HUB-1 type, and this type is characterized by the design and installation features. The bearing has a double-row design, is a type of angular contact ball bearings with closed working surfaces and does not have flanges for attachment to the hub.
Manufacturers and prices of VAZ wheel bearings
These bearings belong to the middle price segment, so the demand for them is very high. Because of this, you can often find the fakes we mentioned. However, the transition of the VAZ plant to bearings of this type, instead of roller ones of the old type, made it possible to choose bearings not only of domestic production, but also of many other foreign factories.
How to change the rear wheel bearing on a VAZ 2110: sequence of actions
First you need to remove the wheel bolts and jack up the car.
Attention, under no circumstances should you carry out work on a car mounted on a single jack; you must additionally use a wooden stand of suitable size.
This is due to the great effort that will have to be exerted during the work process. A car on a jack will be very unstable. The further procedure is as follows:
- The bolts are unscrewed and the wheel is removed;
- Now you can remove the hub boot.
- The wheel guides are unscrewed. Sometimes this is not easy to do, they “sour” in aluminum. The main thing here is not to break the edges, so there is no need to rush;
- Next, the brake drums are removed. It all depends on how long ago they were not filmed. Sometimes they are dismantled “by hand”, and sometimes you have to knock with a hammer, through the wood, from the back side. There is another way. The guides are screwed into special holes. It must be borne in mind that the discs cannot be removed with pins; this will lead to the destruction of the aluminum threads. You can only tighten them until they are slightly tight, and then try tapping the disc through the wood. It should help.
- The hub nut is unscrewed. You'll have to try - it's twisted very tightly. Therefore, the knob is reinforced with a piece of suitable pipe. Care must be taken as the car will sway.
- The hub is removed. Here, of course, it is better to use a three-legged puller. However, not everyone has it, so you will have to use the “proletarian” method. It consists in the following. The wheel is installed on the hub and screwed in, but not completely, but so that there is a gap of several centimeters between the disc and the hub. Thus, a kind of reverse hammer is obtained. With a few sharp jerks of the wheel, the hub can usually be removed. And that's half the battle.
- Using round-nose pliers inserted into the corresponding holes, remove the retaining ring.
- Using a universal puller, the old bearing is pressed out or simply knocked out;
- The hub axis is carefully inspected. Sometimes the old bearing race remains on it. It needs to be removed. The bearing has been removed, you can proceed to installing a new one. But first you can inspect the brake wheel cylinder. If it has leaks, you will have to change it so as not to have to remove the drum again.
- The axle and hub are inspected for damage, cleaned of dust, dirt and rust and lubricated with lithol-type lubricant.
- The new bearing is pulled out of the packaging, its race is also easily lubricated along the seating part;
- Using a universal puller, the bearing is installed in place. If you do not have a tool, you can press the bearing using a vice. In this case, the old clip is used as a mandrel. It is not recommended to hammer the bearing, as this may lead to its destruction.
- Now you can install the retaining ring;
- Carefully, using a mandrel or pipe of a suitable diameter, with light blows, the hub is put in place;
- Fixed with a nut;
- The brake drum is put in place, the guides are screwed in;
- The wheel spins. Just for fun, it’s worth trying to shake and twist it. There will be no extraneous sounds or backlash.