Purpose and design features of the thermostat
The thermostat is designed to block the circulation of fluid through the cooling system until the car engine is completely warmed up in order to speed up this process and further maintain the required operating temperature.
Thermostat operating principle
is based on the melting of artificial wax placed in a small cylinder in the direction of the motor. Wax melts at a temperature of at least 80 degrees. At the same time, it expands, increasing in volume, due to which it squeezes the locking pin out of the cylinder, unlocking the thermostat valve and restoring circulation.
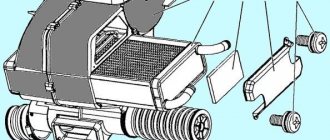
In general, a thermostat consists of:
- inlet pipe connected to the engine cooling system;
- bypass valve, which, if necessary, shuts off the small cooling circle;
- an outlet pipe connected to the coolant pump;
- spring holding the bypass valve;
- wax ball;
- inlet pipe connected to the radiator;
- springs holding the main valve;
- the main valve itself, designed to shut off the main circulation;
- piston;
- housings.
Before the engine warms up, the circulation of the coolant does not stop completely - it is carried out in a so-called small circle, where the coolant flows from the pump only through the cooling jacket and the heater radiator, so that the system does not stagnate. When the main circulation valve opens, the small circle is automatically closed.
That is, the entire thermostat device is actually just a cylinder, a return pin, wax and a number of minor parts. This simple thermostat circuit is effective and reliable, so it remains the same in most newer cars.
In different car models, thermostats are set to different opening temperatures, which are most often indicated on the device body. In addition, different cars can be installed with or without housing thermostats. Their main difference is the installation itself, either in the engine block, or in a separate housing, which is a complex two-level circuit.
How to determine if the thermostat is faulty?
We figured out how to replace it, but we didn’t figure out how to determine that the thermostat is faulty. And identifying problems with this element is not difficult. You can, of course, take measurements in the ECU test mode to determine the exact coolant temperature (as said, its readings may differ from the sensor on the dashboard).
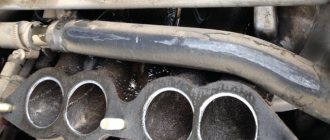
But you can do it easier. It’s just enough to check the temperature of the pipe going from the thermostat to the radiator in different modes.
That is, it is enough to start a cold engine, and then go into the engine compartment and put your hand on the indicated pipe.
If it begins to warm up even before reaching the optimal temperature regime, then this indicates jamming in the open or half-open position. At the same time, the engine itself cannot reach the optimal temperature regime, and the stove in the cabin does not heat.
If, on the contrary, the pipe is cold even after reaching the required temperature, this indicates that the thermostat is stuck in the closed position.
Causes of thermostat failure
The most important sign of a thermostat failure is a lack of circulation in the engine cooling system, which leads to overheating.
There can be many reasons why a thermostat may malfunction, but the most common problem is corrosion eating away at the cylinder and locking pin, causing fluid flow to not completely stop in any valve position.
In such a situation, it will be much more difficult for the engine to warm up, and it will take much longer than in normal mode. If, on the contrary, the thermostat constantly remains closed, the engine quickly overheats, which leads to a complete inability to continue driving or more serious consequences, such as thermal deformation of the cylinder block and expensive engine overhauls.
When the coolant temperature indicator is on the verge of overheating, despite the fact that one hose is hot and the other is cold, we can most likely say that the thermostat valve is stuck closed and the liquid is not passing through the radiator.
Preparing to replace the thermostat
It should be noted that replacing the thermostat on a VAZ 2110 will require a number of preparatory work, including:
- First of all, you need to place the car on a flat surface and wait for the engine to cool. After all, replacing the thermostat will require draining the coolant, and in working condition it has an extremely high temperature,
- you need to prepare a container for draining the antifreeze, after which you can unscrew the clamps securing the thermostat pipes. By the way, at this stage the coolant can also be replaced.
The thermostat, despite its small size, plays a very important role in the cooling system. It is this part that allows the engine to quickly warm up to operating temperature, and subsequently controls operation and prevents overheating. So, replacing the thermostat will be required if any malfunction occurs - when the thermostat does not open and when it does not close.
In addition to the above tools, to carry out such an operation as replacing a thermostat, you will need a 13 key, a 4 hex key. As for draining the antifreeze, for this you need to take a container, preferably a five-liter container and a two-meter hose.
Thermostat replacement sequence
So, replacing the thermostat is performed in the following sequence:
- It is necessary to drain the coolant from the cooling system. By the way, replacing the heater core will also require this operation, like any other intervention in the operation of the cooling system. Here you will need a clean five-liter container, the above keys and a hose. At the bottom on the left side you need to unscrew the plug, which looks like a plastic lamb - so you don’t need any tools to unscrew it, it’s easy to do by hand. One end of the hose is lowered into the container, after which the other end is quickly brought to the drain hole. Then it will take some time for all the liquid to drain out of the radiator. After the fluid flow has dried up, the hose can be removed and the plug put in place,
- on a VAZ 2106 - replacing the thermostat also requires draining the fluid from the engine block. The plug in this case is located at the bottom right. To unscrew you will need a 13 key. Drain the coolant in the same way as described above. The drained liquid can be used again unless there is obvious contamination,
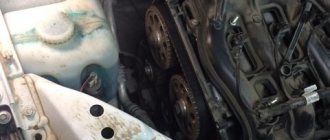
- it is necessary to remove the thermostat cover. Its location is on the right side of the engine block above the gearbox. To remove it, you will need to unscrew the three bolts using a 4mm hex wrench, then loosen the two clamps on the pipes, and subsequently disconnect the cover from the pipes. Along with the cover, the thermostat element that needs to be replaced will also be removed.
- To remove the faulty part from the cover, press it slightly and turn it. Under the action of the spring, the thermostat will come out of the mount. The element must be replaced with a new one, after which the thermostat is assembled in the reverse order. A new O-ring must also be installed between the thermostat cover and its housing. The junction of the parts should be additionally sealed with sealant. It should also be used to process the ends of the pipes that will be attached to the lid. The pipes are attached to the cover and secured with three previously removed clamps,
- it is necessary to fill the coolant, taking into account all existing recommendations for such an operation. After this, you can start the engine,
- any operation, including replacing the thermostat, as well as repairing the stove on a VAZ 2110, requires monitoring upon completion of the work. The correct operation of the thermostat is checked as follows: the engine should be warmed up to a temperature of eighty-five to ninety degrees, then touch the pipe. It turns out that at the moment the large circuit opens, the pipe must be hot.
It is clear that repairs on the VAZ 2110 can be carried out either by the driver himself or in a specialized workshop.
Determining the functionality of the thermostat
In order to determine whether a given part works, you don’t even need to know where the thermostat is located. It is enough to simply warm up the engine, but do not bring its temperature to the red line. Then turn off the engine and open the hood, look for the upper and lower radiator hoses there. Simply touching them is enough. If one hose turns out to be hot, while the other remains cold, most likely the thermostat valve did not open when the engine was running, which means it is not operational and needs urgent replacement. The thermostat circuit is quite simple, the device is cheap, so there is no point in trying to repair it - changing it is much easier.
Diagram, elements of the cooling system and their operation
The main elements that make up the engine cooling system circuit are found and are similar in different types of engines: injection, diesel and carburetor.
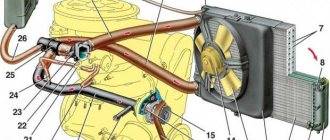
General diagram of a liquid engine cooling system
Liquid cooling of the motor makes it possible to equally absorb heat from all components and parts of the engine, regardless of the degree of thermal load. A water-cooled engine creates less noise than an air-cooled engine and has a faster warm-up rate when starting.
The engine cooling system contains the following parts and elements:
- cooling jacket (water jacket);
- radiator;
- fan;
- thermostat;
- liquid pump (pump);
- expansion tank;
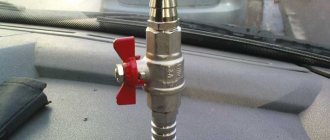
- connecting pipes and drain taps;
- interior heater.
- A cooling jacket (“water jacket”) is considered to be cavities communicating between double walls in those places where excess heat is most needed to be removed.
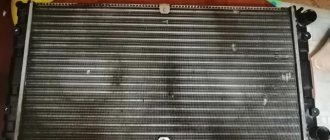
- Radiator. Designed to dissipate heat into the surrounding atmosphere. It structurally consists of many curved tubes with additional ribs to increase heat transfer.
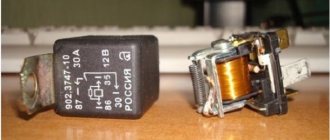
- The fan, activated by an electromagnetic or, less commonly, hydraulic clutch, when the coolant temperature sensor is triggered, increases the air flow flowing into the car. Fans with a “classic” (always on) belt drive are rarely found these days, mainly on older cars.
- The centrifugal liquid pump (pump) in the cooling system ensures constant circulation of coolant. The pump drive is most often implemented using a belt or gears. Turbocharged and direct injection engines are usually equipped with an additional pump.
- The thermostat is the main unit that regulates the flow of coolant, usually installed between the radiator inlet pipe and the “water jacket” of the engine, and is designed in the form of a bimetallic or electronic valve. The purpose of the thermostat is to maintain the specified operating temperature range of the coolant in all engine operating modes.
- The heater radiator is very similar to the smaller radiator of the cooling system and is located in the car interior. The fundamental difference is that the heater radiator transfers heat to the passenger compartment, and the cooling system radiator transfers heat to the environment.
Principle of operation
The principle of operation of liquid engine cooling is as follows: the cylinders are surrounded by a “water jacket” of coolant, which removes excess heat and transfers it to the radiator, from where it is transferred to the atmosphere. The liquid continuously circulates to ensure optimal engine temperature.
Operating principle of the engine cooling system
Coolants - antifreeze, antifreeze and water - during operation form sediment and scale, disrupting the normal operation of the entire system.
Water is not chemically pure in principle (with the exception of distilled water) - it contains impurities, salts and all kinds of aggressive compounds. At elevated temperatures they precipitate and form scale.
Unlike water, antifreezes do not create scale, but during operation they decompose, and the decomposition products negatively affect the operation of mechanisms: corrosion deposits and layers of organic substances appear on the internal surfaces of metal elements.
In addition, various foreign contaminants may enter the cooling system: oil, detergents or dust. Special sealants used for emergency repair of damage in radiators can also get in.
All these contaminants settle on the internal surfaces of components and assemblies. They are characterized by poor thermal conductivity and clog thin tubes and honeycombs of the radiator, interfering with the efficient operation of the cooling system, which leads to engine overheating.
Video about how engine cooling works, operating principles and malfunctions
Something else useful for you:
- The stove in the cabin does not heat well, reasons, what to do and prevention
- Why the car engine does not start: how to find the reason
- Engine cooling radiator: design and principle of operation
Traditional methods for cleaning an engine cooling radiator
Abstract Engine cooling system VAZ 2108 Similar works
Craftsmen recommend that to flush the radiator, use:
- anti-scale detergents for washing machines
- caustic soda
- milk tank cleaning products
- whey
- sewer pipe cleaning products
- coca cola
Engine cleaning in this case is mediocre, and the engine damage that can be caused by cleaning the radiator in this way is not worth the money saved.
When deciding how to flush the engine cooling radiator without removing it, the car owner must take into account the degree of contamination of the radiator of his car, the available budget and common sense, so as not to harm his iron horse.
I think many people have experienced engine boiling. Unfortunately, there are plenty of reasons for overheating. This could be a broken radiator, a torn pipe, resulting in all the coolant leaking out. But sometimes the reason lies much deeper. In this article we will try to consider as many possible reasons for engine overheating.
So, let's begin. In the first part of our article we will consider reasons that are not related to the problem of the operation and integrity of the engine itself.
The thermostat is not working. The thermostat may lie in the closed position and refuse to open, or may not open all the way. How do you know it's him?
We find the upper and lower pipes going to the radiator. We warm up the engine to operating temperature (80-90) and carefully test the hoses. If one hose is hot and the other is cold, then the thermostat is probably not opening. To make sure that the thermostat is not working, you can boil it. Usually the opening temperature is indicated on the thermostat itself, or in the “smart book” of the car’s operation manual. But in any case, the thermostat should begin to open 70-90 degrees, depending on its operating temperature, and be fully open before the water begins to boil. Also, when the thermostat opens, the temperature of the liquid usually drops slightly, which can be seen from the temperature sensor. The cost of a thermostat usually varies from 100-300 for Russian cars and 300 or more for foreign ones.
The radiator is clogged.
The radiator must cool the liquid with air flow. But it happens that the radiator becomes clogged. It can become clogged both inside (due to the ingress and accumulation of any dirty tricks from water or damage to the cylinder head gasket or a burst jacket, which can be read about in the next article), and outside.
The radiator is clogged inside. How to find out? There are several ways: Start and warm up the engine to a temperature of 80-90 degrees. Turn it off and touch the radiator with your hand. It should be evenly heated. If you feel a cold zone, then the radiator is clogged in that place. You can observe the pipes coming from the radiator. If the radiator is sufficiently clogged, then the lower pipe through which the pump pumps fluid into the engine should shrink and be colder to the touch than the upper pipe, which will also feel significantly hard to the touch due to excess pressure
It is important to know that on many cars, coolant is sucked in through the upper pipe. I think there is no need to explain what should be done in this case
If this happens, you can warm up the engine to operating temperature and unscrew the lower pipe from the radiator and drain the liquid. Usually, subsequent flushing with a hose is sufficient, but it happens that you need to remove the radiator and pour boiling water. First you need to plug all the holes except the neck. Next, close the stopper and shake for 5-10 minutes, or until your hands get tired. Pour out the water and rinse. Ideally, I would turn on the jackhammer compressor and blow through it. That's the only way I could clean it up. If, during flushing, pieces of coagulated oil flying out of the radiator were noticed, then you should think about the integrity of the cylinder head gasket and cylinder block.
The radiator is clogged on the outside. How to determine? Yes, very simple. just look at him. Perhaps it was filled with fluff or midges. Maybe the old honeycombs have rotted and started to break off, blocking the space for air flow. What should I do? If the radiator is very rotten, then it may be more advisable to buy a new one. If midges are to blame, then you can blow it out with a compressor. The main thing is not to bring it too close, otherwise you can crush the honeycombs with air pressure. Finally, you can rinse with hot water and blow again
Of course, I want to pay attention to the integrity of the radiator. You need to make sure that it is not leaking anywhere.
I think few people would like to stand on the highway without coolant.
It is important to know that highly bent pipes are the cause of overheating!
Tip: Always monitor the coolant temperature. And fill only with good and high-quality antifreeze or antifreeze.
Interactive engine cooling system diagram
Hover your mouse over the picture to make it interactive.
Why you need an engine cooling system can already be guessed from the name - when working, the engine heats up and cools through the radiator. That's it in a nutshell. In fact, the task of the engine cooling system is to maintain its temperature in a certain range (85-100 degrees), called operating temperature. At operating temperature, the motor operates as efficiently and safely as possible.
Large and small circle of the engine cooling system
After starting, the engine must reach operating temperature as quickly as possible. For this purpose, the cooling system is divided into two parts - a small circle and a large circulation circle. In a small circle, the coolant circulates as close as possible to the cylinders and, accordingly, heats up as quickly as possible. As soon as it warms up to the highest operating temperature, the valve opens and the liquid flows into a large circle, where it prevents the engine from overheating. The task of the small circle is to maintain the operating temperature, and the large circle is to remove excess heat.
Heater as part of the engine cooling system
It’s nice when the interior warms up quickly, but this happens because the stove is part of a small circulation circle. Through the hoses, the liquid goes to the heater radiator and returns back. What does it mean? In order for the heater to start blowing warm air faster, it must be turned on when the engine warms up.
Thermostat and pump
Cooling system pump and thermostat
So, we found out that the engine does not overheat due to coolant circulation. But what makes the liquid move? The answer is a pump. This is a special pump that is driven by an engine through a belt, but there are also pumps with an electric motor. The main pump malfunctions are associated with leakage through the drainage hole and bearing wear (accompanied by a squeaking sound). There are also pumps with a plastic impeller, which is corroded by low-quality antifreeze.
The thermostat is the same valve that opens when the coolant heats up and circulates it in a large circle. Consists of a cylinder containing a substance that expands when heated; Having reached a certain temperature, it squeezes out the stem and opens the valve. Once cooled, the rod retracts and the valve closes.
Radiator and expansion tank of the engine cooling system
The radiator is part of a large circle and is installed in front of the car. Liquid circulates in it, which is cooled by counter air and a fan.
The fan operates on suction so as not to interfere with the oncoming air flow.
The radiator cap maintains pressure in the cooling system. It has a valve that opens when the pressure exceeds the operating pressure and releases excess liquid through a hose into the expansion tank.
The expansion tank is needed to store the liquid needed for cooling. When the antifreeze in the expansion tank cools, it will return through the hose back to the radiator, excluding air from entering. There are combined tanks with a valve cover.
This is how the engine cooling system works. Among the main problems associated with this system it is worth highlighting:
leak - can appear anywhere, from the block channels to the expansion tank;
The main reason is excess pressure due to a faulty radiator cap/ext. tank
- overheating occurs unexpectedly, but there is no need to panic. It is better to turn on the heater at full speed, turn on the highest speed, stop coasting and turn off the engine.
Do not perform any actions until the system has cooled down.
The main reasons are that all the coolant in the system has leaked, the fan has failed, the radiator is clogged, the thermostat or pump has failed.
The main reasons are the lack of antifreeze, the thermostat broke in the open position.
Thermostat valve sticking
This device is responsible for redirecting the coolant flow from a small to a large circle. This is done to speed up the warming up of the power unit to operating temperature (due to the fact that antifreeze does not enter the head radiator, circulating from the engine to the stove and back). Due to age and contamination, the thermostat valve stem begins to jam, which leads to malfunction of the device, and, consequently, to disruptions in the operation of the cooling system. This malfunction can be determined from the engine compartment by simply assessing the temperature of the pipe leading to the radiator: it should remain cold until the engine reaches operating mode, and only then will it quickly warm up. If it starts to heat up immediately after starting the engine, or remains cold after turning on the fan, it needs to be replaced (the thermostat cannot be repaired). The procedure for dismantling it occurs in the following order:
- the antifreeze is drained by unscrewing the plug on the cylinder block (not on the radiator!);
- the clamp securing the pipe going to the thermostat cover is loosened;
- the tube itself is removed;
- unscrew the bolts securing the thermostat cover;
- the faulty thermostat is removed along with the sealing ring;
- the seat is thoroughly cleaned;
- a new thermostat is installed along with the gasket;
- all other operations are performed in reverse order.
After adding coolant, you should make sure that there are no leaks when the engine is running, as well as that the device is working properly.