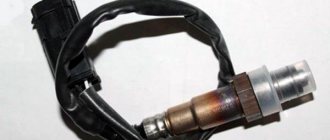
How to check the serviceability of the VAZ ignition module?
In our opinion, the most effective way is cross-replacement. That is, we dismantle your ignition module and replace it with a known good one. If after replacement the engine starts to work normally, you can say that the problem was in the module.
Also, of course, there are other methods of checking, but they are more troublesome, and you will also need a light bulb and a multitester.
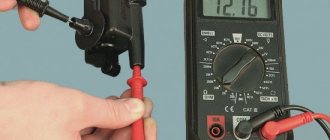
Using these devices, you can check the resistance between the paired terminals of the secondary winding. The procedure is as follows: transfer the tester to the ohmmeter state, install the probes on the terminals to the 1st and 4th cylinders. Then do the same with the 2nd and 3rd cylinders and compare the readings; if they differ by more than ohms, this is a sign of a malfunction of the secondary, which means that the module is faulty and needs to be replaced.
There is one more method to check. We transfer the multitester to the voltmeter state. In this case, we check the wiring harness to which the module is connected. We disconnect this block from the module and install a voltmeter test probe on it, then install another probe on the engine ground. Oh yes, we forgot to say. You will also need an assistant who will start the engine or turn the starter. At this time we look at the values on the monitor. The voltage should be around 12 Volts. Do the same with the second contact.
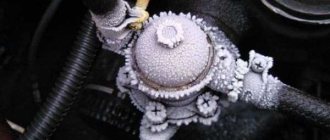
There is such a problem that there is no tension at all. In such a situation, it is necessary to check the fuse, but the problem may also be wire rupture and wear due to corrosion and broken contacts.
Is it possible to check without a multitester? There is such a way. We take a twelve-volt control lamp and connect one of its contacts to block A, and the second to ground. Next, it’s up to the aforementioned assistant, who must turn the starter. Watch for yourself, the light should blink. Repeat the same with contact B.
So it’s not difficult to understand how important the VAZ ignition module is for a vehicle, which, without exaggeration, can be considered the heart of the propulsion system.
Let's sum it up
If the results of the diagnostic actions of the LADA Kalina car reveal that the ignition coil is faulty, then replacing this unit is a very simple undertaking. To implement the process, you will need a hex wrench. Before dismantling, we recommend that you remember the location of the high-voltage cables at the corresponding coil terminals. This will eliminate switching errors when installing the device.
Turn off the ignition and disconnect the engine control system wiring harness block from the coil.
To check the coil power circuit, connect the tester to the middle terminal of the harness block and the engine ground.
When the ignition is turned on, the device should record a voltage approximately equal to the battery voltage.
If there is no voltage at the middle terminal of the wiring harness block, then the wire connecting the block to the ignition switch or the lock contact group is probably faulty.
To test the coil control circuits, you can use a probe with a 1-2 W lamp.
We relieve the pressure in the engine power supply system and do not replace the fuel pump fuse.
We connect the probe probes to the middle and one of the outer terminals of the wiring harness block.
If the control (and power) circuit is working properly, the probe light should blink frequently when cranking the crankshaft with the starter.
Otherwise, check the wire connecting the outer terminal of the block to the controller terminal for open circuit and short to ground.
Similarly, by connecting the probe probes to the middle and other extreme terminals of the block, we check the other control circuit of the ignition coil.
You can check the serviceability of the ignition coil itself on the engine by disconnecting the wiring harness block and high-voltage wires from it; for clarity, we show the test on a dismantled coil.
Self-diagnosis of the module
You can check the module in the following ways:
- Checking for weight. To carry out the test you will need a multimeter. The tester should be set to resistance measurement mode. One probe of the tester must be connected to pin 15, and the second one must be shorted to the housing. If the unit is working properly, the resistance should tend to infinity.
- Checking the primary windings of the short circuit. The primary windings are checked for breaks using a tester. To check, you need to connect the probes of the meter to the outer contacts on the short circuit. If the resistance tends to infinity, this indicates the presence of a break in one of the windings.
- Checking secondary windings. Since there are two windings, the test is carried out in two stages. First you need to check the short-circuit winding of cylinders 1 and 4. To do this, the multimeter probes must be placed in the appropriate terminals. A resistance of about 5.4 kOhm is considered normal. If the resistance tends to infinity, then there is a break in the winding. The short-circuit winding of cylinders 2 and 3 is checked in the same way.
In case of malfunction, the ignition module is replaced with a new one.
Methods for diagnosing device performance
The simplest method that will help determine the performance of the coil is to replace it with a similar working device. This is possible if there is somewhere to get it. Please note that the module must match the parameters of the device under test . If the engine with a working coil works as before the breakdown, the ignition module is definitely faulty.
The main testing method involves using a multimeter. It consists in determining the resistance of the secondary windings of the coils built into the ignition module. The method is simple and does not require additional skills. The device does not need to be removed for testing. The check is done with the engine turned off.
This is how you check the resistance of the secondary winding with a multimeter
- High-voltage wires are removed from the module sockets.
- The tester switch is set to the 20 kOhm position.
- The multimeter rods are placed in turn in the recesses of the corresponding contact pairs (1 and 4, 2 and 3).
- With an intact secondary winding, the performance in both cases is the same. Normally, the resistance should be about 5.4 kOhm (in some models the indicators differ, which needs to be clarified). If the resistance is much greater, then there is a winding break. The resistance is much lower - a breakdown. The coil is faulty and cannot be repaired.
Nanofilm invisible to cameras for license plates
Fines for crossing the stop line and speeding will no longer bother you!
Video: How to check the secondary winding with a multimeter
How to check the ignition coil?
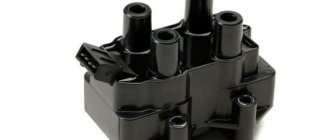
The ignition coil consists of two electric coils, which are controlled by the engine controller. It serves to convert low-voltage 12-volt voltage into high-voltage to produce a spark.
Typical unit malfunctions
The short circuit is a reliable unit with a long service life, but it can fail.
Signs of a short circuit fault:
- engine power decreases;
- failures at certain speeds;
- misfires;
- high fuel consumption;
- work with jerks at idle;
- coil overheating due to internal short circuit;
- The Check Engine light comes on.
Based on these signs, it is impossible to say for sure that the short circuit is faulty. Therefore, its diagnosis is necessary.
How to check the ignition coil on Lada cars
The car jerks, there is no traction, vibration is felt, or the engine is rough; all these are symptoms of improper operation of the individual ignition coil (IIC). Other signs of a faulty ignition coil are the presence of errors 0301, 0302, 0303 and 0304, indicating misfire in one of the cylinders. Let's look at a few simple ways to check the ignition coil with your own hands.
It is worth noting that the process of checking IKZ on modern Lada cars (XRAY, Vesta, Largus, Granta, Kalina and Priora) does not have significant differences. All actions are performed in the same way.
Checking the ignition coil and its circuits on VAZ 11183, VAZ 21116 and VAZ 11186 Lada Granta engines
Tool:
Parts and consumables:
- Probe with 1-2 W lamp
- Ignition switch contact group (if necessary)
- Ignition coil (if necessary)
- Bare wire
1. With the ignition switch OFF, disconnect the engine management system wiring harness connector from the ignition coil as described here.
2. To check the coil power circuit, connect the tester probes to the middle terminal of the harness block and the engine ground. When the ignition is turned on, the device should record a voltage approximately equal to the battery voltage.
Note:
If there is no voltage at the middle terminal of the wiring harness block, then the wire connecting the block to the ignition switch is probably faulty or the lock contact group is faulty.
3. To test the coil control circuits, you can use a probe with a 1-2 W lamp. Relieve pressure in the engine supply system and do not replace the fuel pump fuse. Connect the probe probes to the middle and one of the outer terminals of the wiring harness block. If the control (and power) circuit is working properly, the probe light should blink frequently when cranking the crankshaft with the starter.
Note:
Otherwise, check for a break or short to ground in the wire connecting the outer terminal of the block to the controller terminal.
4. Similarly, by connecting the probe probes to the middle and other extreme terminals of the block, check the other ignition coil control circuit.
5. You can check the serviceability of the ignition coil itself on the engine by disconnecting the wiring harness block and high-voltage wires from it. For clarity, we show the test on a dismantled coil. It is necessary to connect the device wires to the module contacts, which are located at the edges. That is, to the extreme left and right. Using an ohmmeter, check the circuit for an open circuit.
Note:
If the multimeter readings do not change after connecting the wires, this indicates that there is an open circuit in the circuit.
6. To check for breakdown (short to ground) of the primary windings, connect the tester probes to the middle terminal of the coil and to the metal part of the coil body.
Note:
If the circuit of the primary windings is working properly, the tester should record the value “infinity”.
7. To check for a break in the secondary winding of the ignition coil, connect the tester probes to the paired high-voltage terminals of the coil (terminals 1-4 or 2-3 cylinders).
Note:
For a working ignition coil, the tester should record a resistance of about 4.0 kOhm. If the secondary winding breaks, the tester will show “infinity”.
8. Check the other secondary winding of the ignition coil in the same way.
9. Check the secondary windings of the ignition coil for breakdown on the engine. Relieve pressure in the engine supply system and do not replace the fuel pump fuse.
10. To test, you will need two known good spark plugs. Tie the spark plug bodies together with a piece of bare wire (“massage”). Connect the paired terminals of the ignition coil with the spark plugs using serviceable high-voltage wires and place the spark plugs on the cylinder head cover.
11. Turn the crankshaft with the starter. If the ignition coil is working properly, sparks should regularly jump between the electrodes of the spark plugs.
Note:
To avoid electric shock, do not touch spark plugs or high-voltage wire tips.
12. Similarly, by connecting the high-voltage wires to the other two paired terminals of the coil, check the other secondary winding for breakdown.
The article is missing:
- Photos of parts and consumables
- High-quality photos of repairs
Sequence of actions for self-diagnosis of ignition on a Lada Grant
- To check the module, connect the terminals (crocodiles) of the multimeter to the central terminal of the wire block. We activate the ignition, the tester shows the voltage, which should be close to 13 - 14 V.
Check
Note to the Driver! If there is no voltage on the central harness, then look for the cause of the malfunction in the electrical wiring connecting the coils and the contact group of the lock.
- To diagnose the health of the control circuit, we use a probe with a 2 W lamp. We connect the tester terminals to the outputs of the block. If there is no damage to the circuit, the lamp will flash.
Tester with a lamp
By analogy, we take measurements on the remaining three pads.
- To check the proper operation of the coil, first disconnect the block with the high-voltage wire harness. We connect the terminals to the extreme outputs and measure the voltage.
Voltage measurement
To check the secondary winding, we connect the tester to the coil according to the scheme: 1 – 4 / 2 – 3 cylinders.
In good condition, the coil will show a resistance of 4.0 Ohms. Gravity towards infinity is the first sign of circuit damage.
We check the spark plugs according to the following scheme: unscrew them from their standard place, put on the cradles, start the engine. In good condition, a spark jumps between the electrodes.
Replacing spark plugs Lada Kalina video instructions
Hi all. Today we will replace spark plugs on a second generation Lada Kalina with a sixteen valve engine.
I recommend buying Denso spark plugs. Inexpensive and go from replacement to replacement without problems. Order number: Q20PR-U11.
To replace spark plugs you will need:
- open-end wrench for ten
- seven-head wrench
- a long spark plug wrench because the wells are deep
Step by step replacement
1. First, disconnect the negative terminal of the battery. Ten key nut.
2. Remove the engine protective cover. We just pull it towards ourselves.
3. Using a socket head, unscrew the fastenings of the ignition coils. Each coil is secured with one bolt.
Ignition coil bolt locations.
4. Remove the power connectors from the coils. On the connector, press the latch with your thumb and pull it towards you.
5. Take out the coils. They fit tightly, so you need to apply some force.
We stack the coils so that we remember where each one was. During assembly you need to install it as it was.
6. Unscrew and change the spark plugs. I advise you to change one spark plug at a time. That is, they unscrewed one spark plug and screwed in a new one.
If you unscrew all the spark plugs at once, there is a chance that debris will get into the wells.
We tighten the candles without fanaticism.
7. Insert the coils all the way and tighten them with bolts.
8. Connect the connectors and battery terminal.
9. Put on the motor cover.
There are four grooves on the cover, and four matching holes on the motor. Just put the grooves into the holes and press.
10. Start the engine and enjoy the work done.
We also recommend:
Ignition coil (module) - check and replacement
To quickly check the serviceability of the ignition system, you can use a spark indicator for engines with fuel injection. It is put on the spark plug, and a high-voltage wire is connected to it. When checking, you must follow the instructions supplied with the device.
The 11183 (1.6i) engine uses an ignition coil. The 2111 (1.5i) engine may have an ignition coil or ignition module installed (see System Description). The ignition coil replacement is shown below. Replacing the module is done in the same way.
To complete the work, you will need a multimeter (in voltmeter and ohmmeter mode).
1. Prepare the car for work (see “Preparing the car for maintenance and repair”), turn off the ignition.
2. Having released the latch, disconnect the wiring harness block from the ignition coil (module) terminals.
3. Turning on the ignition, use a voltmeter to measure the voltage between terminal 15 and ground (for the ignition coil) or terminals C and D (for the ignition module) of the wiring harness block.
The voltage must be at least 12 V. If the voltage is not supplied to the block or it is less than 12 V, then the battery is discharged, the power circuit is faulty, or the ECU is faulty. You can verify that the ignition module is faulty by replacing it with a known good one. The ignition coil can be checked with an ohmmeter.
After taking measurements, turn off the ignition.
4. Disconnect the high-voltage wires from the spark plugs (see “High-voltage wires - check and replacement”).
13 mm socket wrench
Unscrew the two bolts of the upper fastening of the ignition coil bracket.
6. 17 mm
Having loosened the lower bolt securing the ignition coil bracket, remove the bracket together with the coil.
7. Disconnect the high-voltage wires from the ignition coil (module) (see “High-voltage wires - check and replacement”).
8. Using an ohmmeter, we measure the electrical resistance between the central terminal 15 and the housing (bracket). The device should indicate that there is no short circuit in the primary winding of the coil to ground. We sequentially measure the electrical resistance between the central terminal 15 and the outer terminals - 1a and 1b. The resistance of each of the primary windings of the coil should be about 0.5 ohms.
When measuring small values of electrical resistance (about 1 ohm), it is necessary to take into account the internal resistance of the device, which can be determined by shorting the ohmmeter probes.
9. Using an ohmmeter, measure the resistance between the high-voltage terminals of the coil 1 and 4, and then 2 and 3. The resistance of the windings should be about 5.4 kOhm.
A faulty ignition coil must be replaced.
5mm hex wrench
unscrew the four screws securing the coil to the bracket and remove the coil.
11. Install the ignition coil in the reverse order of removal. We connect high-voltage wires in accordance with the cylinder numbers marked on each wire and on the coil body next to the terminals.
Since the numbering of the terminals on the coil installed on the engine is not visible, it is better to connect high-voltage wires to the terminals of the ignition coil before installing it on the engine.
Checking the ignition coil with a multimeter
Checking the voltage at the terminal block of the wires:
- Disconnect the block with wires from the ignition coil (on the H4M engine, to access the coils of cylinders 1 and 2, remove the intake pipe).
- Turn on the ignition and measure the voltage at terminal 3 of the wiring harness block (the numbering of the terminals is on the ignition coil).
- The voltage at the terminal must be at least 12 V. If it is less or absent, it means the battery is discharged, there is a fault in the power circuit, or the engine control unit (ECU) is faulty.
- Turn off the ignition.
How to check ignition coil resistance:
- We set the switch on the multimeter to the 200 Ohm position and close the probes (the instrument error will be displayed on the screen, which will need to be subtracted from the readings during testing).
- We check the primary winding of the ignition coil by connecting the probes of the device to the contacts.
- The resistance between pins 1 and 3 should be close to zero (about 1 ohm).
- The resistance between pins 1-2 and 2-3 should be high (tend to infinity).
- Set the switch on the multimeter to the 2000 kOhm (or 2 MOhm) position.
- We check the secondary winding of the coil by connecting the red probe to the spring inside the rubber cap, and the black probe to pin 2.
- For good contact, it is best to remove the rubber cap from the coil and connect the probe directly to the coil contact, having first cleaned it of deposits.
- The resistance should be about 300-400 kOhm.
Attention! The resistance of the secondary winding of the ignition coil is highly dependent on its temperature. Carry out the test when the coil is completely cool. Compare the resistance of all four ignition coils to each other. A faulty ignition coil can be identified by very different values, provided that all coils are from the same manufacturer.
The process is also shown in the video:
Checking the ignition coil yourself. Video instruction ZR:
The simplest way to check the ignition coils is to swap them. If misfires change the cylinder, then this coil is not working. To more accurately determine the fault, special equipment should be used (for example, a spark gap or an oscilloscope).
Let us remind you that you can find a problem in engine operation by independently measuring the pressure in the fuel rail, or by checking the compression in the cylinders.
Ignition switch and features of its replacement
The ZZ is secured with one screw and is located on the steering column on the right under the steering wheel. Its design includes a locking device and a contact group. They are interconnected, working synchronously, and are activated using the ignition key.
When diagnosing faults in the electrical circuit, it is necessary to check whether the contacts close correctly when the position of the key changes. If any irregularities in the operation of the ignition protection are detected, it should be replaced (the author of the video is Renault Repair).
The procedure for replacing the ZZ on the Lada Largus consists of the following steps:
- Before work, disconnect the negative terminal from the battery to turn off the power supply to the car.
- Next, remove the steering column casing.
- At the next stage, by releasing the latch, we disconnect the connector with the wires of the contact group.
- Then, inserting the key into the ignition switch and setting it to the first position, remove the 33 wires from the dashboard.
- Next, unscrew the bolt that secures the ZZ.
- Use a screwdriver to press out the latches and remove the 3Z from the housing.
- We dismantle the faulty unit.
- Having installed a new spare part, we assemble it in the reverse order.
After replacement, we check the operation of the locking device by changing the position of the key.
Diagnostics, repair and replacement of lock, coil and ignition module on Lada Granta and Largus
The ignition system (IS) is the most important unit of a modern car, which ensures the timely occurrence of a spark. The system consists of a large number of parts, on the serviceability of which the entire operation of the system depends. The article discusses the main components of the SZ Lada Largus and Granta: ignition lock (IZ), ignition coil (IC).
Ignition switch and features of its replacement
The ZZ is secured with one screw and is located on the steering column on the right under the steering wheel. Its design includes a locking device and a contact group. They are interconnected, working synchronously, and are activated using the ignition key.
When diagnosing faults in the electrical circuit, it is necessary to check whether the contacts close correctly when the position of the key changes. If any irregularities in the operation of the ignition protection are detected, it should be replaced (the author of the video is Renault Repair).
The procedure for replacing the ZZ on the Lada Largus consists of the following steps:
- Before work, disconnect the negative terminal from the battery to turn off the power supply to the car.
- Next, remove the steering column casing.
- At the next stage, by releasing the latch, we disconnect the connector with the wires of the contact group.
- Then, inserting the key into the ignition switch and setting it to the first position, remove the 33 wires from the dashboard.
- Next, unscrew the bolt that secures the ZZ.
- Use a screwdriver to press out the latches and remove the 3Z from the housing.
- We dismantle the faulty unit.
- Having installed a new spare part, we assemble it in the reverse order.
Kit for Lada Largus
After replacement, we check the operation of the ignition lock by changing the position of the key.
How to check the ignition coil?
The ignition coil consists of two electric coils, which are controlled by the engine controller. It serves to convert low-voltage 12-volt voltage into high-voltage to produce a spark.
Typical unit malfunctions
The short circuit is a reliable unit with a long service life, but it can fail.
Signs of a short circuit fault:
- engine power decreases;
- failures at certain speeds;
- misfires;
- high fuel consumption;
- work with jerks at idle;
- coil overheating due to internal short circuit;
- The Check Engine light comes on.
Based on these signs, it is impossible to say for sure that the short circuit is faulty. Therefore, its diagnosis is necessary.
Instructions for repairing and replacing the ignition coil
Removing and replacing short circuits is carried out according to the following algorithm:
- First you need to de-energize the car by disconnecting the negative terminal of the battery.
- Having released the latch, you need to disconnect the block with the wires coming from the controller.
- Then the high-voltage wires should be disconnected from the short circuit.
- Next, unscrew the screws securing the ignition module to the bracket and remove it from the bracket.
- The new module is installed in place of the old one. Next, perform the reverse steps of removal.
Photo gallery “Replacing the ignition coil”
Self-diagnosis of the module
You can check the module in the following ways:
- Checking for weight. To carry out the test you will need a multimeter. The tester should be set to resistance measurement mode. One probe of the tester must be connected to pin 15, and the second one must be shorted to the housing. If the unit is working properly, the resistance should tend to infinity.
- Checking the primary windings of the short circuit. The primary windings are checked for breaks using a tester. To check, you need to connect the probes of the meter to the outer contacts on the short circuit. If the resistance tends to infinity, this indicates the presence of a break in one of the windings.
- Checking secondary windings. Since there are two windings, the test is carried out in two stages. First you need to check the short-circuit winding of cylinders 1 and 4. To do this, the multimeter probes must be placed in the appropriate terminals. A resistance of about 5.4 kOhm is considered normal. If the resistance tends to infinity, then there is a break in the winding. The short-circuit winding of cylinders 2 and 3 is checked in the same way.
Checking short circuit with a tester
In case of malfunction, the ignition module is replaced with a new one.
Loading .
Video “Checking the ignition module”
This video clearly shows how to check a short circuit using a multimeter (the author of the video is Diary of an Auto Electrician).
How to replace spark plugs in Lada Kalina
Replacing spark plugs is an important procedure that is performed every 30 thousand km or in case of their malfunction. The reason why spark plugs are replaced unscheduled may be unstable engine operation, excessive fuel consumption or poor engine starting. In addition, poor throttle response or when the engine stalls can be evidence of faulty spark plugs. You can even determine the condition of the spark plugs by external signs; below I will give a table by which you can decide whether you need to replace the spark plugs or not.
Today I will talk about how to replace spark plugs on a VAZ 2170, 2171, 2172 (Lada Priora 16 valve)
Before you start replacing, take care of new spark plugs, choose one you like from the options in the auto store.
Replacing spark plugs on a Lada Priora is impossible without a special 16″ socket wrench with an extension. There must be a magnet in the spark plug wrench or head so that the spark plugs can be held suspended.
HOW TO REPLACE CANDLES FOR VAZ 2170, 2171, 2172 LADA PRIORA WITH YOUR OWN HANDS.
If you have everything, then you can proceed:
1. First, remove the decorative plastic casing.
2. Next, disconnect the ignition coil terminal.
3. Unscrew the coil mounting bolt.
4. Using a flathead screwdriver, remove the ignition coil.
5. The spark plug is located in a recess, in the so-called spark plug well, so to unscrew it you will need an extension cord.
6. Be careful, if you notice traces of oil in the spark plug well, be sure to find out its origin; the engine may need immediate replacement of the cylinder head gasket.
7. If this is your first time replacing spark plugs, then it will take some effort to unscrew the spark plugs; in some cases it is simply impossible to do this with a simple spark plug wrench. To do this, you will have to buy a special spark plug socket with a knob.
8. So, unscrew the spark plug, be careful not to accidentally break the spark plug insulator, since it will be quite difficult to remove the fragments, and if, God forbid, they get into the cylinder, then you will need to completely disassemble the cylinder head.
9. Remove the spark plug from the well; if this does not work, use the removed ignition coil, put it on the spark plug shank and try again.
10. The candle has been removed, now you can look at its condition.
11. Draw a conclusion based on the table above. If the spark plug insulator is clean and does not fall into any of the categories, everything is fine with your engine.
12. Install the new spark plug into the head, then reinstall.
13
Attention! Tighten the spark plug without using a wrench; the spark plug should twist easily without any effort. If you break the threads in the cylinder head, you will need repairs, which are not cheap, plus you will create a lot of trouble for yourself
14. Do everything carefully and take your time. When the candle is screwed in, use the wrench and tighten the spark plugs. Again, remember that everything should be in moderation; if you overdo it, you can break the thread.
15. Now all that remains is to put the ignition coil in place, tighten the mounting bolt and put the connector in place.
Repeat the procedure for all other spark plugs.
That's all, now you know that replacing spark plugs on a Lada Priora is a procedure that you can do yourself!
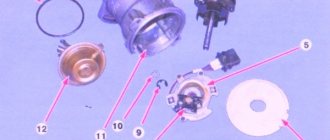
Sequence of actions to independently replace the ignition module on a Lada Grant
- We install wheel chocks on the rear row of wheels for safety purposes.
- Using a key set to “12”, unscrew the terminals from the battery. It is enough to turn off the negative power, but experts recommend both.
- In the center of the engine compartment we find the contact chip for the ignition module. It is held on by a special latch. We unclip it and take it out.
We detach the contact chip
- Disconnect the four high-voltage wires from the coil module. We hold it by the rubber base and remove it from its seat.
- By analogy, disconnect the remaining three wires.
Disconnecting the wires
- Unscrew the four screws with a Phillips-head screwdriver and remove the ignition module of the Lada Granta 8-valve. It is placed on a metal bracket.
Removing the ignition module
- We remove the module.
Afterwards we carry out troubleshooting, diagnostics, and inspect the seat. We install the new module and assemble the mechanism in the reverse order.
Replacing the ignition module on the Lada Grant is completed.
Lada Granta black little devil › Logbook › The ignition coil 8 kl (ignition module) was faulty
Hello everyone. In general, this started a long time ago, about 2 months ago. The engine seemed to be working normally with the sound of nothing unusual, but the exhaust sometimes jumped from the silencer as if the car had sneezed a little. I didn't even attach any importance to it. But about 2 weeks ago, at an intersection, when she started moving, the check light came on. I parked, pressed the error function on the BC state and I got these 4 errors. (1) 0351-Ignition coil, open circuit check, primary circuit current is less than the threshold value. (2) 0363-Random or multiple misfires detected for protection converter.(3) 1301-Misfires were detected to protect the converter in the 1st cylinder.(4) 1304-Misfires were detected to protect the converter in the 4th cylinder. I cleared the errors, the check went out, the car started up normally, the engine did not fail, I drove off then I forgot. Three days later the same thing happened again, but the check no longer lit up on the BC state there was error 0351. I reset it again and the car drove fine. Throughout the whole day there was this crap engine Troil and for some reason it only happened at that moment when I had to get going. The next day I went to our wonderful spare parts store CAR-CITY and decided to buy a new ignition coil, we have a salesman called Joseph who has it in our Lada city they probably know him. He tells me before buying a new one, check yours. I brought him my coil, he checked it on some kind of device that imitates candles. There was a spark on all contacts. He said that my coil was intact. says the problem lies elsewhere. I took the wires and spark plugs from him and installed them. At first it didn’t bother me, but then it all started again. I went to the nearest service station to see an electrician. The electrician looked and said I need to open the computer and resolder some 2 microcircuits. I thought, now I’ve come and I need to open the computer (I didn’t want to do that). By the way, he also checked my coil with the same crap. He said the price, like 3 pieces of diagnostics to identify the cause, and then work of 6 pieces. I left to look for another service station, then I called an electrician, he reflashed my computer, his name is Oleg, he works on March 8, Kalinin is also familiar to many who have a Lada. So he tells me that since the errors appear on cylinders 1 and 4, feel free to change the coil so that the instruments don’t show it there. It’s like, if 2-3 cylinders, then it’s the microcircuits in the computer that have burned out, or the fuel pump doesn’t have enough power and there’s a misfire signal. In short, I changed the ignition coil and everything disappeared and the exhaust became a uniform sound without any skipping sneezing. I think this is the sneezing and This is the first sign that something is wrong with the ignition. The mileage at that time was 61 thousand and a penny. At the same time I changed the front brake pads and took the same Korean HI-Qs as before, I drove more than 32 thousand km on them, I think they would have covered 3-4 thousand more. They wear in during the first kilometers and do not creak, I liked them and recommend them. Just yesterday, Tsuka hit the mother of a dog. She ran out before she could dodge and hit her with the right edge of the bumper. The dog has medium withers, about a generation high. The bumper cracked and a piece broke off from the lip. Damn it was so unpleasant. The living dog lay down, whined, got up and ran away. It’s good that when I was dodging it, there was no one who was driving nearby. When it hit, it crap on my front door)). It’s not nice how the year started.
At the top are my old spark plugs, they're like new ones.
Checking the ignition coil of Lada Granta
Page 1 of 2
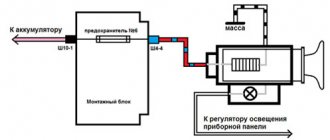
Turn off the ignition and disconnect the engine control system wiring harness block from the coil.
To check the coil power circuit, connect the tester to the middle terminal of the harness block and the engine ground.
rice. 1
When the ignition is turned on, the device should record a voltage approximately equal to the battery voltage.
If there is no voltage at the middle terminal of the wiring harness block, then the wire connecting the block to the ignition switch or the lock contact group is probably faulty.
To test the coil control circuits, you can use a probe with a 1-2 W lamp.
We relieve the pressure in the engine power supply system and do not replace the fuel pump fuse.
| rice. 2 |
We connect the probe probes to the middle and one of the outer terminals of the wiring harness block.
If the control (and power) circuit is working properly, the probe light should blink frequently when cranking the crankshaft with the starter.
Otherwise, check the wire connecting the outer terminal of the block to the controller terminal for open circuit and short to ground.
Similarly, by connecting the probe probes to the middle and other extreme terminals of the block, we check the other control circuit of the ignition coil.
You can check the serviceability of the ignition coil itself on the engine by disconnecting the wiring harness block and high-voltage wires from it; for clarity, we show the test on a dismantled coil.
The ignition coil in the 8-valve version of the Lada Kalina power unit, as in the 16-valve version, plays a primary role. It allows the engine to start easily even in very unfavorable climatic conditions. This circumstance encourages owners to pay increased attention to this product. Even a minor deviation in the functioning of the coil can immobilize the car for a long time. To minimize the risks of such a situation, we urge owners to follow the manufacturer’s regulatory recommendations. If the owner neglects this aspect, he will provoke himself into replacing the coil, which is very expensive. And in general, the ignition system must be maintained and operated carefully.
How to check the grant ignition coil
To check the module, you will need a tester that can measure resistance modes. At the first stage, you should make sure that there are no short circuits to the contact ground. To do this, you need to connect the multimeter probe to the middle connector of the module, and connect the second one to the metal part of the car body. If the resistance readings are high, then a short circuit does not occur. The second stage of the test is to test the primary circuits of the ignition coil. To do this, attach the multimeter probes to the contact connectors. One is marked “1a”, the second “1b”. Measure the resistance parameters. If the readings show extremely high numbers, then the module is faulty.
A similar principle of checking is carried out in relation to the four sockets for connecting high-voltage wires to the module. To do this, use pairwise connection of probes, for example: the first is connected to the socket of the first cylinder, the second to the socket of the fourth
Next, one probe to the second socket, the other to the third. Please note that if the multimeter readings during measurement are high (numbers tending to infinity), then the grant ignition coil is faulty and must be replaced
checking grant ignition coil
How to check the ignition coil on Lada cars
The car jerks, there is no traction, vibration is felt, or the engine is rough; all these are symptoms of improper operation of the individual ignition coil (IIC). Other signs of a faulty ignition coil are the presence of errors 0301, 0302, 0303 and 0304, indicating misfire in one of the cylinders. Let's look at a few simple ways to check the ignition coil with your own hands.
It is worth noting that the process of checking IKZ on modern Lada cars (XRAY, Vesta, Largus, Granta, Kalina and Priora) does not have significant differences. All actions are performed in the same way.
Visual inspection of the IKZ
Remove the ignition coils from the engine using a 10mm or Torx E8 socket wrench (depending on the powertrain model). Carefully inspect the removed coils. There should be no cracks, damage to the rubber cap, melting or leakage of plastic. The spring located inside the coil must be in the correct position.
Checking the ignition coil with a multimeter
Checking the voltage at the terminal block of the wires:
- Disconnect the block with wires from the ignition coil (on the H5M engine, to access the coils of cylinders 1 and 2, remove the intake pipe).
- Turn on the ignition and measure the voltage at terminal 3 of the wiring harness block (the numbering of the terminals is on the ignition coil).
- The voltage at the terminal must be at least 12 V. If it is less or absent, it means the battery is discharged, there is a fault in the power circuit, or the engine control unit (ECU) is faulty.
- Turn off the ignition.