Car alarms have a wide range of functions, including not only security systems. Not everyone can set the time on the Starline A93 key fob using buttons.
In addition to the standard engine shutdown, door, hood and gearbox locking, Starline car alarm owners have access to many secondary functions.
The system can turn on a timer for the turbine. After active driving on turbocharged engines, some elements of the intake tract heat up to about 800 degrees Celsius. Cooling occurs due to engine oil circulating through the system. Therefore, turning off the turbo engine immediately after aggressive driving is not recommended. Turning on the turbo timer is a useful function that depends on the watch.
You can set an alarm clock and auto-start on it. This setup will be one-time only. Setting an alarm clock is convenient if the owner is going to do unusual things after hours (pick someone up from the airport, meet someone from the train station). At the set hour, the Starline key fob will play the wake-up melody and then give a command for auto-warming. During daily use, you will need to constantly restart the system: go to the top menu (clock-alarm-clock-timer), and then set the alarm to activate again.
How to set the time on a Starline key fob?
Setting the clock, timer and alarm clock of the Starline car alarm is necessary for accurate activation of functions by time. For example, to use remote automatic engine start. You can set the time on the Starline key fob yourself using the user manual.
Instructions for setting the time
What happens if you don't set the clock?
Video “Visual guide to setting up”
About setting the current time
The alarm control panel allows you to perform several different functions. Among them there are the following modes:
- Setting the current time on the display;
- Fixing the time when the alarm clock turned on;
- The ability to enable or disable it;
- Turn on the timer to start the countdown;
- Function to start or stop it.
The time is set as follows:
- You must press and hold button No. 3, which is designed to adjust the clock readings. You need to hold it until one melodic signal is heard, then one short one, and then two similar short signals. After such actions, the clock icon begins to blink. Button No. 1 increases the clock readings, and button No. 2 decreases them accordingly;
- After this, you need to briefly press button No. 3 to set the minutes. As a result of such actions, the minute icon begins to blink. Again, the first button increases the readings, and the second decreases them;
- Briefly press the third button again and the alarm will begin setting. When the alarm icon flashes, you can again increase the readings with the first button and decrease the readings with the second;
- Again, briefly press the same button to set the alarm minutes. Also, buttons one and two increase and decrease readings;
- The next short press of the third button will turn the alarm on or off. You can turn it on with the first button, and turn it off with the second;
- If you continue to briefly press the third button, the mode for setting the timer readings is called up. After the timer clock icon flashes, use buttons one and two to increase or decrease the readings;
- Another short press of the third button will cause the timer minutes icon to blink. They are adjusted with the same buttons one and two;
- Further pressing of button three will turn the timer on or off. You can turn it off with the first button, and turn it back on with the second button.
As you can see, there is nothing complicated about this. We told you how to configure and set the time on the StarLine A91 key fob. We hope that after reading this article, setting the time will work out and no additional questions will arise.
Setting the clock, timer and alarm clock of the Starline car alarm is necessary for accurate activation of functions by time. For example, to use remote automatic engine start. You can set the time on the Starline key fob yourself using the user manual.
Instructions for setting the time
Reasons for settings failure
What happens if you don't set the clock?
Video “Visual guide to setting up”
Comments and Reviews
Instructions for setting the time
The procedure for setting the time on the Starline key fob may differ depending on the alarm model.
How to set and set the time on the Starline model A91 remote control:
- Take the pager and hold down the key under the third number, it is used to adjust the alarm system clock parameters. Press and hold the key until the key fob speaker emits one melodic pulse. After this, another short beep will sound, and then two more short melodies will sound. This indicates successful entry into the clock programming mode. The indicator with a clock on the signaling key fob will blink. Using the key under the first number, the hour values are increased, and using the second button this parameter can be decreased.
- Then briefly press the third key to set the minutes. This will cause the minute indicator to blink on the display. Key 1 increases the minutes, and the second button decreases them.
- After this, click on key 3, this will cause the pager to enter the alarm clock parameters activation mode. When the corresponding indicator starts blinking, the first button increases the readings, and the button number two decreases them.
- Click on the key again to set the alarm minutes. The procedure for increasing and decreasing parameters is performed in a similar way.
- With a subsequent short click on key 3, you can activate or deactivate the alarm clock. Button 1 “signals” turns on the function, and key number 2 turns it off.
- If you further press the key number 3, the alarm timer setting menu will open. When the option indicator starts blinking, the first and second keys decrease or increase the parameters. When you next briefly click the third key, the minute indicator will flash. The value is adjusted using similar buttons. After setting, pressing key number 3 will activate or disable the option.
- To leave the clock setting mode, you simply do not touch the buttons on the pager for five seconds.
Irina Belousova showed how to independently set the time on the Starline pager.
How to set the time on the Starline key fob in models E90, E91, B94:
- To enter the setup menu, you need to click and hold down key number 4. The button is held until the security system pager emits one long and then two short beeps.
- After this, you will hear another long and two short beeps. On the pager screen you can see the indication of the first option. Using the first and fourth keys, you select the required function. F1 is used to adjust time and date settings.
- Having selected an option, click on the fourth button and hold it until two short beeps sound.
- Specify the adjustment option. The pager allows you to set not only the minutes and hours, but also the day, month and year. To select the desired value, click on the fourth or first key.
- Once a parameter is selected, the values are adjusted by using the second and third buttons.
- When all the values have been set, you need to exit the setup mode. The alarm will automatically go off if you do not click on the pager buttons for eight seconds. You can exit the settings menu by holding down the first transmitter button. Exit from the mode will be indicated by two short-term pager signals.
Alarm characteristics
- Dialogue protection: the presence of a convenient interactive 128-bit control code, which cannot be penetrated by any of the known code grabbers (devices that allow reading the system code);
- Radio interference protection StarLine works reliably in conditions of extreme urban radio interference
- SUPER SLAVE (optional) Control of vehicle security using a standard key fob with reliable additional interactive authorization using an additional StarLine key fob. Option available when integrating 2CAN or CAN LIN interface
- Extended temperature range Operates at temperatures from minus 50 to plus 85 ° C
- Record energy efficiency Battery charge lasts up to 60 days in security mode
- Communication channel monitoring Constant communication channel monitoring checks whether the key fob is within the alarm coverage area
- Authorization by PIN code (optional) Additional authorization by entering an individual PIN code. Option available when integrating 2CAN or CAN LIN interface
- 3D shock and tilt sensor will work when jacking up and evacuating the car
- Telematics (optional) Remote control of vehicle security, with the integration of optional GSM-GPRS, GPS-GLONASS etc
- Control from your phone GSM interface allows you to control and receive alerts on your phone
- Free monitoring (optional) When you connect StarLine GPS-GLONASS-Master, you can find out the location of your car with an accuracy of several meters
- Autostart Intelligent autostart allows you to start the engine based on temperature, at a specified time or periodically
- 2CAN (optional) Integration of the 2CAN interface ensures installation of alarm systems on vehicles equipped with several digital CAN buses
- CAN LIN (optional) Integration of the CAN LIN interface ensures quick installation on vehicles equipped with CAN, LIN buses, such as: Lada Kalina, Lada Kalina II, Lada Priora and Lada Granta
- Flexible service channels Can be programmed: hazard warning lights, folding mirrors, customizable seats and much more
- Shockproof keychain with protected antenna
- Three stages of protection. First comes the password, then the immobilizer, then the standard system
- Smart engine start, based on temperature time, timer, alarm clock or after a time interval
- The range of the key fob reaches two kilometers
- Quick installation, without interfering with the vehicle system
- Remote adjustment function
| Long press on K4 (3-4 seconds) | One long melodic and two short beeps. The clock will start flashing | Short press on keys 2 (increase time value) or 3 (decrease) | |
| Setting the minutes | Short press on K4 | The minutes are flashing | Quick click on key 2 (increase) or 3 (decrease) |
| Setting an alarm | |||
| Setting the alarm clock | Quick press on K4 | The alarm clock indicators are flashing | Briefly press button 2 (increase) or 3 (decrease) |
| Setting the alarm minutes | Brief click on K4 | The alarm minutes are flashing | Quickly press buttons 2 (increase) or 3 (decrease) |
| Turning the alarm on/off | Short press on K4 | Alarm icon flashing | Briefly click on button 2 (on) or 3 (off) |
| Setting the timer | |||
| Setting the Timer Clock | Quick press on K4 | Timer clock values are flashing | Short press on key 2 (increase) or 3 (decrease) |
| Setting the Timer Minutes | Short click on K4 | The minutes of the timer are flashing | Quickly press button 2 (increase) or 3 (decrease) |
| Turning the timer on/off | Brief press on K4 | The timer icon is flashing | Briefly press key 2 (on) or 3 (off) |
| Setting the volume and type of alerts | |||
| Selecting the signal volume | Quick click on K4 | Siren icon flashing | Short click on key 2 – select the signal volume. Quickly press button 3 to turn on silent mode |
| Selecting the signal type | Short click on K4 | Icons “1” or “2” are flashing | Briefly click on key 2 – “Trill” signal. Short press on button 3 – “Siren” signal |
| Radio control signal carrier frequency | 433.05 to 434.79 MHz |
| Number of radio control channels | 128 |
| Maximum range of the main key fob: – when transmitting control commands – when receiving alert signals | 800 m* 2000 m* |
| Maximum range of additional key fob | 15 m* |
| Shock/tilt sensor type | integral three-axis accelerometer |
| Operating temperature range | from – 50 to 85 °C |
| DC supply voltage | 9 – 18 V |
| Current consumed by the complex in security mode | no more than 17 mA |
| Average current consumption with installed GSM module | 25 mA** |
| • siren connections | 2 A |
| • control of light signals | 2x7.5 A |
| • control circuits for electric door lock drives | 15 A |
| • turning on the ignition | 25 A |
| • inclusion of accessories | 25 A |
| • turning on the starter | 25 A |
| • engine blocking (black-red wire of connector X3) | 200 mA |
| • engine blocking (using an external relay) | 30 A |
| • additional control channels (except No. 7 and No. 8) | 200 mA |
* The range of key fobs may be reduced depending on the location of the transceiver, location of the vehicle and owner, radio frequency interference, weather conditions, vehicle battery voltage, and key fob battery voltage.
**Average current consumption may increase depending on the conditions for receiving the GSM radio signal: distance to the base station of the cellular operator, location of the car (underground parking, metal garage, etc.)
StarLine A93, A63 complexes are approved for use on the territory of the Russian Federation and comply with all requirements of regulatory documents of the Russian Federation. The service life of StarLine A93, A63 is 5 years, provided that the product is installed and operated in accordance with the installation and operating instructions.
Reasons for settings failure
If the control device displays the wrong time, then first of all you need to diagnose the battery condition in the pager. All remote controls of modern Starline security systems are equipped with an option to indicate battery charge. When the battery loses its capacity and cannot perform its main function, a discharge indicator will appear on the screen. In addition to the icon on the display, the remote control will emit a characteristic melodic signal.
The cause of the failure may be the replacement of the battery. When a new battery is installed in the pager, it automatically resets the time. Please remember that replacing the power source will reset the alarm's anti-burglary protection parameters. After you change the battery, you need to activate the security mode. Only then is it possible to set temporary indicators. The problem of settings failure may be due to the fact that the car owner made mistakes during adjustment.
Andrey Sharshukov showed how to adjust the time values on the key fob from the Starline A93 complex.
Description of the capabilities of the Starline A93 alarm key fob
Instructions for resetting the key fob to factory settings:
- Find the Valet button, which is usually located in hidden places in the car. Most often, the service key is installed under the dashboard, in the glove compartment, near the steering wheel, next to the gearshift lever or in the fuse hatch.
- Turn on the ignition and with the engine running, click on the service button 9 times (you need to press it briefly). Each press should last no more than half a second.
- Turn off the engine and wait until the system responds with 9 short beeps. They will indicate successful entry into factory reset mode.
- Press the service button once and wait for the siren to respond.
- Click on button 1 on the alarm key fob. The key fob will respond with a single sound signal, which notifies the car owner that all indicators have been reset to factory settings.
- To exit the reset mode, turn on the car engine. The system will respond with 5 light signals.
Table: settings in the main key fob function menu
Photo gallery: designation of buttons on the key fob
Timed engine start
Setting up autorun on alarm clock
Before setting the time on the car alarm control panel, you need to insert a working battery into the communicator. The battery is installed in a special compartment located behind the back cover.
To reset all parameters to factory values, perform the following steps:
- The ignition in the car is turned off. The service mode entry button is pressed nine or ten times depending on which settings are being reset. In the first case, the functions indicated in the first table are returned to the factory values, in the second - for table No. 2. Detailed numbers are indicated in the service documentation. The siren should play several beeps.
- The button to enter the service mode is pressed once. One sound pulse of the siren will sound.
- The first key on the key fob is pressed. If the siren beeps, this indicates that all parameters have been successfully reset.
- The ignition in the car is turned off. External lighting devices will blink three times.
The Starline A93 alarm system is distinguished by its ease and simplicity of operation. All settings and control of the car are carried out using 4 buttons. Actions and alerts are visualized on the LCD screen.
The time setting is carried out as follows:
- Enter the “Functions Menu”. To do this, press and hold button 4 for several seconds. Upon entry, 1 long and 2 short beeps are heard. The clock on the screen begins to blink.
- To set the time, use buttons 2 and 3 - increase and decrease the value, respectively. First change the clock. Then press button 4 and set the minutes in the same way.
- The next press of button 4 takes you to the alarm time setting menu. Hours and minutes are configured similarly to step 3.
- After pressing button 4, they switch to the mode of turning on (ON) or turning off (OFF) the alarm clock. When turned on, the alarm will sound at the configured time.
- Then the autorun timer is set. The process is similar to adjusting the alarm clock: using button 4, you go to setting the hours and minutes, turning the function on and off.
When entering the menu, the user is given 8 seconds to set the clock on the key fob. If no action has been performed during the specified period, the device returns to its original position.
There is another way to set up a car engine to start using a timer. To do this, press and hold buttons 2 and 3 simultaneously until a long and short beep appears.
The alarm clock icon will flash at the bottom of the display. If you press button 1, the icon will be lit constantly. In this case, autorun will turn on according to the time set on the alarm clock.
If you press buttons 2 and 3, they switch to autorun mode using a timer, and an hourglass image appears. The machine will be turned on when the mode is activated and subsequently after a set time interval.
You need to set the alarm time to start the car engine like this:
- Activate the function programming menu.
- Move the cursor on the communicator screen to the indicator with a clock symbol, then click on the first key. The car's lights will blink once, and the communicator's speaker will play a melodic signal.
- The time will appear on the communicator screen after which the function of starting the internal combustion engine by alarm will be activated. To adjust the parameter, use the pager buttons.
- Five seconds after setting the alarm clock parameters, the time indication will appear on the pager screen.
Configuring the option to start the internal combustion engine on an alarm clock in the alarm system
Starline A93
is performed for one unit start cycle. The activation of the function is indicated by active indicators with a symbol in the form of a clock and a bell on the remote control.
Alex Sila talked about adjusting the time parameters for remote starting of an internal combustion engine.
Alex Sila in the video showed how to adjust the time parameters yourself and set an alarm clock to remotely start the internal combustion engine.
Trouble-shooting
To fix the problem, you need to diagnose the key fob and, if necessary, change the power sources. If the malfunction was a failure of the pager itself, then the device must be repaired or replaced.
After eliminating the cause of the malfunction in the Starline key fob, you will have to re-adjust the clock readings.
- Traditional. Setting time parameters is carried out according to the instructions described above.
- Radical. The power supply in the pager is replaced at 00-00. All time parameters will automatically be reset to zero, and the time will begin to count from the specified point.
Hyundai i30 2013, 130 l. With. — electronics
Cars for sale
Hyundai i30, 2013
Hyundai i30, 2013
Hyundai i30, 2012
Hyundai i30, 2014
see also
Comments 79
If you have an alarm model StarLine B9 / B91 / A91:
Enter the function menu of the main key fob:
The functions menu of the main key fob allows you to: set the current time. Hold button 3 until:
1 melodic signal, 1 short signal, 2 short signals. After this, the clock digits of the current time will flash, then we perform the following operations:
using button 1 - increase the readings, using button 2 - decrease the readings.
Likewise with the minutes display:
Briefly press button 3 to go to setting the minutes of the current time:
The minute digits of the current time are flashing: button 1 — increases the readings, button 2 — decreases the readings.
If you do not press the key fob buttons within 5 seconds, you will automatically exit from the key fob functions programming menu.
If you have an alarm model StarLine E90 / E91 / B94/ D94:
To enter the key fob function programming menu, press and hold button 4 until one long beep and then 2 short beeps.
Next, a long beep will sound, followed by 2 short beeps. The first menu function appears on the display. By short pressing buttons 1 or 4, select the required function: F-1 – setting the current date and time.
To set the date and time, select function F - 1 and press button 4 for a long time, up to 2 short signals.
Selecting a setting parameter (year, month, day, hours, minutes) is carried out by short pressing buttons 4 (forward) or 1 (backward).
Setting the required parameter value is carried out by short pressing buttons 2 (increase readings) or 3 (decrease readings) year, month, day, hours, minutes.
If there are no button presses within 8 seconds, the key fob functions programming menu will automatically exit.
The key fob functions programming menu can also be exited by long pressing button 1 (2 short beeps from the key fob will follow)
If you have an alarm model StarLine B9 / B91 / A91:
Enter the function menu of the main key fob:
The functions menu of the main key fob allows you to: set the current time. Hold button 3 until:
1 melodic signal, 1 short signal, 2 short signals. After this, the clock digits of the current time will flash, then we perform the following operations:
using button 1 - increase the readings, using button 2 - decrease the readings.
Likewise with the minutes display:
Briefly press button 3 to go to setting the minutes of the current time:
The minute digits of the current time are flashing: button 1 — increases the readings, button 2 — decreases the readings.
Start the engine on time
Automatic starting of the engine in time can be carried out by an alarm system and a timer.
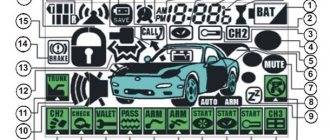
Icons on Starline A93 keychain
Set the alarm to start automatically
Before configuring the power supply to run with automatic start alarm, ensure that:
- The current time on the device is programmed correctly;
- The alarm is set at the desired time
; - The set alarm is turned on.
READ How to Install a Hard Ceiling on a VAZ 2107
The auto trigger for the alarm will be configured as follows:
- Enter the programming menu.
- To activate cursor function selection, press and hold 2 until two short beeps and one long beep sound. After quickly hovering over the icons at the bottom of the screen, quickly press keys 2 and 3 to place it on the clock icon.
- The first key of the communicator is pressed. The vehicle's exterior lights will flash once and the remote will beep. The time will be displayed on the keypad for the next five seconds until the engine warms up. The dial and bell icons on the communicator display will indicate that the option is enabled.
Video: automatic start on alarm
In his video, the Alex Sila channel showed in detail the process of setting up and automatically starting the engine in accordance with the Starline A93 alarm.
Start the engine for a certain period of time
To set up autorun by timer, you need to:
- Enter the programming menu.
- Using the cursor method, select the hourglass icon and press the 1 key. The auto lights will flash once, the key will play 1 melody. The current auto start period will be displayed for four seconds (example: 4H - start every 4 hours).
- A short press on 1 will set the start period. Each press increases the start time by two hours.
- Save the selected period with one long press of the button or wait for automatic saving (after 4 seconds). Two short beeps will sound and the hourglass icon will appear. After a few seconds the engine will automatically warm up.
How to correctly set the time on the Starline key fob
The Starline alarm key fob displays not only useful system information, but also the time, which can be manually adjusted.
Most car alarm key fobs that have a screen can also display the time. This is not only practical in terms of controlling your schedule and time awareness, but also convenient when implementing additional automatic start capabilities. Starline does not lag behind its competitors and also uses the watch function in its arsenal. Setting them up is not difficult; you need to know the main principles of controlling the alarm key fob.
Despite the fact that Starline has simplified the time setting procedure to the maximum, some issues related to unsuccessful installation attempts continue to arise.
What happens if you don’t set the time on the Starline remote control?
An incorrectly set key fob clock entails a number of additional inconveniences. Automatic engine start may occur at unexpected times, the alarm may not work correctly, and the engine start timer may not start at the appointed hour. After all, the alarm is based on the indicators set in the Starline key fob. You need to configure all parameters correctly.
The StarLine A91 security system belongs to the class of budget alarms. Despite this fact, it provides all the necessary functions to protect the car, and the anti-theft complex itself meets all current requirements. The data flow in Starline A91 passes through eight changing channels with a 128-bit encryption code.
In addition, the system provides an option for intelligent engine start. Thanks to such features, it is extremely difficult to intercept a security system signal, because the alarm independently selects the frequency for communication between the key fob and the main unit in the car. This feature, in city conditions and high levels of radio interference, plays a key role.
How to start the engine from the remote control
As noted above, the StarLine A91 alarm system provides a remote engine starting function. But before setting up autorun, follow a few steps:
- Move the gearshift knob to neutral (disengage all gears).
- Turn the key in the ignition and remove it. The engine must be turned off.
- Apply the handbrake.
- Close all doors, trunk lid and hood well.
To successfully set up autorun, it is important to strictly follow the given algorithm. Otherwise, remote startup will not be possible. If the car is properly prepared (the engine is turned off by the Starline A91 alarm), it can be started from the key fob in various ways:
- Press and hold the 1st button for three seconds. As soon as you hear the beep, press the 3rd key.
- Set up periodic engine start from the remote control.
This option is especially relevant in winter, when it is necessary to warm up the engine from time to time. The StarLine A91 control panel is capable of automatically starting the engine and warming it up at the required frequency - once every two, three, four hours or once a day.
Setting up automatic start based on temperature and time
The peculiarity of the Starline A91 Dialogue security system is the ease of setting up autorun. The latter can be adjusted so that the function will start the engine when the temperature drops to a certain level, or at a specific time period.
Enabling autostart based on temperature
To set up autostart based on temperature, take into account some conditions for the correct operation of this option - the installation location, the presence of a temperature sensor, and its serviceability. To activate the function, follow these steps:
- For a long time, press the 3rd key (with the star icon).
- Wait for the sound signal from the remote control to appear (the sound should be a single sound).
- Look at the display - the icon located on the left side at the bottom of the display will blink.
- Briefly press the 3rd button, then move through the menu to the thermometer icon (third from the left).
Once you are sure that the required function is set on the alarm, press the 1st button to activate the mode. If you need to turn it off, press the 2nd key on the key fob body. Now look at the display - in place of the clock, the motor temperature parameter should appear, at which the autostart will work.
After the temperature is displayed, you don’t need to do anything - after 8-10 seconds, the Starline A91 key fob will give a signal and a clock will appear on the screen. At the same time, the 3rd icon with a thermometer remains darkened. By the appearance of the image, you can control the correctness of the autostart settings based on temperature. If the icon is light, the function is disabled, and if it is dark, the option is activated.
Configuring autorun by time
To enable this option on the StarLine A91 alarm system, select the 2nd icon on the display. At the same time, the car’s headlights should blink once, and the security system key fob should give a signal in the form of a melody. This completes the timed autorun setup. The system will independently give a command to start the engine at a certain time.
If the car does not start on the first try, a second attempt is made. In this case, the starter operating time is automatically extended by 0.2 seconds. The device timer includes four attempts to start the engine. If all of them are used up, but the engine still does not start, a sound signal will sound on the Starline A91 remote control.
To configure autorun by time, take the following steps:
If the above manipulations are done correctly, then the autorun setup is complete. Now the StarLine A91 alarm system will issue a command to start the engine at a certain interval.
Disabling the option is carried out using a similar algorithm. The only thing is that confirmation of the choice is made using the 2nd button, which shows an open lock. If the engine started successfully, an icon depicting exhaust gases appears on the display. The car's headlights should flash three times and the horn sound three times.
Why autorun does not work - the main reasons
During the operation of the car, situations are possible when the Starline A91 autostart does not work from the key fob. The reason for this phenomenon, as a rule, is not associated with the failure of one of the parts, but with errors in operation or configuration. If the automatic start fails, problems may arise with setting up the vehicle software.
The main signs of failure include:
- The car doors cannot be closed using the key fob. Here it is better to contact the specialists at the service station. To eliminate the malfunction, it is necessary to check and calculate the location of the break in the chain between the main unit and the door, the compliance of the actuator wires with the stated technical requirements, as well as the correct setting of the door closing pulse.
- Commands from the StarLine A91 key fob do not receive a response from the main unit installed in the car. Such a malfunction can usually be explained by a low battery or stuck control keys. The solution to the problem is to completely replace the remote control and register it in the alarm system.
- The shock sensor does not work. The correct solution here is to reconfigure it.
- Autostart of Starline A91 is not activated. A common cause is faulty wiring that can become damaged. In addition, the cause of the breakdown may be an incorrectly installed immobilizer bypass (most often an antenna). Also check that autorun is configured correctly.
- The alarm is activated excessively. There are two possible reasons for this: oversensitivity of the sensor or the appearance of rust on the limit switches.
- The car siren does not work. There may be several reasons - the siren itself has failed, or the car’s wiring is damaged. To eliminate the breakdown, it may be necessary to replace the signal source or repair the vehicle wiring.
Video: Setting up Starline A91 autostart, by temperature (by timer, by alarm clock)
The Starline alarm key fob displays not only useful system information, but also the time, which can be manually adjusted.
Most car alarm key fobs that have a screen can also display the time. This is not only practical in terms of controlling your schedule and time awareness, but also convenient when implementing additional automatic start capabilities. Starline does not lag behind its competitors and also uses the watch function in its arsenal. Setting them up is not difficult; you need to know the main principles of controlling the alarm key fob.
ATTENTION! A completely simple way to reduce fuel consumption has been found! Don't believe me? An auto mechanic with 15 years of experience also didn’t believe it until he tried it. And now he saves 35,000 rubles a year on gasoline!
Despite the fact that Starline has simplified the time setting procedure to the maximum, some issues related to unsuccessful installation attempts continue to arise.
Possible reasons for time settings failure
If you find that your Starline key fob no longer displays the time correctly, then you should check the condition of the battery. This is quite easy to do, thanks to the built-in low battery indicator function. When the battery loses the energy necessary for high-quality operation, a corresponding picture appears on the display, accompanied by a sound signal. And although this reason is extremely rare, especially for Starline, it is necessary to check any possible options.
The second reason could be changing the battery. After installing a new battery, the time is automatically reset.
Be careful, replacing the battery inevitably entails resetting the anti-burglary protection, so the first thing you should do is not set a new indicator, but set the car to the Starline alarm system.
Another reason is incorrectly adjusted clock indicators or incorrect procedure for setting.
Important functions of the Starline A93 alarm system
- All opening parts: doors, hood, trunk, parking brake, brake pedal, control, through limit switches
- Body, vibration response, two-level shock sensor, tilt sensor
- Ignition, control via input to the ignition circuit
- Engine - blocking relay, code relay StarLine R3 (optional)
- Interior space - additional sensor (optional)
- Security mode with sound and light alarms
- Providing alarm alerts to a key fob with an LCD display
- Silent activation/deactivation of security mode
- Silent security mode
- Security mode with engine running
- Turning security on/off without using a key fob
- Automatic return to security mode in case of accidental shutdown
- Automatic arming
- Immobilizer mode
- Anti-robbery mode
- Panic mode
- Programmable personal code for emergency disarming of the security mode
- Engine blocking and its preservation when dismantling the car alarm
- Programmable 2-step engine lock release
- Indication of trigger causes for 11 zones
- Alarm of a faulty zone when arming
- Automatic monitoring of the status of security sensors with disabling faulty ones and reporting their malfunction
- Indication of the fact of activation by sound signals
- Indication of car alarm by LED and on the key fob display
- LED indication of limit switch serviceability
- Activating sensors before turning off the interior lights and bypassing the door area
- Disabling security, adjusting the volume of signals
- Remote disabling of the shock and tilt sensor in security mode
- Remote control of the central locking system (central locking)
- Central locking control from the ignition switch
- Two-step lock opening
- Two-pulse closing of door locks
- Six channels for controlling additional equipment
- Car battery voltage monitoring
- Determining the temperature inside and outside the car
- Search from car
- Light alarm for open doors
- Turbo timer mode
- Remote programming of functions and key fobs
- Service mode
- Car interior light control
- Call from car
- Insurance against accidental pressing of key fob buttons
- Registering new key fobs and deleting lost ones from the system memory
- Setting the time, alarm clock, timer
- Main key fob charging control
- Possibility of working together with GSM modules StarLine M20, M30 and StarLine M21, M31 (car alarm control and monitoring its status via GSM channel
- Remote and automatic start, extension, engine stop
- Remote engine start in cars with a start-stop button
- Works with any engine: gasoline/diesel
- Transmission choice: manual or automatic
- Monitoring engine operation using signals from a tachometer, generator or mains voltage
- Protection against starter overexposure when starting the engine
- Understanding the remaining engine operating time on the key fob
Debugg
Regardless of the conditions that caused the crash or reset, you will have to restore the watch. This can be done in two ways:
- Classic. The time is set using service commands on the alarm key fob;
- Radical. Replace the battery at zero hours zero minutes. The temporary values will be reset to zero and the countdown will begin from the specified point.
Setting new indicators on the Starline alarm display has common principles for most models. They are carried out using a specific algorithm of actions, which can be divided into three types, depending on the generation of the Starline alarm and some of its features.
Making settings for series E, D, B
Starline car alarms marked E90, E91, D and B94 allow you to set the time period by performing the following actions:
Press the fourth button on the control panel and hold it until three signals count down - one long and two short. After this, 4 menu functions will appear on the screen. Select the one you are looking for by pressing the fourth key again. You can set the date and time using the first function. It is designated F-1. After this, hold down the fourth button again, wait for two signals and start setting the time using the first two service keys.
Making settings for the A series
Setting the necessary parameters on the Starline Series A alarm system depends on the model number.
Starline a94 and a92 provide for the presence of four service keys, which determine the features of the commands produced.
You can set the time parameters on these devices by long pressing the fourth key. After three consecutive beeps, the hour digits will flash, and changing the values will be possible using the second and third keys. To set the minutes, press the fourth button again and repeat the steps described.
Starline a91 and a61 have a simplified appearance and are content with the presence of three service buttons.
To carry out this procedure on the key fobs of these models, you will need to press and hold the third button with the image of an asterisk until three characteristic signals occur. After this, you can adjust the hours and minutes. The opening and closing keys of the lock allow you to decrease or increase the numbers, and the asterisk button allows you to move between hours and minutes.
Starline a93 (a63, a39, a36) key fob operating instructions
You may have a keychain with a horizontal arrangement of icons, or maybe with a vertical one. The first ones came complete with signals released before 2020. All modern systems come with vertical icons. The additional key fob is the same in both the first and second cases.
Key rings Starline A93
1.1. Duration of pressing key fob buttons
- short press – a single press of one or two buttons lasting less than half a second; long press – press and hold one or two buttons until the key fob beeps; double press – press the button 2 times in a row within one second; sequential pressing – double pressing of one or different buttons. First, press and hold the button until a sound signal appears, then release this button and briefly press the second (or the same) button.
1.2. Control commands
The table below shows the main commands of the key fobs with feedback, as well as the additional Starline a93 key fob - it briefly shows how to use them.
Basic control commands for Starline A93 key fobs
1.2.1. Arming and disarming
To arm the Starline A93, you need to briefly press button 1, to disarm it, briefly press button 2.
Video of arming and disarming
1.2.2. Silent arming and disarming
To arm without sound, press and hold button 1 until a beep sounds, then release it and briefly press it again. To silently disarm, we perform the same manipulations with button 2. In silent mode, no siren signals will be emitted when disarming and arming.
Reasons for failure of StarLine key fob time settings
Below is how to set the time on the Starline key fob of various series. Even correctly set parameters can go wrong, and this can be caused by several factors. The first is the usual mechanical damage to the Starline key fob. Due to impact or heavy loads, the remote control may break, its screen may crack, and settings may be lost.
The second - and most common - is a weak or discharged key fob battery. If the charge is weak, the clock setting can easily go wrong. A special charge indicator, which is equipped with almost all Starline alarm key fobs, will help you track the moment of timely replacement.
After replacing the battery with a new one, you need to remember that all system parameters are reset. Therefore, you will need to re-set the time on the key fob. Also, changing parameters may be affected by a system or software failure of the remote control itself. In this case, it will need to be replaced or the help of a qualified service center specialist. But you can change the battery and set the clock again yourself.
How to set the clock on the A series alarm key fob
One of the most popular Starline alarm models are the A series systems. Setting this parameter here is simple and the same for all types. Below are instructions based on the example of the Starline A91 modification.
- The remote control is equipped with three functional buttons, each of which is responsible for a certain number of functions. To set the time on the Starline key fob, you will need to hold down the third button for a few seconds, until it beeps. Afterwards, another sound should sound, and two melodies should also be played. Now the owner has entered the time settings mode, and the clock indicator blinks on the display.
- Using the first and second buttons, the parameters of the “Clock” function are changed. In the first case, they increase, in the second, they decrease. After setting the correct parameter, you must press the third button again. The “Minute” indicator now starts flashing. Its adjustment is carried out in the same way - by pressing keys 1 and 2.
- The next click on the third button switches to the alarm setting mode. The procedure for programming it is exactly the same - the first button is responsible for increasing the parameter, the second - for decreasing it.
- Pressing key 3 again allows you to activate or deactivate the alarm. In this case, the first button turns it on, and the second deactivates it.
- Another click of the third button allows you to go to the alarm timer setting menu. Parameters are reduced or increased in the same way.
- It’s very easy to finish setting the clock on the Starline remote control - just don’t press anything for 5 seconds. The system will remember and save the changes made.
How to set up Starline A91 key fob
The remote control or remote control can perform several functions, namely:
- Setting the current time on the device display.
- Activation of the set alarm time.
- The ability to turn it on and off.
- Ability to set countdown timer.
- The ability to activate the function of starting or shutting down the internal combustion engine.
How to set the time on Starline A91:
- Press and hold button No. 3 on the key fob. The third button is used to change the time. You should hold this button until the following sound signals appear: one long melody - short beep - 2 short beeps. When the three sound modes have passed, the time display begins to flash. Button No. 1 should be used to increase the time, No. 2 to decrease it.
- After the time has been set, you need to hold button No. 3 for a while to proceed to setting the minutes. As soon as the minute indicator starts blinking, we adjust the minute values using buttons No. 1 and No. 2.
- Then, press button No. 3 again to set the alarm time. We also hold it until the alarm starts flashing and set the time with keys No. 1 and No. 2.
- Next, you need to adjust the minutes of the alarm clock. Again, hold button No. 3 until the minute indicator blinks and also set the desired values.
- Then, by briefly pressing button 3, the alarm clock turns on or off.
- When you press the 3rd button further, the timer setting mode is activated. When the timer indicator blinks, set the desired value.
- If you press button 3 again, you can also edit the minutes of the timer using buttons 1 and 2.
- If you press the third button again, the timer will turn on or off. The first button turns it off, the second turns it on.
As you can see, there is nothing complicated in setting the alarm time. This applies not only to this model, but also to setting up key fobs for different models of car alarms.
How to set the time on the E, D, B series alarm remote control
The difference between these alarms is the expanded functionality, as well as a different control panel with four buttons. Therefore, the setup here is carried out in a different way.
- Initially, you should press and hold the fourth button. Pressing is carried out until the user hears one long and two short squeaks.
- Now the available options indicators start flashing on the screen. Pressing keys 1 and 4 switches functions. Parameter F1 is responsible for setting the time and date on the Starline key fob.
- After the function is selected and flashing, you need to hold down the fourth key until two short melodic beeps are heard.
- The user must again press the fourth or first key, selecting the desired indicator. The system allows you to set not only the minute or hour parameter, but also the date indicator (day, month, year).
- After selecting a parameter, you need to set the correct value using the first or third button. In the first case, the selected indicator increases, in the second, it decreases.
- The clock setting mode is exited automatically. To do this, you need to not touch the buttons for a certain time. You can also hold down the first button to exit the settings menu completely. Two short beeps from the remote control will indicate that the exit has been made.
How to register (bind, add) Starline a93 keychain
A total of 4 key fobs can be programmed into Starline a93, a39, a63, a36, and it doesn’t matter whether they have feedback or not. When adding a new remote control, all old ones are erased from the system memory. Therefore, when programming, you need all valid key fobs.
To program new key fobs, do the following:
- Press the service button 7 times and turn on the ignition - the siren will sound 7 times;
- Simultaneously briefly press buttons 1 and 2 (does not depend on the type of key fob - with or without LCD) - one siren signal and one remote control signal will sound;
- Repeat step 2 for all recordable key fobs. Each successful programming of the subsequent remote control is confirmed by the corresponding number of siren and key fob signals;
- Turn off the ignition - the turns will flash three times.
7.1. Video of programming new Starline A93 key fobs
What are the consequences of incorrectly setting the clock on the remote control?
Obviously, if the time on the Starline alarm remote control is incorrect, the system will remain operational and will still protect the car from burglary or theft. However, the user will be deprived of a number of advantages.
In critical cases, when it is late, you will have to start driving on “cold and viscous” oil, which does not provide proper lubricating properties. If repeated for a long time, this can even lead to engine damage. So, correctly setting the time on the Starline key fob not only allows you to take advantage of all the benefits of the system, but also take care of the proper operation and safety of the engine.
source